Owner's Manual
Page 6
... 16 DVD Setup 18 VCR Setup 20 Other A/V Source Setup 21 USB Connection 21 Audio Out Connection 22 PC Setup 23 WATCHING TV/ CHANNEL CONTROL Remote Control Functions 25 Turning on the TV 27 Channel Selection 27 Volume Adjustment 27 Initial Setting 28 MENU ADJUSTMENTS On-Screen Menus Selection 30 Quick...
... 16 DVD Setup 18 VCR Setup 20 Other A/V Source Setup 21 USB Connection 21 Audio Out Connection 22 PC Setup 23 WATCHING TV/ CHANNEL CONTROL Remote Control Functions 25 Turning on the TV 27 Channel Selection 27 Volume Adjustment 27 Initial Setting 28 MENU ADJUSTMENTS On-Screen Menus Selection 30 Quick...

Owner's Manual
Page 8
... pin cable 8 PREPARATION PREPARATION Accessories Ensure that the following accessories are included with ferrite cores to maintain standards compliance. Owner's Manual CD Manual 1.5V 1.5V Remote Control, Batteries (AAA) Polishing Cloth Power cable x 8 (M4 x 12mm) Stand screws (T4 x 20mm) Safety screw Option Extras When using the VGA (D-sub 15 pin cable...
... pin cable 8 PREPARATION PREPARATION Accessories Ensure that the following accessories are included with ferrite cores to maintain standards compliance. Owner's Manual CD Manual 1.5V 1.5V Remote Control, Batteries (AAA) Polishing Cloth Power cable x 8 (M4 x 12mm) Stand screws (T4 x 20mm) Safety screw Option Extras When using the VGA (D-sub 15 pin cable...

Owner's Manual
Page 9
a Do not drag the TV. CHANNEL buttons VOLUME buttons ENTER button HOME button INPUT button POWER button Speaker Power/Standby Indicator Remote Control Sensor NOTE a Do not step on the glass stand or subject it to any impact.It may break, causing possible injury from your TV. The floor or the product may be damaged. 9 PREPARATION Front Panel Information r Image shown may differ from fragments of glass, or the TV may fall.
a Do not drag the TV. CHANNEL buttons VOLUME buttons ENTER button HOME button INPUT button POWER button Speaker Power/Standby Indicator Remote Control Sensor NOTE a Do not step on the glass stand or subject it to any impact.It may break, causing possible injury from your TV. The floor or the product may be damaged. 9 PREPARATION Front Panel Information r Image shown may differ from fragments of glass, or the TV may fall.
Owner's Manual
Page 16
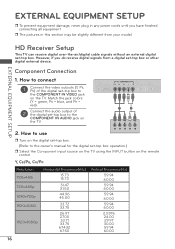
...). 2 Connect the audio output of the digital set -top box operation.) r Select the Component input source on the TV using the INPUT button on the remote control. However, if you have finished connecting all equipment. EXTERNAL EQUIPMENT SETUP r To prevent equipment damage, never plug in this section may be slightly different...
...). 2 Connect the audio output of the digital set -top box operation.) r Select the Component input source on the TV using the INPUT button on the remote control. However, if you have finished connecting all equipment. EXTERNAL EQUIPMENT SETUP r To prevent equipment damage, never plug in this section may be slightly different...

Owner's Manual
Page 17
... on the TV using the INPUT button on the TV. 2 No separate audio connection is necessary. How to HDMI/DVI IN 1, 2, or 3* jack on the remote control. * HDMI 3: For 42LV4400, 47LV4400, 55LV4400 HDMI OUTPUT 1 NOTE a If an HDMI cable doesn't support High Speed HDMI, it can cause flickers or no screen display.
... on the TV using the INPUT button on the TV. 2 No separate audio connection is necessary. How to HDMI/DVI IN 1, 2, or 3* jack on the remote control. * HDMI 3: For 42LV4400, 47LV4400, 55LV4400 HDMI OUTPUT 1 NOTE a If an HDMI cable doesn't support High Speed HDMI, it can cause flickers or no screen display.
Owner's Manual
Page 18
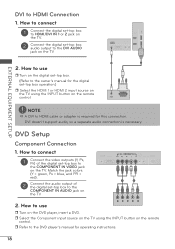
... cable or adapter is necessary. DVD Setup Component Connection 1. r Select the Component input source on the TV using the INPUT button on the remote control. 2 1 AUDIO DVI OUTPUT EXTERNAL EQUIPMENT SETUP NOTE a A DVI to the COMPONENT IN VIDEO jack on the DVD player, insert ... on the TV. 1 2 2. How to the owner's manual for operating instructions. 18 r Refer to the COMPONENT IN AUDIO jack on the remote control. DVI doesn't support audio, so a separate audio connection is required for this connection. How to connect 1 Connect the video outputs (Y, PB...
... cable or adapter is necessary. DVD Setup Component Connection 1. r Select the Component input source on the TV using the INPUT button on the remote control. 2 1 AUDIO DVI OUTPUT EXTERNAL EQUIPMENT SETUP NOTE a A DVI to the COMPONENT IN VIDEO jack on the DVD player, insert ... on the TV. 1 2 2. How to the owner's manual for operating instructions. 18 r Refer to the COMPONENT IN AUDIO jack on the remote control. DVI doesn't support audio, so a separate audio connection is required for this connection. How to connect 1 Connect the video outputs (Y, PB...
Owner's Manual
Page 19
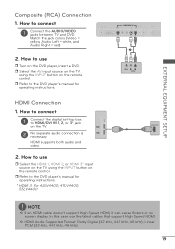
r Select the AV input source on the TV using the INPUT button on the remote control. How to HDMI/DVI IN 1, 2, or 3* jack on the DVD player, insert a DVD. HDMI supports both audio and video. 2. EXTERNAL EQUIPMENT SETUP Composite (RCA)... 1, HDMI 2, or HDMI 3* input source on the TV using the INPUT button on the remote control. How to the DVD player's manual for operating instructions. How to the DVD player's manual for operating instructions. * HDMI 3: For 42LV4400, 47LV4400, 55LV4400 1 VIDEO L R AUDIO HDMI OUTPUT 1 NOTE a If an HDMI cable doesn't support High ...
r Select the AV input source on the TV using the INPUT button on the remote control. How to HDMI/DVI IN 1, 2, or 3* jack on the DVD player, insert a DVD. HDMI supports both audio and video. 2. EXTERNAL EQUIPMENT SETUP Composite (RCA)... 1, HDMI 2, or HDMI 3* input source on the TV using the INPUT button on the remote control. How to the DVD player's manual for operating instructions. How to the DVD player's manual for operating instructions. * HDMI 3: For 42LV4400, 47LV4400, 55LV4400 1 VIDEO L R AUDIO HDMI OUTPUT 1 NOTE a If an HDMI cable doesn't support High ...
Owner's Manual
Page 20
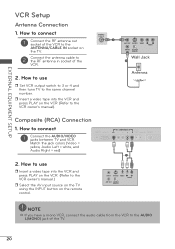
... the TV. 2 Connect the antenna cable to the same channel number. How to use r Insert a video tape into the VCR and press PLAY on the remote control. 1 ANT OUT S-VIDEO VIDEO L R AUDIO ANT IN OUTPUT SWITCH Wall Jack 2 Antenna 1 ANT IN S-VIDEO VIDEO L R AUDIO ANT OUT OUTPUT SWITCH NOTE a If you...
... the TV. 2 Connect the antenna cable to the same channel number. How to use r Insert a video tape into the VCR and press PLAY on the remote control. 1 ANT OUT S-VIDEO VIDEO L R AUDIO ANT IN OUTPUT SWITCH Wall Jack 2 Antenna 1 ANT IN S-VIDEO VIDEO L R AUDIO ANT OUT OUTPUT SWITCH NOTE a If you...

Owner's Manual
Page 21
... is 1 TB or less for a USB external hard disk and 32 GB or less for USB memory. How to the USB IN jack on the remote control. How to connect 1 Connect the AUDIO/VIDEO jacks between TV and external equipment. Match the jack colors. (Video = yellow, Audio Left = white, and Audio...
... is 1 TB or less for a USB external hard disk and 32 GB or less for USB memory. How to the USB IN jack on the remote control. How to connect 1 Connect the AUDIO/VIDEO jacks between TV and external equipment. Match the jack colors. (Video = yellow, Audio Left = white, and Audio...
Owner's Manual
Page 23
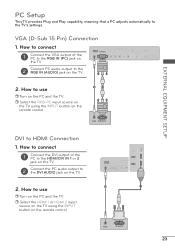
... Connection 1. EXTERNAL EQUIPMENT SETUP PC Setup This TV provides Plug and Play capability, meaning that a PC adjusts automatically to the DVI AUDIO jack on the remote control. How to connect 1 Connect the VGA output of the PC to the HDMI/DVI IN 1 or 2 jack on the TV. 2 Connect the PC audio... output of the PC to the RGB IN (PC) jack on the TV. 2 Connect PC audio output to the RGB IN (AUDIO) jack on the remote control. 2 1 AUDIO RGB OUTPUT DVI to use r Turn on the PC and the TV. r Select the HDMI 1 or HDMI 2 input source on the TV using...
... Connection 1. EXTERNAL EQUIPMENT SETUP PC Setup This TV provides Plug and Play capability, meaning that a PC adjusts automatically to the DVI AUDIO jack on the remote control. How to connect 1 Connect the VGA output of the PC to the HDMI/DVI IN 1 or 2 jack on the TV. 2 Connect the PC audio... output of the PC to the RGB IN (PC) jack on the TV. 2 Connect PC audio output to the RGB IN (AUDIO) jack on the remote control. 2 1 AUDIO RGB OUTPUT DVI to use r Turn on the PC and the TV. r Select the HDMI 1 or HDMI 2 input source on the TV using...
Owner's Manual
Page 25
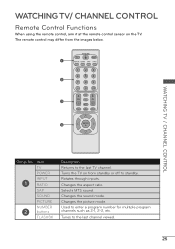
Changes the picture mode. The remote control may differ from standby or off to the last TV channel. POWER TV INPUT 1 PICTURE SOUND SAP RATIO 123 456 2 789 - 0 FLASHBK FAV VOL .... Rotates through inputs. Selects MTS sound. Tunes to enter a program number for multiple program channels such as 2-1, 2-2, etc. WATCHING TV/ CHANNEL CONTROL Remote Control Functions When using the remote control, aim it at the remote control sensor on from the images below. Changes the aspect ratio. Used to the last channel viewed. 25
Changes the picture mode. The remote control may differ from standby or off to the last TV channel. POWER TV INPUT 1 PICTURE SOUND SAP RATIO 123 456 2 789 - 0 FLASHBK FAV VOL .... Rotates through inputs. Selects MTS sound. Tunes to enter a program number for multiple program channels such as 2-1, 2-2, etc. WATCHING TV/ CHANNEL CONTROL Remote Control Functions When using the remote control, aim it at the remote control sensor on from the images below. Changes the aspect ratio. Used to the last channel viewed. 25

Owner's Manual
Page 27
WATCHING TV / CHANNEL CONTROL Turning on the remote control. The TV reverts to select a channel number. NOTE a If you want to be away on vacation, disconnect the power plug from the wall power .... 2 If you intend to switch the sound off, press the MUTE button. 3 You can cancel the Mute function by using the INPUT button on the remote control. 3 When finished using the TV, press press the POWER button on the TV 1 First, connect power cord correctly. a In standby mode to standby mode...
WATCHING TV / CHANNEL CONTROL Turning on the remote control. The TV reverts to select a channel number. NOTE a If you want to be away on vacation, disconnect the power plug from the wall power .... 2 If you intend to switch the sound off, press the MUTE button. 3 You can cancel the Mute function by using the INPUT button on the remote control. 3 When finished using the TV, press press the POWER button on the TV 1 First, connect power cord correctly. a In standby mode to standby mode...
Owner's Manual
Page 33
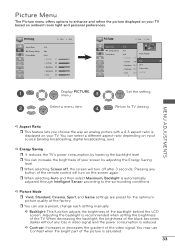
... select a different aspect ratio depending on the screen again. r When selecting Auto and then select Maximum, Backlight is recommended when setting the brightness of the remote control will turn off , the screen will turn on input source (analog broadcasting, digital broadcasting, aux). MENU ADJUSTMENTS a Aspect Ratio r This feature lets you choose...
... select a different aspect ratio depending on the screen again. r When selecting Auto and then select Maximum, Backlight is recommended when setting the brightness of the remote control will turn off , the screen will turn on input source (analog broadcasting, digital broadcasting, aux). MENU ADJUSTMENTS a Aspect Ratio r This feature lets you choose...

Owner's Manual
Page 42
r Ensure that the batteries are pointing the remote control directly at the TV. r Check the power control settings. APPENDIX Video Problems No picture... Adjust Color in . r Check for local interference such as an electrical appliance or power tool. The remote control doesn't work r Ensure that the correct remote operating mode is set ? r If there is no signal, the TV turns off suddenly r Is the... appears slowly after five minutes. r Keep a sufficient distance between the product and the remote control causing obstruction. r Try another product's power cord into wall power outlet?
r Ensure that the batteries are pointing the remote control directly at the TV. r Check the power control settings. APPENDIX Video Problems No picture... Adjust Color in . r Check for local interference such as an electrical appliance or power tool. The remote control doesn't work r Ensure that the correct remote operating mode is set ? r If there is no signal, the TV turns off suddenly r Is the... appears slowly after five minutes. r Keep a sufficient distance between the product and the remote control causing obstruction. r Try another product's power cord into wall power outlet?

Specification
Page 2
PC PC Audio Input CABINET Swivel VESA Compatible Remote Control POWER ENERGY STAR® Qualified Voltage, Hz Standby Mode DIMENSIONS/WEIGHT TV without Stand (WxHxD) TV with Stand (WxHxD) Shipping Dimensions (WxHxD) TV without ... In (Antenna/Cable) AV In Component In (Y, Pb, Pr) + Audio HDMI In USB 2.0 Digital Audio Out (Optical) Analog Audio Out RGB In (D-Sub 15 Pin) - 47LV4400 47" Class 1080p LED LCD TV PANEL SPECIFICATIONS Screen Size Resolution TruMotion (Frame Rate) Contrast Ratio (DCR) Response Time (GTG) BROADCASTING SYSTEM Analog Digital VIDEO...
PC PC Audio Input CABINET Swivel VESA Compatible Remote Control POWER ENERGY STAR® Qualified Voltage, Hz Standby Mode DIMENSIONS/WEIGHT TV without Stand (WxHxD) TV with Stand (WxHxD) Shipping Dimensions (WxHxD) TV without ... In (Antenna/Cable) AV In Component In (Y, Pb, Pr) + Audio HDMI In USB 2.0 Digital Audio Out (Optical) Analog Audio Out RGB In (D-Sub 15 Pin) - 47LV4400 47" Class 1080p LED LCD TV PANEL SPECIFICATIONS Screen Size Resolution TruMotion (Frame Rate) Contrast Ratio (DCR) Response Time (GTG) BROADCASTING SYSTEM Analog Digital VIDEO...


