Owner's Manual
Page 3
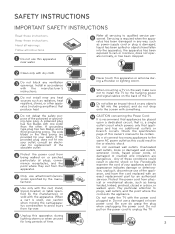
.... Pay particular attention to fall into the product, and do grasp the plug when unplugging the power cord. Be sure do not drop onto the screen with an exact replacement part by the hanging power and signal cables on the wall, make the TV with the apparatus. Keep these instructions. If...
.... Pay particular attention to fall into the product, and do grasp the plug when unplugging the power cord. Be sure do not drop onto the screen with an exact replacement part by the hanging power and signal cables on the wall, make the TV with the apparatus. Keep these instructions. If...
Owner's Manual
Page 5
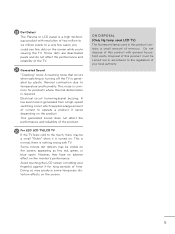
...TV/LCD TV If the TV feels cold to the regulations of your finger(s) against it is turned on the screen. However, they have no adverse effect on the screen while you're viewing the TV. Those dots are deactivated pixels and do not affect the performance and reliability of...panel buzzing: A low level noise is generated from a high-speed switching circuit, which supplies a large amount of mercury. It varies depending on the screen, appearing as tiny red, green, or blue spots. Avoid touching the LCD screen or holding your local authority. 5 Doing so may be visible on the product.
...TV/LCD TV If the TV feels cold to the regulations of your finger(s) against it is turned on the screen. However, they have no adverse effect on the screen while you're viewing the TV. Those dots are deactivated pixels and do not affect the performance and reliability of...panel buzzing: A low level noise is generated from a high-speed switching circuit, which supplies a large amount of mercury. It varies depending on the screen, appearing as tiny red, green, or blue spots. Avoid touching the LCD screen or holding your local authority. 5 Doing so may be visible on the product.
Owner's Manual
Page 6
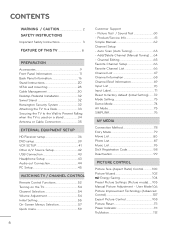
... Setup 45 WATCHING TV / CHANNEL CONTROL Remote Control Functions 52 Turning on the TV 54 Channel Selection 54 Volume Adjustment 54 Initial Setting 55 On-Screen Menus Selection 57 Quick menu 59 6 Customer Support - CONTENTS WARNING / CAUTION 2 SAFETY INSTRUCTIONS Important Safety Instructions 3 FEATURE OF THIS TV 8 PREPARATION Accessories 9 Front Panel Information...
... Setup 45 WATCHING TV / CHANNEL CONTROL Remote Control Functions 52 Turning on the TV 54 Channel Selection 54 Volume Adjustment 54 Initial Setting 55 On-Screen Menus Selection 57 Quick menu 59 6 Customer Support - CONTENTS WARNING / CAUTION 2 SAFETY INSTRUCTIONS Important Safety Instructions 3 FEATURE OF THIS TV 8 PREPARATION Accessories 9 Front Panel Information...

Owner's Manual
Page 7
......117 Audio Reset 118 TV Speakers On/Off Setup 119 External Speakers On/Off Setup 119 Stereo/SAP Broadcast Setup 120 Audio Language 121 On-screen Menus Language Selection..... 122 Caption Mode - Manual Clock Setup 127 Auto On/Off Time Setting 128 Sleep Timer Setting 129 PARENTAL CONTROL / RATINGS Set Password...
......117 Audio Reset 118 TV Speakers On/Off Setup 119 External Speakers On/Off Setup 119 Stereo/SAP Broadcast Setup 120 Audio Language 121 On-screen Menus Language Selection..... 122 Caption Mode - Manual Clock Setup 127 Auto On/Off Time Setting 128 Sleep Timer Setting 129 PARENTAL CONTROL / RATINGS Set Password...
Owner's Manual
Page 8
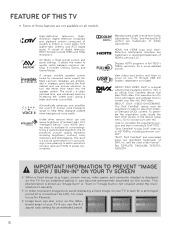
... View videos and photos and listen to quickly switch between common settings. A subset of DivX, Inc. Using a sophisticated algorithm, the LG processes picture quality elements including brightness, contrast, color, sharpness and white balance. ABOUT DIVX VIDEO-ON-DEMAND: This DivX Certified® device.... ABOUT DIVX VIDEO: DivX® is a picture optimized for an extended period, it 's surroundings, more pixels, 16:9 aspect-ratio screens, and AC3 digital audio. This phenomenon is not covered under the manufacturer's warranty. ꔛ In order to 50% in strategic spots ...
... View videos and photos and listen to quickly switch between common settings. A subset of DivX, Inc. Using a sophisticated algorithm, the LG processes picture quality elements including brightness, contrast, color, sharpness and white balance. ABOUT DIVX VIDEO-ON-DEMAND: This DivX Certified® device.... ABOUT DIVX VIDEO: DivX® is a picture optimized for an extended period, it 's surroundings, more pixels, 16:9 aspect-ratio screens, and AC3 digital audio. This phenomenon is not covered under the manufacturer's warranty. ꔛ In order to 50% in strategic spots ...
Owner's Manual
Page 20
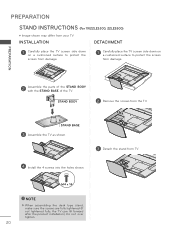
..., 22LE5500) ꔛ Image shown may differ from damage. INSTALLATION DETACHMENT 1 Carefully place the TV screen side down on a cushioned surface to protect the screen from damage. 1 Carefully place the TV screen side down on a cushioned surface to protect the screen from your TV. STAND BASE 3 Assemble the TV as shown. 3 Detach the stand from...
..., 22LE5500) ꔛ Image shown may differ from damage. INSTALLATION DETACHMENT 1 Carefully place the TV screen side down on a cushioned surface to protect the screen from damage. 1 Carefully place the TV screen side down on a cushioned surface to protect the screen from your TV. STAND BASE 3 Assemble the TV as shown. 3 Detach the stand from...
Owner's Manual
Page 21
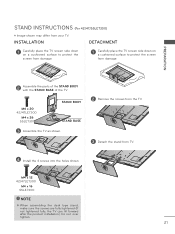
... stand from damage. Do not over tighten. 21 INSTALLATION DETACHMENT 1 Carefully place the TV screen side down on a cushioned surface to protect the screen from damage. 1 Carefully place the TV screen side down on a cushioned surface to protect the screen from TV. 4 Install the 4 screws into the holes shown. PREPARATION 2 Assemble the parts of...
... stand from damage. Do not over tighten. 21 INSTALLATION DETACHMENT 1 Carefully place the TV screen side down on a cushioned surface to protect the screen from damage. 1 Carefully place the TV screen side down on a cushioned surface to protect the screen from TV. 4 Install the 4 screws into the holes shown. PREPARATION 2 Assemble the parts of...
Owner's Manual
Page 22
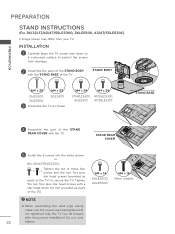
..., 42/47/55LE530C) ꔛ Image shown may differ from damage. 2 Assemble the parts of the STAND BODY with the TV. INSTALLATION 1 Carefully place the TV screen side down on a cushioned surface to secure the TV. or (For 42/47/55LE530C) Tighten the two of these four x 2 x 2 screws and the two ...fully tightened (If ? ? M4 x 24 M4 x 26 37/42LE5300, 47/55LE5300, 42LE530C 47/55LE530C STAND BASE 4 Assemble the part of the TV) to protect the screen from your TV. Do not over 22 tighten. STAND BODY M4 x 20 M4 x 22 26LE5300, 32LE5300 26LE5500 3 Assemble the TV as shown. M4 x 14 26LE5300...
..., 42/47/55LE530C) ꔛ Image shown may differ from damage. 2 Assemble the parts of the STAND BODY with the TV. INSTALLATION 1 Carefully place the TV screen side down on a cushioned surface to secure the TV. or (For 42/47/55LE530C) Tighten the two of these four x 2 x 2 screws and the two ...fully tightened (If ? ? M4 x 24 M4 x 26 37/42LE5300, 47/55LE5300, 42LE530C 47/55LE530C STAND BASE 4 Assemble the part of the TV) to protect the screen from your TV. Do not over 22 tighten. STAND BODY M4 x 20 M4 x 22 26LE5300, 32LE5300 26LE5500 3 Assemble the TV as shown. M4 x 14 26LE5300...
Owner's Manual
Page 23
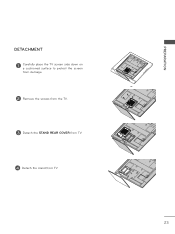
PREPARATION DETACHMENT 1 Carefully place the TV screen side down on a cushioned surface to protect the screen from damage. 2 Remove the screws from the TV. 3 Detach the STAND REAR COVER from TV. 4 Detach the stand from TV. 23
PREPARATION DETACHMENT 1 Carefully place the TV screen side down on a cushioned surface to protect the screen from damage. 2 Remove the screws from the TV. 3 Detach the STAND REAR COVER from TV. 4 Detach the stand from TV. 23
Owner's Manual
Page 24
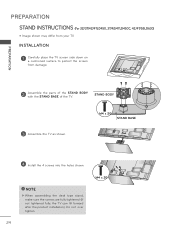
... M4 x 20 CABLE MANAGEMENT STAND BODY M4X20 AC IN CABLE MANAGEMENT 3 Assemble the TV as shown. INSTALLATION 1 Carefully place the TV screen side down on a cushioned surface to protect the screen from your TV. not tightened fully, the TV can tilt forward after the product installation). PREPARATION PREPARATION STAND INSTRUCTIONS (For 32...
... M4 x 20 CABLE MANAGEMENT STAND BODY M4X20 AC IN CABLE MANAGEMENT 3 Assemble the TV as shown. INSTALLATION 1 Carefully place the TV screen side down on a cushioned surface to protect the screen from your TV. not tightened fully, the TV can tilt forward after the product installation). PREPARATION PREPARATION STAND INSTRUCTIONS (For 32...

Owner's Manual
Page 25
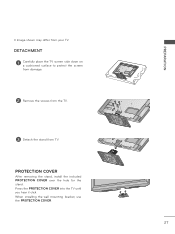
CABLE MANAGEMENT PROTECTION COVER After removing the stand, install the included PROTECTION COVER over the hole for the stand. Press the PROTECTION COVER into the TV until you hear it click. AC IN CABLE MANAGEMENT AC IN CABLE MANAGEMENT AC IN CABLE MANAGEMENT PREPARATION AC IN 25 DETACHMENT 1 Carefully place the TV screen side down on a cushioned surface to protect the screen from TV. CABLEMANAGEMENT 3 DetachACIN the stand from damage. AC IN 2 Remove the screws from the TV. When installing the wall mounting bracket, use the PROTECTION COVER.
CABLE MANAGEMENT PROTECTION COVER After removing the stand, install the included PROTECTION COVER over the hole for the stand. Press the PROTECTION COVER into the TV until you hear it click. AC IN CABLE MANAGEMENT AC IN CABLE MANAGEMENT AC IN CABLE MANAGEMENT PREPARATION AC IN 25 DETACHMENT 1 Carefully place the TV screen side down on a cushioned surface to protect the screen from TV. CABLEMANAGEMENT 3 DetachACIN the stand from damage. AC IN 2 Remove the screws from the TV. When installing the wall mounting bracket, use the PROTECTION COVER.
Owner's Manual
Page 26
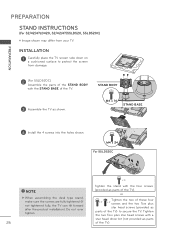
...x 2 screws and the two Torx plus star head screws with a star head driver bit (not provided as parts of the TV) to protect the screen from your TV. Tighten the two Torx plus star head screws (provided as parts of the TV). PREPARATION PREPARATION STAND INSTRUCTIONS (For 32/42/47LD420...TV. 3 Assemble the TV as parts of the STAND BODY STAND BODY M4X20 with the four screws (provided as shown. INSTALLATION 1 Carefully place the TV screen side down on a cushioned surface to secure the TV. M4 x 14 STAND BASE 4 Install the 4 screws into the holes shown. not tightened fully...
...x 2 screws and the two Torx plus star head screws with a star head driver bit (not provided as parts of the TV) to protect the screen from your TV. Tighten the two Torx plus star head screws (provided as parts of the TV). PREPARATION PREPARATION STAND INSTRUCTIONS (For 32/42/47LD420...TV. 3 Assemble the TV as parts of the STAND BODY STAND BODY M4X20 with the four screws (provided as shown. INSTALLATION 1 Carefully place the TV screen side down on a cushioned surface to secure the TV. M4 x 14 STAND BASE 4 Install the 4 screws into the holes shown. not tightened fully...
Owner's Manual
Page 27
Press the PROTECTION COVER into the TV until you hear it click. DETACHMENT 1 Carefully place the TV screen side down on a cushioned surface to protect the screen from damage. 2 Remove the screws from the TV. 3 Detach the stand from your TV. PREPARATION ꔛ Image shown may differ from TV. PROTECTION COVER After removing the stand, install the included PROTECTION COVER over the hole for the stand. When installing the wall mounting bracket, use the PROTECTION COVER. 27
Press the PROTECTION COVER into the TV until you hear it click. DETACHMENT 1 Carefully place the TV screen side down on a cushioned surface to protect the screen from damage. 2 Remove the screws from the TV. 3 Detach the stand from your TV. PREPARATION ꔛ Image shown may differ from TV. PROTECTION COVER After removing the stand, install the included PROTECTION COVER over the hole for the stand. When installing the wall mounting bracket, use the PROTECTION COVER. 27
Owner's Manual
Page 37
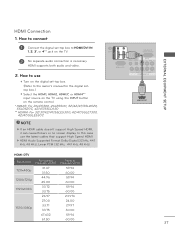
... is necessary. HDMI supports both audio and video. 2. NOTE ►If an HDMI cable doesn't support High Speed HDMI, it can cause flickers or no screen display. In this case ? ?
... is necessary. HDMI supports both audio and video. 2. NOTE ►If an HDMI cable doesn't support High Speed HDMI, it can cause flickers or no screen display. In this case ? ?
Owner's Manual
Page 40
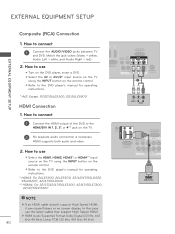
... L(MONO) AUDIO R 2. HDMI supports both audio and video. 2. NOTE ►If an HDMI cable doesn't support High Speed HDMI, it can cause flickers or no screen display. How to connect 1 Connect the HDMI output of the DVD to connect /DVI IN 1 2 (DVI) RS-232C IN 1 Connect the AUDIO/VIDEO jacks between...
... L(MONO) AUDIO R 2. HDMI supports both audio and video. 2. NOTE ►If an HDMI cable doesn't support High Speed HDMI, it can cause flickers or no screen display. How to connect 1 Connect the HDMI output of the DVD to connect /DVI IN 1 2 (DVI) RS-232C IN 1 Connect the AUDIO/VIDEO jacks between...
Owner's Manual
Page 47
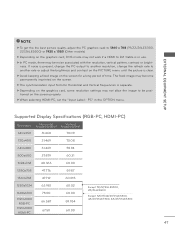
...1360 x 768 (19/22/26LE5300, 22/26LE5500) or 1920 x 1080 (Other models). ? ►? The fixed image may become permanently imprinted on the screen. ►The synchronization input form for a long period of time. Supported Display Specifications (RGB-PC, HDMI-PC) Resolution FreHqoureiznocny(tkaHl z) FreqVueertniccay(lHz) 640x350... rate or adjust the brightness and contrast on the PICTURE menu until the picture is clear. ►Avoid keeping a fixed image on the screen properly. ►When selecting HDMI-PC, set the "Input Label - Depending on the graphics card, DOS mode may not work if a...
...1360 x 768 (19/22/26LE5300, 22/26LE5500) or 1920 x 1080 (Other models). ? ►? The fixed image may become permanently imprinted on the screen. ►The synchronization input form for a long period of time. Supported Display Specifications (RGB-PC, HDMI-PC) Resolution FreHqoureiznocny(tkaHl z) FreqVueertniccay(lHz) 640x350... rate or adjust the brightness and contrast on the PICTURE menu until the picture is clear. ►Avoid keeping a fixed image on the screen properly. ►When selecting HDMI-PC, set the "Input Label - Depending on the graphics card, DOS mode may not work if a...
Owner's Manual
Page 48
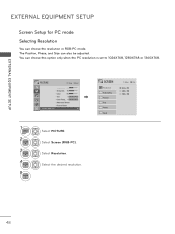
...Phase, and Size can choose this option only when the PC resolution is set to 1024X768, 1280X768 or 1360X768. You can also be adjusted. Select Screen (RGB-PC). Position Size Phase Reset ꔂ Move � Prev. ꔑ 1024 x 768 □ 1280 x 768 □ 1360...8226; Sharpness 70 • Color 60 • Tint 0R G • Color Temp. 0 W C • Advanced Control • Picture Reset • Screen (RGB-PC) ꔠꔉ 1 MENU 2 ENTER 3 ENTER 4 ENTER 5 ENTER Select PICTURE. Select Resolution. EXTERNAL EQUIPMENT SETUP EXTERNAL EQUIPMENT SETUP...
...Phase, and Size can choose this option only when the PC resolution is set to 1024X768, 1280X768 or 1360X768. You can also be adjusted. Select Screen (RGB-PC). Position Size Phase Reset ꔂ Move � Prev. ꔑ 1024 x 768 □ 1280 x 768 □ 1360...8226; Sharpness 70 • Color 60 • Tint 0R G • Color Temp. 0 W C • Advanced Control • Picture Reset • Screen (RGB-PC) ꔠꔉ 1 MENU 2 ENTER 3 ENTER 4 ENTER 5 ENTER Select PICTURE. Select Resolution. EXTERNAL EQUIPMENT SETUP EXTERNAL EQUIPMENT SETUP...
Owner's Manual
Page 49
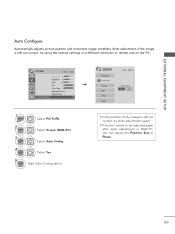
Auto Config. SCREEN Resolution Auto Config. Yes No ꔛ If the position of the image is still not correct, try Auto adjustment again. ꔛ If picture needs to ... 50 • Sharpness 70 • Color 60 • Tint 0R G • Color Temp. 0 W C • Advanced Control • Picture Reset • Screen (RGB-PC) ꔠꔉ 1 MENU Select PICTURE. 2 ENTER Select Screen (RGB-PC). 3 ENTER Select Auto Config.. 4 ENTER Select Yes. 5 ENTER Start Auto Configuration. Position Size Phase Reset ꔂ Move � Prev...
Auto Config. SCREEN Resolution Auto Config. Yes No ꔛ If the position of the image is still not correct, try Auto adjustment again. ꔛ If picture needs to ... 50 • Sharpness 70 • Color 60 • Tint 0R G • Color Temp. 0 W C • Advanced Control • Picture Reset • Screen (RGB-PC) ꔠꔉ 1 MENU Select PICTURE. 2 ENTER Select Screen (RGB-PC). 3 ENTER Select Auto Config.. 4 ENTER Select Yes. 5 ENTER Start Auto Configuration. Position Size Phase Reset ꔂ Move � Prev...
Owner's Manual
Page 50
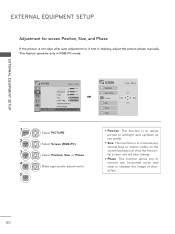
... is shaking, adjust the picture phase manually. Select Position, Size, or Phase. EXTERNAL EQUIPMENT SETUP EXTERNAL EQUIPMENT SETUP Adjustment for screen Position, Size, and Phase If the picture is not clear after auto adjustment or if text is to remove any vertical bars... or stripes visible on the screen background. SCREEN Resolution Auto Config. PICTURE ꔂ Move ꔉ Enter • Brightness 50 • Sharpness 70 • Color 60 • Tint 0R ...
... is shaking, adjust the picture phase manually. Select Position, Size, or Phase. EXTERNAL EQUIPMENT SETUP EXTERNAL EQUIPMENT SETUP Adjustment for screen Position, Size, and Phase If the picture is not clear after auto adjustment or if text is to remove any vertical bars... or stripes visible on the screen background. SCREEN Resolution Auto Config. PICTURE ꔂ Move ꔉ Enter • Brightness 50 • Sharpness 70 • Color 60 • Tint 0R ...
Owner's Manual
Page 51
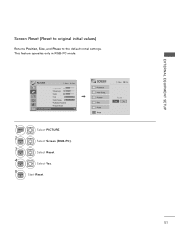
This feature operates only in RGB-PC mode. SCREEN Resolution Auto Config. EXTERNAL EQUIPMENT SETUP Screen Reset (Reset to original initial values) Returns Position, Size, and Phase to the default initial settings. To Set Yes No ...• Brightness 50 • Sharpness 70 • Color 60 • Tint 0R G • Color Temp. 0 W C • Advanced Control • Picture Reset • Screen (RGB-PC) ꔠꔉ 1 MENU Select PICTURE. 2 ENTER Select Screen (RGB-PC). 3 ENTER Select Reset. 4 ENTER Select Yes. 5 ENTER Start Reset.
This feature operates only in RGB-PC mode. SCREEN Resolution Auto Config. EXTERNAL EQUIPMENT SETUP Screen Reset (Reset to original initial values) Returns Position, Size, and Phase to the default initial settings. To Set Yes No ...• Brightness 50 • Sharpness 70 • Color 60 • Tint 0R G • Color Temp. 0 W C • Advanced Control • Picture Reset • Screen (RGB-PC) ꔠꔉ 1 MENU Select PICTURE. 2 ENTER Select Screen (RGB-PC). 3 ENTER Select Reset. 4 ENTER Select Yes. 5 ENTER Start Reset.


