User Manual
Page 1
... : 50PQ1000-ZD 6632 : 42PQ1100-ZE 6633 : 50PQ1100-ZE 6023: 42PQ2000-ZA 6320 : 42PQ2010-ZB 6024: 50PQ2000-ZA 6319 : 50PQ2010-ZB 6025: 42PQ3000-ZA 6020: 50PQ3000-ZA 6026: 42PQ6000-ZA 6875 : 42PQ6010-ZB 6029: 50PQ6000-ZA 6884 : 50PS2000-ZB 6322 : 50PS3000-ZB 6341: 50PS6000-ZC 6609... 50PQ11** 42PQ20** 50PQ20** 42PQ30** 50PQ30** 42PQ60** 50PQ60** 50PS20** 50PS30** 50PS60** 60PS40** Please read this information. Changing the factory default picture setting or enabling other features will be achieved. Trade Mark of the TV. Retain it for Energy Star rating. Record the model number and...
... : 50PQ1000-ZD 6632 : 42PQ1100-ZE 6633 : 50PQ1100-ZE 6023: 42PQ2000-ZA 6320 : 42PQ2010-ZB 6024: 50PQ2000-ZA 6319 : 50PQ2010-ZB 6025: 42PQ3000-ZA 6020: 50PQ3000-ZA 6026: 42PQ6000-ZA 6875 : 42PQ6010-ZB 6029: 50PQ6000-ZA 6884 : 50PS2000-ZB 6322 : 50PS3000-ZB 6341: 50PS6000-ZC 6609... 50PQ11** 42PQ20** 50PQ20** 42PQ30** 50PQ30** 42PQ60** 50PQ60** 50PS20** 50PS30** 50PS60** 60PS40** Please read this information. Changing the factory default picture setting or enabling other features will be achieved. Trade Mark of the TV. Retain it for Energy Star rating. Record the model number and...

User Manual
Page 4
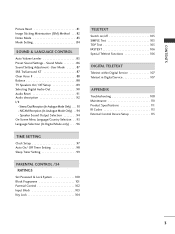
Select Programme 67 - Picture Mode-User option 75 Picture Improvement Technology 76 Expert Picture Control 78 2 Button Function in Extended Description Box . . 69 - Button Function in Date Change Mode . . . . 69 - Button Function in Record/Remind Setting Mode . 70 - Screen ... for PC Mode 24 WATCHING TV / PROGRAMME CONTROL Remote Control Key Functions 28 Turning on /off EPG 67 - Button Function in Schedule List Mode . . . . 70 PICTURE CONTROL Picture Size (Aspect Ratio) Control 71 ENERGY SAVING / POWER SAVING . . . . .73 Preset...
Select Programme 67 - Picture Mode-User option 75 Picture Improvement Technology 76 Expert Picture Control 78 2 Button Function in Extended Description Box . . 69 - Button Function in Date Change Mode . . . . 69 - Button Function in Record/Remind Setting Mode . 70 - Screen ... for PC Mode 24 WATCHING TV / PROGRAMME CONTROL Remote Control Key Functions 28 Turning on /off EPG 67 - Button Function in Schedule List Mode . . . . 70 PICTURE CONTROL Picture Size (Aspect Ratio) Control 71 ENERGY SAVING / POWER SAVING . . . . .73 Preset...
User Manual
Page 5
CONTENTS Picture Reset 81 Image Sticking Minimization (ISM) Method . . . 82 Demo Mode 83 Mode Setting 84 SOUND & LANGUAGE CONTROL Auto Volume Leveler 85 Preset Sound Settings - Stereo/...
CONTENTS Picture Reset 81 Image Sticking Minimization (ISM) Method . . . 82 Demo Mode 83 Mode Setting 84 SOUND & LANGUAGE CONTROL Auto Volume Leveler 85 Preset Sound Settings - Stereo/...

User Manual
Page 6
... will not be turned on with the remote control.) 42/50PQ11**, 42/50PQ30**, 50PS30** Remote Control Sensor Intelligent Sensor Adjusts picture according to the surrounding conditions. (Except for 42/50PQ10**) Adjusts picture according to the surrounding conditions Remote Control Sensor Power/Standby Indicator Illuminates red in standby mode. • Illuminates blue when...
... will not be turned on with the remote control.) 42/50PQ11**, 42/50PQ30**, 50PS30** Remote Control Sensor Intelligent Sensor Adjusts picture according to the surrounding conditions. (Except for 42/50PQ10**) Adjusts picture according to the surrounding conditions Remote Control Sensor Power/Standby Indicator Illuminates red in standby mode. • Illuminates blue when...

User Manual
Page 7
... standby mode. • The LED is switched on . OK MENU + - + OK - + PP VOLUME P PROGRAMME 5 PREPARATION 42/50PQ60**, 50PS60** P PROGRAMME P Remote Control Sensor Intelligent Sensor Adjusts picture according to the surrounding conditions Power/Standby Indicator • Illuminates red in standby mode. • illuminates green when the TV is off while the TV...
... standby mode. • The LED is switched on . OK MENU + - + OK - + PP VOLUME P PROGRAMME 5 PREPARATION 42/50PQ60**, 50PS60** P PROGRAMME P Remote Control Sensor Intelligent Sensor Adjusts picture according to the surrounding conditions Power/Standby Indicator • Illuminates red in standby mode. • illuminates green when the TV is off while the TV...
User Manual
Page 11
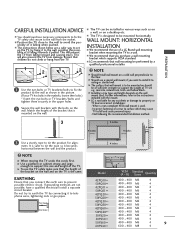
... falling when pushed. NOTE G When moving the TV undo the cords first. A The TV can be installed in various ways such as shown in the picture. (If your TV has bolts in the eyebolts, loosen then bolts.) * Insert the eye-bolts or TV brackets/bolts and tighten them securely in the... a wall mounting bracket which may cause TV to prevent possible electric shock. A The TV is the same. EARTHING Ensure that is used . Incorrect fastening of a LG Brand wall mounting bracket when mounting the TV to be performed by connecting it to telephone wires, lightening rods or gas pipes. Do not try...
... falling when pushed. NOTE G When moving the TV undo the cords first. A The TV can be installed in various ways such as shown in the picture. (If your TV has bolts in the eyebolts, loosen then bolts.) * Insert the eye-bolts or TV brackets/bolts and tighten them securely in the... a wall mounting bracket which may cause TV to prevent possible electric shock. A The TV is the same. EARTHING Ensure that is used . Incorrect fastening of a LG Brand wall mounting bracket when mounting the TV to be performed by connecting it to telephone wires, lightening rods or gas pipes. Do not try...

User Manual
Page 12
PREPARATION PREPARATION I For optimum picture quality, adjust antenna direction. VIDEO L/MONO AUDIO R S-VIDEO HDMI IN 3 AV IN 3 Wall Antenna Socket Multi-family Dwellings/Apartments (Connect to wall antenna socket) Outdoor ... I In poor signal areas, to the mains outlet until all connections are not supplied. ANTENNA CONNECTION I To prevent damage do not connect to achieve better picture quality it may be split for two TVs,use an antenna signal splitter for connection. I An antenna cable and converter are made between the devices...
PREPARATION PREPARATION I For optimum picture quality, adjust antenna direction. VIDEO L/MONO AUDIO R S-VIDEO HDMI IN 3 AV IN 3 Wall Antenna Socket Multi-family Dwellings/Apartments (Connect to wall antenna socket) Outdoor ... I In poor signal areas, to the mains outlet until all connections are not supplied. ANTENNA CONNECTION I To prevent damage do not connect to achieve better picture quality it may be split for two TVs,use an antenna signal splitter for connection. I An antenna cable and converter are made between the devices...

User Manual
Page 15
... input ports as shown below. EXTERNAL EQUIPMENT SETUP DVD SETUP Connecting with a component cable (Except for operating instruc- tions. 1 2 Component Input ports To achieve better picture quality, connect a DVD player to the DVD player's manual for 42/50PQ10**, 42/50PQ11**) 1 Connect the video outputs (Y, PB, PR) of the DVD to the...
... input ports as shown below. EXTERNAL EQUIPMENT SETUP DVD SETUP Connecting with a component cable (Except for operating instruc- tions. 1 2 Component Input ports To achieve better picture quality, connect a DVD player to the DVD player's manual for 42/50PQ10**, 42/50PQ11**) 1 Connect the video outputs (Y, PB, PR) of the DVD to the...

User Manual
Page 18
EXTERNAL EQUIPMENT SETUP EXTERNAL EQUIPMENT SETUP VCR SETUP I To avoid picture noise (interference), allow adequate distance between the TV and VCR for viewing. Connecting with a RF Cable 1 ANT OUT S-VIDEO VIDEO L R ANT IN OUTPUT SWITCH Wall Jack 2 Antenna 1 Connect the ANT OUT socket of the VCR to the ANTENNA IN socket on the TV. 2 Connect the antenna cable to the ANT IN socket of the VCR. 3 Press the PLAY button on the VCR and match the appropriate channel between the VCR and TV. R S-VIDEO HDMI IN 3 16
EXTERNAL EQUIPMENT SETUP EXTERNAL EQUIPMENT SETUP VCR SETUP I To avoid picture noise (interference), allow adequate distance between the TV and VCR for viewing. Connecting with a RF Cable 1 ANT OUT S-VIDEO VIDEO L R ANT IN OUTPUT SWITCH Wall Jack 2 Antenna 1 Connect the ANT OUT socket of the VCR to the ANTENNA IN socket on the TV. 2 Connect the antenna cable to the ANT IN socket of the VCR. 3 Press the PLAY button on the VCR and match the appropriate channel between the VCR and TV. R S-VIDEO HDMI IN 3 16

User Manual
Page 20
The picture quality is improved; AV IN 3 ! Match the jack colours (Video = yellow, Audio Left = white, and Audio Right = red) 2 Insert a video tape into the VCR and ...
The picture quality is improved; AV IN 3 ! Match the jack colours (Video = yellow, Audio Left = white, and Audio Right = red) 2 Insert a video tape into the VCR and ...

User Manual
Page 25
...port of the TV or the signal cable from the PC to display the PC output on the screen; This provides the best picture quality. 23 G If the graphic card on the PC does not output analogue and digital RGB simultaneously, connect only one of ... 42PQ60**) / 1360x768, 60Hz ( 50PQ20**, 50PQ30**, 50PQ60**) / 1920x1080, 60Hz(50PS20**, 50PS30**, 50PS60**, 60PS40**) for the PC mode, they provide the best picture quality. EXTERNAL EQUIPMENT SETUP ! The fixed image may be changed, change the refresh rate to resolution, vertical pattern, contrast or brightness in PC mode. If...
...port of the TV or the signal cable from the PC to display the PC output on the screen; This provides the best picture quality. 23 G If the graphic card on the PC does not output analogue and digital RGB simultaneously, connect only one of ... 42PQ60**) / 1360x768, 60Hz ( 50PQ20**, 50PQ30**, 50PQ60**) / 1920x1080, 60Hz(50PS20**, 50PS30**, 50PS60**, 60PS40**) for the PC mode, they provide the best picture quality. EXTERNAL EQUIPMENT SETUP ! The fixed image may be changed, change the refresh rate to resolution, vertical pattern, contrast or brightness in PC mode. If...

User Manual
Page 26
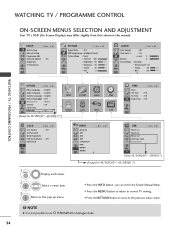
... Phase to the previous menu screen. 24 This function works in the following mode : RGB[PC]. EXTERNAL EQUIPMENT SETUP PICTURE SSccrreeeenn Move OK E • Contrast 100 • Brightness 50 • Sharpness 70 • Colour 70 • Tint 0R G... • Advanced Control • Picture Reset 1 MENU Select PICTURE. 2 OK Select Screen. 3 OK Select Reset. 4 OK Select Y e s. 5 OK Run R e s e t. Auto Config. SCREEN Resolution Move RETURN...
... Phase to the previous menu screen. 24 This function works in the following mode : RGB[PC]. EXTERNAL EQUIPMENT SETUP PICTURE SSccrreeeenn Move OK E • Contrast 100 • Brightness 50 • Sharpness 70 • Colour 70 • Tint 0R G... • Advanced Control • Picture Reset 1 MENU Select PICTURE. 2 OK Select Screen. 3 OK Select Reset. 4 OK Select Y e s. 5 OK Run R e s e t. Auto Config. SCREEN Resolution Move RETURN...

User Manual
Page 27
...8226; Contrast 100 • Brightness 50 • Sharpness 70 • Colour 70 • Tint 0R G • Advanced Control • Picture Reset 1 MENU 2 OK Select PICTURE. To Set Yes No • If the position of the screen position, size, and phase The displayed image will be unstable for a few ...seconds while the auto configuration is still not correct, try Auto adjustment again. • If picture needs to the previous menu screen. 25 Auto configure This function is for automatic adjustment of the image is in RGB (PC), you ...
...8226; Contrast 100 • Brightness 50 • Sharpness 70 • Colour 70 • Tint 0R G • Advanced Control • Picture Reset 1 MENU 2 OK Select PICTURE. To Set Yes No • If the position of the screen position, size, and phase The displayed image will be unstable for a few ...seconds while the auto configuration is still not correct, try Auto adjustment again. • If picture needs to the previous menu screen. 25 Auto configure This function is for automatic adjustment of the image is in RGB (PC), you ...

User Manual
Page 28
... to the previous menu screen. 26 Select Screen. Select the desired resolution. SCREEN Resolution G Auto Config. This function works in the following mode: RGB[PC] PICTURE SSccrreeeenn Move OK E • Contrast 100 • Brightness 50 • Sharpness 70 • Colour 70 • Tint 0R G • Advanced Control •...
... to the previous menu screen. 26 Select Screen. Select the desired resolution. SCREEN Resolution G Auto Config. This function works in the following mode: RGB[PC] PICTURE SSccrreeeenn Move OK E • Contrast 100 • Brightness 50 • Sharpness 70 • Colour 70 • Tint 0R G • Advanced Control •...

User Manual
Page 29
...Move OK E • Contrast 100 • Brightness 50 • Sharpness 70 • Colour 70 • Tint 0R G • Advanced Control • Picture Reset Select PICTURE. SCREEN Resolution Auto Config. Make appropriate adjustments. Position G Size Phase Reset Move RETURN Prev. D F G E • Press the MENU button to return to... screen. 27 Select Screen. Select Position, Size or Phase. EXTERNAL EQUIPMENT SETUP Adjustment for screen Position, Size, Phase If the picture is not clear after auto adjustment and especially if characters are still trembling, adjust the...
...Move OK E • Contrast 100 • Brightness 50 • Sharpness 70 • Colour 70 • Tint 0R G • Advanced Control • Picture Reset Select PICTURE. SCREEN Resolution Auto Config. Make appropriate adjustments. Position G Size Phase Reset Move RETURN Prev. D F G E • Press the MENU button to return to... screen. 27 Select Screen. Select Position, Size or Phase. EXTERNAL EQUIPMENT SETUP Adjustment for screen Position, Size, Phase If the picture is not clear after auto adjustment and especially if characters are still trembling, adjust the...

User Manual
Page 31
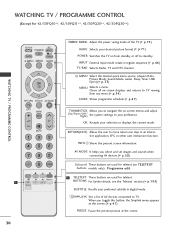
... USB menu(Photo List and Music USB Menu List or Movie List(Only 42/50PQ60**, 50PS60**)). MENU Select the desired quick menu source. (Aspect Ratio, Picture Mode, Sound Mode, Audio, Sleep Timer, USB Eject.)(G p.33) INFO i Shows the present screen information. GUIDE Shows programme schedule.(G p.67) FAV Displays the selected favourite...
... USB menu(Photo List and Music USB Menu List or Movie List(Only 42/50PQ60**, 50PS60**)). MENU Select the desired quick menu source. (Aspect Ratio, Picture Mode, Sound Mode, Audio, Sleep Timer, USB Eject.)(G p.33) INFO i Shows the present screen information. GUIDE Shows programme schedule.(G p.67) FAV Displays the selected favourite...
User Manual
Page 32
... Sound Mode, Audio, Sleep Timer, USB Eject.)(G p.33) MENU Selects a menu. See a list of the TV.(G p.73) RATIO Selects your desired picture format.(G p.71) POWER Switches the TV on TELETEXT buttons models only) , Programme edit. 1 TELETEXT These buttons are used for 42/50PQ10**, 42/50PQ11... GUIDE Shows programme schedule.(G p.67) THUMBSTICK Allows you toggle this button, the Simplink menu appears at the screen.(G p.47) FREEZE Pause the present picture at the screen. When you to navigate the on -screen displays and returns to TV viewing from standby or off to your preference. Clears all...
... Sound Mode, Audio, Sleep Timer, USB Eject.)(G p.33) MENU Selects a menu. See a list of the TV.(G p.73) RATIO Selects your desired picture format.(G p.71) POWER Switches the TV on TELETEXT buttons models only) , Programme edit. 1 TELETEXT These buttons are used for 42/50PQ10**, 42/50PQ11... GUIDE Shows programme schedule.(G p.67) THUMBSTICK Allows you toggle this button, the Simplink menu appears at the screen.(G p.47) FREEZE Pause the present picture at the screen. When you to navigate the on -screen displays and returns to TV viewing from standby or off to your preference. Clears all...
User Manual
Page 35
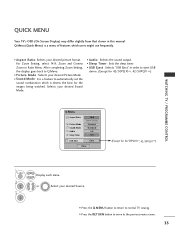
...• Press the Q.MENU button to return to normal TV viewing. • Press the RETURN button to move to Q.Menu. • Picture Mode : Selects your desired Picture Mode. • Sound Mode : It is a menu of features which it deems the best for 42/50PQ10**, 42/50PQ11**) 1 Q. ... Eject : Selects "USB Eject" in order to automatically set the sound combination which users might use frequently. • Aspect Ratio: Selects your desired picture format. WATCHING TV / PROGRAMME CONTROL QUICK MENU Your TV's OSD (On Screen Display) may differ slightly from that shown in Ratio Menu. MENU 2...
...• Press the Q.MENU button to return to normal TV viewing. • Press the RETURN button to move to Q.Menu. • Picture Mode : Selects your desired Picture Mode. • Sound Mode : It is a menu of features which it deems the best for 42/50PQ10**, 42/50PQ11**) 1 Q. ... Eject : Selects "USB Eject" in order to automatically set the sound combination which users might use frequently. • Aspect Ratio: Selects your desired picture format. WATCHING TV / PROGRAMME CONTROL QUICK MENU Your TV's OSD (On Screen Display) may differ slightly from that shown in Ratio Menu. MENU 2...
User Manual
Page 36
SETUP Auto Tuning Manual Tuning Programme Edit Software Update Diagnostics CI Information Move OK : On PICTURE Move Aspect Ratio : 16:9 Energy Saving : Intelligent Sensor Picture Mode : Vivid • Contrast 100 • Brightness 50 • Sharpness 70 • Colour 70 • Tint E 0R OK G AUDIO Move Auto ...shown in Analogue mode. 34 Code Deactivation Move OK (Only 42/50PQ60**, 50PS60**) (Except for 42/50PQ10**, 42/50PQ11**) SETUP OPTION PICTURE LOCK AUDIO INPUT TIME USB TIME Move OK Clock Off Time On Time Sleep Timer : Off : Off : Off LOCK Move OK Lock...
SETUP Auto Tuning Manual Tuning Programme Edit Software Update Diagnostics CI Information Move OK : On PICTURE Move Aspect Ratio : 16:9 Energy Saving : Intelligent Sensor Picture Mode : Vivid • Contrast 100 • Brightness 50 • Sharpness 70 • Colour 70 • Tint E 0R OK G AUDIO Move Auto ...shown in Analogue mode. 34 Code Deactivation Move OK (Only 42/50PQ60**, 50PS60**) (Except for 42/50PQ10**, 42/50PQ11**) SETUP OPTION PICTURE LOCK AUDIO INPUT TIME USB TIME Move OK Clock Off Time On Time Sleep Timer : Off : Off : Off LOCK Move OK Lock...

User Manual
Page 44
... CONTROL SOFTWARE UPDATE Software Update means software can be disconnected. 42 • After Software Update, you can confirm the updated software version in the following picture. ? Do you want to download? (Ver. 02.54.00) Your TV software is turned on the TV will see the following menu on the TV...
... CONTROL SOFTWARE UPDATE Software Update means software can be disconnected. 42 • After Software Update, you can confirm the updated software version in the following picture. ? Do you want to download? (Ver. 02.54.00) Your TV software is turned on the TV will see the following menu on the TV...


