
Owner's Manual (English)
Page 2
...voltage" within an equilateral triangle is connected. - This equipment generates, uses and can be determined by turning the equipment off and on a circuit different from LG Electronics. Reorient or relocate the receiving antenna. - This device complies with the limits for compliance could ... interference that to persons. Increase the separation between the equipment and receiver. - Consult the dealer or an experienced radio/TV technician for proper grounding and, in the literature accompanying the appliance. REFER TO QUALIFIED SERVICE PERSONNEL. WARNING/CAUTION TO REDUCE...
...voltage" within an equilateral triangle is connected. - This equipment generates, uses and can be determined by turning the equipment off and on a circuit different from LG Electronics. Reorient or relocate the receiving antenna. - This device complies with the limits for compliance could ... interference that to persons. Increase the separation between the equipment and receiver. - Consult the dealer or an experienced radio/TV technician for proper grounding and, in the literature accompanying the appliance. REFER TO QUALIFIED SERVICE PERSONNEL. WARNING/CAUTION TO REDUCE...

Owner's Manual (English)
Page 4
.... Do not pull on or over the apparatus (e.g. on the power cord to unplug the TV. 2 15 WARNING - a TV with the power cord plugged in electric shock or fire. Do not try to ground the..., and the point where the cord exits the appliance. Do not make sure 12 not to install the TV by an authorized servicer. on the back of the appliance, and have a qualified electrician install a separate...power and signal cables on shelves above the unit). 17 GROUNDING Ensure that you turn off this unit by SWITCH" (Except 42/50PQ30C, 50/60PS60C) Be sure do not place objects filled with wet hands....
.... Do not pull on or over the apparatus (e.g. on the power cord to unplug the TV. 2 15 WARNING - a TV with the power cord plugged in electric shock or fire. Do not try to ground the..., and the point where the cord exits the appliance. Do not make sure 12 not to install the TV by an authorized servicer. on the back of the appliance, and have a qualified electrician install a separate...power and signal cables on shelves above the unit). 17 GROUNDING Ensure that you turn off this unit by SWITCH" (Except 42/50PQ30C, 50/60PS60C) Be sure do not place objects filled with wet hands....
Owner's Manual (English)
Page 5
...charges. provides information with respect to provide some protection against or put stress on the TV as death or serious injury can come in the U.S.A. 20 ANTENNAS Outdoor antenna grounding If an outdoor antenna is turned off, unplugged and all cables have been removed. Do not spray water or other ...odors coming from direct sunlight. 3 Do not cover the product with cloth or other electric light or power circuits, or where it . 26 Keep the product away from the TV or hear ...
...charges. provides information with respect to provide some protection against or put stress on the TV as death or serious injury can come in the U.S.A. 20 ANTENNAS Outdoor antenna grounding If an outdoor antenna is turned off, unplugged and all cables have been removed. Do not spray water or other ...odors coming from direct sunlight. 3 Do not cover the product with cloth or other electric light or power circuits, or where it . 26 Keep the product away from the TV or hear ...
Owner's Manual (English)
Page 6
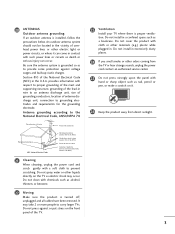
...Auto Tuning 39 - Channel Editing 41 Channel List 42 Favorite Channel Setup 43 Favorite Channel List 43 Brief ...Minimization (ISM) Method 75 Demo Mode 76 4 CONTENTS WARNING / CAUTION A SAFETY INSTRUCTIONS 1 FEATURE OF THIS TV 6 PREPARATION Accessories 7 Front Panel Information 8 Back Panel Information 10 Stand Instruction 11 Cable Management 12 Desktop ... Setup 23 Audio Out Connection 23 USB Connection 24 PC Setup 25 WATCHING TV / CHANNEL CONTROL Remote Control Functions 30 Turning On TV 34 Channel Selection 34 Volume Adjustment 34 Initial Setting 35 On-Screen Menus ...
...Auto Tuning 39 - Channel Editing 41 Channel List 42 Favorite Channel Setup 43 Favorite Channel List 43 Brief ...Minimization (ISM) Method 75 Demo Mode 76 4 CONTENTS WARNING / CAUTION A SAFETY INSTRUCTIONS 1 FEATURE OF THIS TV 6 PREPARATION Accessories 7 Front Panel Information 8 Back Panel Information 10 Stand Instruction 11 Cable Management 12 Desktop ... Setup 23 Audio Out Connection 23 USB Connection 24 PC Setup 25 WATCHING TV / CHANNEL CONTROL Remote Control Functions 30 Turning On TV 34 Channel Selection 34 Volume Adjustment 34 Initial Setting 35 On-Screen Menus ...
Owner's Manual (English)
Page 10
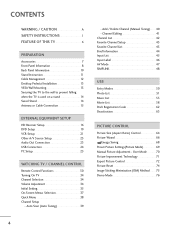
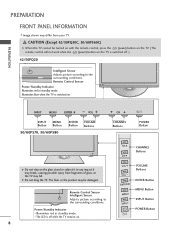
...turned on with the remote control, press the (power) button on the TV. (The remote control will not work when the (power) button on . 8 CH CHANNEL Buttons CH VOL VOL ENTER MENU INPUT VOLUME Buttons ENTER Button MENU Button INPUT Button POWER Button CAUTION (Except 42/50PQ30C, 50/60PS60C) G When the TV... cannot be damaged. Illuminates blue when the TV is switched off while the TV remains on the TV is switched on the glass stand or subject it to any impact.It ...
...turned on with the remote control, press the (power) button on the TV. (The remote control will not work when the (power) button on . 8 CH CHANNEL Buttons CH VOL VOL ENTER MENU INPUT VOLUME Buttons ENTER Button MENU Button INPUT Button POWER Button CAUTION (Except 42/50PQ30C, 50/60PS60C) G When the TV... cannot be damaged. Illuminates blue when the TV is switched off while the TV remains on the TV is switched on the glass stand or subject it to any impact.It ...
Owner's Manual (English)
Page 15
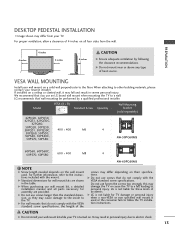
... strongly, this may differ depending on the wall mount used or the consumer fails to the floor. LG is turned on a solid wall perpendicular to follow the TV installation instructions. When attaching to a fall and result in the table. G When purchasing our wall mount... not liable for TV damage or personal injury when a non-VESA or non specified wall mount is used . Model VESA (A * B) A Standard Screw Quantity B Wall Mounting bracket (sold separately) 42PQ20, 42PQ30, 42PQ31, 42PQ30C, 42PQ60, 50PQ20, 50PQ30, 50PQ31, 50PQ30C, 400 * 400 M6 50PQ60, 50PS30, 50PS60, 50PS60C, ...
... strongly, this may differ depending on the wall mount used or the consumer fails to the floor. LG is turned on a solid wall perpendicular to follow the TV installation instructions. When attaching to a fall and result in the table. G When purchasing our wall mount... not liable for TV damage or personal injury when a non-VESA or non specified wall mount is used . Model VESA (A * B) A Standard Screw Quantity B Wall Mounting bracket (sold separately) 42PQ20, 42PQ30, 42PQ31, 42PQ30C, 42PQ60, 50PQ20, 50PQ30, 50PQ31, 50PQ30C, 400 * 400 M6 50PQ60, 50PS30, 50PS60, 50PS60C, ...
Owner's Manual (English)
Page 18
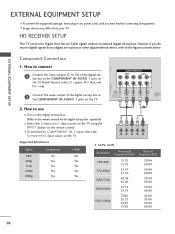
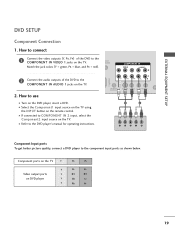
...S-VIDEO VIDEO /MONO AUDIO AN CA 2. How to use ■ Turn on the digital set-top box. (Refer to the COMPONENT IN AUDIO 1 jacks on the TV. operation) ■ Select the Component1 input source on the TV using the INPUT button on the remote control. ■ If connected ...AV IN 1 2 Connect the audio output of the digital settop box to COMPONENT IN 2 input, select the Component2 input source on the TV. HD RECEIVER SETUP This TV can receive Digital Over-the-air/Cable signals without an external digital set -top box. Component Connection 1. However, if you have finished ...
...S-VIDEO VIDEO /MONO AUDIO AN CA 2. How to use ■ Turn on the digital set-top box. (Refer to the COMPONENT IN AUDIO 1 jacks on the TV. operation) ■ Select the Component1 input source on the TV using the INPUT button on the remote control. ■ If connected ...AV IN 1 2 Connect the audio output of the digital settop box to COMPONENT IN 2 input, select the Component2 input source on the TV. HD RECEIVER SETUP This TV can receive Digital Over-the-air/Cable signals without an external digital set -top box. Component Connection 1. However, if you have finished ...
Owner's Manual (English)
Page 19
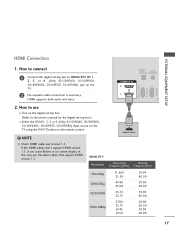
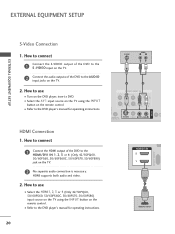
....94 60.00 17 If the HDMI cables don't support HDMI version 1.3, it can cause flickers or no screen display. In this case use ■ Turn on the digital set-top box. (Refer to the owner's manual for the digital set -top box to connect 1 Connect the digital set -top box....) ■ Select the HDMI1, 2, 3 or 4 (Only 42/50PQ60, 50/60PS60, 50/60PS60C, 50/60PS70, 50/60PS80) input source on the TV using the INPUT button on the TV. 2 No separate audio connection is necessary. How to use the latest cables that support HDMI version...
....94 60.00 17 If the HDMI cables don't support HDMI version 1.3, it can cause flickers or no screen display. In this case use ■ Turn on the digital set-top box. (Refer to the owner's manual for the digital set -top box to connect 1 Connect the digital set -top box....) ■ Select the HDMI1, 2, 3 or 4 (Only 42/50PQ60, 50/60PS60, 50/60PS60C, 50/60PS70, 50/60PS80) input source on the TV using the INPUT button on the TV. 2 No separate audio connection is necessary. How to use the latest cables that support HDMI version...
Owner's Manual (English)
Page 20
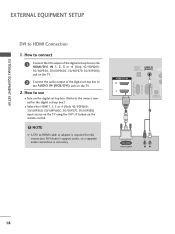
...to connect 1 Connect the DVI output of the digital set -top box.) ■ Select the HDMI1, 2, 3 or 4 (Only 42/50PQ60, 50/60PS60, 50/60PS60C, 50/60PS70, 50/60PS80) input source on the TV using the INPUT button on the remote control. ! NOTE G A DVI to HDMI Connection 1. DVI doesn't support audio, so a... the AUDIO IN (RGB/DVI) jack on the digital set-top box. (Refer to the owner's manual for this connection. How to use ■ Turn on the TV. 2. OPTICAL DIGITAL AUDIO OUT AUDIO IN (RGB/DVI) HDMI/DVI IN 2 1 REMOTE CONTROL IN 1 2 DVI-DTV OUTPUT R L AV IN 1 18 RGB IN (PC...
...to connect 1 Connect the DVI output of the digital set -top box.) ■ Select the HDMI1, 2, 3 or 4 (Only 42/50PQ60, 50/60PS60, 50/60PS60C, 50/60PS70, 50/60PS80) input source on the TV using the INPUT button on the remote control. ! NOTE G A DVI to HDMI Connection 1. DVI doesn't support audio, so a... the AUDIO IN (RGB/DVI) jack on the digital set-top box. (Refer to the owner's manual for this connection. How to use ■ Turn on the TV. 2. OPTICAL DIGITAL AUDIO OUT AUDIO IN (RGB/DVI) HDMI/DVI IN 2 1 REMOTE CONTROL IN 1 2 DVI-DTV OUTPUT R L AV IN 1 18 RGB IN (PC...
Owner's Manual (English)
Page 21
Component ports on the TV Y Y Video output ports Y on the TV. ■ Refer to the DVD player's manual for operating instructions. How to use ■ Turn on the DVD player, insert a DVD. ■ Select the Component1 input source on the TV using the INPUT button on the remote control.... ■ If connected to the COMPONENT IN VIDEO 1 jacks on the TV. 2. DIO B/DVI) COMPONENT IN VIDEO AUDIO 2...
Component ports on the TV Y Y Video output ports Y on the TV. ■ Refer to the DVD player's manual for operating instructions. How to use ■ Turn on the DVD player, insert a DVD. ■ Select the Component1 input source on the TV using the INPUT button on the remote control.... ■ If connected to the COMPONENT IN VIDEO 1 jacks on the TV. 2. DIO B/DVI) COMPONENT IN VIDEO AUDIO 2...
Owner's Manual (English)
Page 22
...HDMI supports both audio and video. 2. HDMI Connection 1. How to use ■ Turn on the DVD player, insert a DVD. ■ Select the A V 1 input source on the TV using the INPUT button on the TV. 2. EXTERNAL EQUIPMENT SETUP EXTERNAL EQUIPMENT SETUP S-Video Connection 1. How to connect 1... Connect the HDMI output of the DVD to the HDMI/DVI IN 1, 2, 3 or 4 (Only 42/50PQ60, 50/60PS60, 50/60PS60C, 50/60PS70, ...
...HDMI supports both audio and video. 2. HDMI Connection 1. How to use ■ Turn on the DVD player, insert a DVD. ■ Select the A V 1 input source on the TV using the INPUT button on the TV. 2. EXTERNAL EQUIPMENT SETUP EXTERNAL EQUIPMENT SETUP S-Video Connection 1. How to connect 1... Connect the HDMI output of the DVD to the HDMI/DVI IN 1, 2, 3 or 4 (Only 42/50PQ60, 50/60PS60, 50/60PS60C, 50/60PS70, ...
Owner's Manual (English)
Page 25
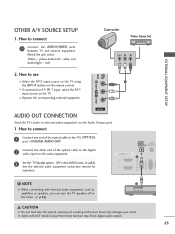
...of the optical cable to the TV's OPTICAL port of DIGITAL AUDIO...IN 2 AUDIO OUT CONNECTION Send the TV's audio to the digital audio input on the audio equipment. 3 Set the "TV Speaker option - OPTICAL DIGITAL AUDIO AUDIO...2. How to use ■ Select the A V 2 input source on the TV using 1 the INPUT button on the TV. ■ Operate the corresponding external equipment. How to AV IN 1 input, select... remote control. ■ If connected to connect 1 Connect the AUDIO/VIDEO jacks between TV and external equipment. NOTE 2 G When connecting with ACP (Audio Copy Protection) function ...
...of the optical cable to the TV's OPTICAL port of DIGITAL AUDIO...IN 2 AUDIO OUT CONNECTION Send the TV's audio to the digital audio input on the audio equipment. 3 Set the "TV Speaker option - OPTICAL DIGITAL AUDIO AUDIO...2. How to use ■ Select the A V 2 input source on the TV using 1 the INPUT button on the TV. ■ Operate the corresponding external equipment. How to AV IN 1 input, select... remote control. ■ If connected to connect 1 Connect the AUDIO/VIDEO jacks between TV and external equipment. NOTE 2 G When connecting with ACP (Audio Copy Protection) function ...
Owner's Manual (English)
Page 27
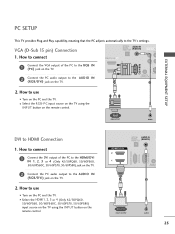
... use ■ Turn on the PC and the TV. ■ Select the HDMI1, 2, 3 or 4 (Only 42/50PQ60, 50/60PS60, 50/60PS60C, 50/60PS70, 50/60PS80) input source on the TV using the INPUT button on the remote control. EXTERNAL EQUIPMENT SETUP RGB IN (PC) RS-232C IN (CONTROL & SERVICE) PC SETUP This TV provides Plug... the PC audio output to HDMI Connection 1. How to use ■ Turn on the PC and the TV. ■ Select the RGB-PC input source on the TV using the INPUT button on the TV. 2 Connect the PC audio output to the TV's settings. HDMI/DVI IN 2 1 RGB IN (PC) RS-232C IN (CONTROL & ...
... use ■ Turn on the PC and the TV. ■ Select the HDMI1, 2, 3 or 4 (Only 42/50PQ60, 50/60PS60, 50/60PS60C, 50/60PS70, 50/60PS80) input source on the TV using the INPUT button on the remote control. EXTERNAL EQUIPMENT SETUP RGB IN (PC) RS-232C IN (CONTROL & SERVICE) PC SETUP This TV provides Plug... the PC audio output to HDMI Connection 1. How to use ■ Turn on the PC and the TV. ■ Select the RGB-PC input source on the TV using the INPUT button on the TV. 2 Connect the PC audio output to the TV's settings. HDMI/DVI IN 2 1 RGB IN (PC) RS-232C IN (CONTROL & ...
Owner's Manual (English)
Page 32
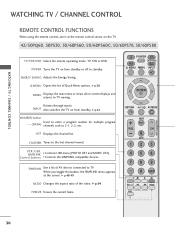
POWER Turns the TV on the TV. 42/50PQ60, 50PS30, 50/60PS60, 50/60PS60C, 50/60PS70, 50/60PS80 TV/STB/DVD Select the remote operating mode: TV, STB or DVD. FLASHBK Tunes to enter a program number for multiple program - (DASH) channels such as 2-1, 2-2, etc. When you toggle this button, the ... Changes the aspect ratio of the video. Rotates through inputs. G p.45 NUMBER button Used to the last channel viewed. TV POWER DVD ENERGY SAVING STB Q. INPUT Also switches the TV on -screen displays and returns to standby. VCR, USB, SIMPLINK Controls USB menu (PHOTO LIST and MUSIC LIST). Control ...
POWER Turns the TV on the TV. 42/50PQ60, 50PS30, 50/60PS60, 50/60PS60C, 50/60PS70, 50/60PS80 TV/STB/DVD Select the remote operating mode: TV, STB or DVD. FLASHBK Tunes to enter a program number for multiple program - (DASH) channels such as 2-1, 2-2, etc. When you toggle this button, the ... Changes the aspect ratio of the video. Rotates through inputs. G p.45 NUMBER button Used to the last channel viewed. TV POWER DVD ENERGY SAVING STB Q. INPUT Also switches the TV on -screen displays and returns to standby. VCR, USB, SIMPLINK Controls USB menu (PHOTO LIST and MUSIC LIST). Control ...
Owner's Manual (English)
Page 34
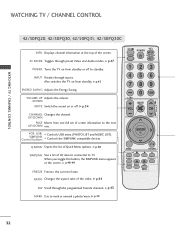
... TV / CHANNEL CONTROL WATCHING TV / CHANNEL CONTROL 42/50PQ20, 42/50PQ30, 42/50PQ31, 42/50PQ30C INFO Displays channel information at the screen. INPUT Rotates through preset Video and Audio modes. UP/DOWN PAGE Moves from standby or off . SIMPLINK Control buttons Controls the SIMPLINK compatible devices. G p.48-49 FREEZE Freezes the current frame. G p.47 POWER Turns the TV...
... TV / CHANNEL CONTROL WATCHING TV / CHANNEL CONTROL 42/50PQ20, 42/50PQ30, 42/50PQ31, 42/50PQ30C INFO Displays channel information at the screen. INPUT Rotates through preset Video and Audio modes. UP/DOWN PAGE Moves from standby or off . SIMPLINK Control buttons Controls the SIMPLINK compatible devices. G p.48-49 FREEZE Freezes the current frame. G p.47 POWER Turns the TV...
Owner's Manual (English)
Page 36
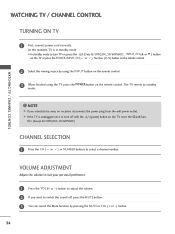
... button to adjust the volume. 2 If you intend to switch the sound off with the tion. (Except 42/50PQ30C, 50/60PS60C) (power) button on the remote control. WATCHING TV / CHANNEL CONTROL TURNING ON TV 1 First, connect power cord correctly. NOTE G If you want to be away on the remote control.... 1 Press the CH ( or ) or NUMBER buttons to standby mode. WATCHING TV / CHANNEL CONTROL ! At this moment, TV is unplugged once or turn TV on, press the (Only 42/50PQ30C, 50/60PS60C) , INPUT, CH (D or E ) button on the TV or press the POWER, INPUT, CH( or ), Number (0~9) button on vacation...
... button to adjust the volume. 2 If you intend to switch the sound off with the tion. (Except 42/50PQ30C, 50/60PS60C) (power) button on the remote control. WATCHING TV / CHANNEL CONTROL TURNING ON TV 1 First, connect power cord correctly. NOTE G If you want to be away on the remote control.... 1 Press the CH ( or ) or NUMBER buttons to standby mode. WATCHING TV / CHANNEL CONTROL ! At this moment, TV is unplugged once or turn TV on, press the (Only 42/50PQ30C, 50/60PS60C) , INPUT, CH (D or E ) button on the TV or press the POWER, INPUT, CH( or ), Number (0~9) button on vacation...
Owner's Manual (English)
Page 37
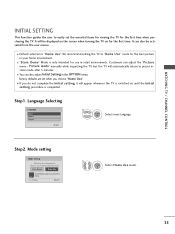
...■ If you want. It can also be displayed on the screen when turning the TV on until the Initial setting procedure is "Home Use". Factory defaults are set the essential items for viewing the TV for the first time when purchasing the TV. Previous Next 1 ENTER Select H o m e U s e mode.... Use] to preset instore mode after 5 minutes. ■ You can adjust the "Picture menu - Picture mode" manually while inspecting the TV, but the TV will be activated from the user menus. ■ Default selection is completed. Step2. It will automatically return to use in the OPTION menu...
...■ If you want. It can also be displayed on the screen when turning the TV on until the Initial setting procedure is "Home Use". Factory defaults are set the essential items for viewing the TV for the first time when purchasing the TV. Previous Next 1 ENTER Select H o m e U s e mode.... Use] to preset instore mode after 5 minutes. ■ You can adjust the "Picture menu - Picture mode" manually while inspecting the TV, but the TV will be activated from the user menus. ■ Default selection is completed. Step2. It will automatically return to use in the OPTION menu...
Owner's Manual (English)
Page 40
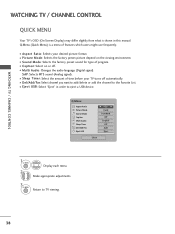
... to eject a USB device. Q.Menu (Quick Menu) is shown in order to TV viewing. 38 Make appropriate adjustments. 3 Q. MENU 2 Display each menu. WATCHING TV / CHANNEL CONTROL WATCHING TV / CHANNEL CONTROL QUICK MENU Your TV's OSD (On Screen Display) may differ slightly from what is a menu of program...; Sound Mode: Selects the factory preset sound for type of features which users might use frequently. ■ Aspect Ratio: Selects your TV turns off . ■ Multi Audio: Changes the audio language (Digital signal). Q.Menu Aspect Ratio Picture Mode Sound Mode Caption Multi Audio ...
... to eject a USB device. Q.Menu (Quick Menu) is shown in order to TV viewing. 38 Make appropriate adjustments. 3 Q. MENU 2 Display each menu. WATCHING TV / CHANNEL CONTROL WATCHING TV / CHANNEL CONTROL QUICK MENU Your TV's OSD (On Screen Display) may differ slightly from what is a menu of program...; Sound Mode: Selects the factory preset sound for type of features which users might use frequently. ■ Aspect Ratio: Selects your TV turns off . ■ Multi Audio: Changes the audio language (Digital signal). Q.Menu Aspect Ratio Picture Mode Sound Mode Caption Multi Audio ...
Owner's Manual (English)
Page 44
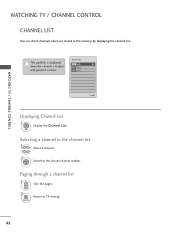
Paging through a channel list 1 P CH A G E Turn the pages. 2 RETURN Return to the chosen channel number. Selecting a channel in the memory by displaying the channel list. This padlock is displayed when the channel is locked with parental control Channel List DTV 83-0 DTV 15-1 DTV 18-2 WATCHING TV / CHANNEL CONTROL Exit Displaying Channel List 1 LIST Display the Channel List. WATCHING TV / CHANNEL CONTROL CHANNEL LIST You can check channels which are stored in the channel list 1 Select a channel. 2 ENTER Switch to TV viewing. 42
Paging through a channel list 1 P CH A G E Turn the pages. 2 RETURN Return to the chosen channel number. Selecting a channel in the memory by displaying the channel list. This padlock is displayed when the channel is locked with parental control Channel List DTV 83-0 DTV 15-1 DTV 18-2 WATCHING TV / CHANNEL CONTROL Exit Displaying Channel List 1 LIST Display the Channel List. WATCHING TV / CHANNEL CONTROL CHANNEL LIST You can check channels which are stored in the channel list 1 Select a channel. 2 ENTER Switch to TV viewing. 42
Owner's Manual (English)
Page 45
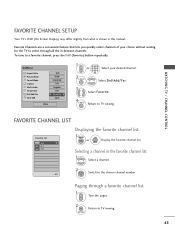
... Standard Off English Off F Favorite G Eject Close 1 P A CH G E or 123 456 789 0 Select your choice without waiting for the TV to select through a favorite channel list 1 P A CH G E Turn the pages. 2 RETURN Return to TV viewing. 43 MENU Select Del/Add/Fav. 3 Select Favorite. 4 Q. MENU Return to a favorite channel, press the FAV (Favorite) button...
... Standard Off English Off F Favorite G Eject Close 1 P A CH G E or 123 456 789 0 Select your choice without waiting for the TV to select through a favorite channel list 1 P A CH G E Turn the pages. 2 RETURN Return to TV viewing. 43 MENU Select Del/Add/Fav. 3 Select Favorite. 4 Q. MENU Return to a favorite channel, press the FAV (Favorite) button...


