
Owner's Manual (English)
Page 5
... HD Receiver Setup 22 DVD Setup 25 VCR Setup 27 Other A/V Source Setup 29 PC Setup 30 Audio Out Setup 35 WATCHING TV / CHANNEL CONTROL Remote Control Functions 36 Turning on TV 38 Channel Selection 39 Volume Adjustment 39 On-Screen Menus Selection 40 Channel Setup -Auto Scan ( EZ Scan 41...
... HD Receiver Setup 22 DVD Setup 25 VCR Setup 27 Other A/V Source Setup 29 PC Setup 30 Audio Out Setup 35 WATCHING TV / CHANNEL CONTROL Remote Control Functions 36 Turning on TV 38 Channel Selection 39 Volume Adjustment 39 On-Screen Menus Selection 40 Channel Setup -Auto Scan ( EZ Scan 41...
Owner's Manual (English)
Page 6
... - Cinema 3:2 Pulldown Mode . . . . . 101 Advanced - Black( Darkness) Level 102 Picture Reset 103 Image Sticking Minimization( ISM) Method 104 Low-Power Picture Mode 105 Programming the Remote Control 137 IR Codes 141 External Control through RS-232C 143 SOUND & LANGUAGE CONTROL Auto Volume Leveler ( EZ SoundRite 106 Preset Sound Settings( EZ Sound...
... - Cinema 3:2 Pulldown Mode . . . . . 101 Advanced - Black( Darkness) Level 102 Picture Reset 103 Image Sticking Minimization( ISM) Method 104 Low-Power Picture Mode 105 Programming the Remote Control 137 IR Codes 141 External Control through RS-232C 143 SOUND & LANGUAGE CONTROL Auto Volume Leveler ( EZ SoundRite 106 Preset Sound Settings( EZ Sound...
Owner's Manual (English)
Page 7
... cable directly into an HDTV set and enR joy HDTV and digital cable without having to record through an electronic program guide. and/or one remote control. With HDMI CEC support of the following issued United States patents 6,498,895, 6,418,556, 6,331,877; 6,239,794; 6,154,203; 5,940... live TV and choose the shows you to view encrypted digital programming. functioning like a VCR, but with one of SRS LaR bs, Inc. LG's own special digital image generator, consisting of Transcontinental Inc., and is used under license from Gemstar-TV Guide International, Inc. In Canada, TV ...
... cable directly into an HDTV set and enR joy HDTV and digital cable without having to record through an electronic program guide. and/or one remote control. With HDMI CEC support of the following issued United States patents 6,498,895, 6,418,556, 6,331,877; 6,239,794; 6,154,203; 5,940... live TV and choose the shows you to view encrypted digital programming. functioning like a VCR, but with one of SRS LaR bs, Inc. LG's own special digital image generator, consisting of Transcontinental Inc., and is used under license from Gemstar-TV Guide International, Inc. In Canada, TV ...
Owner's Manual (English)
Page 9
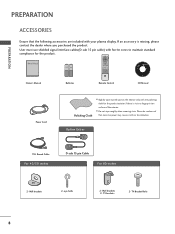
...42/50 inches D-sub 15 pin Cable For 60 inches 2- Wall brackets 2- TV INPUT TV/VIDEO MODE Owner's Manual DAY - Owner's Manual Batteries Remote Control CD Manual Power Cord Polishing Cloth I Do not wipe roughly when removing stain. TV Bracket Bolts 8 DAY + 1.5V 1.5V LCD TV ...PLASMA TV Owner's Manual FLASHBK APM CC AUTO DEMO M/C EJECT http://www.lgusa.com www.lg.ca Copyright© 2007 LGE, All Rights Reserved. Wall brackets 2- TV brackets 2- eye-bolts 2- Please be cautions of the exterior. User must use...
...42/50 inches D-sub 15 pin Cable For 60 inches 2- Wall brackets 2- TV INPUT TV/VIDEO MODE Owner's Manual DAY - Owner's Manual Batteries Remote Control CD Manual Power Cord Polishing Cloth I Do not wipe roughly when removing stain. TV Bracket Bolts 8 DAY + 1.5V 1.5V LCD TV ...PLASMA TV Owner's Manual FLASHBK APM CC AUTO DEMO M/C EJECT http://www.lgusa.com www.lg.ca Copyright© 2007 LGE, All Rights Reserved. Wall brackets 2- TV brackets 2- eye-bolts 2- Please be cautions of the exterior. User must use...
Owner's Manual (English)
Page 11
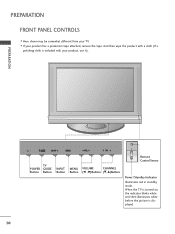
I Here shown may be somewhat different from your TV. PREPARATION TV POWER GUIDE Button Button INPUT Button MENU VOLUME CHANNEL Button (F , G)Buttons (E, D)Buttons Remote Control Sensor Power/Standby Indicator Illuminates red in standby mode. PREPARATION FRONT PANEL CONTROLS I If your product has a protection tape attached, remove the tape. When the TV is turned on, the indicator blinks white and then illuminates white before the picture is included with your product, use it). And then wipe the product with a cloth (If a polishing cloth is displayed. 10
I Here shown may be somewhat different from your TV. PREPARATION TV POWER GUIDE Button Button INPUT Button MENU VOLUME CHANNEL Button (F , G)Buttons (E, D)Buttons Remote Control Sensor Power/Standby Indicator Illuminates red in standby mode. PREPARATION FRONT PANEL CONTROLS I If your product has a protection tape attached, remove the tape. When the TV is turned on, the indicator blinks white and then illuminates white before the picture is included with your product, use it). And then wipe the product with a cloth (If a polishing cloth is displayed. 10
Owner's Manual (English)
Page 12
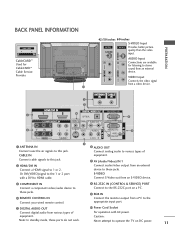
PREPARATION BACK PANEL INFORMATION Cable CARD CableCARD™ Used for listening to stereo sound from an external device. REMOTE CONTROL IN Connect your wired remote control. AUDIO OUT Connect analog audio to the appropriate input port. VIDEO Input Connects the video signal from a PC to various types of equipment. CABLE ...
PREPARATION BACK PANEL INFORMATION Cable CARD CableCARD™ Used for listening to stereo sound from an external device. REMOTE CONTROL IN Connect your wired remote control. AUDIO OUT Connect analog audio to the appropriate input port. VIDEO Input Connects the video signal from a PC to various types of equipment. CABLE ...
Owner's Manual (English)
Page 23
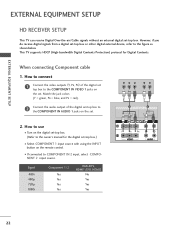
... to use I Select COMPONENT 1 input source with using the INPUT button on the set -top box. (Refer to the COMPONENT IN AUDIO 1 jacks on the remote control. This TV supports HDCP (High-bandwidth Digital Contents Protection) protocol for the digital set-top box.) I Turn on the digital set . Match the jack...
... to use I Select COMPONENT 1 input source with using the INPUT button on the set -top box. (Refer to the COMPONENT IN AUDIO 1 jacks on the remote control. This TV supports HDCP (High-bandwidth Digital Contents Protection) protocol for the digital set-top box.) I Turn on the digital set . Match the jack...
Owner's Manual (English)
Page 24
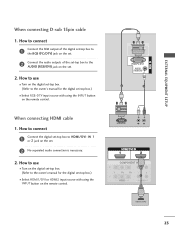
... HDMI1/DVI or HDMI2 input source with using the INPUT button on the set -top box. (Refer to the AUDIO (RGB/DVI) jack on the remote control. How to use I Turn on the digital set . 2 No separated audio connection is necessary. 2. RGB OUTPUT L R L R AUDIO HDMI-DTV OUTPUT 23 EXTERNAL EQUIPMENT SETUP... box.) I Select RGB-DTV input source with using the INPUT button on the set -top box. (Refer to HDMI/DVI IN 1 or 2 jack on the remote control. How to use I Turn on the digital set . 2. When connecting HDMI cable 1.
... HDMI1/DVI or HDMI2 input source with using the INPUT button on the set -top box. (Refer to the AUDIO (RGB/DVI) jack on the remote control. How to use I Turn on the digital set . 2 No separated audio connection is necessary. 2. RGB OUTPUT L R L R AUDIO HDMI-DTV OUTPUT 23 EXTERNAL EQUIPMENT SETUP... box.) I Select RGB-DTV input source with using the INPUT button on the set -top box. (Refer to HDMI/DVI IN 1 or 2 jack on the remote control. How to use I Turn on the digital set . 2. When connecting HDMI cable 1.
Owner's Manual (English)
Page 25
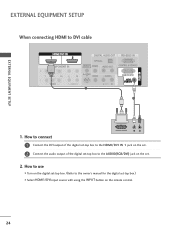
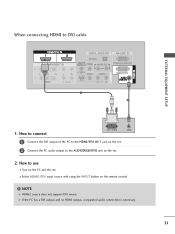
EXTERNAL EQUIPMENT SETUP When connecting HDMI to the AUDIO(RGB/DVI) jack on the set. 2. How to connect DVI-DTV OUTPUT L R 1 Connect the DVI output of the digital set-top box to the HDMI/DVI IN 1 jack on the set. 2 Connect the audio output of the digital set -top box.) I Turn on the remote control. 24 How to use I Select HDMI1/DVI input source with using the INPUT button on the digital set-top box. (Refer to the owner's manual for the digital set -top box to DVI cable EXTERNAL EQUIPMENT SETUP AUDIO 1.
EXTERNAL EQUIPMENT SETUP When connecting HDMI to the AUDIO(RGB/DVI) jack on the set. 2. How to connect DVI-DTV OUTPUT L R 1 Connect the DVI output of the digital set-top box to the HDMI/DVI IN 1 jack on the set. 2 Connect the audio output of the digital set -top box.) I Turn on the remote control. 24 How to use I Select HDMI1/DVI input source with using the INPUT button on the digital set-top box. (Refer to the owner's manual for the digital set -top box to DVI cable EXTERNAL EQUIPMENT SETUP AUDIO 1.
Owner's Manual (English)
Page 26
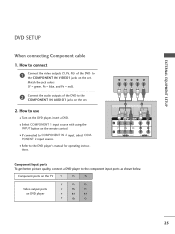
... COMPONENT IN 2 input, select COM- How to connect 1 Connect the video outputs (Y, PB, PR) of the DVD to the COMPONENT IN VIDEO1 jacks on the remote control. tions. I Select COMPONENT 1 input source with using the INPUT button on the set . 2. I If connected to the component input ports as shown below. Match...
... COMPONENT IN 2 input, select COM- How to connect 1 Connect the video outputs (Y, PB, PR) of the DVD to the COMPONENT IN VIDEO1 jacks on the remote control. tions. I Select COMPONENT 1 input source with using the INPUT button on the set . 2. I If connected to the component input ports as shown below. Match...
Owner's Manual (English)
Page 27
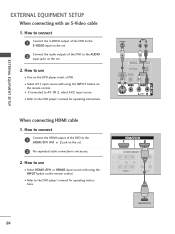
...to the HDMI/DVI IN1 or 2 jack on the DVD player, insert a DVD. I Select A V 1 input source with using the INPUT button on the remote control. I Refer to AV IN 2, select A V 2 input source. I Select HDMI1/DVI or HDMI2 input source with an S-Video cable 1. How to... connection is necessary. 2. I Turn on the set . 2. EXTERNAL EQUIPMENT SETUP EXTERNAL EQUIPMENT SETUP When connecting with using the INPUT button on the remote control. When connecting HDMI cable 1. How to connect 1 Connect the HDMI output of the DVD to the DVD player's manual for operating instructions....
...to the HDMI/DVI IN1 or 2 jack on the DVD player, insert a DVD. I Select A V 1 input source with using the INPUT button on the remote control. I Refer to AV IN 2, select A V 2 input source. I Select HDMI1/DVI or HDMI2 input source with an S-Video cable 1. How to... connection is necessary. 2. I Turn on the set . 2. EXTERNAL EQUIPMENT SETUP EXTERNAL EQUIPMENT SETUP When connecting with using the INPUT button on the remote control. When connecting HDMI cable 1. How to connect 1 Connect the HDMI output of the DVD to the DVD player's manual for operating instructions....
Owner's Manual (English)
Page 29
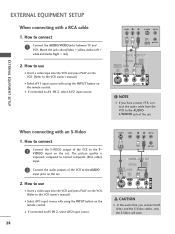
...) input. 2 Connect the audio outputs of the set . I If connected to the VCR owner's manual.) I D E O input on the remote control. When connecting with a RCA cable 1. compared to the AUDIO input jacks on the remote control. How to the S V I Select AV1 input source with using the INPUT button on the set . The picture...
...) input. 2 Connect the audio outputs of the set . I If connected to the VCR owner's manual.) I D E O input on the remote control. When connecting with a RCA cable 1. compared to the AUDIO input jacks on the remote control. How to the S V I Select AV1 input source with using the INPUT button on the set . The picture...

Owner's Manual (English)
Page 30
Match the jack colors. (Video = yellow, Audio Left = white, and Audio Right = red) 2. I If connected to use I Operate the corresponding external equipment. I Select AV1 input source with using the INPUT button on the remote control. How to AV IN 2 input, select AV2 input source. Camcorder Video Game Set 29 OTHER A/V SOURCE SETUP AV IN 2 S-VIDEO VIDEO L/MONO AUDIO R EXTERNAL EQUIPMENT SETUP i.e) 42/50 inches VIDEO L R 1. How to connect 1 Connect the AUDIO/VIDEO jacks between TV and external equipment.
Match the jack colors. (Video = yellow, Audio Left = white, and Audio Right = red) 2. I If connected to use I Operate the corresponding external equipment. I Select AV1 input source with using the INPUT button on the remote control. How to AV IN 2 input, select AV2 input source. Camcorder Video Game Set 29 OTHER A/V SOURCE SETUP AV IN 2 S-VIDEO VIDEO L/MONO AUDIO R EXTERNAL EQUIPMENT SETUP i.e) 42/50 inches VIDEO L R 1. How to connect 1 Connect the AUDIO/VIDEO jacks between TV and external equipment.
Owner's Manual (English)
Page 32
How to use I Turn on the PC and the set I Select HDMI1/DVI input source with using the INPUT button on the set . 2 Connect the PC audio output to the AUDIO(RGB/DVI) jack on the remote control. When connecting HDMI to the HDMI/DVI IN 1 jack on the set . 2. How to connect DVI-PC OUTPUT AUDIO 1 Connect the DVI output of the PC to DVI cable AUDIO EXTERNAL EQUIPMENT SETUP 1. NOTE HDMI2 source does not support DVI source. If the PC has a DVI output and no HDMI output, a separated audio connection is necessary. 31
How to use I Turn on the PC and the set I Select HDMI1/DVI input source with using the INPUT button on the set . 2 Connect the PC audio output to the AUDIO(RGB/DVI) jack on the remote control. When connecting HDMI to the HDMI/DVI IN 1 jack on the set . 2. How to connect DVI-PC OUTPUT AUDIO 1 Connect the DVI output of the PC to DVI cable AUDIO EXTERNAL EQUIPMENT SETUP 1. NOTE HDMI2 source does not support DVI source. If the PC has a DVI output and no HDMI output, a separated audio connection is necessary. 31
Owner's Manual (English)
Page 37
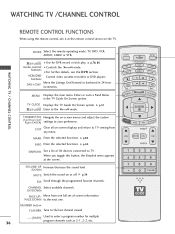
... CHANNEL CONTROL MENU Displays the main menu. MARK Enter the selected functions. When you toggle this button, the Simplink menu appears at the remote control sensor on -screen menus and adjust the system (Up/Down/Left Right/ENTER) settings to enter a program number for DVR record ... mode. p .51 Enter to TV. THUMBSTICK Navigate the on the TV. WATCHING TV /CHANNEL CONTROL REMOTE CONTROL FUNCTIONS When using the remote control, aim it at the screen. MODE Select the remote operating mode: TV, DVD, VCR, AUDIO, CABLE or STB. buttons DAY+/DAY- EXIT Clear all ...
... CHANNEL CONTROL MENU Displays the main menu. MARK Enter the selected functions. When you toggle this button, the Simplink menu appears at the remote control sensor on -screen menus and adjust the system (Up/Down/Left Right/ENTER) settings to enter a program number for DVR record ... mode. p .51 Enter to TV. THUMBSTICK Navigate the on the TV. WATCHING TV /CHANNEL CONTROL REMOTE CONTROL FUNCTIONS When using the remote control, aim it at the screen. MODE Select the remote operating mode: TV, DVD, VCR, AUDIO, CABLE or STB. buttons DAY+/DAY- EXIT Clear all ...
Owner's Manual (English)
Page 38
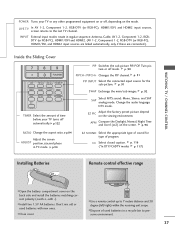
p. 91 SWAP Exchange the main/sub images. I Use a remote control up to 7 meters distance and 30 degree (left/right) within the receiving unit scope. DAY + I Install two 1.5V AA batteries. p. 96 RATIO Change the ... Time and User1(or2) on the viewing environment. p.34 EZ SOUND Select the appropriate type of program. p. 116 (*In DTV/CADTV modes p. 117) Installing Batteries Remote control effective range I Close cover. Don't mix old or used batteries in a recycle bin to the last TV channel. LIVE TV INPUT MODE DAY -
p. 91 SWAP Exchange the main/sub images. I Use a remote control up to 7 meters distance and 30 degree (left/right) within the receiving unit scope. DAY + I Install two 1.5V AA batteries. p. 96 RATIO Change the ... Time and User1(or2) on the viewing environment. p.34 EZ SOUND Select the appropriate type of program. p. 116 (*In DTV/CADTV modes p. 117) Installing Batteries Remote control effective range I Close cover. Don't mix old or used batteries in a recycle bin to the last TV channel. LIVE TV INPUT MODE DAY -
Owner's Manual (English)
Page 39
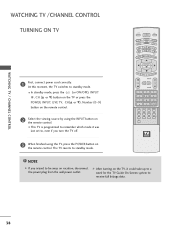
... which mode it could take up to a week for the TV Guide On Screen system to receive full listings data. 38 After turning on the remote control. SIMPLINK FLASHBK APM CC 3 When finished using the INPUT button on vacation, disconnect the power plug from the wall power outlet. The TV ...reverts to be away on the remote control. WATCHING TV / CHANNEL CONTROL WATCHING TV /CHANNEL CONTROL TURNING ON TV LIVE TV INPUT MODE DAY - At this moment, the TV switches to , even...
... which mode it could take up to a week for the TV Guide On Screen system to receive full listings data. 38 After turning on the remote control. SIMPLINK FLASHBK APM CC 3 When finished using the INPUT button on vacation, disconnect the power plug from the wall power outlet. The TV ...reverts to be away on the remote control. WATCHING TV / CHANNEL CONTROL WATCHING TV /CHANNEL CONTROL TURNING ON TV LIVE TV INPUT MODE DAY - At this moment, the TV switches to , even...

Owner's Manual (English)
Page 44
... and then use the ENTER button to the previous menu. 43 A custom list can add or delete the channel by toggling each channel on the remote control when a channel is highlighted you can be created by referring to the small window at the topleft corner of channel lists in gray.
... and then use the ENTER button to the previous menu. 43 A custom list can add or delete the channel by toggling each channel on the remote control when a channel is highlighted you can be created by referring to the small window at the topleft corner of channel lists in gray.
Owner's Manual (English)
Page 48
... to return to TV viewing or press MENU button to return to the DIGITAL AUDIO IN terminal on the remote control. G When you switch the Input source with the INPUT button on the remote control, you execute 'Recorded TV' function during DVD playback included in home theater, DVD playback stops and the...
... to return to TV viewing or press MENU button to return to the DIGITAL AUDIO IN terminal on the remote control. G When you switch the Input source with the INPUT button on the remote control, you execute 'Recorded TV' function during DVD playback included in home theater, DVD playback stops and the...
Owner's Manual (English)
Page 49
..., does not provide this function) LIVE TV INPUT MODE DAY - DAY + SIMPLINK WATCHING TV / CHANNEL CONTROL 1 After selecting the T V button of the MODE on the remote control, press the SIMPLINK button. 2 Use D E F G button to switch audio-out. (A device, which is connected (displayed in gray) G When a device is connected to the previous...
..., does not provide this function) LIVE TV INPUT MODE DAY - DAY + SIMPLINK WATCHING TV / CHANNEL CONTROL 1 After selecting the T V button of the MODE on the remote control, press the SIMPLINK button. 2 Use D E F G button to switch audio-out. (A device, which is connected (displayed in gray) G When a device is connected to the previous...


