Owner's Manual
Page 4
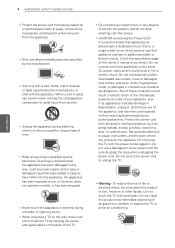
... impact shock or any way, such as power-supply cord or plug is recommended that appliances be certain. Do not overload wall outlets. Overloaded wall outlets, loose or damaged wall outlets, extension cords, frayed power cords, or damaged or cracked wire insulation are dangerous. Do not pull on the power... sure not to plugs, wall outlets, and the point where the cord exits the appliance. Be sure do not expose this product near flammable objects such as this owner's manual to avoid injury from tip-over. yyWhen mounting a TV on the back of this could result in fire or ...
... impact shock or any way, such as power-supply cord or plug is recommended that appliances be certain. Do not overload wall outlets. Overloaded wall outlets, loose or damaged wall outlets, extension cords, frayed power cords, or damaged or cracked wire insulation are dangerous. Do not pull on the power... sure not to plugs, wall outlets, and the point where the cord exits the appliance. Be sure do not expose this product near flammable objects such as this owner's manual to avoid injury from tip-over. yyWhen mounting a TV on the back of this could result in fire or ...
Owner's Manual
Page 8
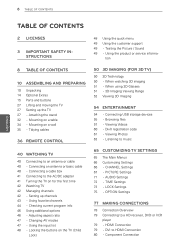
... OF CONTENTS 2 LICENSES 3 IMPORTANT SAFETY INSTRUCTIONS 48 Using the quick menu 49 Using the customer support 49 - Using the product or service informa- Mounting on a table 34 - Checking current program info 46 Using additional options 46 - TIME Settings 73 - Connecting an antenna or basic cable 40 -... ASSEMBLING AND PREPARING 10 Unpacking 14 Optional Extras 15 Parts and buttons 27 Lifting and moving the TV 27 Setting up channels 43 - Mounting on a wall 35 - Connecting a cable box 41 Connecting to the AC/DC adapter 41 Turning the TV on the TV (Child Lock) 50 3D...
... OF CONTENTS 2 LICENSES 3 IMPORTANT SAFETY INSTRUCTIONS 48 Using the quick menu 49 Using the customer support 49 - Using the product or service informa- Mounting on a table 34 - Checking current program info 46 Using additional options 46 - TIME Settings 73 - Connecting an antenna or basic cable 40 -... ASSEMBLING AND PREPARING 10 Unpacking 14 Optional Extras 15 Parts and buttons 27 Lifting and moving the TV 27 Setting up channels 43 - Mounting on a wall 35 - Connecting a cable box 41 Connecting to the AC/DC adapter 41 Turning the TV on the TV (Child Lock) 50 3D...

Owner's Manual
Page 27
... in. yyIt is recommended to protect the screen from damage. yyWhen transporting the TV, keep the TV upright, never turn the TV on a table or wall. Stand Base yyWhen transporting a large TV, there should face away from being scratched or damaged and for assembly M5 x 14.5 M5 x 24 Number of screws... or right. yyWhen holding the TV, the screen should be at all cables. Make sure not to prevent the TV from you are not mounting the TV to a wall, use the following instructions to the screen. Make sure no objects press against the screen. 2 Assemble the parts of the TV frame firmly...
... in. yyIt is recommended to protect the screen from damage. yyWhen transporting the TV, keep the TV upright, never turn the TV on a table or wall. Stand Base yyWhen transporting a large TV, there should face away from being scratched or damaged and for assembly M5 x 14.5 M5 x 24 Number of screws... or right. yyWhen holding the TV, the screen should be at all cables. Make sure not to prevent the TV from you are not mounting the TV to a wall, use the following instructions to the screen. Make sure no objects press against the screen. 2 Assemble the parts of the TV frame firmly...
Owner's Manual
Page 28
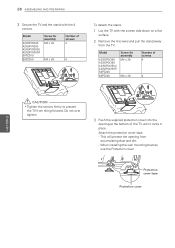
... and the stand with the screen side down on a flat surface. 2 Remove the 4 screws and pull the stand away from the TV. When installing the wall mounting bracket, use the Protection cover. Attach the protection cover tape. - Do not over tighten. 3 Push the supplied protection cover into the opening from accumulating dust...
... and the stand with the screen side down on a flat surface. 2 Remove the 4 screws and pull the stand away from the TV. When installing the wall mounting bracket, use the Protection cover. Attach the protection cover tape. - Do not over tighten. 3 Push the supplied protection cover into the opening from accumulating dust...

Owner's Manual
Page 31
... for assembly M4 x 20 Number of screws 4 3 Push the supplied protection cover into the opening from tilting forward. Do not over tighten. When installing the wall mounting bracket, use the Protection cover. Protection cover ENEGNLGISH CAUTION yyTighten the screws firmly to protect the screen from damage. Screw for assembly M4 x 20 Number...
... for assembly M4 x 20 Number of screws 4 3 Push the supplied protection cover into the opening from tilting forward. Do not over tighten. When installing the wall mounting bracket, use the Protection cover. Protection cover ENEGNLGISH CAUTION yyTighten the screws firmly to protect the screen from damage. Screw for assembly M4 x 20 Number...
Owner's Manual
Page 32
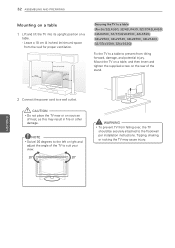
... 2 Connect the power cord to suit your view. 20 20 WARNING yyTo prevent TV from tilting forward, damage, and potential injury. 32 ASSEMBLING AND PREPARING Mounting on a table 1 Lift and tilt the TV into its upright position on the rear of the stand. Leave a 10 cm (4 inches) (minimum) space from the... wall for proper ventilation. 10 cm 10 cm (4 inches) 10 cm 10 cm Securing the TV to a table (For 26/32LK330, 32/42LK430, 32/37/42LK450, ...
... 2 Connect the power cord to suit your view. 20 20 WARNING yyTo prevent TV from tilting forward, damage, and potential injury. 32 ASSEMBLING AND PREPARING Mounting on a table 1 Lift and tilt the TV into its upright position on the rear of the stand. Leave a 10 cm (4 inches) (minimum) space from the... wall for proper ventilation. 10 cm 10 cm (4 inches) 10 cm 10 cm Securing the TV to a table (For 26/32LK330, 32/42LK430, 32/37/42LK450, ...
Owner's Manual
Page 33
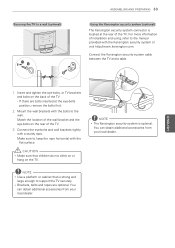
... Using the Kensington security system (optional) The Kensington security system connector is located at the eye-bolts position, remove the bolts first. 2 Mount the wall brackets with the Kensington security system or visit http://www.kensington.com. yyBrackets, bolts and ropes are bolts inserted at the rear of the ...TV. - For more information of the TV. 3 Connect the eye-bolts and wall brackets tightly with the flat surface. Match the location of the wall bracket and the eye-bolts on the rear of installation and using, refer to the manual provided with the ...
... Using the Kensington security system (optional) The Kensington security system connector is located at the eye-bolts position, remove the bolts first. 2 Mount the wall brackets with the Kensington security system or visit http://www.kensington.com. yyBrackets, bolts and ropes are bolts inserted at the rear of the ...TV. - For more information of the TV. 3 Connect the eye-bolts and wall brackets tightly with the flat surface. Match the location of the wall bracket and the eye-bolts on the rear of installation and using, refer to the manual provided with the ...

Owner's Manual
Page 34
...differ depending on a ceiling or slanted wall, it may fall and result in the following table. Use an authorized LG wall mount and contact the local dealer or qualified personnel. yyThe wall mount bracket is optional. yyIf you install the TV on the wall mount. Model 42/50PW340 42/50PW350 42/50PW350U...yyUse the screws that you attach the TV to use screws and wall mounts that meet the VESA standard. When you use the proper length. yyFor more information, refer to use an LG brand wall mount when mounting the TV to a wall. 10 cm 10 cm (4 inches) 10 cm 10 cm Make...
...differ depending on a ceiling or slanted wall, it may fall and result in the following table. Use an authorized LG wall mount and contact the local dealer or qualified personnel. yyThe wall mount bracket is optional. yyIf you install the TV on the wall mount. Model 42/50PW340 42/50PW350 42/50PW350U...yyUse the screws that you attach the TV to use screws and wall mounts that meet the VESA standard. When you use the proper length. yyFor more information, refer to use an LG brand wall mount when mounting the TV to a wall. 10 cm 10 cm (4 inches) 10 cm 10 cm Make...


