Owner's Manual (English)
Page 4
... on shelves above the unit). 17 GROUNDING Ensure that appliance and has no additional outlets or branch circuits. on or over the apparatus (e.g. a TV with a three-prong grounded AC plug must remain readily operable. 19 Keep the product away from physical or mechanical abuse, such as this product near... liquids, such as gasoline or candles or expose the TV to direct air conditioning. 16 Do not expose to unplug the TV. 15 WARNING - When mounting a TV on the power cord to dripping or splashing and do not drop onto the screen with the power cord plugged in electric shock or fire...
... on shelves above the unit). 17 GROUNDING Ensure that appliance and has no additional outlets or branch circuits. on or over the apparatus (e.g. a TV with a three-prong grounded AC plug must remain readily operable. 19 Keep the product away from physical or mechanical abuse, such as this product near... liquids, such as gasoline or candles or expose the TV to direct air conditioning. 16 Do not expose to unplug the TV. 15 WARNING - When mounting a TV on the power cord to dripping or splashing and do not drop onto the screen with the power cord plugged in electric shock or fire...
Owner's Manual (English)
Page 6
...13 VESA Wall Mounting 17 Cable Management 18 Desktop Pedestal Installation 20 Swivel Stand 20 Attaching the TV to a Desk 20 Securing the TV to the wall to prevent falling when the TV is used on a stand 21 Antenna or Cable Connection 22 EXTERNAL EQUIPMENT SETUP HD Receiver Setup... 36 PC Setup 37 USB Connection 46 Audio Out Connection 47 WATCHING TV / CHANNEL CONTROL Remote Control Functions 48 Turning On the TV 50 Channel Selection 50 Volume Adjustment 50 Quick Menu 51 Initial Setting 52 On-Screen Menus Selection 54 Channel Setup - Channel Editing 58 Input List 59 ...
...13 VESA Wall Mounting 17 Cable Management 18 Desktop Pedestal Installation 20 Swivel Stand 20 Attaching the TV to a Desk 20 Securing the TV to the wall to prevent falling when the TV is used on a stand 21 Antenna or Cable Connection 22 EXTERNAL EQUIPMENT SETUP HD Receiver Setup... 36 PC Setup 37 USB Connection 46 Audio Out Connection 47 WATCHING TV / CHANNEL CONTROL Remote Control Functions 48 Turning On the TV 50 Channel Selection 50 Volume Adjustment 50 Quick Menu 51 Initial Setting 52 On-Screen Menus Selection 54 Channel Setup - Channel Editing 58 Input List 59 ...

Owner's Manual (English)
Page 7
Digital Broadcasting System Captions 99 - User Mode 90 Clear Voice 91 Balance 92 TV Speakers On/Off Setup 93 Audio Reset 94 Stereo/SAP Broadcast Setup 95 Audio Language 96 On-Screen Menus Language Selection 97 Caption Mode - Caption Option 100 TIME SETTING Clock Setting - ... Setting 104 Auto Shut-off Setting 105 PARENTAL CONTROL / RATINGS Set Password & Lock System 106 Channel Blocking 109 Movie & TV Rating 110 Downloadable Rating 115 External Input Blocking 116 Key lock 117 APPENDIX Troubleshooting 118 Maintenance 120 Product Specifications 121 Programming the...
Digital Broadcasting System Captions 99 - User Mode 90 Clear Voice 91 Balance 92 TV Speakers On/Off Setup 93 Audio Reset 94 Stereo/SAP Broadcast Setup 95 Audio Language 96 On-Screen Menus Language Selection 97 Caption Mode - Caption Option 100 TIME SETTING Clock Setting - ... Setting 104 Auto Shut-off Setting 105 PARENTAL CONTROL / RATINGS Set Password & Lock System 106 Channel Blocking 109 Movie & TV Rating 110 Downloadable Rating 115 External Input Blocking 116 Key lock 117 APPENDIX Troubleshooting 118 Maintenance 120 Product Specifications 121 Programming the...
Owner's Manual (English)
Page 8
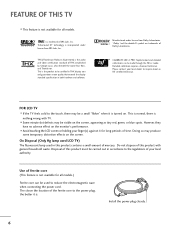
TruSurround XT technology is incorporated under license from SRS Labs, Inc. Please contact your local authority. FOR LCD TV I Avoid touching the LCD screen or holding your finger(s) against it for all models. Use of time. This is not available for long periods of ferrite core (This... of this product must be used in both hardware and software. However, they have no adverse effect on . On Disposal (Only Hg lamp used LCD TV) The fluorescent lamp used to be a small "flicker" when it is turned on the monitor's performance. Do not dispose of your local dealer ...
TruSurround XT technology is incorporated under license from SRS Labs, Inc. Please contact your local authority. FOR LCD TV I Avoid touching the LCD screen or holding your finger(s) against it for all models. Use of time. This is not available for long periods of ferrite core (This... of this product must be used in both hardware and software. However, they have no adverse effect on . On Disposal (Only Hg lamp used LCD TV) The fluorescent lamp used to be a small "flicker" when it is turned on the monitor's performance. Do not dispose of your local dealer ...
Owner's Manual (English)
Page 15
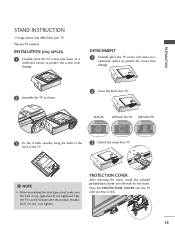
... not tightened fully, the TV can tilt forward after the product installation). Plasma TV models INSTALLATION (Only 42PG25) 1 Carefully place the TV screen side down on a cushioned surface to protect the screen from damage. 2 Assemble the TV as shown. 2 Loose the bolts from TV. 42PG25 50PG25/60/70 ... not over the hole for the stand. Press the PROTECTION COVER into the TV until you hear it click. 13 DETACHMENT 1 Carefully place the TV screen side down on a cushioned surface to protect the screen from TV. ! PREPARATION STAND INSTRUCTION I Image shown may differ from your...
... not tightened fully, the TV can tilt forward after the product installation). Plasma TV models INSTALLATION (Only 42PG25) 1 Carefully place the TV screen side down on a cushioned surface to protect the screen from damage. 2 Assemble the TV as shown. 2 Loose the bolts from TV. 42PG25 50PG25/60/70 ... not over the hole for the stand. Press the PROTECTION COVER into the TV until you hear it click. 13 DETACHMENT 1 Carefully place the TV screen side down on a cushioned surface to protect the screen from TV. ! PREPARATION STAND INSTRUCTION I Image shown may differ from your...
Owner's Manual (English)
Page 16
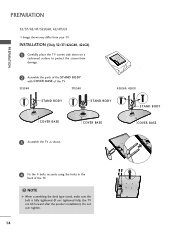
... 32/37/42LG60, 42LGX) 1 Carefully place the TV screen side down on a cushioned surface to protect the screen from your TV. PREPARATION PREPARATION 32/37/42/47/52LG60, 42/47LGX I Image shown may differ from damage. 2 Assemble the parts of the STAND BODY with COVER BASE of the TV. 32LG60 37LG60 42LG60, 42LGX STAND BODY STAND BODY...
... 32/37/42LG60, 42LGX) 1 Carefully place the TV screen side down on a cushioned surface to protect the screen from your TV. PREPARATION PREPARATION 32/37/42/47/52LG60, 42/47LGX I Image shown may differ from damage. 2 Assemble the parts of the STAND BODY with COVER BASE of the TV. 32LG60 37LG60 42LG60, 42LGX STAND BODY STAND BODY...
Owner's Manual (English)
Page 17
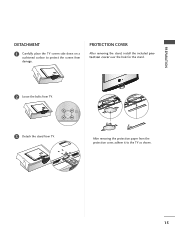
PROTECTION COVER After removing the stand, install the included p r otection cover over the hole for the stand. 2 Loose the bolts from TV. 3 Detach the stand from the protection cover, adhere it to protect the screen from damage. After removing the protection paper from TV. PREPARATION DETACHMENT 1 Carefully place the TV screen side down on a cushioned surface to the TV as shown. 15
PROTECTION COVER After removing the stand, install the included p r otection cover over the hole for the stand. 2 Loose the bolts from TV. 3 Detach the stand from the protection cover, adhere it to protect the screen from damage. After removing the protection paper from TV. PREPARATION DETACHMENT 1 Carefully place the TV screen side down on a cushioned surface to the TV as shown. 15
Owner's Manual (English)
Page 18
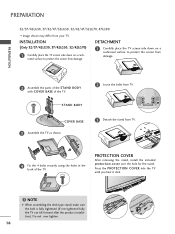
... click. ! PREPARATION PREPARATION 32/37/42LG30, 37/42/47/52LG50, 32/42/47/52LG70, 47LG90 I Image shown may differ from TV. DETACHMENT 1 Carefully place the TV screen side down on a cushioned surface to protect the screen from damage. INSTALLATION (Only 32/37/42LG30, 37/42LG50, 32/42LG70) 1 Carefully place the TV screen side down on a cush- ioned surface to...
... click. ! PREPARATION PREPARATION 32/37/42LG30, 37/42/47/52LG50, 32/42/47/52LG70, 47LG90 I Image shown may differ from TV. DETACHMENT 1 Carefully place the TV screen side down on a cushioned surface to protect the screen from damage. INSTALLATION (Only 32/37/42LG30, 37/42LG50, 32/42LG70) 1 Carefully place the TV screen side down on a cush- ioned surface to...
Owner's Manual (English)
Page 35
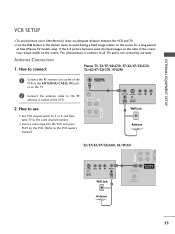
... AUDIO 32/37/42/47/52LG60, 42/47LGX COAX OPTIC 1 S-VIDEO VIDEO L R ANT OUT RS-232C IN ANTENNA/ CABLE IN (SERVICE ONLY) OUTPUT SWITCH ANT IN Wall Jack 2 REMOTE CONTROL IN Antenna 33 I Set VCR output switch to 3 or 4 and then tune TV to avoid having a fixed image remain on the screen for a long...
... AUDIO 32/37/42/47/52LG60, 42/47LGX COAX OPTIC 1 S-VIDEO VIDEO L R ANT OUT RS-232C IN ANTENNA/ CABLE IN (SERVICE ONLY) OUTPUT SWITCH ANT IN Wall Jack 2 REMOTE CONTROL IN Antenna 33 I Set VCR output switch to 3 or 4 and then tune TV to avoid having a fixed image remain on the screen for a long...
Owner's Manual (English)
Page 40
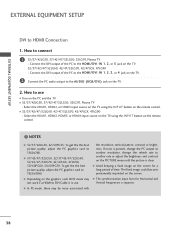
...on the remote control. ! I 32/37/42LG30, 37/42/47/52LG50, 32LG70, Plasma TV - G Depending on the TV. 2. Select the HDMI1, HDMI2, or HDMI3 input source on the TV using the INPUT button on the screen. G 37/42/47/52LG50, 32/37/42/47/52LG60, 32/42/47/52LG70, 42/47LGX, 47LG90, 50/60PG60, 50/60PG70: To get ...the the best picture quality, adjust the PC graphics card to the HDMI/DVI IN 1, 2, or 3 jack on the TV. 2 Connect the ...
...on the remote control. ! I 32/37/42LG30, 37/42/47/52LG50, 32LG70, Plasma TV - G Depending on the TV. 2. Select the HDMI1, HDMI2, or HDMI3 input source on the TV using the INPUT button on the screen. G 37/42/47/52LG50, 32/37/42/47/52LG60, 32/42/47/52LG70, 42/47LGX, 47LG90, 50/60PG60, 50/60PG70: To get ...the the best picture quality, adjust the PC graphics card to the HDMI/DVI IN 1, 2, or 3 jack on the TV. 2 Connect the ...
Owner's Manual (English)
Page 42
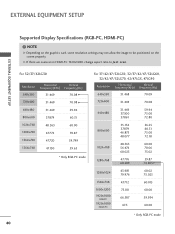
... 1280x768 47.776 59.87 1360x768 47.720 59.799 1366x768 47.130 59.65 * Only RGB-PC mode For 37/42/47/52LG50, 32/37/42/47/52LG60, 32/42/47/52LG70, 42/47LGX, 47LG90 Resolution Horizontal Vertical Frequency(KHz) Frequency(Hz) 640x350 31.468 70.09 720x400 31.469 70.08 640x480... RGB-PC 1920x1080 HDMI-PC 75.00 66.587 67.5 60.00 59.934 60.00 * Only RGB-PC mode 40 NOTE G Depending on the screen properly. G If there are overscan in HDMI-PC 1920x1080, change aspect ratio to be positioned on the graphics card, some resolution settings may not allow...
... 1280x768 47.776 59.87 1360x768 47.720 59.799 1366x768 47.130 59.65 * Only RGB-PC mode For 37/42/47/52LG50, 32/37/42/47/52LG60, 32/42/47/52LG70, 42/47LGX, 47LG90 Resolution Horizontal Vertical Frequency(KHz) Frequency(Hz) 640x350 31.468 70.09 720x400 31.469 70.08 640x480... RGB-PC 1920x1080 HDMI-PC 75.00 66.587 67.5 60.00 59.934 60.00 * Only RGB-PC mode 40 NOTE G Depending on the screen properly. G If there are overscan in HDMI-PC 1920x1080, change aspect ratio to be positioned on the graphics card, some resolution settings may not allow...
Owner's Manual (English)
Page 44
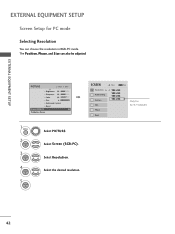
...Prev. 1024 x 768 1280 x 768 1360 x 768 1366 x 768 Only for PC mode Selecting Resolution You can also be adjusted. SCREEN Resolution G Auto config. PICTURE Move Enter E • Brightness 50 • Sharpness 60 • Color 60 • Tint 0R G •...; Advanced Control • Reset Screen (RGB-PC) TruMotion Demo 1 MENU 2 ENTER 3 ENTER 4 ENTER 5 ENTER Select PICTURE. Select Screen (RGB-PC). Select Resolution. Select the desired resolution. EXTERNAL EQUIPMENT SETUP EXTERNAL EQUIPMENT SETUP Screen Setup for 32/37/42LG30...
...Prev. 1024 x 768 1280 x 768 1360 x 768 1366 x 768 Only for PC mode Selecting Resolution You can also be adjusted. SCREEN Resolution G Auto config. PICTURE Move Enter E • Brightness 50 • Sharpness 60 • Color 60 • Tint 0R G •...; Advanced Control • Reset Screen (RGB-PC) TruMotion Demo 1 MENU 2 ENTER 3 ENTER 4 ENTER 5 ENTER Select PICTURE. Select Screen (RGB-PC). Select Resolution. Select the desired resolution. EXTERNAL EQUIPMENT SETUP EXTERNAL EQUIPMENT SETUP Screen Setup for 32/37/42LG30...
Owner's Manual (English)
Page 45
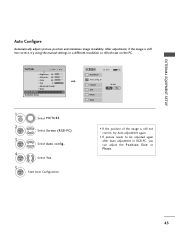
...60 • Tint 0R G • Advanced Control • Reset Screen (RGB-PC) TruMotion Demo 1 MENU 2 ENTER 3 ENTER Select PICTURE. Select Auto config.. 4 ENTER Select Y e s. 5 ENTER Start Auto Configuration. SCREEN Resolution Auto config. EXTERNAL EQUIPMENT SETUP Auto Configure Automatically adjusts picture position and... adjusted again after Auto adjustment in RGB-PC, you can adjust the Position, S i z e or P h a s e. 43 Select Screen (RGB-PC). After adjustment, if the image is still not correct, try using the manual settings or a different resolution or refresh rate on ...
...60 • Tint 0R G • Advanced Control • Reset Screen (RGB-PC) TruMotion Demo 1 MENU 2 ENTER 3 ENTER Select PICTURE. Select Auto config.. 4 ENTER Select Y e s. 5 ENTER Start Auto Configuration. SCREEN Resolution Auto config. EXTERNAL EQUIPMENT SETUP Auto Configure Automatically adjusts picture position and... adjusted again after Auto adjustment in RGB-PC, you can adjust the Position, S i z e or P h a s e. 43 Select Screen (RGB-PC). After adjustment, if the image is still not correct, try using the manual settings or a different resolution or refresh rate on ...
Owner's Manual (English)
Page 46
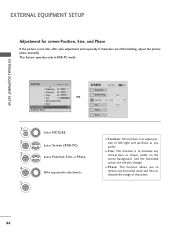
...; Brightness 50 • Sharpness 60 • Color 60 • Tint 0R G • Advanced Control • Reset Screen (RGB-PC) TruMotion Demo SCREEN Resolution Auto config. Select Screen (RGB-PC). I Position: This function is to adjust picture to left/right and up/down as you to minimize any... horizontal noise and clear or sharpen the image of characters. 44 And the horizontal screen size will also change. EXTERNAL EQUIPMENT SETUP EXTERNAL EQUIPMENT SETUP Adjustment for screen Position, Size, and Phase If the picture is to remove any vertical bars or stripes...
...; Brightness 50 • Sharpness 60 • Color 60 • Tint 0R G • Advanced Control • Reset Screen (RGB-PC) TruMotion Demo SCREEN Resolution Auto config. Select Screen (RGB-PC). I Position: This function is to adjust picture to left/right and up/down as you to minimize any... horizontal noise and clear or sharpen the image of characters. 44 And the horizontal screen size will also change. EXTERNAL EQUIPMENT SETUP EXTERNAL EQUIPMENT SETUP Adjustment for screen Position, Size, and Phase If the picture is to remove any vertical bars or stripes...
Owner's Manual (English)
Page 47
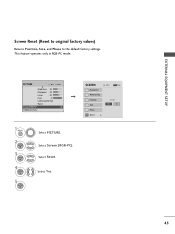
Position Size Phase Reset G Move MENU Prev. PICTURE Move Enter E • Brightness 50 • Sharpness 60 • Color 60 • Tint 0R G • Advanced Control • Reset Screen (RGB-PC) TruMotion Demo 1 MENU 2 ENTER 3 ENTER 4 ENTER 5 ENTER Select PICTURE. Select Screen (RGB-PC). SCREEN Resolution Auto config. To Set Yes No 45 Select Reset. Select Y e s. EXTERNAL EQUIPMENT SETUP Screen Reset (Reset to original factory values) Returns Position, S i z e, and Phase to the default factory settings. This feature operates only in RGB-PC mode.
Position Size Phase Reset G Move MENU Prev. PICTURE Move Enter E • Brightness 50 • Sharpness 60 • Color 60 • Tint 0R G • Advanced Control • Reset Screen (RGB-PC) TruMotion Demo 1 MENU 2 ENTER 3 ENTER 4 ENTER 5 ENTER Select PICTURE. Select Screen (RGB-PC). SCREEN Resolution Auto config. To Set Yes No 45 Select Reset. Select Y e s. EXTERNAL EQUIPMENT SETUP Screen Reset (Reset to original factory values) Returns Position, S i z e, and Phase to the default factory settings. This feature operates only in RGB-PC mode.
Owner's Manual (English)
Page 50
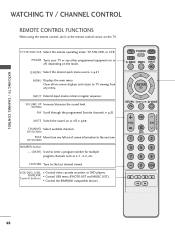
... Select the desired quick menu source. UP/DOWN PAGE Move from any other programmed equipment on -screen displays and return to TV viewing from one full set of screen information to the next one. POWER Turns your TV or any menu. INPUT External input modes rotate in regular sequence. G p.50 CHANNEL Select available channels...
... Select the desired quick menu source. UP/DOWN PAGE Move from any other programmed equipment on -screen displays and return to TV viewing from one full set of screen information to the next one. POWER Turns your TV or any menu. INPUT External input modes rotate in regular sequence. G p.50 CHANNEL Select available channels...

Owner's Manual (English)
Page 51
... this button, the SIMPLINK menu appears at the screen. THUMBSTICK Navigate the on the back side and install the batteries matching correct polarity (+with +,-with new ones. Don't mix old or used batteries with -). G p.61 WATCHING TV / CHANNEL CONTROL Installing Batteries I Open the battery... compartment cover on -screen menus and adjust the system settings to your preference. (Up/Down/Left Right/ENTER) RETURN Allows the ...
... this button, the SIMPLINK menu appears at the screen. THUMBSTICK Navigate the on the back side and install the batteries matching correct polarity (+with +,-with new ones. Don't mix old or used batteries with -). G p.61 WATCHING TV / CHANNEL CONTROL Installing Batteries I Open the battery... compartment cover on -screen menus and adjust the system settings to your preference. (Up/Down/Left Right/ENTER) RETURN Allows the ...
Owner's Manual (English)
Page 53
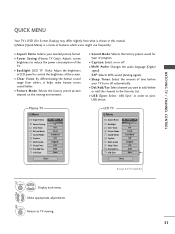
... Mode Caption Multi Audio Sleep Timer CH Del/Add/Fav USB Eject F 16:9 G 3 Off Vivid Standard Off English Off Add Eject Close LCD TV Q.Menu Aspect Ratio Backlight Clear Voice Picture Mode Sound Mode Caption Multi Audio Sleep Timer CH Del/Add/Fav USB Eject F 16:9 G 3...Off English Off Add Eject Close Except 32/37/42LG30 1Q. I Backlight (LCD TV Only): Adjust the brightness of LCD panel to TV viewing. 51 MENU 2 Display each menu. WATCHING TV / CHANNEL CONTROL QUICK MENU Your TV's OSD (On Screen Display) may differ slightly from others, it helps make human voices sound better....
... Mode Caption Multi Audio Sleep Timer CH Del/Add/Fav USB Eject F 16:9 G 3 Off Vivid Standard Off English Off Add Eject Close LCD TV Q.Menu Aspect Ratio Backlight Clear Voice Picture Mode Sound Mode Caption Multi Audio Sleep Timer CH Del/Add/Fav USB Eject F 16:9 G 3...Off English Off Add Eject Close Except 32/37/42LG30 1Q. I Backlight (LCD TV Only): Adjust the brightness of LCD panel to TV viewing. 51 MENU 2 Display each menu. WATCHING TV / CHANNEL CONTROL QUICK MENU Your TV's OSD (On Screen Display) may differ slightly from others, it helps make human voices sound better....
Owner's Manual (English)
Page 54
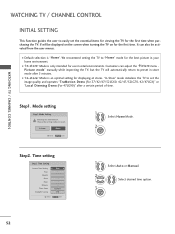
... the user to easily set the image quality and operates "TruMotion Demo (For 37/42/47/52LG60, 42/47/52LG70, 42/47LGX)" or "Local Dimming Demo (For 47LG90)" after 5 minutes. Customers can also be displayed on the screen when turning the TV on for the best picture in -store mode after a certain period of time...
... the user to easily set the image quality and operates "TruMotion Demo (For 37/42/47/52LG60, 42/47/52LG70, 42/47LGX)" or "Local Dimming Demo (For 47LG90)" after 5 minutes. Customers can also be displayed on the screen when turning the TV on for the best picture in -store mode after a certain period of time...
Owner's Manual (English)
Page 56
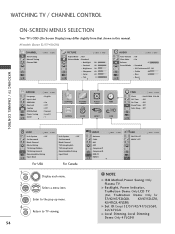
... Indicator, TruMotion Demo: Only LCD TV. (But, T r u M o t i o n D e m o: Only for 37/42/47/52LG60, 42/47/52LG70, 42/47LGX, 47LG90) G Set ID: Except 32/37/42/47/52LG60, 4 2 / 4 7 L G X. INPUT Move Enter Antenna Cable AV1 AV2 Component1 Component2 RGB-PC HDMI1 E USB PHOTO LIST MUSIC LIST Move Enter ! NOTE G ISM Method, Power Saving: Only Plasma TV. G Local Dimming, Local...
... Indicator, TruMotion Demo: Only LCD TV. (But, T r u M o t i o n D e m o: Only for 37/42/47/52LG60, 42/47/52LG70, 42/47LGX, 47LG90) G Set ID: Except 32/37/42/47/52LG60, 4 2 / 4 7 L G X. INPUT Move Enter Antenna Cable AV1 AV2 Component1 Component2 RGB-PC HDMI1 E USB PHOTO LIST MUSIC LIST Move Enter ! NOTE G ISM Method, Power Saving: Only Plasma TV. G Local Dimming, Local...


