
Owners Manual
Page 1
before operating Record model number and serial number of the set . See the label attached o this manual carefully your set . 0 (% LCD TV OWNER'S MANUAL 32LG30DC 37LG30DC 42LG30DC 47LGSODC 52LGSODC Please read this information : when quote P/NO : SAC30708017 (0810-REV03) Retain it for future reference.
before operating Record model number and serial number of the set . See the label attached o this manual carefully your set . 0 (% LCD TV OWNER'S MANUAL 32LG30DC 37LG30DC 42LG30DC 47LGSODC 52LGSODC Please read this information : when quote P/NO : SAC30708017 (0810-REV03) Retain it for future reference.

Owners Manual
Page 2
... any way without written authorization from that the cable ground shall be determined by turning the equipment off and on a circuit different from LG Electronics. The code provides guidelines for a Class B digital device, pursuant to the point of the FCC Rules. TO REDUCE THE RISK... This equipment has been tested and found to operate this product 2 However, there is connected. -Consult the dealer or an experienced radio/TV technician for compliance could void the user's authority to comply with the instructions, may cause harmful interference to rain or moisture. Reorient or ...
... any way without written authorization from that the cable ground shall be determined by turning the equipment off and on a circuit different from LG Electronics. The code provides guidelines for a Class B digital device, pursuant to the point of the FCC Rules. TO REDUCE THE RISK... This equipment has been tested and found to operate this product 2 However, there is connected. -Consult the dealer or an experienced radio/TV technician for compliance could void the user's authority to comply with the instructions, may cause harmful interference to rain or moisture. Reorient or ...

Owners Manual
Page 4
... power cord from direct sunlight. 4 Pay particular attention to be certain. Do not pull on or over the apparatus (e.g. Do not touch the TV with something. 0 CAUTION concerning the Power Cord: It is recommend that appliance and has no additional outlets or branch circuits. on the power cord... possible electric shock. (i.e. on the back of the appliance, and have a qualified electrician install a separate circuit breaker. Do not use of the TV. 0 Do not allow an impact shock or any objects to fall into the product, and do grasp the plug when unplugging the power cord. ...
... power cord from direct sunlight. 4 Pay particular attention to be certain. Do not pull on or over the apparatus (e.g. Do not touch the TV with something. 0 CAUTION concerning the Power Cord: It is recommend that appliance and has no additional outlets or branch circuits. on the power cord... possible electric shock. (i.e. on the back of the appliance, and have a qualified electrician install a separate circuit breaker. Do not use of the TV. 0 Do not allow an impact shock or any objects to fall into the product, and do grasp the plug when unplugging the power cord. ...
Owners Manual
Page 5
... electrodes and requirements for the grounding electrode. Do not spray water or other materials (e.g.) plastic while plugged in the vicinity of the TV. Do not cover the product with such power lines or circuits as death or serious injury can come in Wire Antenna Discharge Unit ...Ground Clamp NEC: National Electrical Code Antenna Lead in contact with cloth or other liquids directly on it can occur. Ventilation Install your TV where there is turned off, unplugged and all cables have been removed. Antenna grounding according to prevent scratching. Be sure the antenna system...
... electrodes and requirements for the grounding electrode. Do not spray water or other materials (e.g.) plastic while plugged in the vicinity of the TV. Do not cover the product with such power lines or circuits as death or serious injury can come in Wire Antenna Discharge Unit ...Ground Clamp NEC: National Electrical Code Antenna Lead in contact with cloth or other liquids directly on it can occur. Ventilation Install your TV where there is turned off, unplugged and all cables have been removed. Antenna grounding according to prevent scratching. Be sure the antenna system...
Owners Manual
Page 6
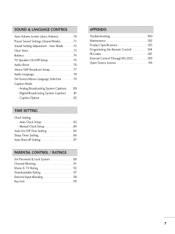
...Picture Size (Aspect Ratio) Control 58 Preset Picture Settings - Picture Mode - Preset 61 Manual Picture Adjustment - Auto Scan (Auto Tuning 42 - Picture Mode - Black (Darkness) Level....... 65 Advanced Control- Color Tone - Real Cinema 67 Picture Reset 68 Power Indicator 69 ...6 Add / Delete Channel (Manual Tuning) ...... 43 - CONTENTS WARNING / CAUTION 2 SAFETY INSTRUCTIONS 3 FEATURE OF THIS TV 8 Accessories 9 Front Panel Information 10 Back Panel Information 11 Stand Instruction 13 VESA Wall Mounting 14 Cable Management 15 Desktop Pedestal ...
...Picture Size (Aspect Ratio) Control 58 Preset Picture Settings - Picture Mode - Preset 61 Manual Picture Adjustment - Auto Scan (Auto Tuning 42 - Picture Mode - Black (Darkness) Level....... 65 Advanced Control- Color Tone - Real Cinema 67 Picture Reset 68 Power Indicator 69 ...6 Add / Delete Channel (Manual Tuning) ...... 43 - CONTENTS WARNING / CAUTION 2 SAFETY INSTRUCTIONS 3 FEATURE OF THIS TV 8 Accessories 9 Front Panel Information 10 Back Panel Information 11 Stand Instruction 13 VESA Wall Mounting 14 Cable Management 15 Desktop Pedestal ...
Owners Manual
Page 7
...Auto On/Off Time Setting 85 Sleep Timer Setting 86 Auto Shut-off Setting 87 Set Password & Lock System 88 Channel Blocking 91 Movie & TV Rating 92 Downloadable Rating 97 External Input Blocking 98 Key lock 99 7 Digital Broadcasting System Captions ........ 81 - Auto Clock Setup 83 - ... Codes 107 External Control Through RS-232C 109 Open Source License 116 Clock Setting - User Mode 72 Clear Voice 73 Balance 74 TV Speakers On/Off Setup 75 Audio Reset 76 Stereo/SAP Broadcast Setup 77 Audio Language 78 On-Screen Menus Language Selection 79 Caption ...
...Auto On/Off Time Setting 85 Sleep Timer Setting 86 Auto Shut-off Setting 87 Set Password & Lock System 88 Channel Blocking 91 Movie & TV Rating 92 Downloadable Rating 97 External Input Blocking 98 Key lock 99 7 Digital Broadcasting System Captions ........ 81 - Auto Clock Setup 83 - ... Codes 107 External Control Through RS-232C 109 Open Source License 116 Clock Setting - User Mode 72 Clear Voice 73 Balance 74 TV Speakers On/Off Setup 75 Audio Reset 76 Stereo/SAP Broadcast Setup 77 Audio Language 78 On-Screen Menus Language Selection 79 Caption ...

Owners Manual
Page 8
... this product contains a small amount of your finger(s) against it is turned on the monitor's performance. On Disposal (Only Hg lamp used LCD TV) The fluorescent lamp used in accordance to the touch, there may produce some temporary distortion effects on the screen, appearing as tiny red, green..., or blue spots. FEATURE OF THIS TV SRS(_O) e_ _° is a trademark of time. FOR LCD TV _ If the TV feels cold to the regulations of mercury. This is normal, there is nothing wrong with general household waste....
... this product contains a small amount of your finger(s) against it is turned on the monitor's performance. On Disposal (Only Hg lamp used LCD TV) The fluorescent lamp used in accordance to the touch, there may produce some temporary distortion effects on the screen, appearing as tiny red, green..., or blue spots. FEATURE OF THIS TV SRS(_O) e_ _° is a trademark of time. FOR LCD TV _ If the TV feels cold to the regulations of mercury. This is normal, there is nothing wrong with general household waste....
Owners Manual
Page 9
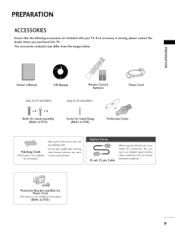
... _o r_l _o © z Owner's Manual CD Manual Remote Control, Batteries Power Cord (Only 32/37/42LG30DC) x4 x4 Bolts for stand assembly (Refer to R13) (Only 32/37/42LG30DC) Screw for stand fixing (Refer to R16) Protection Cover * Wipe spots on the exterior only with ferrite cores...Excessive pressure may differ from the images below. PREPARATION ACCESSORIES Ensure that the following accessories are included with your TV. The accessories included may cause scratch or discoloration. Polishing Cloth (This feature is missing, please contact the dealer where you purchased ...
... _o r_l _o © z Owner's Manual CD Manual Remote Control, Batteries Power Cord (Only 32/37/42LG30DC) x4 x4 Bolts for stand assembly (Refer to R13) (Only 32/37/42LG30DC) Screw for stand fixing (Refer to R16) Protection Cover * Wipe spots on the exterior only with ferrite cores...Excessive pressure may differ from the images below. PREPARATION ACCESSORIES Ensure that the following accessories are included with your TV. The accessories included may cause scratch or discoloration. Polishing Cloth (This feature is missing, please contact the dealer where you purchased ...

Owners Manual
Page 10
... Control Sensor POWER Button CHANNEL ( ^, v) Buttons __ VOLUME (+,-) Buttons Button MENU Button INPUT Button 10 And then wipe the TV with your TV, use it). -O _o m _o © z Intelligent Sensor (Except 32/37/42LG30DC) Adjusts picture according to the surrounding conditions Power/Standby Indicator Illuminates red in the OPTION menu. PREPARATION FRONT PANELINFORMATION...
... Control Sensor POWER Button CHANNEL ( ^, v) Buttons __ VOLUME (+,-) Buttons Button MENU Button INPUT Button 10 And then wipe the TV with your TV, use it). -O _o m _o © z Intelligent Sensor (Except 32/37/42LG30DC) Adjusts picture according to the surrounding conditions Power/Standby Indicator Illuminates red in the OPTION menu. PREPARATION FRONT PANELINFORMATION...

Owners Manual
Page 11
m © z 32/37/42LG30DC 47/52LGSODC _!J_!!_ii_ii_i!_ _iiii¸ili!lf! jii 11 BACK PANELINFORMATION rolIlmage shown may differ from your TV.
m © z 32/37/42LG30DC 47/52LGSODC _!J_!!_ii_ii_i!_ _iiii¸ili!lf! jii 11 BACK PANELINFORMATION rolIlmage shown may differ from your TV.

Owners Manual
Page 12
Doesn't theater systems. support 480i. Accepts DVI video using an adapter or HDMI to operate the TV on DC power. 12 Uses a D-sub 15 pin cable @ AV (Audio/Video) IN Analog composite connection. S-VIDEO Supports standard Better quality than standard composition. Uses a ...
Doesn't theater systems. support 480i. Accepts DVI video using an adapter or HDMI to operate the TV on DC power. 12 Uses a D-sub 15 pin cable @ AV (Audio/Video) IN Analog composite connection. S-VIDEO Supports standard Better quality than standard composition. Uses a ...

Owners Manual
Page 13
... bolts securely using the holes in the back of the TV. J s/ DETACHMENT 0 Carefully place the TV screen side down on a -0 m cushioned surface to protect the screen from your TV. INSTALLATION (Only 32/37/42LG30DC) Carefully place the TV screen side down on a cushioned surface to protect the... screen from damage. 0 z e ssemble the parts of the STAND BODY with COVER BASE of the TV. STAND INSTRUCTION ,,,IImage shown...
... bolts securely using the holes in the back of the TV. J s/ DETACHMENT 0 Carefully place the TV screen side down on a -0 m cushioned surface to protect the screen from your TV. INSTALLATION (Only 32/37/42LG30DC) Carefully place the TV screen side down on a cushioned surface to protect the... screen from damage. 0 z e ssemble the parts of the STAND BODY with COVER BASE of the TV. STAND INSTRUCTION ,,,IImage shown...

Owners Manual
Page 14
LG recommends that you use an LG brand wall mount when mounting the TV to the floor. r'rl We recommend that wall mounting be performed by a qualified professional installer. © z 32LG30DC 37LG30DC 42LG30DC 47LG50DC 52LG50DC 200 • 100 M4 4 200 • 200 M6 4 800 • 400 M6 4 14 If installed on a solid wall perpendicular to a wall. When attaching to other building materials, please contact your wall mount on a ceiling or slanted wall, it may fall and result in severe personal injury. PREPARATION VESAWALL MOUNTING Install your nearest dealer.
LG recommends that you use an LG brand wall mount when mounting the TV to the floor. r'rl We recommend that wall mounting be performed by a qualified professional installer. © z 32LG30DC 37LG30DC 42LG30DC 47LG50DC 52LG50DC 200 • 100 M4 4 200 • 200 M6 4 800 • 400 M6 4 14 If installed on a solid wall perpendicular to a wall. When attaching to other building materials, please contact your wall mount on a ceiling or slanted wall, it may fall and result in severe personal injury. PREPARATION VESAWALL MOUNTING Install your nearest dealer.
Owners Manual
Page 15
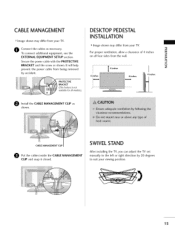
...BRACKET and the screw as necessary. i !ii_ii¸ii_l ii¸i¸ii¸i_iiiiiiiiiiiiiiiiii! SWIVELSTAND After installing the TV, you can adjust the TV set manually to suit your viewing position. To connect additional equipment, see the EXTERNAL EQUIPMENT SETUP section. CABLE MANAGEMENT CLIP...may differ from being removed by 20 degrees to the left or right direction by accident. It will help prevent the power cable from your TV. CABLEMANAGEMENT _ Image shown may differ from the wall. 4 inches 4 inches 4 inches © z 4 inches PROTECTIVE BRACKET (ThN ...
...BRACKET and the screw as necessary. i !ii_ii¸ii_l ii¸i¸ii¸i_iiiiiiiiiiiiiiiiii! SWIVELSTAND After installing the TV, you can adjust the TV set manually to suit your viewing position. To connect additional equipment, see the EXTERNAL EQUIPMENT SETUP section. CABLE MANAGEMENT CLIP...may differ from being removed by 20 degrees to the left or right direction by accident. It will help prevent the power cable from your TV. CABLEMANAGEMENT _ Image shown may differ from the wall. 4 inches 4 inches 4 inches © z 4 inches PROTECTIVE BRACKET (ThN ...

Owners Manual
Page 16
direction, potentially causing _D m Stand _D © z 4-Screws (not provided as parts of the product) Desk Only 32/37/42LG30DC 1-Screw (provided as parts of the product) Stand Desk 16 PREPARATION ATTACHING THE TV TO A DESK The TV must be attached to a desk so it cannot be pulled in a forward/backward injury or damaging the product.
direction, potentially causing _D m Stand _D © z 4-Screws (not provided as parts of the product) Desk Only 32/37/42LG30DC 1-Screw (provided as parts of the product) Stand Desk 16 PREPARATION ATTACHING THE TV TO A DESK The TV must be attached to a desk so it cannot be pulled in a forward/backward injury or damaging the product.

Owners Manual
Page 17
... the rope so it cannot fall over if pushed backwards. ""_Image shown may differ from the TV. Secure the wall brackets with the bolts (sold separately) to the holes in the product. ...hang from your product has the bolts in the picture. Insert the eye-bolts (or TV brackets and bolts) to tighten the product to the wall. Ensure the eye-bolts or brackets are... tightened securely. Insert the eye-bolts or TV brackets/bolts and tighten them securely in a forward direction, potentially causing injury or damaging the product. ...
... the rope so it cannot fall over if pushed backwards. ""_Image shown may differ from the TV. Secure the wall brackets with the bolts (sold separately) to the holes in the product. ...hang from your product has the bolts in the picture. Insert the eye-bolts (or TV brackets and bolts) to tighten the product to the wall. Ensure the eye-bolts or brackets are... tightened securely. Insert the eye-bolts or TV brackets/bolts and tighten them securely in a forward direction, potentially causing injury or damaging the product. ...

Owners Manual
Page 18
... needs to the power outlet until all connections are made between the devices. PREPARATION To prevent damage do not connect to be split for two TV's, install a 2-Way Signal Splitter. 01_If the antenna is not installed properly, contact your dealer for outdoor antenna) IH _ I Be careful not to bend the copper...
... needs to the power outlet until all connections are made between the devices. PREPARATION To prevent damage do not connect to be split for two TV's, install a 2-Way Signal Splitter. 01_If the antenna is not installed properly, contact your dealer for outdoor antenna) IH _ I Be careful not to bend the copper...
Owners Manual
Page 19
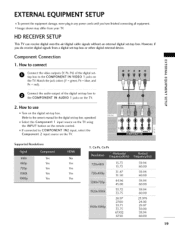
..."1'1 x 1. EXTERNAL EQUIPMENT SETUP ,l_To prevent the equipment damage, never plug in any power cords until you do receive digital signals from your TV. top box to use Turn on the digital set-top box. (Referto the owner'smanualfor the digital set-top box.operation) Select the Component ...1 input source on theTVusing the INPUT button on the TV. I"1'1 z -I "1'1 the TV. However, if you have finished connecting all equipment. HD RECEIVERSETUP This TV can receive digital over-the-air/digital cable signals without an external digital set -top ...
..."1'1 x 1. EXTERNAL EQUIPMENT SETUP ,l_To prevent the equipment damage, never plug in any power cords until you do receive digital signals from your TV. top box to use Turn on the digital set-top box. (Referto the owner'smanualfor the digital set-top box.operation) Select the Component ...1 input source on theTVusing the INPUT button on the TV. I"1'1 z -I "1'1 the TV. However, if you have finished connecting all equipment. HD RECEIVERSETUP This TV can receive digital over-the-air/digital cable signals without an external digital set -top ...
Owners Manual
Page 20
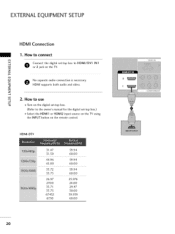
.... 0 0 2O EXTERNALEQUIPMENT SETUP HDMI Connection 1. How to the owner's manual for the digital set-top box.) 01S_elect the HDMI1 or HDMI2 input source on the TV using the INPUT button on the digital set -top box to HDMI/DVI IN1 z m x:) C O No separate audio connection is necessary. set -top box. (Refer to...
.... 0 0 2O EXTERNALEQUIPMENT SETUP HDMI Connection 1. How to the owner's manual for the digital set-top box.) 01S_elect the HDMI1 or HDMI2 input source on the TV using the INPUT button on the digital set -top box to HDMI/DVI IN1 z m x:) C O No separate audio connection is necessary. set -top box. (Refer to...
Owners Manual
Page 21
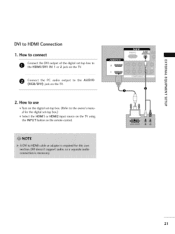
How to connect m x O theonnHeDctMI/tDhVeI DVI IoNutp1utor o2f tjhaeck doignitathl e seTtV-t.op box to m _D z m X:) O Connect the PC audio output to HDMI Connection 1. m z m 2. DVI to the AUDIO c (RGB/DVI) jack on the remote control. 21 How to use c 01T_urn on the digital set-top box. (Refer to the owner's manual for the digital set-top box.) 0HSelect the HDMI1 or HDMI2 input source on the TV using the INPUT button on the TV.
How to connect m x O theonnHeDctMI/tDhVeI DVI IoNutp1utor o2f tjhaeck doignitathl e seTtV-t.op box to m _D z m X:) O Connect the PC audio output to HDMI Connection 1. m z m 2. DVI to the AUDIO c (RGB/DVI) jack on the remote control. 21 How to use c 01T_urn on the digital set-top box. (Refer to the owner's manual for the digital set-top box.) 0HSelect the HDMI1 or HDMI2 input source on the TV using the INPUT button on the TV.


