

Owner's Manual
Page 11
...IN 1 Remote Control Port Connect your TV. Or DVI(VIDEO)signal to the this jack. 10 Power Cord Socket For operation with a DVI to HDMI cable. 3 RGB/AUDIO IN Connect the output from a settop box or PC to the appropriate input port. 4 RS-232C IN (CONTROL &SERVICE)...INTRODUCTION CONNECTION OPTIONS I Here shown may be somewhat different from your wired remote control. 6 AV OUT Connect a second TV or monitor. 2 HDMI IN Connect a HDMI signal. Back Connection Panel VIDEO AUDIO L/MONO R R AUDIO L/MONO VIDEO AVAVININ22 AUDIO Input Connections are available for listening stereo sound from an ...
...IN 1 Remote Control Port Connect your TV. Or DVI(VIDEO)signal to the this jack. 10 Power Cord Socket For operation with a DVI to HDMI cable. 3 RGB/AUDIO IN Connect the output from a settop box or PC to the appropriate input port. 4 RS-232C IN (CONTROL &SERVICE)...INTRODUCTION CONNECTION OPTIONS I Here shown may be somewhat different from your wired remote control. 6 AV OUT Connect a second TV or monitor. 2 HDMI IN Connect a HDMI signal. Back Connection Panel VIDEO AUDIO L/MONO R R AUDIO L/MONO VIDEO AVAVININ22 AUDIO Input Connections are available for listening stereo sound from an ...
Owner's Manual
Page 16
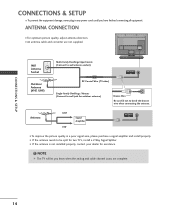
..., UHF) Multi-family Dwellings/Apartments (Connect to wall antenna socket) RF Coaxial Wire (75 ohm) COMPONENT IN ANTIENNNVAIDEO AUDIO AV OUT RGB IN (PC/DTV) HDMI IN AV IN 1 Single-family Dwellings /Houses (Connect to be split for two TV's, install a 2-Way Signal Splitter. I For optimum picture quality, adjust antenna direction...
..., UHF) Multi-family Dwellings/Apartments (Connect to wall antenna socket) RF Coaxial Wire (75 ohm) COMPONENT IN ANTIENNNVAIDEO AUDIO AV OUT RGB IN (PC/DTV) HDMI IN AV IN 1 Single-family Dwellings /Houses (Connect to be split for two TV's, install a 2-Way Signal Splitter. I For optimum picture quality, adjust antenna direction...

Owner's Manual
Page 20
NOTE G Component, RGB, HDMI input sources cannot be used for further details regarding that device's input settings. ! G We recommend to the TV's AV OUT jacks. AUDIO RGB/DVI) AV OUT COMPONE See the Operating Manual of the second TV or monitor 2 for AV out. How to connect 1 Connect the second TV or monitor to use the AV OUT jacks for VCR recording. S-VIDEO VIDEO (MONO) AUDIO 1 VIDEO AUDIO VIDEO L R S-VIDEO CONNECTIONS & SETUP 18 AV OUT SETUP The TV has a special signal output capability which allows you to hook up the second TV or monitor. 1.
NOTE G Component, RGB, HDMI input sources cannot be used for further details regarding that device's input settings. ! G We recommend to the TV's AV OUT jacks. AUDIO RGB/DVI) AV OUT COMPONE See the Operating Manual of the second TV or monitor 2 for AV out. How to connect 1 Connect the second TV or monitor to use the AV OUT jacks for VCR recording. S-VIDEO VIDEO (MONO) AUDIO 1 VIDEO AUDIO VIDEO L R S-VIDEO CONNECTIONS & SETUP 18 AV OUT SETUP The TV has a special signal output capability which allows you to hook up the second TV or monitor. 1.

Owner's Manual
Page 22
.... ! To get the best picture quality, adjust the output resolution of the DVD to the S -VIDEO input on the set . How to connect 1 Connect the HDMI output of the DVD to the AUDIO 2 input jacks on the remote control. NOTE G If the DVD supports Auto... HDMI function, the DVD output resolution will be automatically set . How to the DVD player's manual for operating instructions. VIDEO S-VIDEO L R ANT IN OUTPUT SWITCH ANT ...
.... ! To get the best picture quality, adjust the output resolution of the DVD to the S -VIDEO input on the set . How to connect 1 Connect the HDMI output of the DVD to the AUDIO 2 input jacks on the remote control. NOTE G If the DVD supports Auto... HDMI function, the DVD output resolution will be automatically set . How to the DVD player's manual for operating instructions. VIDEO S-VIDEO L R ANT IN OUTPUT SWITCH ANT ...
Owner's Manual
Page 24
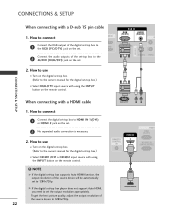
... will be automatically set the output resolution appropriately. How to connect 1 Connect the digital set-top box to 1280x720p. 22 RGB OUTPUT L R REMOTE CONTROL IN HDMI IN 2 1 (DVI) RGB I Select RGB-DTV input source with using the INPUT button on the remote control. 1 2 CONNECTIONS & SETUP When connecting with a D-sub 15 ...of the digital set-top box to the 2 AUDIO (RGB/DVI) jack on the set -top box.) I RGB (PC/DTV) RS-232C IN (CONTROL & SERVICE) 1 HDMI-DVD OUTPUT How to connect MI IN 2 Connect the RGB output of the set-top box to 1 the RGB (PC/DTV) jack on the set...
... will be automatically set the output resolution appropriately. How to connect 1 Connect the digital set-top box to 1280x720p. 22 RGB OUTPUT L R REMOTE CONTROL IN HDMI IN 2 1 (DVI) RGB I Select RGB-DTV input source with using the INPUT button on the remote control. 1 2 CONNECTIONS & SETUP When connecting with a D-sub 15 ...of the digital set-top box to the 2 AUDIO (RGB/DVI) jack on the set -top box.) I RGB (PC/DTV) RS-232C IN (CONTROL & SERVICE) 1 HDMI-DVD OUTPUT How to connect MI IN 2 Connect the RGB output of the set-top box to 1 the RGB (PC/DTV) jack on the set...
Owner's Manual
Page 25
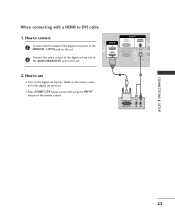
... of the digital set-top box to DVI cable 1. When connecting with using the INPUT button on the set. S-VIDEO VID VI 2. How to connect HDMI IN RGB IN RGB (PC/DTV) AUDIO (RGB/DVI) AUDIO 1 Connect the DVI output of the digital set-top box to 2 the AUDIO(RGB/DVI...) jack on the set -top box.) I Select HDMI1/DVI input source with a HDMI to the H D M I Turn on the digital set-top box. (Refer to the owner's manual for the digital set .
... of the digital set-top box to DVI cable 1. When connecting with using the INPUT button on the set. S-VIDEO VID VI 2. How to connect HDMI IN RGB IN RGB (PC/DTV) AUDIO (RGB/DVI) AUDIO 1 Connect the DVI output of the digital set-top box to 2 the AUDIO(RGB/DVI...) jack on the set -top box.) I Select HDMI1/DVI input source with a HDMI to the H D M I Turn on the digital set-top box. (Refer to the owner's manual for the digital set .

Owner's Manual
Page 27
S-VIDEO VIDE VID CONNECTIONS & SETUP 2. How to the HDMI IN 1(DVI) jack on the set I O 1 (DVI) (CONTROL & SERVICE) AV IN 1 2 (RGB/DVI) jack on... picture quality, adjust the output resolution of the PC to use I Turn on the PC and the set . When connecting HDMI to the A U D I Select HDMI1/DVI input source with using the INPUT button on the set the output resolution appropriately...graphics card's output resolution to set . G If the PC has a DVI output and no HDMI output, a separated audio connection is necessary. G If the PC does not support Auto DVI, you need to 1360x768, 60Hz...
S-VIDEO VIDE VID CONNECTIONS & SETUP 2. How to the HDMI IN 1(DVI) jack on the set I O 1 (DVI) (CONTROL & SERVICE) AV IN 1 2 (RGB/DVI) jack on... picture quality, adjust the output resolution of the PC to use I Turn on the PC and the set . When connecting HDMI to the A U D I Select HDMI1/DVI input source with using the INPUT button on the set the output resolution appropriately...graphics card's output resolution to set . G If the PC has a DVI output and no HDMI output, a separated audio connection is necessary. G If the PC does not support Auto DVI, you need to 1360x768, 60Hz...

Owner's Manual
Page 28
...06 75.02 1280x768 47.693 59.99 1360x768 47.700 60.00 1366x768 47.700 60.00 CONNECTIONS & SETUP ! G When Source Devices connected with HDMI Input, output TV SET Resolution (480p, 720p, 1080i) and TV SET Display fit EIA/CEA-861-B Specification to the Cable or if there is ... PC mode, they provide the best picture quality. G Depending on the graphics card, DOS mode may become permanently imprinted on the screen. G If the HDMI Source Device is not connected to Screen. G Avoid keeping a fixed image on the screen. It provides the best picture quality. 26 G The synchronization input...
...06 75.02 1280x768 47.693 59.99 1360x768 47.700 60.00 1366x768 47.700 60.00 CONNECTIONS & SETUP ! G When Source Devices connected with HDMI Input, output TV SET Resolution (480p, 720p, 1080i) and TV SET Display fit EIA/CEA-861-B Specification to the Cable or if there is ... PC mode, they provide the best picture quality. G Depending on the graphics card, DOS mode may become permanently imprinted on the screen. G If the HDMI Source Device is not connected to Screen. G Avoid keeping a fixed image on the screen. It provides the best picture quality. 26 G The synchronization input...

Owner's Manual
Page 52
NOTE G In RGB-PC and HDMI PC mode, you prefer. 50 CHANNEL PICTURE SOUND TIMER SPECIAL SCREEN DVR APC ACC Advanced Reset CHANNEL PICTURE SOUND TIMER SPECIAL SCREEN DVR APC ACC ...
NOTE G In RGB-PC and HDMI PC mode, you prefer. 50 CHANNEL PICTURE SOUND TIMER SPECIAL SCREEN DVR APC ACC Advanced Reset CHANNEL PICTURE SOUND TIMER SPECIAL SCREEN DVR APC ACC ...

Owner's Manual
Page 55
...TV viewing or press 4 MENU button to return to select O n or O f f. When selecting APC options (Clear, Optimum and Soft), XD is LG Electronic's unique picture improving technology to display a real HD source through an advanced digital signal processing algorithm. Selecting the Manual 1. Press the F or G ...button to the previous menu. 53 It's not available to use this function in RGB-PC, HDMI-PC mode. 1 Press the MENU button and then use D or E button to select the PICTURE menu. 2 Press the G button and then use D...
...TV viewing or press 4 MENU button to return to select O n or O f f. When selecting APC options (Clear, Optimum and Soft), XD is LG Electronic's unique picture improving technology to display a real HD source through an advanced digital signal processing algorithm. Selecting the Manual 1. Press the F or G ...button to the previous menu. 53 It's not available to use this function in RGB-PC, HDMI-PC mode. 1 Press the MENU button and then use D or E button to select the PICTURE menu. 2 Press the G button and then use D...

Owner's Manual
Page 57
... LEVEL Adjusting the contrast and the brightness of the screen using the black level of the screen. This feature operates only in AV (NTSC-M) or HDMI mode. Press the EXIT button to return to TV viewing or 5 press the MENU button to return to select L o w or High. I High The screen gets...
... LEVEL Adjusting the contrast and the brightness of the screen using the black level of the screen. This feature operates only in AV (NTSC-M) or HDMI mode. Press the EXIT button to return to TV viewing or 5 press the MENU button to return to select L o w or High. I High The screen gets...

Owner's Manual
Page 71
... the SPECIAL menu. 2 Press the G button and then use D or E button to select XD Demo. 3 Press the G button to use this function in RGB-PC, HDMI-PC mode. XD DEMO Use it to see the difference between XD Demo on and XD Demo off.
... the SPECIAL menu. 2 Press the G button and then use D or E button to select XD Demo. 3 Press the G button to use this function in RGB-PC, HDMI-PC mode. XD DEMO Use it to see the difference between XD Demo on and XD Demo off.

Owner's Manual
Page 73
This function works in RGB-DTV 480p/720p/1080i, Component 480p/720p/1080i, HDMI 480p/720p/1080i. MEMORY/ERASE EXIT MARK LIVE TV TIME MENU MACHINE SLEEP TIME CONTROL ENTER TIME CONTROL FCR VOL CH MUTE 1 2 3 4 5 6 7 8 9 MTS 0 REVIEW 1 Press ... Manual config.. 3 Press the G button and then use Phase, Clock function in the following mode : RGB-PC, RGBDTV 480p/720p/1080i, Component 480p/720p/1080i, HDMI 480p/720p/1080i. Press the EXIT button to return to TV viewing or 5 press the MENU button to return to select Phase, Clock, H-position or...
This function works in RGB-DTV 480p/720p/1080i, Component 480p/720p/1080i, HDMI 480p/720p/1080i. MEMORY/ERASE EXIT MARK LIVE TV TIME MENU MACHINE SLEEP TIME CONTROL ENTER TIME CONTROL FCR VOL CH MUTE 1 2 3 4 5 6 7 8 9 MTS 0 REVIEW 1 Press ... Manual config.. 3 Press the G button and then use Phase, Clock function in the following mode : RGB-PC, RGBDTV 480p/720p/1080i, Component 480p/720p/1080i, HDMI 480p/720p/1080i. Press the EXIT button to return to TV viewing or 5 press the MENU button to return to select Phase, Clock, H-position or...

Owner's Manual
Page 75
.... ASPECT RATIO CONTROL (ARC) This feature lets you choose the way an analog picture with a 4:3 aspect ratio is displayed on your TV. I RGB-PC and HDMI PC input source use 4:3, 16:9, Zoom1, and Zoom2 aspect ratio. ! This phenomenon is , more enlarged at both vertically extended and cropped. INPUT TV POWER INPUT...
.... ASPECT RATIO CONTROL (ARC) This feature lets you choose the way an analog picture with a 4:3 aspect ratio is displayed on your TV. I RGB-PC and HDMI PC input source use 4:3, 16:9, Zoom1, and Zoom2 aspect ratio. ! This phenomenon is , more enlarged at both vertically extended and cropped. INPUT TV POWER INPUT...

Owner's Manual
Page 77
... an A/V control system) to send) 9 No Connection 1 5 6 9 75 Note: RS-232C connection cables are not supplied with the product. RS-232C Setup REMOTE CONTROL IN HDMI IN 2 1 (DVI) RGB AU (PC/DTV) (RG RS-232C IN (CONTROL & SERVICE) AV IN 1 S VIDEO AUDIO APPENDIX RGB IN (PC/DTV...) HDMI IN PC Type of the control device to the RS-232C jack on the product back panel. Connect the serial port of Connector; Pin Name ...
... an A/V control system) to send) 9 No Connection 1 5 6 9 75 Note: RS-232C connection cables are not supplied with the product. RS-232C Setup REMOTE CONTROL IN HDMI IN 2 1 (DVI) RGB AU (PC/DTV) (RG RS-232C IN (CONTROL & SERVICE) AV IN 1 S VIDEO AUDIO APPENDIX RGB IN (PC/DTV...) HDMI IN PC Type of the control device to the RS-232C jack on the product back panel. Connect the serial port of Connector; Pin Name ...

Owner's Manual
Page 80
... 1: Normal screen (4:3) Date 2: Wide screen (16:9) Date 3: Horizon Date 4: Zoom1 Date 5: Zoom2 Acknowledgement [c][ ][Set ID][ ][OK][Data][x] * Using the RGB-PC, RGB-DTV, Component or HDMI input, you select either 16:9 or 4:3 screen aspect ratio. 03. Volume Mute (Command2:e) To control volume mute on remote control. You can also adjust brightness...
... 1: Normal screen (4:3) Date 2: Wide screen (16:9) Date 3: Horizon Date 4: Zoom1 Date 5: Zoom2 Acknowledgement [c][ ][Set ID][ ][OK][Data][x] * Using the RGB-PC, RGB-DTV, Component or HDMI input, you select either 16:9 or 4:3 screen aspect ratio. 03. Volume Mute (Command2:e) To control volume mute on remote control. You can also adjust brightness...

Owner's Manual
Page 82
...: Structure MSB LSB 0000 000 0 External Input Input Number External Input 0001 0010 0100 0101 0110 1001 Data Analog AV Component RGB-DTV RGB-PC HDMI Input Number 0000 0001 Data Input1 Input2 Acknowledgement [b][ ][Set ID][ ][OK][Data][x] APPENDIX 80 Transmission [k][z][ ][Set ID][ ][FF][ ][Cr] Data FF: Read Acknowledgement [z][ ][Set ID...
...: Structure MSB LSB 0000 000 0 External Input Input Number External Input 0001 0010 0100 0101 0110 1001 Data Analog AV Component RGB-DTV RGB-PC HDMI Input Number 0000 0001 Data Input1 Input2 Acknowledgement [b][ ][Set ID][ ][OK][Data][x] APPENDIX 80 Transmission [k][z][ ][Set ID][ ][FF][ ][Cr] Data FF: Read Acknowledgement [z][ ][Set ID...

Owner's Manual
Page 83
...: Structure MSB LSB 0000 000 0 External Input Input Number External Input 0001 0010 0100 0101 0110 1001 Data Analog AV Component RGB-DTV RGB-PC HDMI Input Number 0000 0001 Data Input1 Input2 Acknowledgement [y][ ][Set ID][ ][OK][Data][x] * Real data mapping 1 0 : Step 0 A : Step 10 (Set ID 10) F : Step 15 (Set ID...
...: Structure MSB LSB 0000 000 0 External Input Input Number External Input 0001 0010 0100 0101 0110 1001 Data Analog AV Component RGB-DTV RGB-PC HDMI Input Number 0000 0001 Data Input1 Input2 Acknowledgement [y][ ][Set ID][ ][OK][Data][x] * Real data mapping 1 0 : Step 0 A : Step 10 (Set ID 10) F : Step 15 (Set ID...


