
Owner's Manual
Page 5
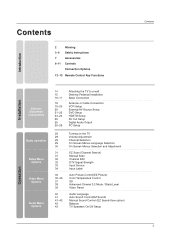
... Language Selection On Screen Menus Selection and Adjustment EZ Scan (Channel Search) Manual Scan Channel Edit DTV Signal Strength Input Source Input Label Auto Picture Control(EZ Picture) Color Temperature Control XD Advanced-Cinema 3:2 Mode / Black Level Video Reset Audio Language Auto Sound Control(EZ Sound) Manual Sound Control (EZ Sound-User...
... Language Selection On Screen Menus Selection and Adjustment EZ Scan (Channel Search) Manual Scan Channel Edit DTV Signal Strength Input Source Input Label Auto Picture Control(EZ Picture) Color Temperature Control XD Advanced-Cinema 3:2 Mode / Black Level Video Reset Audio Language Auto Sound Control(EZ Sound) Manual Sound Control (EZ Sound-User...

Owner's Manual
Page 8
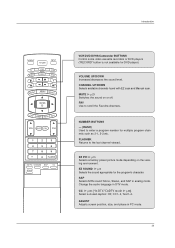
... mode. • illuminates green when the set is switched on . 8 ENTER ENTER POWER INPUT Button Button MENU ENTER Button Button VOLUME (F,G)Buttons CHANNEL (E,D)Buttons This picture shown below may be somewhat different from your TV. 42PC3D/3DC/3DV, 50PC3D Remote Control Sensor Power/Standby Indicator • illuminates red in standby mode...
... mode. • illuminates green when the set is switched on . 8 ENTER ENTER POWER INPUT Button Button MENU ENTER Button Button VOLUME (F,G)Buttons CHANNEL (E,D)Buttons This picture shown below may be somewhat different from your TV. 42PC3D/3DC/3DV, 50PC3D Remote Control Sensor Power/Standby Indicator • illuminates red in standby mode...
Owner's Manual
Page 9
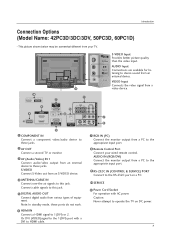
Or DVI (VIDEO)signal to stereo sound from a 11 video device. S-VIDEO Input AV IN 2 Provides better picture quality than the video input. VIDEO Input Connects the video signal from an external device. AUDIO IN (RGB/DVI) Connect the monitor output from various ... to HDMI cable. Connect cable signals to the RS-232C port on DC power. Introduction Connection Options (Model Name: 42PC3D/3DC/3DV, 50PC3D, 60PC1D) - This picture shown below may be somewhat different from an external device to 1(DVI) or 2.
Or DVI (VIDEO)signal to stereo sound from a 11 video device. S-VIDEO Input AV IN 2 Provides better picture quality than the video input. VIDEO Input Connects the video signal from an external device. AUDIO IN (RGB/DVI) Connect the monitor output from various ... to HDMI cable. Connect cable signals to the RS-232C port on DC power. Introduction Connection Options (Model Name: 42PC3D/3DC/3DV, 50PC3D, 60PC1D) - This picture shown below may be somewhat different from an external device to 1(DVI) or 2.

Owner's Manual
Page 10
CHANNEL (D, E) Buttons VOLUME (F,G) Buttons ENTER Button MENU Button INPUT Button (Power) Button Swivel Stand (42LC2D Only) - The TV can be somewhat different from your TV. Introduction Controls (Model Name: 32/37/42LC2D, 32LC2DU) - This picture shown below may be conveniently swivelled on . This is switched on its stand 30° to the left or...
CHANNEL (D, E) Buttons VOLUME (F,G) Buttons ENTER Button MENU Button INPUT Button (Power) Button Swivel Stand (42LC2D Only) - The TV can be somewhat different from your TV. Introduction Controls (Model Name: 32/37/42LC2D, 32LC2DU) - This picture shown below may be conveniently swivelled on . This is switched on its stand 30° to the left or...
Owner's Manual
Page 11
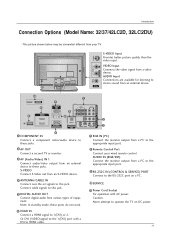
... 5 DIGITAL AUDIO OUT Connect digital audio from a video device. S-VIDEO Input Provides better picture quality than the video input. S-VIDEO Connect S-Video out from your wired remote control. This picture shown below may be somewhat different from an S-VIDEO device. 4 ANTENNA/CABLE IN Connect over...IN VIDEO AUDIO AV OUT AV IN 1 COMPONENT IN VIDEO AUDIO Introduction S-VIDEO VIDEO ( ) AUDIO AV OUT Connection Options (Model Name: 32/37/42LC2D, 32LC2DU) AV IN 1 S-VIDEO VIDEO ( ) AUDIO - VIDEO Input Connects the video signal from various types of equipment. Connect cable signals to...
... 5 DIGITAL AUDIO OUT Connect digital audio from a video device. S-VIDEO Input Provides better picture quality than the video input. S-VIDEO Connect S-Video out from your wired remote control. This picture shown below may be somewhat different from an S-VIDEO device. 4 ANTENNA/CABLE IN Connect over...IN VIDEO AUDIO AV OUT AV IN 1 COMPONENT IN VIDEO AUDIO Introduction S-VIDEO VIDEO ( ) AUDIO AV OUT Connection Options (Model Name: 32/37/42LC2D, 32LC2DU) AV IN 1 S-VIDEO VIDEO ( ) AUDIO - VIDEO Input Connects the video signal from various types of equipment. Connect cable signals to...
Owner's Manual
Page 13
... SOUND G p.41 Selects the sound appropriate for DVD player). ADJUST Adjusts screen position, size, and phase in DTV mode. EZ PIC G p.35 Selects a factory preset picture mode depending on or off. Change the audio language in PC mode. 13 VOLUME UP/DOWN Increases/decreases the sound level. CHANNEL UP/DOWN Selects...
... SOUND G p.41 Selects the sound appropriate for DVD player). ADJUST Adjusts screen position, size, and phase in DTV mode. EZ PIC G p.35 Selects a factory preset picture mode depending on or off. Change the audio language in PC mode. 13 VOLUME UP/DOWN Increases/decreases the sound level. CHANNEL UP/DOWN Selects...
Owner's Manual
Page 14
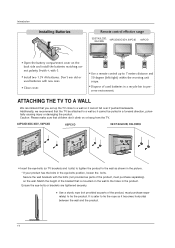
...'t mix old or used batteries in the product. ATTACHING THE TV TO A WALL We recommend that is safer to the wall as shown in the picture. * If your product has the bolts in a forward direction, potentially causing injury or damaging the product. Secure the wall brackets with the bolts ...I Install two 1.5V AA batteries. I Open the battery compartment cover on or hang from the TV. 42PC3D/3DC/3DV, 50PC3D 60PC1D 32/37/42LC2D, 32LC2DU I Use a sturdy rope (not provided as parts of used batteries with -). Introduction Installing Batteries Remote control effective range 32/37...
...'t mix old or used batteries in the product. ATTACHING THE TV TO A WALL We recommend that is safer to the wall as shown in the picture. * If your product has the bolts in a forward direction, potentially causing injury or damaging the product. Secure the wall brackets with the bolts ...I Install two 1.5V AA batteries. I Open the battery compartment cover on or hang from the TV. 42PC3D/3DC/3DV, 50PC3D 60PC1D 32/37/42LC2D, 32LC2DU I Use a sturdy rope (not provided as parts of used batteries with -). Introduction Installing Batteries Remote control effective range 32/37...
Owner's Manual
Page 15
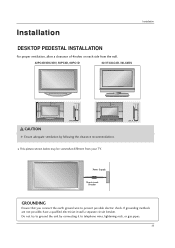
... that you connect the earth ground wire to ground the unit by following the clearance recommendations. I This picture shown below may be somewhat different from the wall. 42PC3D/3DC/3DV, 50PC3D, 60PC1D 32/37/42LC2D, 32LC2DU 4 inches 4 inches 4 inches 4 inches 4 inches 4 inches 4 inches 4 inches CAUTION G Ensure adequate ventilation by connecting it to...
... that you connect the earth ground wire to ground the unit by following the clearance recommendations. I This picture shown below may be somewhat different from the wall. 42PC3D/3DC/3DV, 50PC3D, 60PC1D 32/37/42LC2D, 32LC2DU 4 inches 4 inches 4 inches 4 inches 4 inches 4 inches 4 inches 4 inches CAUTION G Ensure adequate ventilation by connecting it to...
Owner's Manual
Page 18
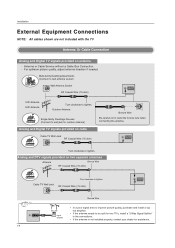
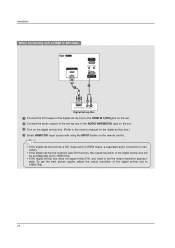
ANTENNA/ CABLE IN Turn clockwise to improve picture quality, purchase and install a sig- IDfIGtIThOALUeATUDaIOntenSn-VIaDEOisVIDnEOot ( ) inAUsDtIOalled properly, contact your dealer for outdoor antenna) Analog and Digital TV signals provided on cable Cable TV... TV signals provided on two separate antennas Antenna Bronze Wire RF Coaxial Wire (75 ohm) Cable TV Wall Jack Turn clockwise to tighten. For optimum picture quality, adjust antenna direction if needed. Analog and DTV signals provided on antenna - OPTICAL DIGITAL AUDIO OUT OPTICAL DIGITAL AUDIO OUT VIDE S-VID Multi-...
ANTENNA/ CABLE IN Turn clockwise to improve picture quality, purchase and install a sig- IDfIGtIThOALUeATUDaIOntenSn-VIaDEOisVIDnEOot ( ) inAUsDtIOalled properly, contact your dealer for outdoor antenna) Analog and Digital TV signals provided on cable Cable TV... TV signals provided on two separate antennas Antenna Bronze Wire RF Coaxial Wire (75 ohm) Cable TV Wall Jack Turn clockwise to tighten. For optimum picture quality, adjust antenna direction if needed. Analog and DTV signals provided on antenna - OPTICAL DIGITAL AUDIO OUT OPTICAL DIGITAL AUDIO OUT VIDE S-VID Multi-...
Owner's Manual
Page 19
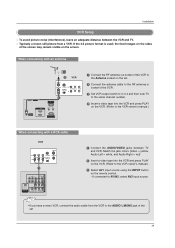
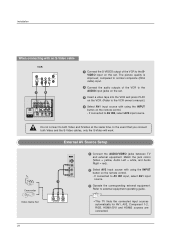
...screen. If connected to the RF antenna in socket of the screen may remain visible on the remote control. - Installation VCR Setup - If the 4:3 picture format is used; COMPONENT IN AV OUT AV IN 1 COMPONENT IN AV OUT AV IN 1 OPTICAL DIGITAL AUDIO OUT S-VIDEO VIDEO (MONO) AUDIO &#... OUT 1 OPTICAL DIGITAL AUDIO ( ) VIDEOS-VIDEO VIDEOAUDIO AUDIO OUT 1 Connect the AUDIO/VIDEO jacks between the VCR and TV. - Typically a frozen still picture from the VCR to the AUDIO L/MONO jack of the set . 2 Connect the antenna cable to AV IN2, select AV2 input source. Match the jack...
...screen. If connected to the RF antenna in socket of the screen may remain visible on the remote control. - Installation VCR Setup - If the 4:3 picture format is used; COMPONENT IN AV OUT AV IN 1 COMPONENT IN AV OUT AV IN 1 OPTICAL DIGITAL AUDIO OUT S-VIDEO VIDEO (MONO) AUDIO &#... OUT 1 OPTICAL DIGITAL AUDIO ( ) VIDEOS-VIDEO VIDEOAUDIO AUDIO OUT 1 Connect the AUDIO/VIDEO jacks between the VCR and TV. - Typically a frozen still picture from the VCR to the AUDIO L/MONO jack of the set . 2 Connect the antenna cable to AV IN2, select AV2 input source. Match the jack...
Owner's Manual
Page 20
... operating guide. • This TV finds the connected input sources automatically for AV1, AV2, Component 1-2, RGB, HDMI1/DVI and HDMI2 sources are connected. 20 The picture quality is improved; If connected to the SVIDEO input on the set . 3 Insert a video tape into the VCR and press PLAY on the set . External...
... operating guide. • This TV finds the connected input sources automatically for AV1, AV2, Component 1-2, RGB, HDMI1/DVI and HDMI2 sources are connected. 20 The picture quality is improved; If connected to the SVIDEO input on the set . 3 Insert a video tape into the VCR and press PLAY on the set . External...
Owner's Manual
Page 21
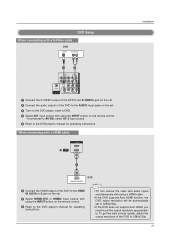
... AV1 input source with using the INPUT button on the remote control. 3 Refer to the DVD player's manual for operating instructions. To get the best picture quality, adjust the output resolution of the DVD to 1280x720p. 21 VIDEO AUDIO DVD Setup When connecting with a S-Video cable DVD S-VIDEO (R) AUDIO (L) COMPONENT IN...
... AV1 input source with using the INPUT button on the remote control. 3 Refer to the DVD player's manual for operating instructions. To get the best picture quality, adjust the output resolution of the DVD to 1280x720p. 21 VIDEO AUDIO DVD Setup When connecting with a S-Video cable DVD S-VIDEO (R) AUDIO (L) COMPONENT IN...
Owner's Manual
Page 22
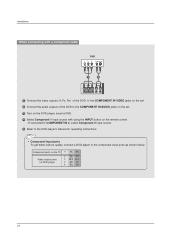
... source. 5 Refer to the component input ports as shown below. COMPONENT IN AV OUT AV IN 1 • Component Input ports VIDEO AUDIO To get better picture quality, connect a DVD player to the DVD player's manual for operating instructions. Installation When connecting with a component cable DVD B R (R) AUDIO (L) 1 2 VIDEO AUDIO ANTENNA/ CABLE IN...
... source. 5 Refer to the component input ports as shown below. COMPONENT IN AV OUT AV IN 1 • Component Input ports VIDEO AUDIO To get better picture quality, connect a DVD player to the DVD player's manual for operating instructions. Installation When connecting with a component cable DVD B R (R) AUDIO (L) 1 2 VIDEO AUDIO ANTENNA/ CABLE IN...
Owner's Manual
Page 23
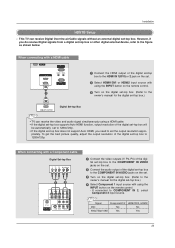
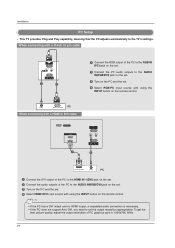
... outputs (Y, PB, PR) of the digiSERVICE tal set-top box to the COMPORGNB INENT IN VIDEO (PC) jacks on the set. To get the best picture quality, adjust the output resolution of the digital set-top box will be automatically set to 1280x720p. • If the digital set-top box does...
... outputs (Y, PB, PR) of the digiSERVICE tal set-top box to the COMPORGNB INENT IN VIDEO (PC) jacks on the set. To get the best picture quality, adjust the output resolution of the digital set-top box will be automatically set to 1280x720p. • If the digital set-top box does...
Owner's Manual
Page 24
... to the HDMI IN 1(DVI) jack on the set. 2 Connect the audio outputs of the set-top box to 1280x720p. 24 To get the best picture quality, adjust the output resolution of the digital set-top box will be automatically set to 1280x720p. • If the digital set-top box does...
... to the HDMI IN 1(DVI) jack on the set. 2 Connect the audio outputs of the set-top box to 1280x720p. 24 To get the best picture quality, adjust the output resolution of the digital set-top box will be automatically set to 1280x720p. • If the digital set-top box does...
Owner's Manual
Page 26
This TV provides Plug and Play capability, meaning that the PC adjusts automatically to 1024x768, 60Hz. (CONTROL&SERVICE) 26 To get the best picture quality, adjust the output resolution of the PC to set the output resolution appropriaRSt-2e32lCyIN. RGB IN (PC) AUDIO IN REMOTE (RGB/DVI) CONTROL IN &#...
This TV provides Plug and Play capability, meaning that the PC adjusts automatically to 1024x768, 60Hz. (CONTROL&SERVICE) 26 To get the best picture quality, adjust the output resolution of the PC to set the output resolution appropriaRSt-2e32lCyIN. RGB IN (PC) AUDIO IN REMOTE (RGB/DVI) CONTROL IN &#...
Owner's Manual
Page 27
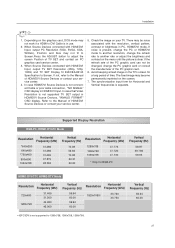
Installation 1. Check the image on the screen. 7. Avoid keeping a fixed image on the menu until the picture is not supported to 1280x768, 1360x768, 1366x768. 27 When Source Devices connected with HDMI/DVI Input, output PC Resolution (VGA, SVGA, XGA, WXGA), Position and ...
Installation 1. Check the image on the screen. 7. Avoid keeping a fixed image on the menu until the picture is not supported to 1280x768, 1360x768, 1366x768. 27 When Source Devices connected with HDMI/DVI Input, output PC Resolution (VGA, SVGA, XGA, WXGA), Position and ...

Owner's Manual
Page 28
..., this function is used . - And the horizontal screen size will also change the resolution, select the proper resolution in present input to see the best picture appearance. * Initializing (Reset to original factory values) 1 2 3 4 5 6 7 8 9 0 FLASHBK EZ PIC EZ SOUND SAP CC ADJUST ADJUST - To initialize ... and Phase 4 5 6 7 8 9 0 FLASHBK EZ PIC EZ SOUND SAP CC ADJUST ADJUST Mini Glossary Position This function is to adjust picture to left/right and up/down as you prefer. After connecting RGB-PC or HDMI/DVI to PC input and checking the screen quality. * ...
..., this function is used . - And the horizontal screen size will also change the resolution, select the proper resolution in present input to see the best picture appearance. * Initializing (Reset to original factory values) 1 2 3 4 5 6 7 8 9 0 FLASHBK EZ PIC EZ SOUND SAP CC ADJUST ADJUST - To initialize ... and Phase 4 5 6 7 8 9 0 FLASHBK EZ PIC EZ SOUND SAP CC ADJUST ADJUST Mini Glossary Position This function is to adjust picture to left/right and up/down as you prefer. After connecting RGB-PC or HDMI/DVI to PC input and checking the screen quality. * ...
Owner's Manual
Page 30
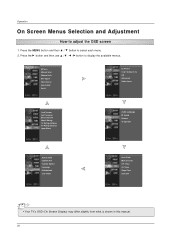
... the MENU button and then D / E button to select each menu. 2. EZ Scan Manual Scan Channel Edit DTV Signal Input Source Input Label Set ID EZ Picture Color Temperature XD Advanced Video Reset Lock System Set Password Block Channel Movie Rating TV Rating-Children TV Rating-General Input Block Audio Language EZ...
... the MENU button and then D / E button to select each menu. 2. EZ Scan Manual Scan Channel Edit DTV Signal Input Source Input Label Set ID EZ Picture Color Temperature XD Advanced Video Reset Lock System Set Password Block Channel Movie Rating TV Rating-Children TV Rating-General Input Block Audio Language EZ...

Owner's Manual
Page 32
... ways in order to select Channel Edit. 3 Press the G button. Press FAV button to add the channel to the previous menu. 32 bers and a preview picture. 4 Use D / E / F / G button to select a channel and then use D / E button to add or delete scanned channels. Operation EZ Scan Manual Scan Channel Edit DTV Signal Input...
... ways in order to select Channel Edit. 3 Press the G button. Press FAV button to add the channel to the previous menu. 32 bers and a preview picture. 4 Use D / E / F / G button to select a channel and then use D / E button to add or delete scanned channels. Operation EZ Scan Manual Scan Channel Edit DTV Signal Input...


