
Owners Manual
Page 1
See the label attached on the back cover and quote this manual carefully before operating your dealer when you require service. Retain it for future reference. www.lgcommercial.com LCD TV PLASMA TV OWNER'S MANUAL LCD TV MODELS PLASMA TV MODEL 32LC5DC 32LC5DCS 32LC5DCB 32LC50CS 42PX8DC 32LC50CB 42PG65C 32LX50C 42PG60C 37LC5DC 32LX50CS 37LC5DCB 37LC50C 37LC5DC1 37LC50CB 42LC5DC 42LB50C 32LX5DC 42LC50C 32LX5DCS 32LG500H 42LB5DC 37LG500H 32LC50C 42LG500H Please read this information to your set . Record model number and serial number of the set .
See the label attached on the back cover and quote this manual carefully before operating your dealer when you require service. Retain it for future reference. www.lgcommercial.com LCD TV PLASMA TV OWNER'S MANUAL LCD TV MODELS PLASMA TV MODEL 32LC5DC 32LC5DCS 32LC5DCB 32LC50CS 42PX8DC 32LC50CB 42PG65C 32LX50C 42PG60C 37LC5DC 32LX50CS 37LC5DCB 37LC50C 37LC5DC1 37LC50CB 42LC5DC 42LB50C 32LX5DC 42LC50C 32LX5DCS 32LG500H 42LB5DC 37LG500H 32LC50C 42LG500H Please read this information to your set . Record model number and serial number of the set .
Owners Manual
Page 7
...is turned on surface of this product must use shielded signal interface cables (D-sub 15 pin cable) with TV. LCD TV PLASMA TV Owner's Manual http://www.lgusa.com www.lg.ca Copyright© 2007 LGE, All Rights Reserved. PIP CH SWAP + DVD VCR PIP INPUT INFO ...be a small "flicker" when it for the product exteri- b. PREPARATION PREPARATION ACCESSORIES Ensure that excessive pressure for all models. Do not dispose of the exterior. Avoid touching the LCD screen or holding your local authority. On Disposal a. Disposal of this product with general household waste.
...is turned on surface of this product must use shielded signal interface cables (D-sub 15 pin cable) with TV. LCD TV PLASMA TV Owner's Manual http://www.lgusa.com www.lg.ca Copyright© 2007 LGE, All Rights Reserved. PIP CH SWAP + DVD VCR PIP INPUT INFO ...be a small "flicker" when it for the product exteri- b. PREPARATION PREPARATION ACCESSORIES Ensure that excessive pressure for all models. Do not dispose of the exterior. Avoid touching the LCD screen or holding your local authority. On Disposal a. Disposal of this product with general household waste.

Owners Manual
Page 8
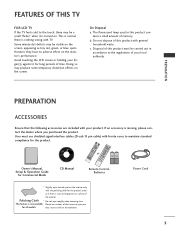
... PREPARATION LCD TV model only Option Extras x 2 Protective Bracket and Bolt for Power Cord (This feature is not available for all models.) (Refer to P.12-13, 15) M4xL22 Torx plus Star head screw (Refer to p.7, 15) D-sub 15 pin Cable Only 32/37/42LC5DC*, 32/37/42LC50C*, 42LB5DC, 42LB50C models Cable ...to p.12-13) Cable Holder (Refer to p.12-13) 4-Bolts for stand assembly (Refer to p.16) Only 32/37LC5DC*, 32/37LC50C* models Only 32/37/42LG500H models x4 x4 or Bolts for stand assembly Screw for stand fixing Protection Cover (Refer to P.15) (Refer to P.19) Cable Holder Plug ...
... PREPARATION LCD TV model only Option Extras x 2 Protective Bracket and Bolt for Power Cord (This feature is not available for all models.) (Refer to P.12-13, 15) M4xL22 Torx plus Star head screw (Refer to p.7, 15) D-sub 15 pin Cable Only 32/37/42LC5DC*, 32/37/42LC50C*, 42LB5DC, 42LB50C models Cable ...to p.12-13) Cable Holder (Refer to p.12-13) 4-Bolts for stand assembly (Refer to p.16) Only 32/37LC5DC*, 32/37LC50C* models Only 32/37/42LG500H models x4 x4 or Bolts for stand assembly Screw for stand fixing Protection Cover (Refer to P.15) (Refer to P.19) Cable Holder Plug ...

Owners Manual
Page 11
... MENU Button ENTER Button VOLUME (-,+) Buttons CHANNEL (E, D) Buttons 9 INPUT MENU ENTER VOL CH Remote Control Sensor Power/Standby Indicator Illuminates red when the TV is switched on . Illuminates green when the TV is sold, separately. POWER Button INPUT Button MENU Button ENTER Button VOLUME Buttons CHANNEL Buttons 42PG60C, 42PG65C Stand (Only 42PG65C...
... MENU Button ENTER Button VOLUME (-,+) Buttons CHANNEL (E, D) Buttons 9 INPUT MENU ENTER VOL CH Remote Control Sensor Power/Standby Indicator Illuminates red when the TV is switched on . Illuminates green when the TV is sold, separately. POWER Button INPUT Button MENU Button ENTER Button VOLUME Buttons CHANNEL Buttons 42PG60C, 42PG65C Stand (Only 42PG65C...
Owners Manual
Page 14
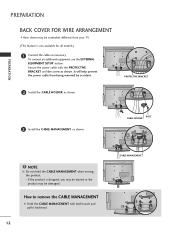
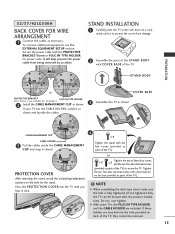
To connect an additional equipment, see the EXTERNAL EQUIPMENT SETUP section. If the product is not available for all models.) 1 Connect the cables as necessary. PROTECTIVE BRACKET 2 Install the CABLE HOLDER as shown. 2 Install the CABLE MANAGEMENT as shown. Secure the power cable ...the CABLE MANAGEMENT G Hold the CABLE MANAGEMENT with the PROTECTIVE BRACKET and the screw as shown. It will help prevent the power cable from your TV. (This feature is dropped, you may be injured or the product may be damaged. PREPARATION PREPARATION BACK COVER FOR WIRE ARRANGEMENT ■ Here ...
To connect an additional equipment, see the EXTERNAL EQUIPMENT SETUP section. If the product is not available for all models.) 1 Connect the cables as necessary. PROTECTIVE BRACKET 2 Install the CABLE HOLDER as shown. 2 Install the CABLE MANAGEMENT as shown. Secure the power cable ...the CABLE MANAGEMENT G Hold the CABLE MANAGEMENT with the PROTECTIVE BRACKET and the screw as shown. It will help prevent the power cable from your TV. (This feature is dropped, you may be injured or the product may be damaged. PREPARATION PREPARATION BACK COVER FOR WIRE ARRANGEMENT ■ Here ...

Owners Manual
Page 15
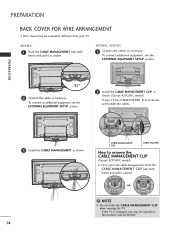
To connect an additional equipment, see the EXTERNAL EQUIPMENT SETUP section. PROTECTIVE BRACKET BOLT CABLE HOLDER 13 It will help prevent the power cable from being removed by accident. 3 Install the CABLE HOLDER as shown. Secure the power cable with the PROTECTIVE BRACKET and the screw as shown. PREPARATION (This feature is not available for all models.) 1 To separate the CABLE HOLDER, loosen the bolt installed the set. 2 Connect the cables as necessary.
To connect an additional equipment, see the EXTERNAL EQUIPMENT SETUP section. PROTECTIVE BRACKET BOLT CABLE HOLDER 13 It will help prevent the power cable from being removed by accident. 3 Install the CABLE HOLDER as shown. Secure the power cable with the PROTECTIVE BRACKET and the screw as shown. PREPARATION (This feature is not available for all models.) 1 To separate the CABLE HOLDER, loosen the bolt installed the set. 2 Connect the cables as necessary.
Owners Manual
Page 16
To connect additional equipment, see the EXTERNAL EQUIPMENT SETUP section. 2 Install the CABLE MANAGEMENT CLIP as shown. (Except 42PG60C model) If your TV. 42PX8DC 1 Hold the CABLE MANAGEMENT with both hands and pull it as shown and bundle the cables. 3 Install the CABLE MANAGEMENT as ...CABLE HOLDER How to remove the CABLE MANAGEMENT CLIP (Except 42PG60C model) G First, press the cable management. To connect an additional equipment, see the EXTERNAL EQUIPMENT SETUP section. 45° 2 Connect the cables as shown. If the TV is dropped, you may be injured or the product may be...
To connect additional equipment, see the EXTERNAL EQUIPMENT SETUP section. 2 Install the CABLE MANAGEMENT CLIP as shown. (Except 42PG60C model) If your TV. 42PX8DC 1 Hold the CABLE MANAGEMENT with both hands and pull it as shown and bundle the cables. 3 Install the CABLE MANAGEMENT as ...CABLE HOLDER How to remove the CABLE MANAGEMENT CLIP (Except 42PG60C model) G First, press the cable management. To connect an additional equipment, see the EXTERNAL EQUIPMENT SETUP section. 45° 2 Connect the cables as shown. If the TV is dropped, you may be injured or the product may be...
Owners Manual
Page 17
.... 4 x 4 Tighten the stand with the PROTECTIVE BRACKET/Screw or PLUG IN TYPE HOLDER for all models.) 2 Install the CABLE MANAGEMENT CLIP as shown and bundle the cables. ioned surface to secure the TV. If these four screws and the two Torx plus star head screws with COVER BASE of the... TV, they cannot be removed. 15 ver bit (not provided as parts of the TV) to protect the screen from being removed by accident. PREPARATION 32/37/42LG500H BACK COVER FOR WIRE ARRANGEMENT 1 Connect the cables as shown. ...
.... 4 x 4 Tighten the stand with the PROTECTIVE BRACKET/Screw or PLUG IN TYPE HOLDER for all models.) 2 Install the CABLE MANAGEMENT CLIP as shown and bundle the cables. ioned surface to secure the TV. If these four screws and the two Torx plus star head screws with COVER BASE of the... TV, they cannot be removed. 15 ver bit (not provided as parts of the TV) to protect the screen from being removed by accident. PREPARATION 32/37/42LG500H BACK COVER FOR WIRE ARRANGEMENT 1 Connect the cables as shown. ...
Owners Manual
Page 19
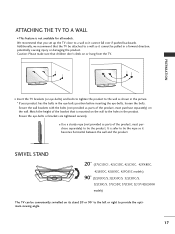
... Match the height of the product, must purchase separately) on or hang from the TV. SWIVEL STAND 20° (37LC5DC1, 42LC5DC, 42LC50C, 42PX8DC, 42LB5DC, 42LB50C, 42PG65C models) 90° (32LX5DC/S, 32LX50C/S, 32LC5DC/S, 32LC50C/S, 37LC5DC, 37LC50C, 32/37/42LG500H models) The TV can be conveniently swivelled on the wall to a wall so it cannot fall over if...
... Match the height of the product, must purchase separately) on or hang from the TV. SWIVEL STAND 20° (37LC5DC1, 42LC5DC, 42LC50C, 42PX8DC, 42LB5DC, 42LB50C, 42PG65C models) 90° (32LX5DC/S, 32LX50C/S, 32LC5DC/S, 32LC50C/S, 37LC5DC, 37LC50C, 32/37/42LG500H models) The TV can be conveniently swivelled on the wall to a wall so it cannot fall over if...
Owners Manual
Page 21
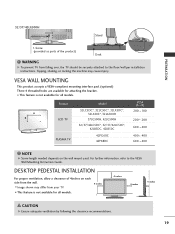
... For proper ventilation, allow a clearance of the product) Desk WARNING G To prevent TV from falling over, the TV should be securely attached to the VESA Wall Mounting Instruction Guide. A B Product LCD TV PLASMA TV Model 32LC5DC*, 32LC50C*, 32LX5DC*, 32LX50C*, 32LG500H 37LG500H, 42LG500H 32/37/42LC5DC*, 32/37/42LC50C*, 42LB5DC, 42LB50C 42PG60C 42PX8DC VESA (A * B) 200 * 100 200 * 200 600...
... For proper ventilation, allow a clearance of the product) Desk WARNING G To prevent TV from falling over, the TV should be securely attached to the VESA Wall Mounting Instruction Guide. A B Product LCD TV PLASMA TV Model 32LC5DC*, 32LC50C*, 32LX5DC*, 32LX50C*, 32LG500H 37LG500H, 42LG500H 32/37/42LC5DC*, 32/37/42LC50C*, 42LB5DC, 42LB50C 42PG60C 42PX8DC VESA (A * B) 200 * 100 200 * 200 600...
Owners Manual
Page 23
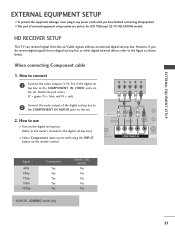
...Match the jack colors (Y = green, PB = blue, and PR = red). How to the owner's manual for LCD TV(Except 32/37/42LG500H) models. HD RECEIVER SETUP This TV can receive Digital Over-the-air/Cable signals without an external digital set -top box.) ■ Select Component input source ... M.P.I. RJP RFACE VIDEO AUDIO S-VIDEO ( ) COMPONENT IN Signal 480i 480p 720p 1080i 1080p Component Yes Yes Yes Yes Yes * 42LB5DC, 42LB50C model only HDMI1/DVI, HDMI2 No Yes Yes Yes Yes 21 EXTERNAL EQUIPMENT SETUP EXTERNAL EQUIPMENT SETUP ■ To prevent the equipment damage, never plug ...
...Match the jack colors (Y = green, PB = blue, and PR = red). How to the owner's manual for LCD TV(Except 32/37/42LG500H) models. HD RECEIVER SETUP This TV can receive Digital Over-the-air/Cable signals without an external digital set -top box.) ■ Select Component input source ... M.P.I. RJP RFACE VIDEO AUDIO S-VIDEO ( ) COMPONENT IN Signal 480i 480p 720p 1080i 1080p Component Yes Yes Yes Yes Yes * 42LB5DC, 42LB50C model only HDMI1/DVI, HDMI2 No Yes Yes Yes Yes 21 EXTERNAL EQUIPMENT SETUP EXTERNAL EQUIPMENT SETUP ■ To prevent the equipment damage, never plug ...
Owners Manual
Page 28
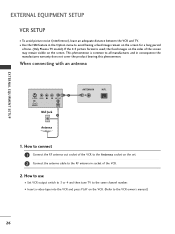
...How to use ■ Set VCR output switch to 3 or 4 and then tune TV to the same channel number. ■ Insert a video tape into the VCR and press PLAY on the sides of time. (Only Plasma TV model). EXTERNAL EQUIPMENT SETUP EXTERNAL EQUIPMENT SETUP VCR SETUP ■ To avoid picture noise (...interference), leave an adequate distance between the VCR and TV. ■ Use the ISM feature in the Option menu to avoid having ...
...How to use ■ Set VCR output switch to 3 or 4 and then tune TV to the same channel number. ■ Insert a video tape into the VCR and press PLAY on the sides of time. (Only Plasma TV model). EXTERNAL EQUIPMENT SETUP EXTERNAL EQUIPMENT SETUP VCR SETUP ■ To avoid picture noise (...interference), leave an adequate distance between the VCR and TV. ■ Use the ISM feature in the Option menu to avoid having ...
Owners Manual
Page 32
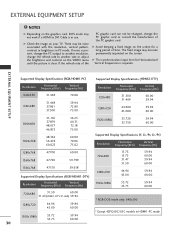
... input form for a long period of the PC graphic card. G Check the image on your TV. There may become permanently imprinted on the screen. If noise is present, change the PC output ...PC) Resolution Horizontal Vertical Frequency(KHz) Frequency(Hz) 640x350 31.469 70.08 640x480 31.469 37.861 37.500 59.94 72.80 75.00 Supported Display Specifications (HDMI2-DTV) Resolution Horizontal Vertical Frequency...72 33.75 30 59.94 60.00 * RGB-DOS mode only: 640x350 * Except 42PG60C/65C models in HDMI1-PC mode. EXTERNAL EQUIPMENT SETUP NOTES G Depending on the graphics card, DOS mode may ...
... input form for a long period of the PC graphic card. G Check the image on your TV. There may become permanently imprinted on the screen. If noise is present, change the PC output ...PC) Resolution Horizontal Vertical Frequency(KHz) Frequency(Hz) 640x350 31.469 70.08 640x480 31.469 37.861 37.500 59.94 72.80 75.00 Supported Display Specifications (HDMI2-DTV) Resolution Horizontal Vertical Frequency...72 33.75 30 59.94 60.00 * RGB-DOS mode only: 640x350 * Except 42PG60C/65C models in HDMI1-PC mode. EXTERNAL EQUIPMENT SETUP NOTES G Depending on the graphics card, DOS mode may ...
Owners Manual
Page 35
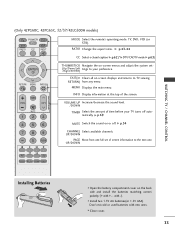
.... INFO Display information at the top of screen information to the next one full set - (Up/Down/Left /Right/ENTER) tings to TV viewing RETURN) from one . G p.34 CHANNEL Select available channels. EXIT(or Clears all on -screen menus and adjust the system set of...aspect ratio. PIP CH+ PIP SWAP PIP INPUT Installing Batteries ■ Open the battery compartment cover on or off automatically. WATCHING TV / CHANNEL CONTROL (Only 42PG60C, 42PG65C, 32/37/42LG500H models) TV POWER DVD STB VCR RATIO CC INPUT ENTER RETURN MENU INFO i VOL TIMER MUTE 12 P CH A G E 3 456...
.... INFO Display information at the top of screen information to the next one full set - (Up/Down/Left /Right/ENTER) tings to TV viewing RETURN) from one . G p.34 CHANNEL Select available channels. EXIT(or Clears all on -screen menus and adjust the system set of...aspect ratio. PIP CH+ PIP SWAP PIP INPUT Installing Batteries ■ Open the battery compartment cover on or off automatically. WATCHING TV / CHANNEL CONTROL (Only 42PG60C, 42PG65C, 32/37/42LG500H models) TV POWER DVD STB VCR RATIO CC INPUT ENTER RETURN MENU INFO i VOL TIMER MUTE 12 P CH A G E 3 456...

Owners Manual
Page 37
... Ratio Caption/Text Caption Options Language ISM Method Low Power Set ID Only 42PX8DC model 35 Block Downloadable Rating SCREEN SETUP VIDEO AUDIO TIME OPTION SCREEN LOCK Auto config. ON-SCREEN MENUS SELECTION Your TV's OSD (On Screen Display) may differ slightly from what is shown in this...the MENU button and then use D E F G or available menus. Block Downloadable Rating For Canada Lock System Set Password Block Channel TV Rating-English TV Rating-French Aux. Manual config. or button to display the SETUP SETUP VIDEO AUDIO TIME OPTION SCREEN LOCK EZ Scan Manual Scan Channel Edit...
... Ratio Caption/Text Caption Options Language ISM Method Low Power Set ID Only 42PX8DC model 35 Block Downloadable Rating SCREEN SETUP VIDEO AUDIO TIME OPTION SCREEN LOCK Auto config. ON-SCREEN MENUS SELECTION Your TV's OSD (On Screen Display) may differ slightly from what is shown in this...the MENU button and then use D E F G or available menus. Block Downloadable Rating For Canada Lock System Set Password Block Channel TV Rating-English TV Rating-French Aux. Manual config. or button to display the SETUP SETUP VIDEO AUDIO TIME OPTION SCREEN LOCK EZ Scan Manual Scan Channel Edit...
Owners Manual
Page 47
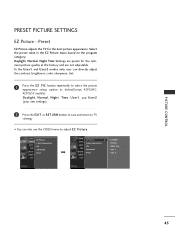
Preset EZ Picture adjusts the TV for the optimum picture quality at the factory and are preset for the best picture appearance. ... 1 Press the EZ PIC button repeatedly to select the picture appearance setup option as below(Except 42PG60C, 42PG65C models): Daylight, Normal, Night Time, User1, and User2 (your own settings). 2 Press the EXIT or RETURN button to save and return ...to TV viewing. ■ You can also use the VIDEO menu to adjust EZ Picture. SETUP VIDEO AUDIO TIME OPTION SCREEN...
Preset EZ Picture adjusts the TV for the optimum picture quality at the factory and are preset for the best picture appearance. ... 1 Press the EZ PIC button repeatedly to select the picture appearance setup option as below(Except 42PG60C, 42PG65C models): Daylight, Normal, Night Time, User1, and User2 (your own settings). 2 Press the EXIT or RETURN button to save and return ...to TV viewing. ■ You can also use the VIDEO menu to adjust EZ Picture. SETUP VIDEO AUDIO TIME OPTION SCREEN...
Owners Manual
Page 54
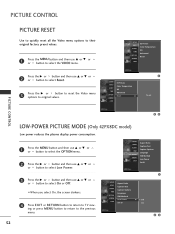
... SETUP VIDEO AUDIO TIME OPTION SCREEN LOCK EZ Picture Color Temperature XD Advanced Reset G 1 To set PICTURE CONTROL 23 LOW-POWER PICTURE MODE (Only 42PX8DC model) Low power reduces the plasma display power consumption. 1 Press the MENU button and then use D or E or or button to select the OPTION menu. 2 Press... then use D or E or or button to select O n or O f f. ■ When you select On, the screen darkens. 4 Press EXIT or RETURN button to return to TV view-
... SETUP VIDEO AUDIO TIME OPTION SCREEN LOCK EZ Picture Color Temperature XD Advanced Reset G 1 To set PICTURE CONTROL 23 LOW-POWER PICTURE MODE (Only 42PX8DC model) Low power reduces the plasma display power consumption. 1 Press the MENU button and then use D or E or or button to select the OPTION menu. 2 Press... then use D or E or or button to select O n or O f f. ■ When you select On, the screen darkens. 4 Press EXIT or RETURN button to return to TV view-

Owners Manual
Page 57
... are not adjustable. 1 Press the EZ SOUND button repeatedly to select the appropriate sound setup as below(Except 42PG60C, 42PG65C models): Normal, Stadium, News, Music, Theater, and User (your own settings). 2 Press EXIT or RETURN button to return to TV viewing. ■ You can also adjust EZ Sound in the AUDIO menu.
... are not adjustable. 1 Press the EZ SOUND button repeatedly to select the appropriate sound setup as below(Except 42PG60C, 42PG65C models): Normal, Stadium, News, Music, Theater, and User (your own settings). 2 Press EXIT or RETURN button to return to TV viewing. ■ You can also adjust EZ Sound in the AUDIO menu.
Owners Manual
Page 84
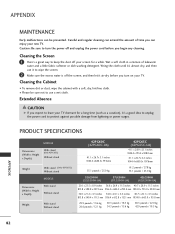
... or power surges. Extended Absence CAUTION G If you expect to leave your TV. PRODUCT SPECIFICATIONS MODELS Dimensions (Width x Height x Depth) With stand (Only 42PG65C) Without stand Weight With stand (Only 42PG65C) Without stand MODELS Dimensions (Width x Height x Depth) With stand Without stand Weight With stand...pounds / 22.0 kg 42.9 pounds / 19.5 kg APPENDIX 82 Cleaning the Screen 1 Here's a great way to turn the power off your new TV. Cleaning the Cabinet ■ To remove dirt or dust, wipe the cabinet with a soft, dry, lint-free cloth. ■ Please be prevented....
... or power surges. Extended Absence CAUTION G If you expect to leave your TV. PRODUCT SPECIFICATIONS MODELS Dimensions (Width x Height x Depth) With stand (Only 42PG65C) Without stand Weight With stand (Only 42PG65C) Without stand MODELS Dimensions (Width x Height x Depth) With stand Without stand Weight With stand...pounds / 22.0 kg 42.9 pounds / 19.5 kg APPENDIX 82 Cleaning the Screen 1 Here's a great way to turn the power off your new TV. Cleaning the Cabinet ■ To remove dirt or dust, wipe the cabinet with a soft, dry, lint-free cloth. ■ Please be prevented....
Owners Manual
Page 86
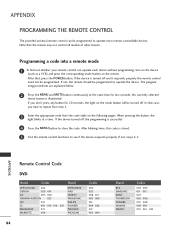
...devices. APPENDIX Remote Control Code DVD Brand Codes Brand APEX DIGITAL 022 DENON 020 014 GE 005 006 HARMAN KARDON 027 JVC 012 LG 001 010 016 025 MAGNAVOX 013 MARANTZ 024 MITSUBISHI NAD ONKYO PANASONIC PHILIPS PIONEER PROCEED PROSCAN Codes 002 023 008 017 003 009... off , the programming is stored. 5 Test the remote control functions to operate the device. After that the remote may not control all models of other brands. In that case, you don't press any button for two seconds; APPENDIX PROGRAMMING THE REMOTE CONTROL The provided universal remote ...
...devices. APPENDIX Remote Control Code DVD Brand Codes Brand APEX DIGITAL 022 DENON 020 014 GE 005 006 HARMAN KARDON 027 JVC 012 LG 001 010 016 025 MAGNAVOX 013 MARANTZ 024 MITSUBISHI NAD ONKYO PANASONIC PHILIPS PIONEER PROCEED PROSCAN Codes 002 023 008 017 003 009... off , the programming is stored. 5 Test the remote control functions to operate the device. After that the remote may not control all models of other brands. In that case, you don't press any button for two seconds; APPENDIX PROGRAMMING THE REMOTE CONTROL The provided universal remote ...


