
Owners Manual
Page 4
...power outlet as this product near flammable objects such as gasoline or candles or expose the TV to direct air conditioning. 16 Do not expose to dripping or splashing and do not drop onto the screen with a three-prong grounded AC plug must remain readily operable. 19 Keep the product ...away from physical or mechanical abuse, such as vases, cups, etc. Any of the appliance, and have a qualified electrician install a separate circuit breaker. Do not make sure not to install the TV by ...
...power outlet as this product near flammable objects such as gasoline or candles or expose the TV to direct air conditioning. 16 Do not expose to dripping or splashing and do not drop onto the screen with a three-prong grounded AC plug must remain readily operable. 19 Keep the product ...away from physical or mechanical abuse, such as vases, cups, etc. Any of the appliance, and have a qualified electrician install a separate circuit breaker. Do not make sure not to install the TV by ...
Owners Manual
Page 6
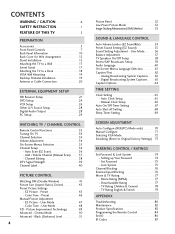
...26 Other A/V Source Setup 28 Digital Audio Output 28 PC Setup 29 WATCHING TV / CHANNEL CONTROL Remote Control Functions 32 Turning On TV 34 Channel Selection 34 Volume Adjustment 34 On-Screen Menus Selection 35 Channel Setup 36 - Setting up Your Password 74 Set ...Cover for Wire Arrangement 12 Stand Installation 15 Attaching the TV to a Wall 17 Swivel Stand 17 Attaching the TV to Original Factory Settings) . 73 PARENTAL CONTROL / RATINGS Set Password & Lock System 74 - Add / Delete Channel (Manual Scan 37 - Picture Improvement Technology 49 Advanced - Cinema Mode 50...
...26 Other A/V Source Setup 28 Digital Audio Output 28 PC Setup 29 WATCHING TV / CHANNEL CONTROL Remote Control Functions 32 Turning On TV 34 Channel Selection 34 Volume Adjustment 34 On-Screen Menus Selection 35 Channel Setup 36 - Setting up Your Password 74 Set ...Cover for Wire Arrangement 12 Stand Installation 15 Attaching the TV to a Wall 17 Swivel Stand 17 Attaching the TV to Original Factory Settings) . 73 PARENTAL CONTROL / RATINGS Set Password & Lock System 74 - Add / Delete Channel (Manual Scan 37 - Picture Improvement Technology 49 Advanced - Cinema Mode 50...
Owners Manual
Page 7
... LCD TV If the TV feels cold to the regulations of your local authority. This is normal, there is missing, please contact the dealer where you purchased the product. User must be visible on the screen. PIP CH SWAP + DVD VCR PIP INPUT INFO EXIT CC MENU RATIO SAP... Cord * Slightly wipe stained spot on . LCD TV PLASMA TV Owner's Manual http://www.lgusa.com www.lg.ca Copyright© 2007 LGE, All Rights Reserved. or if there is turned on the exterior only with general household waste. Avoid touching the LCD screen or holding your product. On Disposal a. PIP...
... LCD TV If the TV feels cold to the regulations of your local authority. This is normal, there is missing, please contact the dealer where you purchased the product. User must be visible on the screen. PIP CH SWAP + DVD VCR PIP INPUT INFO EXIT CC MENU RATIO SAP... Cord * Slightly wipe stained spot on . LCD TV PLASMA TV Owner's Manual http://www.lgusa.com www.lg.ca Copyright© 2007 LGE, All Rights Reserved. or if there is turned on the exterior only with general household waste. Avoid touching the LCD screen or holding your product. On Disposal a. PIP...
Owners Manual
Page 17
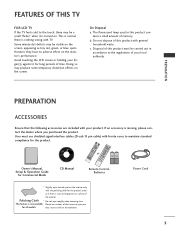
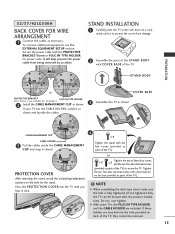
PREPARATION 32/37/42LG500H BACK COVER FOR WIRE ARRANGEMENT 1 Connect the cables as shown and bundle the cables. If your TV has the CABLE HOLDER, install it as necessary. Press the PROTECTION COVER into the hole provided on a cush- To connect additional equipment... the included protection cover over tighten. ver bit (not provided as parts of the TV) to protect the screen from being removed by accident. STAND INSTALLATION 1 Carefully place the TV screen side down on back of the TV). ! If these four screws and the two Torx plus star head screws with the...
PREPARATION 32/37/42LG500H BACK COVER FOR WIRE ARRANGEMENT 1 Connect the cables as shown and bundle the cables. If your TV has the CABLE HOLDER, install it as necessary. Press the PROTECTION COVER into the hole provided on a cush- To connect additional equipment... the included protection cover over tighten. ver bit (not provided as parts of the TV) to protect the screen from being removed by accident. STAND INSTALLATION 1 Carefully place the TV screen side down on back of the TV). ! If these four screws and the two Torx plus star head screws with the...
Owners Manual
Page 18
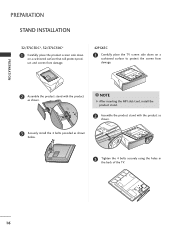
... the holes in the back of the TV. 16 PREPARATION PREPARATION STAND INSTALLATION 32/37LC5DC*, 32/37LC50C* 1 Carefully place the product screen side down on a cushioned surface that will protect product and screen from damage. 42PG65C 1 Carefully place the TV screen side down on a cushioned surface to protect the screen from damage. 2 Assemble the product stand with...
... the holes in the back of the TV. 16 PREPARATION PREPARATION STAND INSTALLATION 32/37LC5DC*, 32/37LC50C* 1 Carefully place the product screen side down on a cushioned surface that will protect product and screen from damage. 42PG65C 1 Carefully place the TV screen side down on a cushioned surface to protect the screen from damage. 2 Assemble the product stand with...
Owners Manual
Page 28
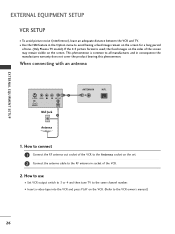
... of the VCR to the Antenna socket on the set. 2 Connect the antenna cable to avoid having a fixed image remain on the screen for a long period of time. (Only Plasma TV model). When connecting with an antenna 1 S-VIDEO VIDEO L R ANT OUT OUTPUT SWITCH ANT IN Wall Jack 2 Antenna ANTENNA IN M.P.I. 1. ... this phenomenon. This phenomenon is used; How to use ■ Set VCR output switch to 3 or 4 and then tune TV to the same channel number. ■ Insert a video tape into the VCR and press PLAY on the screen. If the 4:3 picture format is common to the VCR owner's manual.) 26
... of the VCR to the Antenna socket on the set. 2 Connect the antenna cable to avoid having a fixed image remain on the screen for a long period of time. (Only Plasma TV model). When connecting with an antenna 1 S-VIDEO VIDEO L R ANT OUT OUTPUT SWITCH ANT IN Wall Jack 2 Antenna ANTENNA IN M.P.I. 1. ... this phenomenon. This phenomenon is used; How to use ■ Set VCR output switch to 3 or 4 and then tune TV to the same channel number. ■ Insert a video tape into the VCR and press PLAY on the screen. If the 4:3 picture format is common to the VCR owner's manual.) 26
Owners Manual
Page 32
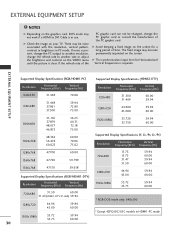
...DVI Cable is in HDMI1-PC mode. There may become permanently imprinted on the screen. G The synchronization input form for a long period of time. EXTERNAL EQUIPMENT...Frequency(KHz) Frequency(Hz) 640x350 31.469 70.08 640x480 31.469 37.861 37.500 59.94 72.80 75.00 Supported Display Specifications (HDMI2-DTV)....960 45.000 59.94 60.00 800x600 1024x768 35.156 37.879 48.077 46.875 48.363 56.476 60.023 ... Except 42PG60C/65C models in use. G Avoid keeping a fixed image on the screen for Horizontal and Vertical frequencies is separate. EXTERNAL EQUIPMENT SETUP NOTES G Depending on ...
...DVI Cable is in HDMI1-PC mode. There may become permanently imprinted on the screen. G The synchronization input form for a long period of time. EXTERNAL EQUIPMENT...Frequency(KHz) Frequency(Hz) 640x350 31.469 70.08 640x480 31.469 37.861 37.500 59.94 72.80 75.00 Supported Display Specifications (HDMI2-DTV)....960 45.000 59.94 60.00 800x600 1024x768 35.156 37.879 48.077 46.875 48.363 56.476 60.023 ... Except 42PG60C/65C models in use. G Avoid keeping a fixed image on the screen for Horizontal and Vertical frequencies is separate. EXTERNAL EQUIPMENT SETUP NOTES G Depending on ...

Owners Manual
Page 34
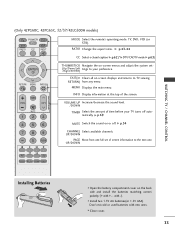
...input source for type of program. G p.42 VCR/DVD Control video cassette recorders or DVD players. TV INPUT In AV 1-2, Component, RGB, HDMI1/DVI, and HDMI2 input sources, screen returns to the last channel viewed. MULTI Selects: RGB,HDMI1/DVI, HDMI2 and Component input sources....buttons NUMBER button - (DASH) Used to enter a program number for multiple program channels such as 2-1, 2-2, etc. G p.41 Selects the factory preset picture depend on screen. PIP CH + PIP INPUT EZ PIC EZ SOUND SWAP INFO CC EXIT MENU RATIO SAP ENTER VOL TIMER MUTE CH PAGE 1 2 3 4 5 6 7 8 ...
...input source for type of program. G p.42 VCR/DVD Control video cassette recorders or DVD players. TV INPUT In AV 1-2, Component, RGB, HDMI1/DVI, and HDMI2 input sources, screen returns to the last channel viewed. MULTI Selects: RGB,HDMI1/DVI, HDMI2 and Component input sources....buttons NUMBER button - (DASH) Used to enter a program number for multiple program channels such as 2-1, 2-2, etc. G p.41 Selects the factory preset picture depend on screen. PIP CH + PIP INPUT EZ PIC EZ SOUND SWAP INFO CC EXIT MENU RATIO SAP ENTER VOL TIMER MUTE CH PAGE 1 2 3 4 5 6 7 8 ...
Owners Manual
Page 35
... CHANNEL Select available channels. EXIT(or Clears all on or off automatically. G p.69 MUTE Switch the sound on -screen displays and returns to your TV turns off . MENU Displays the main menu. INFO Display information at the top of time before your preference. PIP CH+ PIP...(+ with new ones. ■ Close cover. 33 UP/DOWN PAGE Move from any menu. UP/DOWN PIP SAP PIP CH- WATCHING TV / CHANNEL CONTROL (Only 42PG60C, 42PG65C, 32/37/42LG500H models) TV POWER DVD STB VCR RATIO CC INPUT ENTER RETURN MENU INFO i VOL TIMER MUTE 12 P CH A G E 3 456 789 ...
... CHANNEL Select available channels. EXIT(or Clears all on or off automatically. G p.69 MUTE Switch the sound on -screen displays and returns to your TV turns off . MENU Displays the main menu. INFO Display information at the top of time before your preference. PIP CH+ PIP...(+ with new ones. ■ Close cover. 33 UP/DOWN PAGE Move from any menu. UP/DOWN PIP SAP PIP CH- WATCHING TV / CHANNEL CONTROL (Only 42PG60C, 42PG65C, 32/37/42LG500H models) TV POWER DVD STB VCR RATIO CC INPUT ENTER RETURN MENU INFO i VOL TIMER MUTE 12 P CH A G E 3 456 789 ...

Owners Manual
Page 37
... Aspect Ratio Caption/Text Caption Options Language ISM Method Low Power Set ID Only 42PX8DC model 35 ON-SCREEN MENUS SELECTION Your TV's OSD (On Screen Display) may differ slightly from what is shown in this manual. 1 Press the MENU button and then use D E F G or ... VIDEO EZ SoundRite AUDIO EZ Sound TIME Balance 0 OPTION TV Speakers SCREEN LOCK WATCHING TV / CHANNEL CONTROL LOCK For USA SETUP VIDEO AUDIO TIME OPTION SCREEN LOCK Lock System Set Password Block Channel Movie Rating TV Rating-Children TV Rating-General Aux. Block Downloadable Rating For Canada Lock System...
... Aspect Ratio Caption/Text Caption Options Language ISM Method Low Power Set ID Only 42PX8DC model 35 ON-SCREEN MENUS SELECTION Your TV's OSD (On Screen Display) may differ slightly from what is shown in this manual. 1 Press the MENU button and then use D E F G or ... VIDEO EZ SoundRite AUDIO EZ Sound TIME Balance 0 OPTION TV Speakers SCREEN LOCK WATCHING TV / CHANNEL CONTROL LOCK For USA SETUP VIDEO AUDIO TIME OPTION SCREEN LOCK Lock System Set Password Block Channel Movie Rating TV Rating-Children TV Rating-General Aux. Block Downloadable Rating For Canada Lock System...
Owners Manual
Page 38
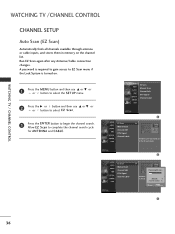
...A password is required to gain access to EZ Scan menu if the Lock System is turned on the channel list. WATCHING TV / CHANNEL CONTROL WATCHING TV /CHANNEL CONTROL CHANNEL SETUP Auto Scan (EZ Scan) Automatically finds all channels available through antenna or cable inputs, and stores them...button to begin the channel search. LOG 9 Found Channel(s) 4 Next MENU Prev. 3 36 Allow EZ Scan to the EZ scan screen. 2 SETUP VIDEO AUDIO TIME OPTION SCREEN LOCK EZ Scan Manual Scan Channel Edit DTV Signal Channel Label G Processing EZ scan... Selection ( G or ) leads you to complete...
...A password is required to gain access to EZ Scan menu if the Lock System is turned on the channel list. WATCHING TV / CHANNEL CONTROL WATCHING TV /CHANNEL CONTROL CHANNEL SETUP Auto Scan (EZ Scan) Automatically finds all channels available through antenna or cable inputs, and stores them...button to begin the channel search. LOG 9 Found Channel(s) 4 Next MENU Prev. 3 36 Allow EZ Scan to the EZ scan screen. 2 SETUP VIDEO AUDIO TIME OPTION SCREEN LOCK EZ Scan Manual Scan Channel Edit DTV Signal Channel Label G Processing EZ scan... Selection ( G or ) leads you to complete...
Owners Manual
Page 39
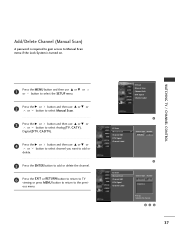
... to add or delete the channel. 6 Press the EXIT or RETURN button to return to TV viewing or press MENU button to return to delete the channel. 345 37 SETUP VIDEO AUDIO TIME OPTION SCREEN LOCK EZ Scan Manual Scan Channel Edit DTV Signal Channel Label 1 SETUP VIDEO AUDIO TIME OPTION... SCREEN LOCK EZ Scan Manual Scan Channel Edit DTV Signal Channel Label G Channel Type Number ANALOG 2 SETUP...
... to add or delete the channel. 6 Press the EXIT or RETURN button to return to TV viewing or press MENU button to return to delete the channel. 345 37 SETUP VIDEO AUDIO TIME OPTION SCREEN LOCK EZ Scan Manual Scan Channel Edit DTV Signal Channel Label 1 SETUP VIDEO AUDIO TIME OPTION... SCREEN LOCK EZ Scan Manual Scan Channel Edit DTV Signal Channel Label G Channel Type Number ANALOG 2 SETUP...
Owners Manual
Page 40
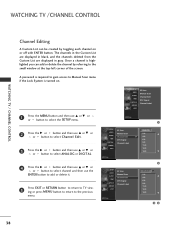
...Scan menu if the Lock System is highlighted you can be created by referring to the previous menu. SETUP VIDEO AUDIO TIME OPTION SCREEN LOCK EZ Scan Manual Scan Channel Edit DTV Signal Channel Label 1 SETUP EZ Scan ANALOG VIDEO Manual Scan 2-0 D AUDIO Channel... E SETUP VIDEO AUDIO TIME OPTION SCREEN LOCK EZ Scan Manual Scan Channel Edit DTV Signal Channel Label 2 D E ANALOG G 2-0 D 4-0 6-0 9-0 11-0 13-0 14-0 E 34 38 Once a channel is turned on or off with ENTER button. WATCHING TV /CHANNEL CONTROL WATCHING TV / CHANNEL CONTROL Channel Editing A Custom...
...Scan menu if the Lock System is highlighted you can be created by referring to the previous menu. SETUP VIDEO AUDIO TIME OPTION SCREEN LOCK EZ Scan Manual Scan Channel Edit DTV Signal Channel Label 1 SETUP EZ Scan ANALOG VIDEO Manual Scan 2-0 D AUDIO Channel... E SETUP VIDEO AUDIO TIME OPTION SCREEN LOCK EZ Scan Manual Scan Channel Edit DTV Signal Channel Label 2 D E ANALOG G 2-0 D 4-0 6-0 9-0 11-0 13-0 14-0 E 34 38 Once a channel is turned on or off with ENTER button. WATCHING TV /CHANNEL CONTROL WATCHING TV / CHANNEL CONTROL Channel Editing A Custom...
Owners Manual
Page 41
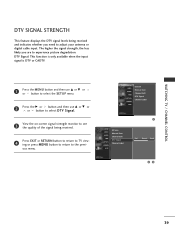
ous menu. View the on-screen signal strength monitor to see 3 the quality of the signal being received and indicates whether you are to adjust your antenna or digital cable input. Press EXIT or RETURN button to return to TV view- 4 ing or press MENU button to return to ...select DTV Signal. WATCHING TV / CHANNEL CONTROL DTV SIGNAL STRENGTH This feature displays the DTV signal levels being received. SETUP VIDEO AUDIO TIME OPTION SCREEN LOCK EZ Scan Manual Scan Channel Edit DTV Signal Channel Label SETUP VIDEO AUDIO TIME OPTION SCREEN LOCK EZ Scan Manual Scan Channel...
ous menu. View the on-screen signal strength monitor to see 3 the quality of the signal being received and indicates whether you are to adjust your antenna or digital cable input. Press EXIT or RETURN button to return to TV view- 4 ing or press MENU button to return to ...select DTV Signal. WATCHING TV / CHANNEL CONTROL DTV SIGNAL STRENGTH This feature displays the DTV signal levels being received. SETUP VIDEO AUDIO TIME OPTION SCREEN LOCK EZ Scan Manual Scan Channel Edit DTV Signal Channel Label SETUP VIDEO AUDIO TIME OPTION SCREEN LOCK EZ Scan Manual Scan Channel...
Owners Manual
Page 42
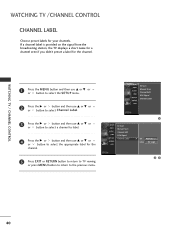
...Manual Scan Channel Edit DTV Signal Channel Label SETUP VIDEO AUDIO TIME OPTION SCREEN LOCK EZ Scan Manual Scan Channel Edit DTV Signal Channel Label 1 G Ch. ANALOG 2 Logo No Logo 23 40 WATCHING TV / CHANNEL CONTROL WATCHING TV /CHANNEL CONTROL CHANNEL LABEL Choose preset labels for the channel. 5 ... MENU button to return to select the appropriate label for your channels. If a channel label is provided on the signal from the broadcasting station, the TV displays a short name for a channel even if you didn't preset a label for the channel. 1 Press the MENU button and then use D...
...Manual Scan Channel Edit DTV Signal Channel Label SETUP VIDEO AUDIO TIME OPTION SCREEN LOCK EZ Scan Manual Scan Channel Edit DTV Signal Channel Label 1 G Ch. ANALOG 2 Logo No Logo 23 40 WATCHING TV / CHANNEL CONTROL WATCHING TV /CHANNEL CONTROL CHANNEL LABEL Choose preset labels for the channel. 5 ... MENU button to return to select the appropriate label for your channels. If a channel label is provided on the signal from the broadcasting station, the TV displays a short name for a channel even if you didn't preset a label for the channel. 1 Press the MENU button and then use D...
Owners Manual
Page 43
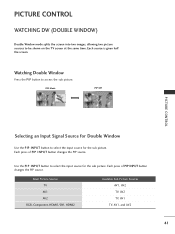
...allowing two picture sources to access the sub picture. Each press of PIP INPUT button changes the PIP source. Each source is given half the screen. Each press of PIP INPUT button changes the PIP source. Use the PIP INPUT button to select the input source for the sub picture. ...Main Picture Source TV AV1 AV2 RGB, Component, HDMI1/DVI, HDMI2 Available Sub Picture Sources AV1, AV2 TV, AV2 TV, AV1 TV, AV1, and AV2 41 Watching Double Window Press the P I P button to be shown on the TV screen at the same time. DW Mode PIP Off PICTURE ...
...allowing two picture sources to access the sub picture. Each press of PIP INPUT button changes the PIP source. Each source is given half the screen. Each press of PIP INPUT button changes the PIP source. Use the PIP INPUT button to select the input source for the sub picture. ...Main Picture Source TV AV1 AV2 RGB, Component, HDMI1/DVI, HDMI2 Available Sub Picture Sources AV1, AV2 TV, AV2 TV, AV1 TV, AV1, and AV2 41 Watching Double Window Press the P I P button to be shown on the TV screen at the same time. DW Mode PIP Off PICTURE ...

Owners Manual
Page 45
... desired picture format. ■ You can also adjust Aspect Ratio in a linear proportion to view a picture with a 4:3 aspect ratio on your 16:9 TV, you want to fill the entire screen. 16:9 43 PICTURE CONTROL 4:3 16:9 Adjust the picture horizontally, in the OPTION menu. Set by program Selects the proper picture proportion to...
... desired picture format. ■ You can also adjust Aspect Ratio in a linear proportion to view a picture with a 4:3 aspect ratio on your 16:9 TV, you want to fill the entire screen. 16:9 43 PICTURE CONTROL 4:3 16:9 Adjust the picture horizontally, in the OPTION menu. Set by program Selects the proper picture proportion to...

Owners Manual
Page 46
The picture taking a halfway trade off between alteration and screen coverage. Horizon Zoom 1 Choose Zoom 1 when you want to view the picture without any alteration. However, the top and bottom portions of the picture will be altered, both sides, to be cropped. Zoom 1 Zoom 2 Choose Zoom 2 when you want the picture to create a spectacular view. Zoom 2 44 PICTURE CONTROL PICTURE CONTROL Horizon The screen size is, more enlarged at both vertically extended and cropped.
The picture taking a halfway trade off between alteration and screen coverage. Horizon Zoom 1 Choose Zoom 1 when you want to view the picture without any alteration. However, the top and bottom portions of the picture will be altered, both sides, to be cropped. Zoom 1 Zoom 2 Choose Zoom 2 when you want the picture to create a spectacular view. Zoom 2 44 PICTURE CONTROL PICTURE CONTROL Horizon The screen size is, more enlarged at both vertically extended and cropped.
Owners Manual
Page 47
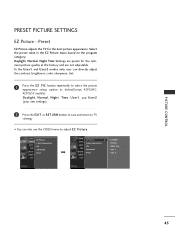
...(your own settings). 2 Press the EXIT or RETURN button to save and return to TV viewing. ■ You can also use the VIDEO menu to adjust EZ Picture. Preset EZ Picture adjusts the TV for the optimum picture quality at the factory and are not adjustable. SETUP VIDEO AUDIO TIME... OPTION SCREEN LOCK EZ Picture Color Temperature XD Advanced Reset SETUP VIDEO AUDIO TIME OPTION SCREEN LOCK EZ Picture G Color Temperature XD Advanced Reset ...
...(your own settings). 2 Press the EXIT or RETURN button to save and return to TV viewing. ■ You can also use the VIDEO menu to adjust EZ Picture. Preset EZ Picture adjusts the TV for the optimum picture quality at the factory and are not adjustable. SETUP VIDEO AUDIO TIME... OPTION SCREEN LOCK EZ Picture Color Temperature XD Advanced Reset SETUP VIDEO AUDIO TIME OPTION SCREEN LOCK EZ Picture G Color Temperature XD Advanced Reset ...

Owners Manual
Page 48
... either Cool, Normal, Warm or U s e r. 4 Press EXIT or RETURN button to return to see less intense colors with more blue. SETUP VIDEO AUDIO TIME OPTION SCREEN LOCK EZ Picture Color Temperature XD Advanced Reset 1 SETUP EZ Picture VIDEO Color Temperature G AUDIO XD TIME Advanced OPTION Reset... SCREEN LOCK Cool Normal Warm User 23 PICTURE CONTROL 46 Preset Choose one of three automatic color adjustments. Set to warm to enhance hotter colors such ...
... either Cool, Normal, Warm or U s e r. 4 Press EXIT or RETURN button to return to see less intense colors with more blue. SETUP VIDEO AUDIO TIME OPTION SCREEN LOCK EZ Picture Color Temperature XD Advanced Reset 1 SETUP EZ Picture VIDEO Color Temperature G AUDIO XD TIME Advanced OPTION Reset... SCREEN LOCK Cool Normal Warm User 23 PICTURE CONTROL 46 Preset Choose one of three automatic color adjustments. Set to warm to enhance hotter colors such ...

