Owner's Manual (English)
Page 3
... the presence of the National Electric Code (U.S.A.). Reorient or relocate the receiving antenna. - NO USER SERVICEABLE PARTS INSIDE. REFER TO QUALIFIED SERVICE PERSONNEL. FCC NOTICE Class B digital device This equipment has been tested and found to comply with the instructions, may be determined by turning the equipment off and on a circuit different from LG Electronics. If this equipment does cause...
... the presence of the National Electric Code (U.S.A.). Reorient or relocate the receiving antenna. - NO USER SERVICEABLE PARTS INSIDE. REFER TO QUALIFIED SERVICE PERSONNEL. FCC NOTICE Class B digital device This equipment has been tested and found to comply with the instructions, may be determined by turning the equipment off and on a circuit different from LG Electronics. If this equipment does cause...
Owner's Manual (English)
Page 6
... Panel Information 10 Attaching the TV to a Wall 12 Stand Installation 13 Back Cover for Wire Arrangement 14 Desktop Pedestal Installation 16 Vesa Wall Mounting 16 Antenna or Cable Connection 17 EXTERNAL EQUIPMENT SETUP HD Receiver Setup 18 DVD Setup 21 VCR Setup 23 Other A/V Source Setup 25 PC Setup 26 USB In Setup 32 Audio Out Setup 33 WATCHING TV / CHANNEL CONTROL Remote Control Functions 34 Turning on TV 36 Channel Selection 37 Volume Adjustment 38 On-Screen Menus Selection 39 Channel Setup - Auto Scan ( Auto Tuning 40 - Picture Mode - Picture Mode - User Mode 57...
... Panel Information 10 Attaching the TV to a Wall 12 Stand Installation 13 Back Cover for Wire Arrangement 14 Desktop Pedestal Installation 16 Vesa Wall Mounting 16 Antenna or Cable Connection 17 EXTERNAL EQUIPMENT SETUP HD Receiver Setup 18 DVD Setup 21 VCR Setup 23 Other A/V Source Setup 25 PC Setup 26 USB In Setup 32 Audio Out Setup 33 WATCHING TV / CHANNEL CONTROL Remote Control Functions 34 Turning on TV 36 Channel Selection 37 Volume Adjustment 38 On-Screen Menus Selection 39 Channel Setup - Auto Scan ( Auto Tuning 40 - Picture Mode - Picture Mode - User Mode 57...

Owner's Manual (English)
Page 11
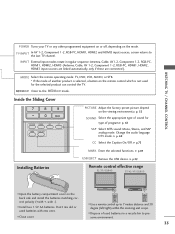
Remote Control Sensor Power/Standby Indicator • illuminates red in standby mode. • illuminates green when the set is switched on. 9 PREPARATION 37/42/47/52LB5D CH VOL ENTER MENU INPUT /I CHANNEL (E,D) Buttons VOLUME (F,G) Buttons ENTER Button MENU Button INPUT Button POWER Button Intelligent Eye Adjusts picture according to the surrounding conditions.
Remote Control Sensor Power/Standby Indicator • illuminates red in standby mode. • illuminates green when the set is switched on. 9 PREPARATION 37/42/47/52LB5D CH VOL ENTER MENU INPUT /I CHANNEL (E,D) Buttons VOLUME (F,G) Buttons ENTER Button MENU Button INPUT Button POWER Button Intelligent Eye Adjusts picture according to the surrounding conditions.
Owner's Manual (English)
Page 20
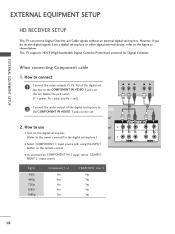
... receive digital signals from a digital set -top bo(xDV.)I) I Select COMPONENT 1 input source with using the INPUT button on the remote control. How to connect 1 Connect the video outputs (Y, PB, PR) of the digital set-top box to COMPONENT IN 2 input, select COMPONENT 2 input source. When connecting Component cable 1. Signal 480i 480p 720p 1080i 1080p Component 1/2 Yes Yes Yes Yes Yes HDMI/DVI1, 2 or 3 No Yes Yes Yes Yes 18 Match the jack colors (Y = green, PB = blue, and PR = red). 2 Connect the audio output of the digital set top box...
... receive digital signals from a digital set -top bo(xDV.)I) I Select COMPONENT 1 input source with using the INPUT button on the remote control. How to connect 1 Connect the video outputs (Y, PB, PR) of the digital set-top box to COMPONENT IN 2 input, select COMPONENT 2 input source. When connecting Component cable 1. Signal 480i 480p 720p 1080i 1080p Component 1/2 Yes Yes Yes Yes Yes HDMI/DVI1, 2 or 3 No Yes Yes Yes Yes 18 Match the jack colors (Y = green, PB = blue, and PR = red). 2 Connect the audio output of the digital set top box...
Owner's Manual (English)
Page 21
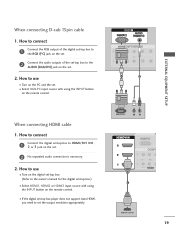
... the owner's manual for the digital set-top box.) I If the digital set-top box player does not support Auto HDMI, you need to HDMI/DVI IN1, 2 or 3 jack on the set the output resolution appropriately. I Turn on the remote control. How to the AUDIO (RGB/DVI) jack on the remote control. RGB OUTPUT L R (DVI) 1 HDMI-DTV OUTPUT 19 EXTERNAL EQUIPMENT SETUP When connecting D-sub 15pin cable 1. How to connect 1 Connect the RGB output of the digital set-top box to the RGB (PC) jack on the set. 2 Connect the audio outputs of the set-top box to use I Select...
... the owner's manual for the digital set-top box.) I If the digital set-top box player does not support Auto HDMI, you need to HDMI/DVI IN1, 2 or 3 jack on the set the output resolution appropriately. I Turn on the remote control. How to the AUDIO (RGB/DVI) jack on the remote control. RGB OUTPUT L R (DVI) 1 HDMI-DTV OUTPUT 19 EXTERNAL EQUIPMENT SETUP When connecting D-sub 15pin cable 1. How to connect 1 Connect the RGB output of the digital set-top box to the RGB (PC) jack on the set. 2 Connect the audio outputs of the set-top box to use I Select...
Owner's Manual (English)
Page 22
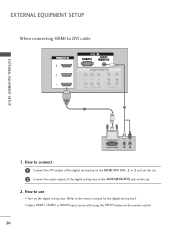
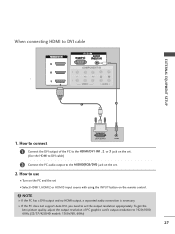
How to connect 1 Connect the DVI output of the digital set-top box to the HDMI/DVI IN1, 2 or 3 jack on the set. 2 Connect the audio output of the digital set-top box to the AUDIO(RGB/DVI) jack on the set -top box.) I Select HDMI1, HDMI2 or HDMI3 input source with using the INPUT button on the digital set-top box. (Refer to DVI cable RGB 3 EXTERNAL EQUIPMENT SETUP 2 1 DVI-DTV OUTPUT L R 1. EXTERNAL EQUIPMENT SETUP When connecting HDMI to the owner's manual for the digital set . 2. How to use I Turn on the remote control. 20
How to connect 1 Connect the DVI output of the digital set-top box to the HDMI/DVI IN1, 2 or 3 jack on the set. 2 Connect the audio output of the digital set-top box to the AUDIO(RGB/DVI) jack on the set -top box.) I Select HDMI1, HDMI2 or HDMI3 input source with using the INPUT button on the digital set-top box. (Refer to DVI cable RGB 3 EXTERNAL EQUIPMENT SETUP 2 1 DVI-DTV OUTPUT L R 1. EXTERNAL EQUIPMENT SETUP When connecting HDMI to the owner's manual for the digital set . 2. How to use I Turn on the remote control. 20
Owner's Manual (English)
Page 23
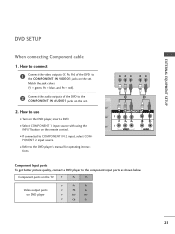
... Video output ports on the remote control. How to connect 1 Connect the video outputs (Y, PB, PR) of the DVD to use I Select COMPONENT 1 input source with using the INPUT button on DVD player Y PB PR Y Pb Pr Y B-Y R-Y Y Cb Cr 21 PONENT 2 input source. How to the COMPONENT IN AUDIO1 jacks on the DVD player, insert a DVD. I Turn on the set . Match the jack colors (Y = green, PB = blue, and PR = red). 2 Connect the audio outputs of the DVD to the component input ports as shown below. EXTERNAL EQUIPMENT SETUP DVD SETUP When connecting Component cable...
... Video output ports on the remote control. How to connect 1 Connect the video outputs (Y, PB, PR) of the DVD to use I Select COMPONENT 1 input source with using the INPUT button on DVD player Y PB PR Y Pb Pr Y B-Y R-Y Y Cb Cr 21 PONENT 2 input source. How to the COMPONENT IN AUDIO1 jacks on the DVD player, insert a DVD. I Turn on the set . Match the jack colors (Y = green, PB = blue, and PR = red). 2 Connect the audio outputs of the DVD to the component input ports as shown below. EXTERNAL EQUIPMENT SETUP DVD SETUP When connecting Component cable...
Owner's Manual (English)
Page 24
... SETUP When connecting HDMI cable 1. I Refer to AV IN 2, select A V 2 input source. How to connect 1 Connect the HDMI output of the DVD to use I If connected to the DVD player's manual for operating instructions. I Select HDMI1, HDMI2 or HDMI3 input source with using the INPUT button on the remote control. I Turn on the set the output resolution appropriately. 22 1 HDMI-DVD OUTPUT How to the HDMI/DVI IN1, 2 or 3 jack on the DVD player, insert a DVD. How to connect 1 Connect the S-VIDEO output of the DVD to the S-VIDEO input on the set. 2 Connect the audio...
... SETUP When connecting HDMI cable 1. I Refer to AV IN 2, select A V 2 input source. How to connect 1 Connect the HDMI output of the DVD to use I If connected to the DVD player's manual for operating instructions. I Select HDMI1, HDMI2 or HDMI3 input source with using the INPUT button on the remote control. I Turn on the set the output resolution appropriately. 22 1 HDMI-DVD OUTPUT How to the HDMI/DVI IN1, 2 or 3 jack on the DVD player, insert a DVD. How to connect 1 Connect the S-VIDEO output of the DVD to the S-VIDEO input on the set. 2 Connect the audio...
Owner's Manual (English)
Page 25
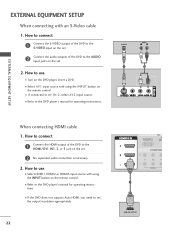
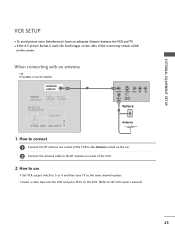
.../42/47/52LB5D ANTENNA/ CABLE IN 1 ANT OUT S-VIDEO VIDEO L R ANT IN OUTPUT SWITCH Wall Jack 2 Antenna 1. How to the VCR owner's manual.) 23 the fixed images on the sides of the screen may remain visible on the set. 2 Connect the antenna cable to the RF antenna in socket of the VCR to the same channel number. I Set VCR output switch to 3 or 4 and then tune TV to the Antenna socket on the screen. EXTERNAL EQUIPMENT SETUP VCR SETUP I To avoid picture noise (interference...
.../42/47/52LB5D ANTENNA/ CABLE IN 1 ANT OUT S-VIDEO VIDEO L R ANT IN OUTPUT SWITCH Wall Jack 2 Antenna 1. How to the VCR owner's manual.) 23 the fixed images on the sides of the screen may remain visible on the set. 2 Connect the antenna cable to the RF antenna in socket of the VCR to the same channel number. I Set VCR output switch to 3 or 4 and then tune TV to the Antenna socket on the screen. EXTERNAL EQUIPMENT SETUP VCR SETUP I To avoid picture noise (interference...
Owner's Manual (English)
Page 29
... need to set . 2. How to connect DVI-PC OUTPUT AUDIO 1 Connect the DVI output of PC graphics card's output resolution to the AUDIO(RGB/DVI) jack on the set the output resolution appropriately. When connecting HDMI to use I Turn on the PC and the set I Select HDMI1, HDMI2 or HDMI3 input source with using the INPUT button on the remote control. How to DVI cable RGB EXTERNAL EQUIPMENT SETUP 1 2 1. NOTE G If the PC has a DVI output and no HDMI output, a separated audio connection is necessary. To get the best picture quality, adjust...
... need to set . 2. How to connect DVI-PC OUTPUT AUDIO 1 Connect the DVI output of PC graphics card's output resolution to the AUDIO(RGB/DVI) jack on the set the output resolution appropriately. When connecting HDMI to use I Turn on the PC and the set I Select HDMI1, HDMI2 or HDMI3 input source with using the INPUT button on the remote control. How to DVI cable RGB EXTERNAL EQUIPMENT SETUP 1 2 1. NOTE G If the PC has a DVI output and no HDMI output, a separated audio connection is necessary. To get the best picture quality, adjust...

Owner's Manual (English)
Page 30
If noise is in PC mode. The fixed image may not work if a HDMI to DVI Cable is present, change the PC output to another resolution, change the PC graphic card or consult the manufacturer of the PC graphic card. EXTERNAL EQUIPMENT SETUP 28 There may be changed, change the refresh rate to another rate or adjust the brightness and contrast on the screen for Horizontal and Vertical...
If noise is in PC mode. The fixed image may not work if a HDMI to DVI Cable is present, change the PC output to another resolution, change the PC graphic card or consult the manufacturer of the PC graphic card. EXTERNAL EQUIPMENT SETUP 28 There may be changed, change the refresh rate to another rate or adjust the brightness and contrast on the screen for Horizontal and Vertical...
Owner's Manual (English)
Page 37
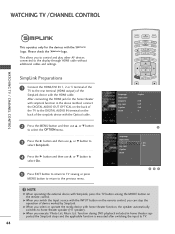
... / CHANNEL CONTROL POWER Turns your TV or any other programmed equipment on or off, depending on the viewing environment.G p. 55 SOUND Select the appropriate type of sound for the selected product can control the TV. MEDIAHOST MEDIAHOST Enter to the last TV channel. DAY + LIVE TV INPUT MODE DAY - Change the audio language DTV mode. G p. 69 CC Select the Caption On/Off. LIVE TV INPUT MODE DAY - I Dispose of another product is selected, a button...
... / CHANNEL CONTROL POWER Turns your TV or any other programmed equipment on or off, depending on the viewing environment.G p. 55 SOUND Select the appropriate type of sound for the selected product can control the TV. MEDIAHOST MEDIAHOST Enter to the last TV channel. DAY + LIVE TV INPUT MODE DAY - Change the audio language DTV mode. G p. 69 CC Select the Caption On/Off. LIVE TV INPUT MODE DAY - I Dispose of another product is selected, a button...

Owner's Manual (English)
Page 38
... TV or press the POWER, INPUT, TV INPUT, CH(D or E), Number (0~9) button on the remote control. 2 Select the viewing source by using the TV, press the POWER button on vacation, disconnect the power plug from the wall power outlet. I This TV is programmed to remember which mode it was last set to, even if you intend to be away on the remote control. WATCHING TV / CHANNEL CONTROL WATCHING TV /CHANNEL CONTROL TURNING ON TV 1 First, connect power cord correctly.
... TV or press the POWER, INPUT, TV INPUT, CH(D or E), Number (0~9) button on the remote control. 2 Select the viewing source by using the TV, press the POWER button on vacation, disconnect the power plug from the wall power outlet. I This TV is programmed to remember which mode it was last set to, even if you intend to be away on the remote control. WATCHING TV / CHANNEL CONTROL WATCHING TV /CHANNEL CONTROL TURNING ON TV 1 First, connect power cord correctly.
Owner's Manual (English)
Page 43
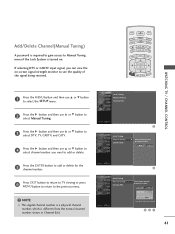
... the channel number. 6 Press EXIT button to return to TV viewing or press MENU button to return to delete the channel. 41 NOTE G This digital channel number is a physical channel number, which is turned on -screen signal strength monitor to select the SETUP menu. TV INPUT TV INPUT STB MEDIA HOST STB MEDIA HOST Add/Delete Channel(Manual Tuning) A password is required to gain access to Manual Tuning menu if the Lock System is different from the normal channel number...
... the channel number. 6 Press EXIT button to return to TV viewing or press MENU button to return to delete the channel. 41 NOTE G This digital channel number is a physical channel number, which is turned on -screen signal strength monitor to select the SETUP menu. TV INPUT TV INPUT STB MEDIA HOST STB MEDIA HOST Add/Delete Channel(Manual Tuning) A password is required to gain access to Manual Tuning menu if the Lock System is different from the normal channel number...
Owner's Manual (English)
Page 46
... speaker (HT speaker). G When you select or operate the media device with SimpLink, press the TV button among the MODE button on the remote control, you to control and play other AV devices connected to the previous menu. G When you switch the Input source with the INPUT button on the remote control. TIMER RATIO SIMPLINK Language Input label SimpLink Key Lock Caption Set ID : English : Off : Off : Off : 1 PICTURE SOUND BACK SAP CC MARK USB EJECT Language Input label SimpLink Key Lock Caption Set...
... speaker (HT speaker). G When you select or operate the media device with SimpLink, press the TV button among the MODE button on the remote control, you to control and play other AV devices connected to the previous menu. G When you switch the Input source with the INPUT button on the remote control. TIMER RATIO SIMPLINK Language Input label SimpLink Key Lock Caption Set ID : English : Off : Off : Off : 1 PICTURE SOUND BACK SAP CC MARK USB EJECT Language Input label SimpLink Key Lock Caption Set...
Owner's Manual (English)
Page 57
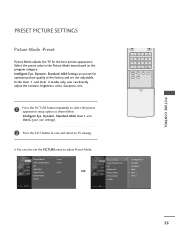
... factory MARK USBEJECT and are preset for the best picture appearance. BACK PICTURE SOUND SAP CC MARK USB EJECT PICTURE S MARK US PICTURE CONTROL 1 Press the PICTURE button repeatedly to select the picture appearance setup option as shown below : Intelligent Eye, Dynamic, Standard, Mild, User1, and User2 (your own settings). 2 Press the EXIT button to save and return to adjust Picture Mode. Select the preset value in the Picture Mode menu based on the BACK program...
... factory MARK USBEJECT and are preset for the best picture appearance. BACK PICTURE SOUND SAP CC MARK USB EJECT PICTURE S MARK US PICTURE CONTROL 1 Press the PICTURE button repeatedly to select the picture appearance setup option as shown below : Intelligent Eye, Dynamic, Standard, Mild, User1, and User2 (your own settings). 2 Press the EXIT button to save and return to adjust Picture Mode. Select the preset value in the Picture Mode menu based on the BACK program...
Owner's Manual (English)
Page 60
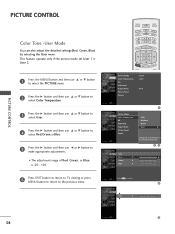
... to TV viewing or press MENU button to return to make appropriate adjustments. E Red 0 E 58 This feature operate only if the picture mode set User 1 or User 2. 1 Press the MENU button and then use D or E button to confirm. MENU BRIGHT + TIMER RATIO SIMPLINK Picture Mode : User1 Color Temperature : Cool XD Advanced Aspect Ratio : 16:9 Picture Reset Screen BACK PICTURE SOUND CC MARK USB EJECT Picture Mode Color Temperature XD Advanced Aspect Ratio Picture Reset Screen Cool Medium Warm User G Selection ( G or ) leads you to select the PICTURE menu. User Red...
... to TV viewing or press MENU button to return to make appropriate adjustments. E Red 0 E 58 This feature operate only if the picture mode set User 1 or User 2. 1 Press the MENU button and then use D or E button to confirm. MENU BRIGHT + TIMER RATIO SIMPLINK Picture Mode : User1 Color Temperature : Cool XD Advanced Aspect Ratio : 16:9 Picture Reset Screen BACK PICTURE SOUND CC MARK USB EJECT Picture Mode Color Temperature XD Advanced Aspect Ratio Picture Reset Screen Cool Medium Warm User G Selection ( G or ) leads you to select the PICTURE menu. User Red...
Owner's Manual (English)
Page 84
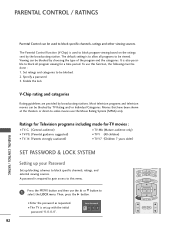
... theaters or direct-to-video movies use this menu. 1 Press the MENU button and then use the D or E button to select the LOCK menu. PARENTAL CONTROL / RATINGS Parental Control can be used to block program viewing based on the ratings sent by the broadcasting station. To use the Movie Rating System (MPAA) only. MENU BRIGHT + TIMER RATIO SIMPLINK BACK Most television programs and television movies can be blocked by broadcasting stations. Enter Password 82 BACK PICTURE SOUND SAP CC BACK...
... theaters or direct-to-video movies use this menu. 1 Press the MENU button and then use the D or E button to select the LOCK menu. PARENTAL CONTROL / RATINGS Parental Control can be used to block program viewing based on the ratings sent by the broadcasting station. To use the Movie Rating System (MPAA) only. MENU BRIGHT + TIMER RATIO SIMPLINK BACK Most television programs and television movies can be blocked by broadcasting stations. Enter Password 82 BACK PICTURE SOUND SAP CC BACK...
Owner's Manual (English)
Page 91
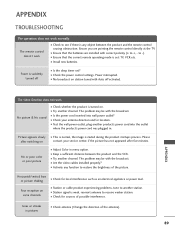
... work normally. No or poor color or poor picture I Adjust Color in pictures I Station or cable product experiencing problems, tune to restore the brightness of the picture. I Try another product's power cord into wall power outlet? I Station signal is turned on some channels I Check antenna (Change the direction of possible interference. I Check whether the product is weak, reorient antenna to +, - Power interrupted. No picture & No sound I Ensure that the batteries are pointing the remote control directly...
... work normally. No or poor color or poor picture I Adjust Color in pictures I Station or cable product experiencing problems, tune to restore the brightness of the picture. I Try another product's power cord into wall power outlet? I Station signal is turned on some channels I Check antenna (Change the direction of possible interference. I Check whether the product is weak, reorient antenna to +, - Power interrupted. No picture & No sound I Ensure that the batteries are pointing the remote control directly...
Owner's Manual (English)
Page 96
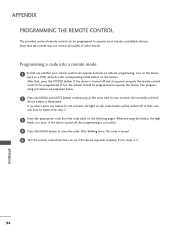
... that , press the POWER button. After that the remote may not control all models of other brands. After blinking twice, this code is illuminated. APPENDIX 94 APPENDIX PROGRAMMING THE REMOTE CONTROL The provided universal remote control can operate each device without programming, turn on the device (such as a VCR) and press the corresponding mode button on the mode button will be programmed to operate most remote-controllable devices. When pressing the button, the light blinks at the same...
... that , press the POWER button. After that the remote may not control all models of other brands. After blinking twice, this code is illuminated. APPENDIX 94 APPENDIX PROGRAMMING THE REMOTE CONTROL The provided universal remote control can operate each device without programming, turn on the device (such as a VCR) and press the corresponding mode button on the mode button will be programmed to operate most remote-controllable devices. When pressing the button, the light blinks at the same...


