

Owners Manual
Page 3
... 6,331,877; 6,239,794; 6,154,203; 5,940,073; 4,908,713; 4,751,578; 4,706,121. TV Guide On Screen Notices In the United States, TV GUIDE and other related marks are registered marks of receiving basic analog, digital basic and digital premium cable television programming by one ...or more information contact your cable operator is required to a cable system providing such programming. The TV Guide On Screen system is capable of Gemstar-TV Guide International, Inc. Digital Cable Compatibility This digital television is protected by direct connection to view encrypted digital ...
... 6,331,877; 6,239,794; 6,154,203; 5,940,073; 4,908,713; 4,751,578; 4,706,121. TV Guide On Screen Notices In the United States, TV GUIDE and other related marks are registered marks of receiving basic analog, digital basic and digital premium cable television programming by one ...or more information contact your cable operator is required to a cable system providing such programming. The TV Guide On Screen system is capable of Gemstar-TV Guide International, Inc. Digital Cable Compatibility This digital television is protected by direct connection to view encrypted digital ...
Owners Manual
Page 6
...2 3 4~5 8 9 10 11 12 13 14~18 Warnings TV Guide On Screen Notices / Digital Cable Compatibility Safety Instructions Accessories Controls (Model Name: 32/37/42LP1D) Connection Options (Model Name: 32/37/42LP1D) Controls (Model Name: 26/32LX1D, 26/32LX2D) Connection Options (Model Name: 26LX1D/2D) Connection... HDSTB Setup External AV Source Setup Digital Audio Output Monitor Out Setup (32LX1D/2D, 32/37/42LP1D only) CableCARDTM Setup PC Setup IEEE1394 G-LINKTM Setup TV Guide On ScreenTM System Setup TV Guide On ScreenTM System Feature Installation Operation 69 69 Basic operation 69 69 70...
...2 3 4~5 8 9 10 11 12 13 14~18 Warnings TV Guide On Screen Notices / Digital Cable Compatibility Safety Instructions Accessories Controls (Model Name: 32/37/42LP1D) Connection Options (Model Name: 32/37/42LP1D) Controls (Model Name: 26/32LX1D, 26/32LX2D) Connection Options (Model Name: 26LX1D/2D) Connection... HDSTB Setup External AV Source Setup Digital Audio Output Monitor Out Setup (32LX1D/2D, 32/37/42LP1D only) CableCARDTM Setup PC Setup IEEE1394 G-LINKTM Setup TV Guide On ScreenTM System Setup TV Guide On ScreenTM System Feature Installation Operation 69 69 Basic operation 69 69 70...

Owners Manual
Page 9
... Video1-2 mode Component1-2 mode PC mode HDMI mode 1394 IEEE IEEE1394 Stereo mode mode CH TV VOL MENU TV/VIDEO/ GUIDE ON/OFF R AUDIO L/MONO VIDEO S-VIDEO IN2 Memory Card Slot (For mode) CHANNEL (E, D) Buttons ON/OFF Button TV GUIDE Button TV/VIDEO / Button S-VIDEO Input MENU Button Audio/Video Input 2 VOLUME (F,G) Buttons 9 This is a simplified...
... Video1-2 mode Component1-2 mode PC mode HDMI mode 1394 IEEE IEEE1394 Stereo mode mode CH TV VOL MENU TV/VIDEO/ GUIDE ON/OFF R AUDIO L/MONO VIDEO S-VIDEO IN2 Memory Card Slot (For mode) CHANNEL (E, D) Buttons ON/OFF Button TV GUIDE Button TV/VIDEO / Button S-VIDEO Input MENU Button Audio/Video Input 2 VOLUME (F,G) Buttons 9 This is a simplified...

Owners Manual
Page 11
Remote Control Sensor /Power Standby Indicator Illuminates red when the TV is a simplified representation of front panel. - CH VOL MENU TV/ VIDEO/ TV GUIDE ON/OFF ON/OFF Button TV GUIDE Button TV/VIDEO / Button MENU Button VOLUME (F,G) Buttons CHANNEL (E, D) Buttons 11 This is in standby mode. When the TV is switched on, blinks green and then illuminates green. Here shown may be somewhat different from your TV. Introduction Controls (Model Name: 26/32LX1D, 26/32LX2D) -
Remote Control Sensor /Power Standby Indicator Illuminates red when the TV is a simplified representation of front panel. - CH VOL MENU TV/ VIDEO/ TV GUIDE ON/OFF ON/OFF Button TV GUIDE Button TV/VIDEO / Button MENU Button VOLUME (F,G) Buttons CHANNEL (E, D) Buttons 11 This is in standby mode. When the TV is switched on, blinks green and then illuminates green. Here shown may be somewhat different from your TV. Introduction Controls (Model Name: 26/32LX1D, 26/32LX2D) -

Owners Manual
Page 14
...SWAP SAP EZ PIC APM EZ SOUND CC FREEZE AUTO DEMO M/C EJECT LIGHT Illuminates the remote control buttons. TV/VIDEO (Refer to p.17) External input modes rotate in the TV Guide On Screen system. INFO (Refer to p.93) When you to navigate the on mode. THUMBSTICK (Up/Down... up the TV Guide On Screen system to the screen. NUMBER BUTTONS 14 TV GUIDE Brings up the main menu to the last TV channel. Introduction Remote Control Key Functions TV INPUT POWER TV AUDIO DVD MODE CABLE TV/VIDEO VCR STB DAY MENU DAY+ TV GUIDE ENTER POWER Turns your preference. TV INPUT Rotates the...
...SWAP SAP EZ PIC APM EZ SOUND CC FREEZE AUTO DEMO M/C EJECT LIGHT Illuminates the remote control buttons. TV/VIDEO (Refer to p.17) External input modes rotate in the TV Guide On Screen system. INFO (Refer to p.93) When you to navigate the on mode. THUMBSTICK (Up/Down... up the TV Guide On Screen system to the screen. NUMBER BUTTONS 14 TV GUIDE Brings up the main menu to the last TV channel. Introduction Remote Control Key Functions TV INPUT POWER TV AUDIO DVD MODE CABLE TV/VIDEO VCR STB DAY MENU DAY+ TV GUIDE ENTER POWER Turns your preference. TV INPUT Rotates the...

Owners Manual
Page 15
...p.84) Changes the aspect ratio. PAGE UP/DOWN Moves from one . FLASHBK Returns to the next one full set of time before your TV turns itself off . PIP CH+ PIP INPUT TIMER RATIO ADJUST SWAP SAP EZ PIC APM EZ SOUND CC FREEZE AUTO DEMO M/C EJECT Introduction ... in M/C EJECT When removing the memory card, this button is not available for multiple program channels such as 2-1, 2-2,etc. TV INPUT POWER TV AUDIO DVD MODE CABLE TV/VIDEO VCR STB DAY MENU DAY+ TV GUIDE ENTER EXIT 1394 MARK INFO i PAGE VOL MUTE FAV CH PAGE 1 2 3 4 5 6 7 8 9 0 FLASHBK PIP PIP CH...
...p.84) Changes the aspect ratio. PAGE UP/DOWN Moves from one . FLASHBK Returns to the next one full set of time before your TV turns itself off . PIP CH+ PIP INPUT TIMER RATIO ADJUST SWAP SAP EZ PIC APM EZ SOUND CC FREEZE AUTO DEMO M/C EJECT Introduction ... in M/C EJECT When removing the memory card, this button is not available for multiple program channels such as 2-1, 2-2,etc. TV INPUT POWER TV AUDIO DVD MODE CABLE TV/VIDEO VCR STB DAY MENU DAY+ TV GUIDE ENTER EXIT 1394 MARK INFO i PAGE VOL MUTE FAV CH PAGE 1 2 3 4 5 6 7 8 9 0 FLASHBK PIP PIP CH...

Owners Manual
Page 16
...Refer to p.94) Changes to p.95) Exchanges the main/sub images in a recycle bin to p.94) Switches between PIP, POP (Picture-out-of this TV. with +, - PIP CH+ PIP INPUT TIMER RATIO ADJUST SWAP SAP EZ PIC APM EZ SOUND CC FREEZE AUTO DEMO M/C EJECT Installing Batteries 1 Open ...in PIP/Twin picture mode. SAP (Refer to p.75) Concurrently, compare with new ones. 3 Close the cover. 16 TV INPUT POWER TV AUDIO DVD MODE CABLE TV/VIDEO VCR STB DAY MENU DAY+ TV GUIDE ENTER * Use a remote control 7 meter distance and 30 degree (left/right) within the receiving unit scope. * Dispose...
...Refer to p.94) Changes to p.95) Exchanges the main/sub images in a recycle bin to p.94) Switches between PIP, POP (Picture-out-of this TV. with +, - PIP CH+ PIP INPUT TIMER RATIO ADJUST SWAP SAP EZ PIC APM EZ SOUND CC FREEZE AUTO DEMO M/C EJECT Installing Batteries 1 Open ...in PIP/Twin picture mode. SAP (Refer to p.75) Concurrently, compare with new ones. 3 Close the cover. 16 TV INPUT POWER TV AUDIO DVD MODE CABLE TV/VIDEO VCR STB DAY MENU DAY+ TV GUIDE ENTER * Use a remote control 7 meter distance and 30 degree (left/right) within the receiving unit scope. * Dispose...

Owners Manual
Page 17
When some External Equipment is not connected: RGB-DTV (or RGB-PC) HDMI/DVI 3. Introduction TV INPUT POWER TV AUDIO DVD MODE CABLE TV/VIDEO VCR STB DAY MENU DAY+ TV GUIDE ENTER EXIT 1394 MARK INFO i PAGE VOL MUTE FAV CH PAGE 1 2 3 4 5 6 7 8 9 0 FLASHBK PIP PIP CH- When any external equipment... Label Set ID MENU Previous Antenna Cable Video1 Video2 Component1 G Component2 RGB-PC HDMI/DVI • Antenna: Select it when watching the TV/DTV. • Cable: Select it when watching the CATV/CADTV. • Video1-2: Select it when using PC or Digital set-top...
When some External Equipment is not connected: RGB-DTV (or RGB-PC) HDMI/DVI 3. Introduction TV INPUT POWER TV AUDIO DVD MODE CABLE TV/VIDEO VCR STB DAY MENU DAY+ TV GUIDE ENTER EXIT 1394 MARK INFO i PAGE VOL MUTE FAV CH PAGE 1 2 3 4 5 6 7 8 9 0 FLASHBK PIP PIP CH- When any external equipment... Label Set ID MENU Previous Antenna Cable Video1 Video2 Component1 G Component2 RGB-PC HDMI/DVI • Antenna: Select it when watching the TV/DTV. • Cable: Select it when watching the CATV/CADTV. • Video1-2: Select it when using PC or Digital set-top...
Owners Manual
Page 18
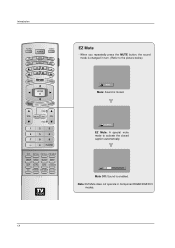
.... 18 PIP CH+ PIP INPUT TIMER RATIO ADJUST SWAP SAP EZ PIC APM EZ SOUND CC FREEZE AUTO DEMO M/C EJECT EZ Mute - Introduction TV INPUT POWER TV AUDIO DVD MODE CABLE TV/VIDEO VCR STB DAY MENU DAY+ TV GUIDE ENTER EXIT 1394 MARK INFO i PAGE VOL MUTE FAV CH PAGE 1 2 3 4 5 6 7 8 9 0 FLASHBK PIP PIP CH...
.... 18 PIP CH+ PIP INPUT TIMER RATIO ADJUST SWAP SAP EZ PIC APM EZ SOUND CC FREEZE AUTO DEMO M/C EJECT EZ Mute - Introduction TV INPUT POWER TV AUDIO DVD MODE CABLE TV/VIDEO VCR STB DAY MENU DAY+ TV GUIDE ENTER EXIT 1394 MARK INFO i PAGE VOL MUTE FAV CH PAGE 1 2 3 4 5 6 7 8 9 0 FLASHBK PIP PIP CH...

Owners Manual
Page 30
... 2 Select Video2 input source with external audio equipments, such as amplifiers or speakers, please turn the TV speakers off. (Refer to p.80) CAUTION Do not look into the optical output port. If connected to operate the TV Guide On Screen system, see page 42~43. When connecting with using the... TV/VIDEO button on the audio equipment. 3 See the external audio equipment instruction manual for operation. Refer to ...
... 2 Select Video2 input source with external audio equipments, such as amplifiers or speakers, please turn the TV speakers off. (Refer to p.80) CAUTION Do not look into the optical output port. If connected to operate the TV Guide On Screen system, see page 42~43. When connecting with using the... TV/VIDEO button on the audio equipment. 3 See the external audio equipment instruction manual for operation. Refer to ...

Owners Manual
Page 42
... IN 42 Installation G-LINKTM Setup - See page 44~50 for the TV Guide On Screen system to work with your Cable Box and VCR. Antenna Service 32, 37, 42 inch TV Back AC IN HDMI G-LINK DIGITAL AUDIO (OPTICAL) OUTPUT REMOTE RS-... CableCARD VCR Front VCR Back ANT OUT S-VIDEO OUT OUTPUT SWITCH (R) AUDIO (L) VIDEO 34 IN ANT IN 26 inch TV Back AC IN G-LINK DIGITAL AUDIO OUTPUT (OPTICAL) REMOTE RS-232C INPUT DVI INPUT CONTROL (CONTROL/SERVICE PORT) PC ... IN ANT IN 2. The G-LINKTM cable is necessary for information on setting up the TV Guide On Screen system. 1.
... IN 42 Installation G-LINKTM Setup - See page 44~50 for the TV Guide On Screen system to work with your Cable Box and VCR. Antenna Service 32, 37, 42 inch TV Back AC IN HDMI G-LINK DIGITAL AUDIO (OPTICAL) OUTPUT REMOTE RS-... CableCARD VCR Front VCR Back ANT OUT S-VIDEO OUT OUTPUT SWITCH (R) AUDIO (L) VIDEO 34 IN ANT IN 26 inch TV Back AC IN G-LINK DIGITAL AUDIO OUTPUT (OPTICAL) REMOTE RS-232C INPUT DVI INPUT CONTROL (CONTROL/SERVICE PORT) PC ... IN ANT IN 2. The G-LINKTM cable is necessary for information on setting up the TV Guide On Screen system. 1.

Owners Manual
Page 44
...turn it ON. 3. Note - If you are updated several times a day. - after initial TV set up TV Guide On Screen now", displays the Welcome Screen. Press ENTER button to download. The TV Guide On Screen system uses Setup information to provide you have more than one Cable system in your area-... system's Welcome Screen appears: - You will need to connect the G-LINKTM cable for information on -screen instructions. The TV Guide On Screen system receives program listings data through your TV when it back On To make a selection, use . (Do not unplug the power cord.) 4. If so prompted,...
...turn it ON. 3. Note - If you are updated several times a day. - after initial TV set up TV Guide On Screen now", displays the Welcome Screen. Press ENTER button to download. The TV Guide On Screen system uses Setup information to provide you have more than one Cable system in your area-... system's Welcome Screen appears: - You will need to connect the G-LINKTM cable for information on -screen instructions. The TV Guide On Screen system receives program listings data through your TV when it back On To make a selection, use . (Do not unplug the power cord.) 4. If so prompted,...

Owners Manual
Page 45
.... • Press ENTER button to display Screen 2. 2 Screen 2: Enter ZIP or Postal Code Option 1 • If you selected USA in Screen 1, you see Screen 12. TV Guide On Screen System 45 How to use 1 Screen 1: Country • This screen asks you the location of your...
.... • Press ENTER button to display Screen 2. 2 Screen 2: Enter ZIP or Postal Code Option 1 • If you selected USA in Screen 1, you see Screen 12. TV Guide On Screen System 45 How to use 1 Screen 1: Country • This screen asks you the location of your...

Owners Manual
Page 46
... Box Configuration Diagram • The diagram shows the correct way to install the GLINKTM Cable from the back of the device to display Screen 8. 46 TV Guide On Screen System 4 Screen 4: Do you have a Cable Box? • If you select Yes, you see Screen 5. • If you select No, you see Screen...
... Box Configuration Diagram • The diagram shows the correct way to install the GLINKTM Cable from the back of the device to display Screen 8. 46 TV Guide On Screen System 4 Screen 4: Do you have a Cable Box? • If you select Yes, you see Screen 5. • If you select No, you see Screen...

Owners Manual
Page 47
...; If you select Yes, you see Screen 12. • If you select Test this code again, the same code is tested again in Screen 10. - TV Guide On Screen System 9 Screen 9: Cable Box Preparation • Follow the on-screen instructions, and press ENTER button to display Screen 10. 10 Screen 10: Cable...
...; If you select Yes, you see Screen 12. • If you select Test this code again, the same code is tested again in Screen 10. - TV Guide On Screen System 9 Screen 9: Cable Box Preparation • Follow the on-screen instructions, and press ENTER button to display Screen 10. 10 Screen 10: Cable...

Owners Manual
Page 48
... see Screen 14. • If you select No, you see Screen 1. 14 Screen 14: Congratulations • Press ENTER button to receive a channel lineup and listings. - TV Guide On Screen System 12 Screen 12: Do you have an antenna connected? • If you select Yes, you see Screen 21. 48
... see Screen 14. • If you select No, you see Screen 1. 14 Screen 14: Congratulations • Press ENTER button to receive a channel lineup and listings. - TV Guide On Screen System 12 Screen 12: Do you have an antenna connected? • If you select Yes, you see Screen 21. 48

Owners Manual
Page 49
16 Screen 16: VCR Configuration Diagram • This screen shows the correct way to install the GLINKTM Cable from the back of the TV to display Screen 19. 19 Screen 19: VCR Code Testing • When testing is properly installed. • Press ENTER button, and you see Screen 17. ... • Follow the on-screen instructions, and press ENTER button to the Recording device. Make sure the G-LINKTM Cable is done, Screen 20 displays automatically. TV Guide On Screen System 49
16 Screen 16: VCR Configuration Diagram • This screen shows the correct way to install the GLINKTM Cable from the back of the TV to display Screen 19. 19 Screen 19: VCR Code Testing • When testing is properly installed. • Press ENTER button, and you see Screen 17. ... • Follow the on-screen instructions, and press ENTER button to the Recording device. Make sure the G-LINKTM Cable is done, Screen 20 displays automatically. TV Guide On Screen System 49

Owners Manual
Page 50
... 22: Congratulations • You have successfully completed Setup! • Press ENTER button and you see Screen 21. • If you valuable information on using your Guide. • Press ENTER button to Channel 9? • If you select Yes, you see Screen 23. 23 Screen 23: Helpful Information • This screen tells you...
... 22: Congratulations • You have successfully completed Setup! • Press ENTER button and you see Screen 21. • If you valuable information on using your Guide. • Press ENTER button to Channel 9? • If you select Yes, you see Screen 23. 23 Screen 23: Helpful Information • This screen tells you...

Owners Manual
Page 51
...new episode, etc. • Intuitive up/down/left/right navigation using your viewing experience. TV Guide On Screen Overview - The TV Guide On Screen system has the following figure: TV Guide Logo Video Window Current Service Label Highlight Service bar Time Slot Info Button Info Box Tile...title. • Direct tuning to Record. • Schedule show is displayed. • Service Bar- Your new TV contains the TV Guide On Screen Interactive Program Guide. - Screen Components - or product-specific information appears (and also where Panel Menu appears) 51 provides access to indicate...
...new episode, etc. • Intuitive up/down/left/right navigation using your viewing experience. TV Guide On Screen Overview - The TV Guide On Screen system has the following figure: TV Guide Logo Video Window Current Service Label Highlight Service bar Time Slot Info Button Info Box Tile...title. • Direct tuning to Record. • Schedule show is displayed. • Service Bar- Your new TV contains the TV Guide On Screen Interactive Program Guide. - Screen Components - or product-specific information appears (and also where Panel Menu appears) 51 provides access to indicate...

Owners Manual
Page 52
Simply scroll down to Cancel. TV Guide On Screen System Panel Menu Panel Menu Command Button Highlight Entry Box Odometer • A Panel Menu appears when the Menu key is pressed on an ...
Simply scroll down to Cancel. TV Guide On Screen System Panel Menu Panel Menu Command Button Highlight Entry Box Odometer • A Panel Menu appears when the Menu key is pressed on an ...


