User Manual
Page 5
... TV or hear strange sounds, unplug the power cord contact an authorized service center. 25 Do not press strongly upon the panel with a hand or sharp object such as nail, pencil or pen, or make a scratch on it can occur. Be sure the antenna system is turned off, unplugged and all cables have been removed. Do not press against...
... TV or hear strange sounds, unplug the power cord contact an authorized service center. 25 Do not press strongly upon the panel with a hand or sharp object such as nail, pencil or pen, or make a scratch on it can occur. Be sure the antenna system is turned off, unplugged and all cables have been removed. Do not press against...
User Manual
Page 6
...Captions 63 Caption Options 64 TIME SETTING Clock Setting 65 Auto Clock Setup 65 Manual Clock Setup 66 Auto On/Off Timer Setting 67 Auto Shut-off Setting 68 Sleep Timer Setting 69 SCREEN ADJUSTMENT Auto Configure (RGB(PC) Mode only 70 Manual Configure 71 Selecting XGA Mode 72 Initializing (Reset to a Desk 18 VESA Wall Mounting 19 Desktop Pedestal Installation 19 Antenna or Cable Connection 20 EXTERNAL EQUIPMENT SETUP HD Receiver Setup 21 DVD Setup 24 VCR Setup 26 Other A/V Source Setup 28 Digital Audio Output 28 PC Setup 29 WATCHING TV / CHANNEL CONTROL Remote Control...
...Captions 63 Caption Options 64 TIME SETTING Clock Setting 65 Auto Clock Setup 65 Manual Clock Setup 66 Auto On/Off Timer Setting 67 Auto Shut-off Setting 68 Sleep Timer Setting 69 SCREEN ADJUSTMENT Auto Configure (RGB(PC) Mode only 70 Manual Configure 71 Selecting XGA Mode 72 Initializing (Reset to a Desk 18 VESA Wall Mounting 19 Desktop Pedestal Installation 19 Antenna or Cable Connection 20 EXTERNAL EQUIPMENT SETUP HD Receiver Setup 21 DVD Setup 24 VCR Setup 26 Other A/V Source Setup 28 Digital Audio Output 28 PC Setup 29 WATCHING TV / CHANNEL CONTROL Remote Control...
User Manual
Page 11
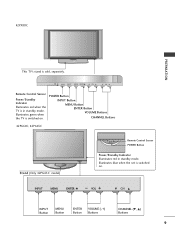
... green when the TV is switched on . INPUT MENU ENTER VOL CH INPUT MENU ENTER VOL CH INPUT MENU ENTER VOL CH INPUT Button MENU Button ENTER Button VOLUME (-,+) Buttons CHANNEL (E, D) Buttons 9 INPUT MENU ENTER VOL CH Remote Control Sensor Power/Standby Indicator Illuminates red when the TV is sold, separately. 42PX8DC PREPARATION INPUT ENTER This TV's stand is in standby mode. POWER Button INPUT Button MENU Button ENTER Button VOLUME Buttons CHANNEL Buttons 42PG60C, 42PG65C Stand (Only 42PG65C model) Remote Control Sensor POWER Button Power/Standby...
... green when the TV is switched on . INPUT MENU ENTER VOL CH INPUT MENU ENTER VOL CH INPUT MENU ENTER VOL CH INPUT Button MENU Button ENTER Button VOLUME (-,+) Buttons CHANNEL (E, D) Buttons 9 INPUT MENU ENTER VOL CH Remote Control Sensor Power/Standby Indicator Illuminates red when the TV is sold, separately. 42PX8DC PREPARATION INPUT ENTER This TV's stand is in standby mode. POWER Button INPUT Button MENU Button ENTER Button VOLUME Buttons CHANNEL Buttons 42PG60C, 42PG65C Stand (Only 42PG65C model) Remote Control Sensor POWER Button Power/Standby...
User Manual
Page 13
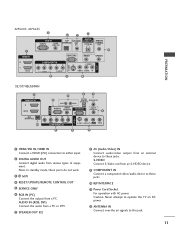
.... 7 SPEAKER OUT 8Ω 8 AV (Audio/Video) IN Connect audio/video output from an S-VIDEO device. 9 COMPONENT IN Connect a component video/audio device to these jacks. S-VIDEO Connect S-Video out from an external device to these jacks. 10 RJP INTERFACE 11 Power Cord Socket For operation with AC power. PREPARATION 42PG60C, 42PG65C 6 RGB IN RGB(PC) AUDIO (RGB / DVI) 10 7 RJP SPEAKER INTERFACE OUT 8 2 DIGITAL AUDIO OUT REMOTE CONTROL OPTICAL OUT 1 4 HDMI IN SERVICE ONLY RESET UPDATE S-VIDEO AV IN 1 2 1 DVI IN COMPONENT IN L R VIDEO 9 AUDIO 5 AUDIO VIDEO L(MONO...
.... 7 SPEAKER OUT 8Ω 8 AV (Audio/Video) IN Connect audio/video output from an S-VIDEO device. 9 COMPONENT IN Connect a component video/audio device to these jacks. S-VIDEO Connect S-Video out from an external device to these jacks. 10 RJP INTERFACE 11 Power Cord Socket For operation with AC power. PREPARATION 42PG60C, 42PG65C 6 RGB IN RGB(PC) AUDIO (RGB / DVI) 10 7 RJP SPEAKER INTERFACE OUT 8 2 DIGITAL AUDIO OUT REMOTE CONTROL OPTICAL OUT 1 4 HDMI IN SERVICE ONLY RESET UPDATE S-VIDEO AV IN 1 2 1 DVI IN COMPONENT IN L R VIDEO 9 AUDIO 5 AUDIO VIDEO L(MONO...

User Manual
Page 23
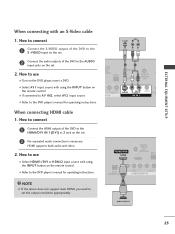
... set. 2. When connecting Component cable 1. Y PB PR L R Connect the audio output of external equipment setup mainly use ■ Turn on the remote control. RJP RFACE VIDEO AUDIO S-VIDEO ( ) COMPONENT IN Signal 480i 480p 720p 1080i 1080p Component Yes Yes Yes Yes Yes * 42LB5DC, 42LB50C model only HDMI1/DVI, HDMI2 No Yes Yes Yes Yes 21 Match the jack colors (Y = green, PB = blue, and PR = red). HDMI/DVI IN 1(DVI) 1 2 DIGITAL AUDIO OUT (OPTICAL) 2 M.P.I. HD RECEIVER SETUP This TV can receive Digital...
... set. 2. When connecting Component cable 1. Y PB PR L R Connect the audio output of external equipment setup mainly use ■ Turn on the remote control. RJP RFACE VIDEO AUDIO S-VIDEO ( ) COMPONENT IN Signal 480i 480p 720p 1080i 1080p Component Yes Yes Yes Yes Yes * 42LB5DC, 42LB50C model only HDMI1/DVI, HDMI2 No Yes Yes Yes Yes 21 Match the jack colors (Y = green, PB = blue, and PR = red). HDMI/DVI IN 1(DVI) 1 2 DIGITAL AUDIO OUT (OPTICAL) 2 M.P.I. HD RECEIVER SETUP This TV can receive Digital...

User Manual
Page 24
... support Auto HDMI, you need to set . 2 No separated audio connection is necessary. EXTERNAL EQUIPMENT SETUP EXTERNAL EQUIPMENT SETUP When connecting HDMI cable 1. How to connect 1 Connect the digital set-top box to the owner's manual for the digital set-top box.) ■ Select HDMI1/DVI or HDMI2 input source with using the INPUT button on the set the output resolution appropriately. HDMI supports both audio and video. 2. HDMI/DVI IN 1(DVI) DIGITAL AUDIO OUT (OPTICAL) 2 M.P.I RJP INTERFACE 1 VIDEO AUDIO COMPONENT IN HDMI-DTV OUTPUT ( ) 22 How to use ■ Turn...
... support Auto HDMI, you need to set . 2 No separated audio connection is necessary. EXTERNAL EQUIPMENT SETUP EXTERNAL EQUIPMENT SETUP When connecting HDMI cable 1. How to connect 1 Connect the digital set-top box to the owner's manual for the digital set-top box.) ■ Select HDMI1/DVI or HDMI2 input source with using the INPUT button on the set the output resolution appropriately. HDMI supports both audio and video. 2. HDMI/DVI IN 1(DVI) DIGITAL AUDIO OUT (OPTICAL) 2 M.P.I RJP INTERFACE 1 VIDEO AUDIO COMPONENT IN HDMI-DTV OUTPUT ( ) 22 How to use ■ Turn...

User Manual
Page 25
... using the INPUT button on the set -top box to the AUDIO IN (RGB,DVI) jack on the remote control. 23 EXTERNAL EQUIPMENT SETUP When connecting HDMI to the HDMI/DVI IN 1(DVI) or 2 jack on the set. 2 Connect the audio output of the digital set . 2. How to connect 1 Connect the DVI output of the digital set-top box to DVI cable HDMI/DVI IN 1(DVI) DIGITAL AUDIO OUT (OPTICAL) 2 M.P.I. RESET UPDATE REMOTE CONTROL OUT SERVICE ONLY RGB IN RJP INTERFACE 1 VIDEO AUDIO COMPONENT IN S-VIDEO (MONO) AUDIO AV IN 1 VIDEO SPEAKER AUDIO...
... using the INPUT button on the set -top box to the AUDIO IN (RGB,DVI) jack on the remote control. 23 EXTERNAL EQUIPMENT SETUP When connecting HDMI to the HDMI/DVI IN 1(DVI) or 2 jack on the set. 2 Connect the audio output of the digital set . 2. How to connect 1 Connect the DVI output of the digital set-top box to DVI cable HDMI/DVI IN 1(DVI) DIGITAL AUDIO OUT (OPTICAL) 2 M.P.I. RESET UPDATE REMOTE CONTROL OUT SERVICE ONLY RGB IN RJP INTERFACE 1 VIDEO AUDIO COMPONENT IN S-VIDEO (MONO) AUDIO AV IN 1 VIDEO SPEAKER AUDIO...

User Manual
Page 26
...Video output ports Y on the set . How to use ■ Turn on the remote control. ■ Refer to the 2 COMPONENT IN AUDIO jacks on DVD player Y Y PB PR PB PR B-Y R-Y Cb Cr Pb Pr 24 HDMI/DVI IN 1(DVI) 1 2 DIGITAL AUDIO OUT (OPTICAL) 2 M.P.I. ■ Select Component input source with using the INPUT button on the DVD player, insert a DVD. EXTERNAL EQUIPMENT SETUP EXTERNAL EQUIPMENT SETUP DVD SETUP When connecting Component cable 1. How to connect 1 Connect the video outputs (Y, PB, PR) of the DVD to the DVD player's manual for operating instructions...
...Video output ports Y on the set . How to use ■ Turn on the remote control. ■ Refer to the 2 COMPONENT IN AUDIO jacks on DVD player Y Y PB PR PB PR B-Y R-Y Cb Cr Pb Pr 24 HDMI/DVI IN 1(DVI) 1 2 DIGITAL AUDIO OUT (OPTICAL) 2 M.P.I. ■ Select Component input source with using the INPUT button on the DVD player, insert a DVD. EXTERNAL EQUIPMENT SETUP EXTERNAL EQUIPMENT SETUP DVD SETUP When connecting Component cable 1. How to connect 1 Connect the video outputs (Y, PB, PR) of the DVD to the DVD player's manual for operating instructions...
User Manual
Page 27
... button on the remote control. ■ If connected to AV IN2, select A V 2 input source. ■ Refer to the DVD player's manual for operating instructions. How to use ■ Turn on the DVD player, insert a DVD. ■ Select A V 1 input source with an S-Video cable 1. RJP INTERFACE VIDEO AUDIO COMPONENT IN 1 NOTE G If the device does not support Auto HDMI, you need to use HDMI/DVI IN 1(DVI) DIGITAL AUDIO OUT (OPTICAL) 2 M.P.I . How to connect 1 Connect the HDMI output of the DVD to the AUDIO input jacks on the set the output resolution appropriately. HDMI-DVD OUTPUT...
... button on the remote control. ■ If connected to AV IN2, select A V 2 input source. ■ Refer to the DVD player's manual for operating instructions. How to use ■ Turn on the DVD player, insert a DVD. ■ Select A V 1 input source with an S-Video cable 1. RJP INTERFACE VIDEO AUDIO COMPONENT IN 1 NOTE G If the device does not support Auto HDMI, you need to use HDMI/DVI IN 1(DVI) DIGITAL AUDIO OUT (OPTICAL) 2 M.P.I . How to connect 1 Connect the HDMI output of the DVD to the AUDIO input jacks on the set the output resolution appropriately. HDMI-DVD OUTPUT...

User Manual
Page 29
... jack colors (Video = yellow, Audio Left = white, and Audio Right = red) M.P.I. 2. ANT IN S-VIDEO L R VIDEO ANT OUT OUTPUT SWITCH 2 Connect the audio outputs of the VCR to the VCR owner's manual.) ■ Select A V 1 input source with using the INPUT button on the set . 1. AUDIO ENT IN S-VIDEO (MONO) AUDIO AV IN 1 VIDEO SPEAK OUT 8 ■ If connected to connect 1 Connect the AUDIO/VIDEO jacks between TV and VCR. SER REMOTE CONTROL UPDATE OUT ■ Insert a video tape into the VCR and press PLAY on the...
... jack colors (Video = yellow, Audio Left = white, and Audio Right = red) M.P.I. 2. ANT IN S-VIDEO L R VIDEO ANT OUT OUTPUT SWITCH 2 Connect the audio outputs of the VCR to the VCR owner's manual.) ■ Select A V 1 input source with using the INPUT button on the set . 1. AUDIO ENT IN S-VIDEO (MONO) AUDIO AV IN 1 VIDEO SPEAK OUT 8 ■ If connected to connect 1 Connect the AUDIO/VIDEO jacks between TV and VCR. SER REMOTE CONTROL UPDATE OUT ■ Insert a video tape into the VCR and press PLAY on the...

User Manual
Page 30
... the AUDIO menu. (G p.58). Match the jack colors. (Video = yellow, Audio Left = white, and Audio Right = red) Camcorder Video Game Set VIDEO L R 2. How to connect 1 Connect one end of an optical cable to the TV Digital Audio (Optical) Output port. 2 Connect the other end of the optical cable to the digital audio (optical) input on the remote control. ■ If connected to use ■ Select A V 2 input source with external audio equipments, such as amplifiers or speakers, please turn the TV speakers off. (G p.58) CAUTION G Do not look into the optical output port...
... the AUDIO menu. (G p.58). Match the jack colors. (Video = yellow, Audio Left = white, and Audio Right = red) Camcorder Video Game Set VIDEO L R 2. How to connect 1 Connect one end of an optical cable to the TV Digital Audio (Optical) Output port. 2 Connect the other end of the optical cable to the digital audio (optical) input on the remote control. ■ If connected to use ■ Select A V 2 input source with external audio equipments, such as amplifiers or speakers, please turn the TV speakers off. (G p.58) CAUTION G Do not look into the optical output port...

User Manual
Page 31
... AUDIO COMPONENT IN (RGB, DVI) 2. How to connect 1 Connect the DVI output of the PC to the RGB IN jack on the set. (MONO) AUDIO AV IN 1 VIDEO SPEAKER AUDIO OUT IN 8 (RGB, DVI) Connect the PC audio output to the HDMI/DVI IN 1(DVI) jack on the set. How to use ( ) 1 ■ Turn on the PC and the set 2 ■ Select HDMI1/DVI input source with using the INPUT button on the remote control...
... AUDIO COMPONENT IN (RGB, DVI) 2. How to connect 1 Connect the DVI output of the PC to the RGB IN jack on the set. (MONO) AUDIO AV IN 1 VIDEO SPEAKER AUDIO OUT IN 8 (RGB, DVI) Connect the PC audio output to the HDMI/DVI IN 1(DVI) jack on the set. How to use ( ) 1 ■ Turn on the PC and the set 2 ■ Select HDMI1/DVI input source with using the INPUT button on the remote control...

User Manual
Page 32
... refresh rate of time. G Avoid keeping a fixed image on the screen for Horizontal and Vertical frequencies is clear. G The synchronization input form for a long period of the PC graphic card can not be noise associated with the resolution, vertical pattern, contrast or brightness in PC mode. There may become permanently imprinted on the screen. EXTERNAL EQUIPMENT SETUP Supported Display Specifications (RGB/HDMI1-PC...
... refresh rate of time. G Avoid keeping a fixed image on the screen for Horizontal and Vertical frequencies is clear. G The synchronization input form for a long period of the PC graphic card can not be noise associated with the resolution, vertical pattern, contrast or brightness in PC mode. There may become permanently imprinted on the screen. EXTERNAL EQUIPMENT SETUP Supported Display Specifications (RGB/HDMI1-PC...

User Manual
Page 34
... Component input sources. WATCHING TV / CHANNEL CONTROL WATCHING TV / CHANNEL CONTROL REMOTE CONTROL FUNCTIONS When using the remote control, aim it at the remote control sensor on the viewing EZ PIC environment. G p.41 Selects the factory preset picture depend on the TV. Adjusts brightness on or off mode. G p.42 VCR/DVD Control video cassette recorders or DVD players. PIP Switches the sub picture Double Window or off , depending on mode. FLASH BACK Tune to enter a program number for multiple program channels such as 2-1, 2-2, etc. POWER Turns...
... Component input sources. WATCHING TV / CHANNEL CONTROL WATCHING TV / CHANNEL CONTROL REMOTE CONTROL FUNCTIONS When using the remote control, aim it at the remote control sensor on the viewing EZ PIC environment. G p.41 Selects the factory preset picture depend on the TV. Adjusts brightness on or off mode. G p.42 VCR/DVD Control video cassette recorders or DVD players. PIP Switches the sub picture Double Window or off , depending on mode. FLASH BACK Tune to enter a program number for multiple program channels such as 2-1, 2-2, etc. POWER Turns...

User Manual
Page 37
... SCREEN SETUP VIDEO AUDIO TIME OPTION SCREEN LOCK Auto config. ON-SCREEN MENUS SELECTION Your TV's OSD (On Screen Display) may differ slightly from what is shown in this manual. 1 Press the MENU button and then use D E F G or available menus. or button to display the SETUP SETUP VIDEO AUDIO TIME OPTION SCREEN LOCK EZ Scan Manual Scan Channel Edit DTV Signal Channel Label VIDEO SETUP VIDEO AUDIO TIME OPTION SCREEN LOCK EZ Picture Color Temperature XD Advanced Reset AUDIO SETUP Audio Language VIDEO EZ SoundRite AUDIO EZ Sound TIME Balance 0 OPTION TV Speakers SCREEN LOCK...
... SCREEN SETUP VIDEO AUDIO TIME OPTION SCREEN LOCK Auto config. ON-SCREEN MENUS SELECTION Your TV's OSD (On Screen Display) may differ slightly from what is shown in this manual. 1 Press the MENU button and then use D E F G or available menus. or button to display the SETUP SETUP VIDEO AUDIO TIME OPTION SCREEN LOCK EZ Scan Manual Scan Channel Edit DTV Signal Channel Label VIDEO SETUP VIDEO AUDIO TIME OPTION SCREEN LOCK EZ Picture Color Temperature XD Advanced Reset AUDIO SETUP Audio Language VIDEO EZ SoundRite AUDIO EZ Sound TIME Balance 0 OPTION TV Speakers SCREEN LOCK...

User Manual
Page 76
... block program viewing based on the ratings sent by broadcasting stations. A password is set up blocking schemes to this function, the following must be viewed. Then, press the G or button. ■ Enter the password as requested. ■ The TV is required to gain access to block specific channels, ratings, and external viewing sources. PARENTAL CONTROL / RATINGS Parental Control can be blocked. 2. Ratings for Television programs including made-for a time period. The Parental Control...
... block program viewing based on the ratings sent by broadcasting stations. A password is set up blocking schemes to this function, the following must be viewed. Then, press the G or button. ■ Enter the password as requested. ■ The TV is required to gain access to block specific channels, ratings, and external viewing sources. PARENTAL CONTROL / RATINGS Parental Control can be blocked. 2. Ratings for Television programs including made-for a time period. The Parental Control...

User Manual
Page 78
... LOCK Aux. PARENTAL CONTROL /RATINGS CHANNEL BLOCKING Blocks any channels that you do not want to watch . 1 After inputting the password, use the D or E or or button to choose Block Channel. 2 Press the G or button. You will now see a screen filled with channel numbers and a preview picture. 3 Use D E F G or button to select a channel and then use the D or E or or button to the previous menu. 76 For USA SETUP VIDEO AUDIO TIME OPTION SCREEN LOCK Lock System Set Password Block Channel...
... LOCK Aux. PARENTAL CONTROL /RATINGS CHANNEL BLOCKING Blocks any channels that you do not want to watch . 1 After inputting the password, use the D or E or or button to choose Block Channel. 2 Press the G or button. You will now see a screen filled with channel numbers and a preview picture. 3 Use D E F G or button to select a channel and then use the D or E or or button to the previous menu. 76 For USA SETUP VIDEO AUDIO TIME OPTION SCREEN LOCK Lock System Set Password Block Channel...
User Manual
Page 86
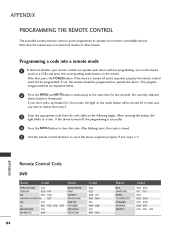
... blinking twice, this code is turned off . After that the remote may not control all models of other brands. The programming procedures are explained below. 2 Press the MENU and MUTE button continuously at a time. In that case, you don't press any button for two seconds; If the device is stored. 5 Test the remote control functions to operate the device. APPENDIX Remote Control Code DVD Brand Codes Brand APEX DIGITAL 022...
... blinking twice, this code is turned off . After that the remote may not control all models of other brands. The programming procedures are explained below. 2 Press the MENU and MUTE button continuously at a time. In that case, you don't press any button for two seconds; If the device is stored. 5 Test the remote control functions to operate the device. APPENDIX Remote Control Code DVD Brand Codes Brand APEX DIGITAL 022...

Brochure
Page 2
... LG500H/LG505H televisions have technologies to change of harmful materials used in algorithms, TV will automatically reduce the power consumption based on incoming video, while maximizing picture performance. •Static Power Savings - MOUNTING HOLES ON STAND ATTACHING THE TV TO A DESK 4-Screws (not provided) Stand Desk FREE-TO-GUEST C A R D HCS1410 FREE-TO-GUEST CARD Works with Pro:Idiom TVs with Pay-Per-View systems if needed in...
... LG500H/LG505H televisions have technologies to change of harmful materials used in algorithms, TV will automatically reduce the power consumption based on incoming video, while maximizing picture performance. •Static Power Savings - MOUNTING HOLES ON STAND ATTACHING THE TV TO A DESK 4-Screws (not provided) Stand Desk FREE-TO-GUEST C A R D HCS1410 FREE-TO-GUEST CARD Works with Pro:Idiom TVs with Pay-Per-View systems if needed in...
Brochure
Page 4
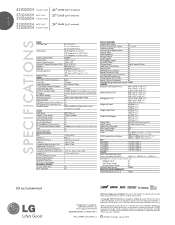
... (1 tuner) Calibration Mode Yes Commercial Installation Menu Yes Function Menu Yes Channel Labeling Yes Favorite Channel Yes TV Link Protocol Yes RJP Plug&Play Support Yes Discrete IR Codes Yes Trilingual Menus English/Spanish/French Sleep Timer, On/Off Timer Yes Manual Clock Yes Flashback (Previous Channel) Yes Parental Control w/V-Chip Yes EZ Menus (High Performance Interface) Yes Auto/Manual Programming Yes Closed Captions (Customizable) Yes Remote, Universal w/batteries Yes Optional Cloning Programmer Remote LT2002 CABINET Dimensions with Stand...
... (1 tuner) Calibration Mode Yes Commercial Installation Menu Yes Function Menu Yes Channel Labeling Yes Favorite Channel Yes TV Link Protocol Yes RJP Plug&Play Support Yes Discrete IR Codes Yes Trilingual Menus English/Spanish/French Sleep Timer, On/Off Timer Yes Manual Clock Yes Flashback (Previous Channel) Yes Parental Control w/V-Chip Yes EZ Menus (High Performance Interface) Yes Auto/Manual Programming Yes Closed Captions (Customizable) Yes Remote, Universal w/batteries Yes Optional Cloning Programmer Remote LT2002 CABINET Dimensions with Stand...


