
Owners Manual
Page 2
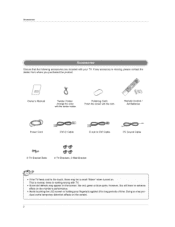
Polishing Cloth Potish the screen with the cloth, Remote Control / AA Batteries Power Cord DVI-D Cable D sub to DVI Cable @@ 2-TV Bracket Bolts 2-TV Brackets, 2-Walt Bracket PC Sound Cable • If the TV ...
Polishing Cloth Potish the screen with the cloth, Remote Control / AA Batteries Power Cord DVI-D Cable D sub to DVI Cable @@ 2-TV Bracket Bolts 2-TV Brackets, 2-Walt Bracket PC Sound Cable • If the TV ...
Owners Manual
Page 4
Contents 4 2 3 6 7 8 9_1;1 Acc_essori_ Safety Instructions Controls Connection Options (Model: 32LX2R) Connection Options (Model:26LX2R) Remote Control Key Functions 12 13 13 14 15 15 16-17 17 18_19 20 21 21 22--23 24_25 26 Various Installation How to use ...
Contents 4 2 3 6 7 8 9_1;1 Acc_essori_ Safety Instructions Controls Connection Options (Model: 32LX2R) Connection Options (Model:26LX2R) Remote Control Key Functions 12 13 13 14 15 15 16-17 17 18_19 20 21 21 22--23 24_25 26 Various Installation How to use ...
Owners Manual
Page 5
... P_P 51 Swapping the PIP/Double Window 52~55 56~57 58 59~60 61 ~62 63 External Control Device Setup IR C_ Programming the Remote Programming Codes Troubleshooting Checklist Product Spec#_catio_s 5
... P_P 51 Swapping the PIP/Double Window 52~55 56~57 58 59~60 61 ~62 63 External Control Device Setup IR C_ Programming the Remote Programming Codes Troubleshooting Checklist Product Spec#_catio_s 5
Owners Manual
Page 6
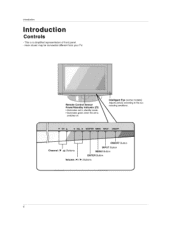
Introduction This is switched on, Intelligent Eye (some Adjusts picture according rounding conditions. ON/OFF Button Channel (TfA) Buttons INPUT Button MENU Button ENTER Button Volume (4 / I_) But:tons 6 Remote Control Sensor Power/S_ndby indicator ((b) * i_[uminatesred in standby mode. * illuminates green when the set is a simplified representation of front panel Here shown may be somewhat different from your TV. models) to the sur-
Introduction This is switched on, Intelligent Eye (some Adjusts picture according rounding conditions. ON/OFF Button Channel (TfA) Buttons INPUT Button MENU Button ENTER Button Volume (4 / I_) But:tons 6 Remote Control Sensor Power/S_ndby indicator ((b) * i_[uminatesred in standby mode. * illuminates green when the set is a simplified representation of front panel Here shown may be somewhat different from your TV. models) to the sur-

Owners Manual
Page 9
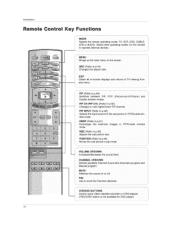
Remote Control Key Fu nct ions Introduction ,utton once_ the input source appear on screen as shown Press S-Video, Componentl, , DVI [ Selects the MTS sound: Mono Stereo or SAP. ._..:.:_iiiiiiiiiiiiiiiiiiiiiiiiiiiiiiiiiiiiiiiiiiiiiiiiiiiiiiiiiiiiiiiiiiiiiiiiiiiiiiiiiiiiiiiiiiiiiiiiiiiiiiiiiiiiiiiiiiiiiiiiiiiiiiiiiiiiiiiiiiiiiiiiiiiiiiiiiiiiiiiiiiiiii_ 9
Remote Control Key Fu nct ions Introduction ,utton once_ the input source appear on screen as shown Press S-Video, Componentl, , DVI [ Selects the MTS sound: Mono Stereo or SAP. ._..:.:_iiiiiiiiiiiiiiiiiiiiiiiiiiiiiiiiiiiiiiiiiiiiiiiiiiiiiiiiiiiiiiiiiiiiiiiiiiiiiiiiiiiiiiiiiiiiiiiiiiiiiiiiiiiiiiiiiiiiiiiiiiiiiiiiiiiiiiiiiiiiiiiiiiiiiiiiiiiiiiiiiiiiii_ 9
Owners Manual
Page 10
... PIP INPUT [Refer to p.48) Selects the _nput source for DVD ptayer). 10 Introduction Remote Control Key Functions MODE Selects the remote operating mode: TV, VCR, DVD, CABLE, STB or AUDIO Select other operating modes, for the remote to operate external devices, MENU Brings up the main menu to the screen, ARC (Refer...
... PIP INPUT [Refer to p.48) Selects the _nput source for DVD ptayer). 10 Introduction Remote Control Key Functions MODE Selects the remote operating mode: TV, VCR, DVD, CABLE, STB or AUDIO Select other operating modes, for the remote to operate external devices, MENU Brings up the main menu to the screen, ARC (Refer...

Owners Manual
Page 11
Close the cover, * Use a remote control 7 meter distance and 30 degree (left/right) within the receiving unit scope. * Dispose of used batteries with +, - Don't mix old or used batteries in correct polarity (+ with new ones. Introduction Ocopveenr tohne thbeattbearyck cosmidep.artment Insert two 1_5V AA batteries in a recycle bin to prevent environment. 11 with -).
Close the cover, * Use a remote control 7 meter distance and 30 degree (left/right) within the receiving unit scope. * Dispose of used batteries with +, - Don't mix old or used batteries in correct polarity (+ with new ones. Introduction Ocopveenr tohne thbeattbearyck cosmidep.artment Insert two 1_5V AA batteries in a recycle bin to prevent environment. 11 with -).
Owners Manual
Page 16
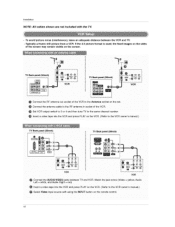
... Connect the AUDIO/VIDEO jacks between the VCR and TM. Installation NOTE: All cables shown are not included with using the INPUT button on the remote control 16 Typically a frozen still picture from a VCR. on the sides 0 _nsert a video tape into the VCR and press PLAY on the screen. Match the...
... Connect the AUDIO/VIDEO jacks between the VCR and TM. Installation NOTE: All cables shown are not included with using the INPUT button on the remote control 16 Typically a frozen still picture from a VCR. on the sides 0 _nsert a video tape into the VCR and press PLAY on the screen. Match the...

Owners Manual
Page 17
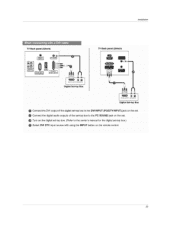
... picture quaJity is improved; compared to connecting a regular VCR to the VCR owneCs manual ) Select S-Video input source with using the INPUT button on the remote control I Operate the co[responding external equipment. "_'_J _&_ _[_ [%T_'_;_ _ TV Sack panel (32inch) O " , TV Back paneJ (26inch) g VCR VCR O Connect the an S-VIDEO output of...
... picture quaJity is improved; compared to connecting a regular VCR to the VCR owneCs manual ) Select S-Video input source with using the INPUT button on the remote control I Operate the co[responding external equipment. "_'_J _&_ _[_ [%T_'_;_ _ TV Sack panel (32inch) O " , TV Back paneJ (26inch) g VCR VCR O Connect the an S-VIDEO output of...

Owners Manual
Page 18
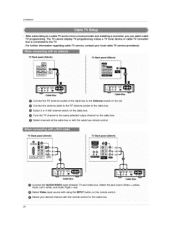
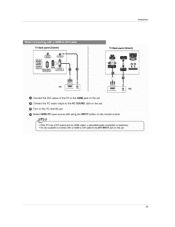
Installation ;o input sour_ w!th using the INPUT bu_on on the remote cont[oL TV Back panel (32inch) o m 1 DVD OVD TV Back panel (26|rich} Connect the HDMI output of the DVD to the HDM| jack ot_ the set. ,Select FIDMI DTV input source with using the INPUT button on _:he remote control Refer to the DVD player's manual for operating instructions. _can receive the wdeo and audio _ignal s_multaneously w_th using a HDMI cable. ) 18
Installation ;o input sour_ w!th using the INPUT bu_on on the remote cont[oL TV Back panel (32inch) o m 1 DVD OVD TV Back panel (26|rich} Connect the HDMI output of the DVD to the HDM| jack ot_ the set. ,Select FIDMI DTV input source with using the INPUT button on _:he remote control Refer to the DVD player's manual for operating instructions. _can receive the wdeo and audio _ignal s_multaneously w_th using a HDMI cable. ) 18

Owners Manual
Page 19
..., 26inch) DVD DVD DVO Connect the v4deo outputs (Y, PB, PR) of the DVD to the COM_ PONIENT1 AUDIO jacks on the set . Turn on the remote control - Select: Component 1 input source with using the INPUT button on the DVD player, insert a DVD. Video output ports on the set . Refer to the...
..., 26inch) DVD DVD DVO Connect the v4deo outputs (Y, PB, PR) of the DVD to the COM_ PONIENT1 AUDIO jacks on the set . Turn on the remote control - Select: Component 1 input source with using the INPUT button on the DVD player, insert a DVD. Video output ports on the set . Refer to the...
Owners Manual
Page 20
... tuner device or cable TV converter box is connected to the same selected output channel on the cable box. Select 3 or 4 with the cable pox remote control 20 For further information regarding cable TV service, contact your local cable TV service provider(s), TV BaCk pane] (32inch) TV Back panel (26inch) N Cab...
... tuner device or cable TV converter box is connected to the same selected output channel on the cable box. Select 3 or 4 with the cable pox remote control 20 For further information regarding cable TV service, contact your local cable TV service provider(s), TV BaCk pane] (32inch) TV Back panel (26inch) N Cab...
Owners Manual
Page 22
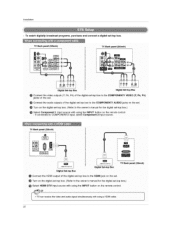
TV Back panel (32inch) Q D|gita| Set-top Box TV Sack pane! (26_nch) ! Turn on the digital set . jack on the remote control 22 To w_ch digRally broadcast programs, purchase and connect a digital set4op box. Dig_al _4op Box Connect the HDMI ou_ut of the digital set-top box to the owner's manual for the digital set-top box,) Select HDMI DTV nput source w_th using the iNPUT button on the set -top box_ _Refer to the HDM! Installation -
TV Back panel (32inch) Q D|gita| Set-top Box TV Sack pane! (26_nch) ! Turn on the digital set . jack on the remote control 22 To w_ch digRally broadcast programs, purchase and connect a digital set4op box. Dig_al _4op Box Connect the HDMI ou_ut of the digital set-top box to the owner's manual for the digital set-top box,) Select HDMI DTV nput source w_th using the iNPUT button on the set -top box_ _Refer to the HDM! Installation -
Owners Manual
Page 23
TV Back panel (32inch) O lnsL_/lation TV B_k panel (26inch) 1 i e 1 Digital Set-top Box Connect the DVL output of the dig4tai set-top box to the DVI INPUT (PC/DTV INPUT) jack on the set Connect the digital audio outputs of the set*top box to the PC SOUND jack on the set, Turn on the digital set-top box (Refer to the owner's manual for the digital set-top box,_ SeEect DMI DTV input source with using the INPUT button on the remote control. 23
TV Back panel (32inch) O lnsL_/lation TV B_k panel (26inch) 1 i e 1 Digital Set-top Box Connect the DVL output of the dig4tai set-top box to the DVI INPUT (PC/DTV INPUT) jack on the set Connect the digital audio outputs of the set*top box to the PC SOUND jack on the set, Turn on the digital set-top box (Refer to the owner's manual for the digital set-top box,_ SeEect DMI DTV input source with using the INPUT button on the remote control. 23

Owners Manual
Page 24
....a.e(_=i"c"): : i [ TVB_k_na (26_.¢h) | | .... _ | !,=Lo%o%%,_ZJ: ' _l_ ! _...... _° PC Connect the RG8 output of the PC to the DVI INPUT (PC/DTV INPUT) jack on the remote COntrol. 24 Select DV_ PC in put source with Using the iNPUT bUttOn on the set . Connect the PC audio outputs to the TV*s settings... set . This TV provides Plug and Play capability, meaning that the PC adjusts automatically to the PC SOUND jack on the set, Turn on the remote control * Connect the signal cable (DVI-D cable. Installation -
....a.e(_=i"c"): : i [ TVB_k_na (26_.¢h) | | .... _ | !,=Lo%o%%,_ZJ: ' _l_ ! _...... _° PC Connect the RG8 output of the PC to the DVI INPUT (PC/DTV INPUT) jack on the remote COntrol. 24 Select DV_ PC in put source with Using the iNPUT bUttOn on the set . Connect the PC audio outputs to the TV*s settings... set . This TV provides Plug and Play capability, meaning that the PC adjusts automatically to the PC SOUND jack on the set, Turn on the remote control * Connect the signal cable (DVI-D cable. Installation -
Owners Manual
Page 25
Turn on the PC and the set . I • ff the PC has a DV_ output and no HDMI oL_put, a separated audio connection is neces_ny, L -Et's not available to the BY| |NPtY[ jack on the remote control. PC PC O Connect the DVl output of the PC to the HDMI jack on the set_ Connect the PC audio output to the PC SOUND jack on the set Select HDMI PC input source with a H DMI to DV_cable to connect with using the INPUT button on the _et, # 25 TV Back panel (32inch) Q lnsL_/lation TV Back panel (26Lnch) m !
Turn on the PC and the set . I • ff the PC has a DV_ output and no HDMI oL_put, a separated audio connection is neces_ny, L -Et's not available to the BY| |NPtY[ jack on the remote control. PC PC O Connect the DVl output of the PC to the HDMI jack on the set_ Connect the PC audio output to the PC SOUND jack on the set Select HDMI PC input source with a H DMI to DV_cable to connect with using the INPUT button on the _et, # 25 TV Back panel (32inch) Q lnsL_/lation TV Back panel (26Lnch) m !

Owners Manual
Page 27
Select the viewing source by pressing the MUTE or VOL ,I V button on the TV or press the POWER, TV_ INPUT, CH A / T, Number (0 ~ 9) button on the remote control and then the TV will be shown on . 2. Press the MENU button and then use A / _I' button to select the _CL_J, menu, 2 Press the ... TV viewing. 27 Press the OH ,i, / T or NUMBER buttons to standby mode. At this function by using the TV, press the POWER button on the remote centroi. First select your desired language. First, connect power cord correctly. Ope[afio_ Basic operation 1. When finished using INPUT button on the...
Select the viewing source by pressing the MUTE or VOL ,I V button on the TV or press the POWER, TV_ INPUT, CH A / T, Number (0 ~ 9) button on the remote control and then the TV will be shown on . 2. Press the MENU button and then use A / _I' button to select the _CL_J, menu, 2 Press the ... TV viewing. 27 Press the OH ,i, / T or NUMBER buttons to standby mode. At this function by using the TV, press the POWER button on the remote centroi. First select your desired language. First, connect power cord correctly. Ope[afio_ Basic operation 1. When finished using INPUT button on the...

Owners Manual
Page 40
... use ,i, ! V button to select On or Off. 4 Press the EXIT button to return to normal TV viewing. • TMs feature can be used with the remote control. 1 Press the MENU button and then use A / V button to setec_ the _&L menu, 2 Press the I_ button and then use A / V button to stop XD _mo...
... use ,i, ! V button to select On or Off. 4 Press the EXIT button to return to normal TV viewing. • TMs feature can be used with the remote control. 1 Press the MENU button and then use A / V button to setec_ the _&L menu, 2 Press the I_ button and then use A / V button to stop XD _mo...
Owners Manual
Page 54
...Sub Picture Input) ] 41 : Component 2 50 or 60 : DVl go : HDMI Acknowledgement 04. Screen Mute (Command:d) I_ To select screen mute on remote control with the volume buttons Transmission Data Min: 0 ~ Max: 64 (transm_ by Hexadecimal code) • Refer to 'Rea_ _ta n'_pping 1' as shown ...volume on !off ) _. Transmission [[kl[d][ ][Set IDI[ ][Dat, a][Cr] ] Data 0 : Screen mute off (Picture on) 1 : Screen mute on remote control or in the Picture menu. Transmission Data 0 : Power Off 1 : Power On Acknowledgement IN[ l[Set_Ol[][OKl[Oata][×l ] Ii_ To show Power On/...
...Sub Picture Input) ] 41 : Component 2 50 or 60 : DVl go : HDMI Acknowledgement 04. Screen Mute (Command:d) I_ To select screen mute on remote control with the volume buttons Transmission Data Min: 0 ~ Max: 64 (transm_ by Hexadecimal code) • Refer to 'Rea_ _ta n'_pping 1' as shown ...volume on !off ) _. Transmission [[kl[d][ ][Set IDI[ ][Dat, a][Cr] ] Data 0 : Screen mute off (Picture on) 1 : Screen mute on remote control or in the Picture menu. Transmission Data 0 : Power Off 1 : Power On Acknowledgement IN[ l[Set_Ol[][OKl[Oata][×l ] Ii_ To show Power On/...

Owners Manual
Page 55
.... See page 54, Acknowlecioement [[j][ ][Set ID][ ][OK][Data][x] I 11. See page 54. When main power is on Acknowledqement ] 1: OSD mute off , remote control lock is released. 15. Balance (Command:t) • To adjust balance. Transmission [[k][t][ ][Set Ig][ ][gata][Cr] ] Data Min: 0 ~ Max: 64... in the Picture menu. Max: 64 (transmit by Hexadecimal • Refer to 'Real data mapping 1'. Key (Command:m c) • To send IR remote key code, Transmission [[m][c][ ][Set ID][ ][Data][Cr] Data: Key code (Refer to 'Real data mapping 1'. Brightness (Command:h) • To adjust ...
.... See page 54, Acknowlecioement [[j][ ][Set ID][ ][OK][Data][x] I 11. See page 54. When main power is on Acknowledqement ] 1: OSD mute off , remote control lock is released. 15. Balance (Command:t) • To adjust balance. Transmission [[k][t][ ][Set Ig][ ][gata][Cr] ] Data Min: 0 ~ Max: 64... in the Picture menu. Max: 64 (transmit by Hexadecimal • Refer to 'Real data mapping 1'. Key (Command:m c) • To send IR remote key code, Transmission [[m][c][ ][Set ID][ ][Data][Cr] Data: Key code (Refer to 'Real data mapping 1'. Brightness (Command:h) • To adjust ...


