
Owners Manual
Page 25
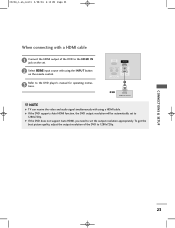
G If the DVD supports Auto HDMI function, the DVD output resolution will be automatically set the output resolution appropriately. tions. AV IN 3 S-VIDEO VIDEO ( ) AUDIO CONNECTIONS & SETUP 23 G If the DVD does not support Auto HDMI, you need to set to 1280x720p. ... 2 Select HDMI input source with a HDMI cable 1 Connect the HDMI output of the DVD to 1280x720p. To get the best picture quality, adjust the output resolution of the DVD to the DVD player's manual for operating instruc- 0323G_1-en_rev01 2/28/06 4:12 PM Page 23 When connecting with using a HDMI cable...
G If the DVD supports Auto HDMI function, the DVD output resolution will be automatically set the output resolution appropriately. tions. AV IN 3 S-VIDEO VIDEO ( ) AUDIO CONNECTIONS & SETUP 23 G If the DVD does not support Auto HDMI, you need to set to 1280x720p. ... 2 Select HDMI input source with a HDMI cable 1 Connect the HDMI output of the DVD to 1280x720p. To get the best picture quality, adjust the output resolution of the DVD to the DVD player's manual for operating instruc- 0323G_1-en_rev01 2/28/06 4:12 PM Page 23 When connecting with using a HDMI cable...

Owners Manual
Page 26
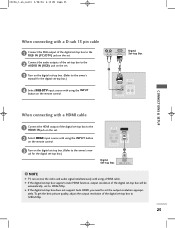
... (L) 1 2 COMPONENT IN VIDEO AUDIO 1 2 AV OUT ( MONO) S-VIDEO VIDEO AUDIO AV IN 1 CONNECTIONS & SETUP ! To get the best picture quality, adjust the output resolution of the digital set-top box will be automatically set to 1280x720p. G If the digital set-top box supports Auto DVI function, the output...top box.) 4 Select HDMI input source with using the INPUT button on the remote control. NOTE G If the digital set the output resolution appropriately. NOTE Signal 480i/576i 480p/576p/720p/1080i Component Yes Yes RGB-DTV No Yes HDMI Yes Yes When connecting with a HDMI to...
... (L) 1 2 COMPONENT IN VIDEO AUDIO 1 2 AV OUT ( MONO) S-VIDEO VIDEO AUDIO AV IN 1 CONNECTIONS & SETUP ! To get the best picture quality, adjust the output resolution of the digital set-top box will be automatically set to 1280x720p. G If the digital set-top box supports Auto DVI function, the output...top box.) 4 Select HDMI input source with using the INPUT button on the remote control. NOTE G If the digital set the output resolution appropriately. NOTE Signal 480i/576i 480p/576p/720p/1080i Component Yes Yes RGB-DTV No Yes HDMI Yes Yes When connecting with a HDMI to...
Owners Manual
Page 27
... does not support Auto HDMI, you need to set -top box to 1280x720p. To get the best picture quality, adjust the output resolution of the digital set the output resolution appropri- ual for the digital set-top box.) 4 Select RGB-DTV input source with using the INPUT button on the remote control... the digital set-top box to the HDMI IN jack on the remote control. G If the digital set-top box supports Auto HDMI function, output resolution of the digital set-top box will be automatically set -top box.) VIDEO AUDIO RGB IN (PC/DTV) HDMI IN REMOTE AUDIO IN CONTROL IN...
... does not support Auto HDMI, you need to set -top box to 1280x720p. To get the best picture quality, adjust the output resolution of the digital set the output resolution appropri- ual for the digital set-top box.) 4 Select RGB-DTV input source with using the INPUT button on the remote control... the digital set-top box to the HDMI IN jack on the remote control. G If the digital set-top box supports Auto HDMI function, output resolution of the digital set-top box will be automatically set -top box.) VIDEO AUDIO RGB IN (PC/DTV) HDMI IN REMOTE AUDIO IN CONTROL IN...
Owners Manual
Page 28
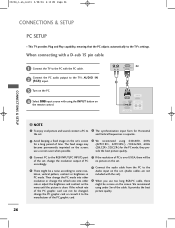
... possible. 6 We recommend using 640x480, 60Hz (42PC1RV*, 42PC3RV*) /1024x768, 60Hz (26LC2R*, 32LC2R*) for the PC mode, they provide the best picture quality. 3 Connect PC to the manufacturer of the PC graphic card. 7 If the resolution of the PC graphic card can not be a noise on the screen. change the...consult it to the RGB INPUT(PC INPUT) port of the set; NOTE 1 To enjoy vivid picture and sound, connect a PC to some resolution, vertical pattern, contrast or brightness in PC mode. The fixed image may become permanently imprinted on the set. 8 Connect the audio cable from ...
... possible. 6 We recommend using 640x480, 60Hz (42PC1RV*, 42PC3RV*) /1024x768, 60Hz (26LC2R*, 32LC2R*) for the PC mode, they provide the best picture quality. 3 Connect PC to the manufacturer of the PC graphic card. 7 If the resolution of the PC graphic card can not be a noise on the screen. change the...consult it to the RGB INPUT(PC INPUT) port of the set; NOTE 1 To enjoy vivid picture and sound, connect a PC to some resolution, vertical pattern, contrast or brightness in PC mode. The fixed image may become permanently imprinted on the set. 8 Connect the audio cable from ...
Owners Manual
Page 31
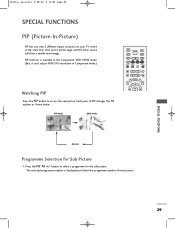
... I P button to select a programme for Sub Picture 1. The selected programme number is available in the Component, RGB, HDMI mode. (But, it can't adjust 480i/576i resolution of main picture. PIP PR+ PIP INPUT Watching PIP Press the P I /II SLEEP OK PIP Off Programme Selection for the sub picture. SPECIAL FUNTIONS 29...
... I P button to select a programme for Sub Picture 1. The selected programme number is available in the Component, RGB, HDMI mode. (But, it can't adjust 480i/576i resolution of main picture. PIP PR+ PIP INPUT Watching PIP Press the P I /II SLEEP OK PIP Off Programme Selection for the sub picture. SPECIAL FUNTIONS 29...
Owners Manual
Page 70
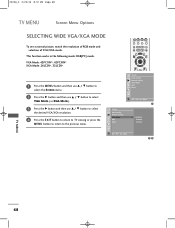
...: RGB[PC] mode. PIP PR+ PIP INPUT LIST EXIT MENU I/II SLEEP OK Q.VIEW Screen Auto config. Manual config. VGA Mode: 42PC1RV*, 42PC3RV* XGA Mode: 26LC2R*, 32LC2R* 1 Press the M E N U button and then use D / E button to select the Screen menu. 2 Press the G button and then use D / E button to select VGA ...Mode (or XGA Mode). 3 Press the G button and then use D / E button to select the desired VGA/XGA resolution. 4 Press the EXIT button to return to TV viewing or press the MENU button to return to the previous menu. VGA Mode ARC Reset TEXT...
...: RGB[PC] mode. PIP PR+ PIP INPUT LIST EXIT MENU I/II SLEEP OK Q.VIEW Screen Auto config. Manual config. VGA Mode: 42PC1RV*, 42PC3RV* XGA Mode: 26LC2R*, 32LC2R* 1 Press the M E N U button and then use D / E button to select the Screen menu. 2 Press the G button and then use D / E button to select VGA ...Mode (or XGA Mode). 3 Press the G button and then use D / E button to select the desired VGA/XGA resolution. 4 Press the EXIT button to return to TV viewing or press the MENU button to return to the previous menu. VGA Mode ARC Reset TEXT...
Owners Manual
Page 75
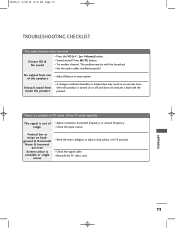
... does not work. The problem may result in ambient humidity or temperature may be with the product. Picture OK & No sound I Try another channel. I Adjust resolution, horizontal frequency, or vertical frequency.
... does not work. The problem may result in ambient humidity or temperature may be with the product. Picture OK & No sound I Try another channel. I Adjust resolution, horizontal frequency, or vertical frequency.

