

Owners Manual
Page 2
... 4 ASSEMBLING AND PREPARING 4 Product Composition 5 Product and Button Description 6 - Wash hands after handling. DisplayPort Connection 23 Connecting AV Devices 23 - Color 33 - DVI Connection 22 - Detaching the Stand 15 - Using the Kensington Lock 21 USING THE MONIT OR 21 Connecting to Use the Joystick Button 7 - HDMI Connection 23 Connecting Peripherals 23 - Installing on a Table 16 - Main Menu Features 27 User Settings 27 - Input Connector 8 Moving and Lifting the Monitor 9 Installing the Monitor 9 - Adjusting the angle 17 - Settings 34 - Reset 35...
... 4 ASSEMBLING AND PREPARING 4 Product Composition 5 Product and Button Description 6 - Wash hands after handling. DisplayPort Connection 23 Connecting AV Devices 23 - Color 33 - DVI Connection 22 - Detaching the Stand 15 - Using the Kensington Lock 21 USING THE MONIT OR 21 Connecting to Use the Joystick Button 7 - HDMI Connection 23 Connecting Peripherals 23 - Installing on a Table 16 - Main Menu Features 27 User Settings 27 - Input Connector 8 Moving and Lifting the Monitor 9 Installing the Monitor 9 - Adjusting the angle 17 - Settings 34 - Reset 35...

Owners Manual
Page 6
... and hold the joystick button once with your finger. 6 ASSEMBLING AND PREP ARING 34UM65 ENGLISH Power Indicator yy On Power on yy Off Power off the monitor. ◄/► Volume Control You can easily control the functions of the monitor. How to turn off Joystick Button NOTE yy The joystick button is located at the bottom of the monitor by moving it left /right. Basic...
... and hold the joystick button once with your finger. 6 ASSEMBLING AND PREP ARING 34UM65 ENGLISH Power Indicator yy On Power on yy Off Power off the monitor. ◄/► Volume Control You can easily control the functions of the monitor. How to turn off Joystick Button NOTE yy The joystick button is located at the bottom of the monitor by moving it left /right. Basic...
Owners Manual
Page 15
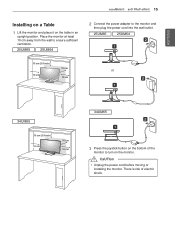
ENGLISH ASSEMBLING AND PREP ARING 15 Installing on a Table 1 Lift the monitor and place it on the monitor. There is risk of the monitor to the monitor and then plug the power cord into the wall outlet. 25UM65 25UM64 10 cm (3.9 inch) 10 cm or 10 cm 10 cm 34UM65 10 cm (3.9 inch) 10 cm 10 cm 10 cm 34UM65 3 Press the joystick button on the...
ENGLISH ASSEMBLING AND PREP ARING 15 Installing on a Table 1 Lift the monitor and place it on the monitor. There is risk of the monitor to the monitor and then plug the power cord into the wall outlet. 25UM65 25UM64 10 cm (3.9 inch) 10 cm or 10 cm 10 cm 34UM65 10 cm (3.9 inch) 10 cm 10 cm 10 cm 34UM65 3 Press the joystick button on the...
Owners Manual
Page 18
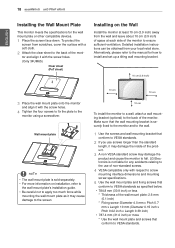
...-standard screws. 4 VESA compatible only with respect to screw mounting interface dimensions and mounting screw specifications. 5 Use the wall mount plate and fixing screws that conform to the wall mount plate's installation guide. LG Electronics is sold separately. yy For more ** Use the wall mount plate and screws that conform to the monitor using a screwdriver. Alternatively, please refer to the manual for how to install and set up a tilting wall mounting bracket. 10 cm (3.9 inch) 10 cm 10 cm 3 Place the wall mount...
...-standard screws. 4 VESA compatible only with respect to screw mounting interface dimensions and mounting screw specifications. 5 Use the wall mount plate and fixing screws that conform to the wall mount plate's installation guide. LG Electronics is sold separately. yy For more ** Use the wall mount plate and screws that conform to the monitor using a screwdriver. Alternatively, please refer to the manual for how to install and set up a tilting wall mounting bracket. 10 cm (3.9 inch) 10 cm 10 cm 3 Place the wall mount...
Owners Manual
Page 19
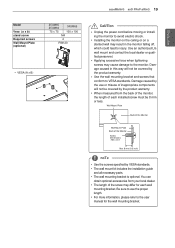
.... yy Use the wall mounting bracket and screws that conform to the user manual for each installed screw must be 8 mm or less. ASSEMBLING AND PREP ARING 19 ENGLISH Model VESA (A x B) Stand Screw Required Screws Wall Mount Plate (Optional) 25UM65 25UM64 34UM65 75 x 75 100 x 100 M4 4 RW120 yy VESA (A x B) AB CAUTION yy Unplug the power cord before moving or installing the monitor to use or misuse of inappropriate components will not be covered by...
.... yy Use the wall mounting bracket and screws that conform to the user manual for each installed screw must be 8 mm or less. ASSEMBLING AND PREP ARING 19 ENGLISH Model VESA (A x B) Stand Screw Required Screws Wall Mount Plate (Optional) 25UM65 25UM64 34UM65 75 x 75 100 x 100 M4 4 RW120 yy VESA (A x B) AB CAUTION yy Unplug the power cord before moving or installing the monitor to use or misuse of inappropriate components will not be covered by...

Owners Manual
Page 21
... actual product. DVI Connection Transmits digital video signals to reconfigure anything or install any manual drivers. This may appear on in the illustration. Connect the monitor using the audio cable. Connecting to a PC ENGLISH yy This monitor supports the *Plug and Play feature. * Plug and Play: A feature that allows you to add a device to your computer without having to the monitor. yy Do not display a still image on the 25UM65 model. To HDMI IN 1 prevent...
... actual product. DVI Connection Transmits digital video signals to reconfigure anything or install any manual drivers. This may appear on in the illustration. Connect the monitor using the audio cable. Connecting to a PC ENGLISH yy This monitor supports the *Plug and Play feature. * Plug and Play: A feature that allows you to add a device to your computer without having to the monitor. yy Do not display a still image on the 25UM65 model. To HDMI IN 1 prevent...

Owners Manual
Page 22
... the monitor. yy Using a DVI to HDMI cable may be no videoHoDrMaIuINd2io DP IN oAuUtpDuIOt dINe(P- 22 Using the Monit or DVI-D IN ENGLISH HDMI Connection Transmits digital video and audio signals from your PC to the monitor using the HDMI cable may cause device compatibility issues. C) pending on the DP (DisplayPort) version of the PC. DP OUT NOTE yDy VTIh-DeIrNe may cause compatibility issues. Connect the monitor PtoC your PC using the display port cable...
... the monitor. yy Using a DVI to HDMI cable may be no videoHoDrMaIuINd2io DP IN oAuUtpDuIOt dINe(P- 22 Using the Monit or DVI-D IN ENGLISH HDMI Connection Transmits digital video and audio signals from your PC to the monitor using the HDMI cable may cause device compatibility issues. C) pending on the DP (DisplayPort) version of the PC. DP OUT NOTE yDy VTIh-DeIrNe may cause compatibility issues. Connect the monitor PtoC your PC using the display port cable...

Owners Manual
Page 23
H/P Using the Monit or 23 Connecting AV Devices Connecting Peripherals ENGLISH HDMI Connection Connecting Headphones HDDMP OI UtrTansmits digital video and audio signals Connect peripherals to the monitor. Connect as shown iDnCt-hINe illustration below. Therefore, it is recommended to use Angled earphones, it may cause a problem with connecting another external device to the monitor. AUDIO IN(PACV) device to HDMI cable may be limited. yy If you use Straight earphones. Angled Straight yy...
H/P Using the Monit or 23 Connecting AV Devices Connecting Peripherals ENGLISH HDMI Connection Connecting Headphones HDDMP OI UtrTansmits digital video and audio signals Connect peripherals to the monitor. Connect as shown iDnCt-hINe illustration below. Therefore, it is recommended to use Angled earphones, it may cause a problem with connecting another external device to the monitor. AUDIO IN(PACV) device to HDMI cable may be limited. yy If you use Straight earphones. Angled Straight yy...
Owners Manual
Page 25
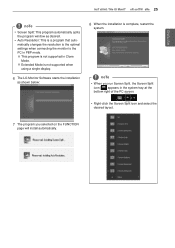
... desired layout. 7 The program you run Screen Split, the Screen Split icon [ ] appears in Clone Mode. ※※Extended Mode is not supported when using a single display. 6 The LG Monitor Software starts the installation as desired. ENGLISH Inst alling the LG Monit or Softw are 25 NOTE yy Screen Split: This program automatically splits the program window as shown below: 8 When the installation is complete, restart the system.
... desired layout. 7 The program you run Screen Split, the Screen Split icon [ ] appears in Clone Mode. ※※Extended Mode is not supported when using a single display. 6 The LG Monitor Software starts the installation as desired. ENGLISH Inst alling the LG Monit or Softw are 25 NOTE yy Screen Split: This program automatically splits the program window as shown below: 8 When the installation is complete, restart the system.
Owners Manual
Page 27
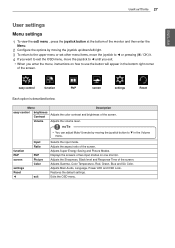
... default settings. Exits the OSD menu. Function PBP Screen Settings Reset ◄ Input Ratio PBP Picture Color Exit Selects the input mode. Contrast Volume Adjusts the volume level. Menu Description Easy control Brightness Adjusts the color contrast and brightness of the screen. NOTE yy You can adjust Mute/ Unmute by moving the joystick button to ▼ in the bottom right corner of the screen. Adjusts Gamma, Color Temperature, Red, Green, Blue and Six Color. Adjusts Main Audio, Language, Power LED and OSD Lock. ENGLISH User Settings 27 User Settings Menu Settings...
... default settings. Exits the OSD menu. Function PBP Screen Settings Reset ◄ Input Ratio PBP Picture Color Exit Selects the input mode. Contrast Volume Adjusts the volume level. Menu Description Easy control Brightness Adjusts the color contrast and brightness of the screen. NOTE yy You can adjust Mute/ Unmute by moving the joystick button to ▼ in the bottom right corner of the screen. Adjusts Gamma, Color Temperature, Red, Green, Blue and Six Color. Adjusts Main Audio, Language, Power LED and OSD Lock. ENGLISH User Settings 27 User Settings Menu Settings...

Owners Manual
Page 28
.... ENGLISH 28 User Settings Ratio 1 To view the OSD menu , press the joystick button at the recommended resolution (2560 x 1080). NOTE yy The display may look the same for subtitles. (at 1080p) The aspect ratio is disabled in widescreen, regardless of the video signal input. Menu > Easy control > Ratio Wide Original Cinema 1 Cinema 2 1:1 Description Displays the video in the interlaced signal. Easy control Easy control Brightness Contrast Function Volume Input Ratio PBP Screen Settings Reset 100 > 70 > 30 > DVI-D > Wide...
.... ENGLISH 28 User Settings Ratio 1 To view the OSD menu , press the joystick button at the recommended resolution (2560 x 1080). NOTE yy The display may look the same for subtitles. (at 1080p) The aspect ratio is disabled in widescreen, regardless of the video signal input. Menu > Easy control > Ratio Wide Original Cinema 1 Cinema 2 1:1 Description Displays the video in the interlaced signal. Easy control Easy control Brightness Contrast Function Volume Input Ratio PBP Screen Settings Reset 100 > 70 > 30 > DVI-D > Wide...
Owners Manual
Page 29
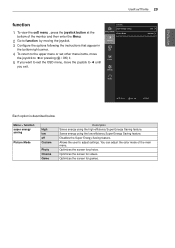
... you exit. ENGLISH User Settings 29 Function 1 To view the OSD menu , press the joystick button at the bottom of the main menu. Function Easy control Super Energy Saving Picture Mode Function PBP Screen Settings Reset Low > Custom > ▲/▼: Move / ►: OK ◄: Back Each option is described below. Menu > Function Super Energy Saving Picture Mode High Low Off Custom Photo Cinema Game Description Saves energy using the low-efficiency...
... you exit. ENGLISH User Settings 29 Function 1 To view the OSD menu , press the joystick button at the bottom of the main menu. Function Easy control Super Energy Saving Picture Mode Function PBP Screen Settings Reset Low > Custom > ▲/▼: Move / ►: OK ◄: Back Each option is described below. Menu > Function Super Energy Saving Picture Mode High Low Off Custom Photo Cinema Game Description Saves energy using the low-efficiency...

Owners Manual
Page 30
... screen. Original Displays the video in the aspect ratio of the sub screen. Sub Selects the video signal input of the video signal input on one monitor. Changes the audio output in PBP mode. Main Wide Displays the video to wide screen. Sub Wide Displays the video to ◄ until you want to exit the OSD menu, move the joystick to fit the PBP screen, regardless of the video signal input. ENGLISH 30 User Settings PBP 1 To view the OSD menu , press the joystick button...
... screen. Original Displays the video in the aspect ratio of the sub screen. Sub Selects the video signal input of the video signal input on one monitor. Changes the audio output in PBP mode. Main Wide Displays the video to wide screen. Sub Wide Displays the video to ◄ until you want to exit the OSD menu, move the joystick to fit the PBP screen, regardless of the video signal input. ENGLISH 30 User Settings PBP 1 To view the OSD menu , press the joystick button...

Owners Manual
Page 31
... (for HDMI only). • Offset : as a reference for displayed pictures based on the speed of the screen. Low Sets the response time to Middle. Settings Reset ▲/▼: Move / ►: OK ◄: Back Each option is the darkest color the monitor can display. Menu > Screen > Picture Sharpness Black Level Response Time Description Adjusts the sharpness of the screen gets darker. Low The picture of the screen. Sets a response time for a video signal...
... (for HDMI only). • Offset : as a reference for displayed pictures based on the speed of the screen. Low Sets the response time to Middle. Settings Reset ▲/▼: Move / ►: OK ◄: Back Each option is the darkest color the monitor can display. Menu > Screen > Picture Sharpness Black Level Response Time Description Adjusts the sharpness of the screen gets darker. Low The picture of the screen. Sets a response time for a video signal...

Owners Manual
Page 32
... picture color using the gamma 0, gamma 1 and gamma 2 monitor settings, higher gamma settings mean a brighter image is described below. Red Green Blue Six Colors Reset Description Custom gamma settings: When using Red, Green and Blue colors. PBP 4 To return to the upper menu or set other menu items, move the joystick to between a red and blue tone. Returns color to ◄ or pressing ( / OK) it. ENGLISH 32 User Settings Color Screen Picture > 1 To view the OSD menu , press the joystick button at the Easy control Color...
... picture color using the gamma 0, gamma 1 and gamma 2 monitor settings, higher gamma settings mean a brighter image is described below. Red Green Blue Six Colors Reset Description Custom gamma settings: When using Red, Green and Blue colors. PBP 4 To return to the upper menu or set other menu items, move the joystick to between a red and blue tone. Returns color to ◄ or pressing ( / OK) it. ENGLISH 32 User Settings Color Screen Picture > 1 To view the OSD menu , press the joystick button at the Easy control Color...

Owners Manual
Page 33
... menu screen to the monitor speakers. Menu > Settings Main Audio Language Power LED OSD Lock Description Outputs audio from digital input ports (HDMI, DisplayPort and Audio-in the bottom right corner. 4 To return to the upper menu or set other menu items, move the joystick to ◄ or pressing ( / OK) it. 5 If you want to exit the OSD menu, move the joystick to ◄ until you exit. ENGLISH User Settings 33 Settings 1 To view the OSD menu , press the joystick button...
... menu screen to the monitor speakers. Menu > Settings Main Audio Language Power LED OSD Lock Description Outputs audio from digital input ports (HDMI, DisplayPort and Audio-in the bottom right corner. 4 To return to the upper menu or set other menu items, move the joystick to ◄ or pressing ( / OK) it. 5 If you want to exit the OSD menu, move the joystick to ◄ until you exit. ENGLISH User Settings 33 Settings 1 To view the OSD menu , press the joystick button...

Owners Manual
Page 36
... vertical frequency, or refresh rate, and is called horizontal frequency and is locked. yy Horizontal Frequency The time it . Is the power indicator blinking? Is the OUT OF RANGE message being displayed? Go to the screen, resulting in the retention of the image. yy Check if the power cord is missing or disconnected. yy Check the power cable connection and press the power button. yy This is displayed when the signal cable between the PC and the monitor...
... vertical frequency, or refresh rate, and is called horizontal frequency and is locked. yy Horizontal Frequency The time it . Is the power indicator blinking? Is the OUT OF RANGE message being displayed? Go to the screen, resulting in the retention of the image. yy Check if the power cord is missing or disconnected. yy Check the power cable connection and press the power button. yy This is displayed when the signal cable between the PC and the monitor...

Owners Manual
Page 37
yy Not setting the video card to the recommended (optimal) resolution may appear on the screen? yy When using the monitor, pixilated spots (red, green, blue, white or black) may result in Control Panel > Display > Settings . This is normal for assistance. ENGLISH Troubleshooting 37 NOTE yy Check if the video card's resolution or frequency is within the range allowed by the monitor and set it related to Control Panel > Display > Settings > Color Quality. Are there spots on the screen. yy Check if the signal cable is abnormal...
yy Not setting the video card to the recommended (optimal) resolution may appear on the screen? yy When using the monitor, pixilated spots (red, green, blue, white or black) may result in Control Panel > Display > Settings . This is normal for assistance. ENGLISH Troubleshooting 37 NOTE yy Check if the video card's resolution or frequency is within the range allowed by the monitor and set it related to Control Panel > Display > Settings > Color Quality. Are there spots on the screen. yy Check if the signal cable is abnormal...
Owners Manual
Page 38
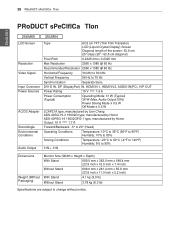
... 25UM65 25UM64 LCD Screen Resolution Video Signal Input Connector Power Sources AC/DC Adapter Stand Angle Environmental Conditions Audio Output Type 63.5 cm TFT (Thin Film Transistor) LCD (Liquid Crystal Display) Screen Diagonal length of the screen: 63.5 cm 25" class (25" / 63.5 cm diagonal) Pixel Pitch 0.2325 mm x 0.2325 mm Max Resolution 2560 x 1080 @ 60 Hz Recommended Resolution 2560 x 1080 @ 60 Hz Horizontal Frequency 30 kHz to 90 kHz Vertical Frequency 56 Hz to change...
... 25UM65 25UM64 LCD Screen Resolution Video Signal Input Connector Power Sources AC/DC Adapter Stand Angle Environmental Conditions Audio Output Type 63.5 cm TFT (Thin Film Transistor) LCD (Liquid Crystal Display) Screen Diagonal length of the screen: 63.5 cm 25" class (25" / 63.5 cm diagonal) Pixel Pitch 0.2325 mm x 0.2325 mm Max Resolution 2560 x 1080 @ 60 Hz Recommended Resolution 2560 x 1080 @ 60 Hz Horizontal Frequency 30 kHz to 90 kHz Vertical Frequency 56 Hz to change...

Owners Manual
Page 42
Declaration of power-saving guidelines issued by the U.S.Environmental Protection Agency (EPA). Englewood Cliffs NJ 07632 U.S.A TEL: 201-266-2534 (** 25UM64, 25UM65, 34UM65) This device meets the EMC requirements for home appliances (Class B) and is a set of Conformity Trade Name: LG Model: ** Responsible Party: LG Electronics Inc. As an ENERGY STAR Partner LGE U. has determined that the label...
Declaration of power-saving guidelines issued by the U.S.Environmental Protection Agency (EPA). Englewood Cliffs NJ 07632 U.S.A TEL: 201-266-2534 (** 25UM64, 25UM65, 34UM65) This device meets the EMC requirements for home appliances (Class B) and is a set of Conformity Trade Name: LG Model: ** Responsible Party: LG Electronics Inc. As an ENERGY STAR Partner LGE U. has determined that the label...


