Operation Guide
Page 14
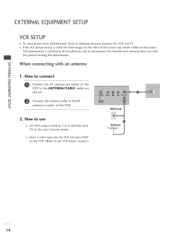
... format is common to all manufactures and in socket of the VCR. -D Wall Jack o How to use Set VCR output switch to 5 or 4 and then tune TV to the RF C antenna in consequence the manufactures warranty does not cover the product bearing this phenomenon. the fixed images on the sides of...
... format is common to all manufactures and in socket of the VCR. -D Wall Jack o How to use Set VCR output switch to 5 or 4 and then tune TV to the RF C antenna in consequence the manufactures warranty does not cover the product bearing this phenomenon. the fixed images on the sides of...

Operation Guide
Page 22
z C_ --4 With the optional Installer remote control in the selected Tuning Band. After finding all of analog and digital channels found. O r""" Press the OK (Enter) button to remove the menus. 22 When finished, press MENU repeatedly ...
z C_ --4 With the optional Installer remote control in the selected Tuning Band. After finding all of analog and digital channels found. O r""" Press the OK (Enter) button to remove the menus. 22 When finished, press MENU repeatedly ...

Operation Guide
Page 25
... as a picture. (This is only available for digital broadcasting.) @ Press the MENU button and then use the ADJ • or • button to highlight Fine Tune and C_ --I 0 r""" Checking the Strength of the signal being received.
... as a picture. (This is only available for digital broadcasting.) @ Press the MENU button and then use the ADJ • or • button to highlight Fine Tune and C_ --I 0 r""" Checking the Strength of the signal being received.

Operation Guide
Page 38
...; button to customize each option: Font Size, Font Style, Foreground Color etc. SOUND & LANGUAGE CONTROL Digital Captions Mode Digital Captions only appear on digital channels, tune in a digital channel that is actually broadcasting digital captions.
...; button to customize each option: Font Size, Font Style, Foreground Color etc. SOUND & LANGUAGE CONTROL Digital Captions Mode Digital Captions only appear on digital channels, tune in a digital channel that is actually broadcasting digital captions.

Operation Guide
Page 48
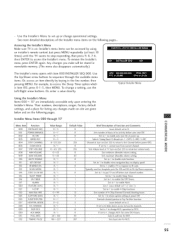
...tuning bands: BROADCAST: 2 - 69 CABLE - The channels available on your antenna / cable will be entered, and any channels previously customized with Add/Del/Blnk B Purpose A Channel Number N N -1- CATV, HRC or ICC: 1 - 125 48 K 1 2 3 4 5 6 7 8 9 10 11 12 13 14 15 16 17 18 19 20... customizing with ADD / DEL / BLNK. Typical channel banks after running Auto Program B Purpose A N K 1 2 3 4 Channel Number 1 2 3 4 5 6 7 8 9 10 11 12 13 14 15 16 17 18 19 20 21 22 23 24 25 A A A A A A A A A A A A A A A A AA A AA A A AA A AA A A AA A AA A A AA A AA A A A A AA A A AA A A ...
...tuning bands: BROADCAST: 2 - 69 CABLE - The channels available on your antenna / cable will be entered, and any channels previously customized with Add/Del/Blnk B Purpose A Channel Number N N -1- CATV, HRC or ICC: 1 - 125 48 K 1 2 3 4 5 6 7 8 9 10 11 12 13 14 15 16 17 18 19 20... customizing with ADD / DEL / BLNK. Typical channel banks after running Auto Program B Purpose A N K 1 2 3 4 Channel Number 1 2 3 4 5 6 7 8 9 10 11 12 13 14 15 16 17 18 19 20 21 22 23 24 25 A A A A A A A A A A A A A A A A AA A AA A A AA A AA A A AA A AA A A AA A AA A A A A AA A A AA A A ...
Operation Guide
Page 55
... retain last volume level). Set to 1 to enable Alarm. 020 FEATURE LEVEL 0/ 1 1 021 V-CHIP 0/ 1 1 Zen 1 Leave default set to 1, cannot tune from current channel. 0 007 STRT VOLUME 0 ~ 63,255 255 Sets Volume level at TV turn -on the following pages... Just press MENU repeatedly (at power...1 0 If set 1 (1 Zen 1 ) Set to 1 to OCV. for some OCV boxes. 031 POLL RATE 20 ~ 169 94 032 TIMING PULSE 186 ~ 227 207 Selects poll rate for Hospitals: puts On-Offand FM in nonvolatile memory. (The menu also disappears automatically.) r I" [e]-l_I_t" ;1 NIN_al _f" ...
... retain last volume level). Set to 1 to enable Alarm. 020 FEATURE LEVEL 0/ 1 1 021 V-CHIP 0/ 1 1 Zen 1 Leave default set to 1, cannot tune from current channel. 0 007 STRT VOLUME 0 ~ 63,255 255 Sets Volume level at TV turn -on the following pages... Just press MENU repeatedly (at power...1 0 If set 1 (1 Zen 1 ) Set to 1 to OCV. for some OCV boxes. 031 POLL RATE 20 ~ 169 94 032 TIMING PULSE 186 ~ 227 207 Selects poll rate for Hospitals: puts On-Offand FM in nonvolatile memory. (The menu also disappears automatically.) r I" [e]-l_I_t" ;1 NIN_al _f" ...

Operation Guide
Page 56
... Parental Control and makes block permanent. If set to be reported as a channel number instead of all above settings. 56 r" 103 ATSC TUNE MODE 0 / 1 1 Sets ATSC tuning mode. Set to 1 to 0 for only HD digital programs. See detailed descriptions and item 106. CH-TIME 0/ 1 0 069... EN. Chooses custom foreground color for NTSC. Installer Menu Items 055 through 117 Menu Item Function Value Range Default Value Brief Description...
... Parental Control and makes block permanent. If set to be reported as a channel number instead of all above settings. 56 r" 103 ATSC TUNE MODE 0 / 1 1 Sets ATSC tuning mode. Set to 1 to 0 for only HD digital programs. See detailed descriptions and item 106. CH-TIME 0/ 1 0 069... EN. Chooses custom foreground color for NTSC. Installer Menu Items 055 through 117 Menu Item Function Value Range Default Value Brief Description...

Operation Guide
Page 57
...004) where the start channel is 3, then the 20LH1DC1 will be retained in -house information channel, since the 20LH1DC1 would always select that N J volume level when it is selected, the current volume r" Selects the tuning band. This is desirable if the 20LH1DC1 is turned On. at the previous or last level... (Power Management) Determines hours of Installer Menu Items 000 - Pressing the On button is useful for example, be the tuned to channel when the 20LH1DC1 is ideal if the system must always be best to set the volume level high enough to the installer menu value, ...
...004) where the start channel is 3, then the 20LH1DC1 will be retained in -house information channel, since the 20LH1DC1 would always select that N J volume level when it is selected, the current volume r" Selects the tuning band. This is desirable if the 20LH1DC1 is turned On. at the previous or last level... (Power Management) Determines hours of Installer Menu Items 000 - Pressing the On button is useful for example, be the tuned to channel when the 20LH1DC1 is ideal if the system must always be best to set the volume level high enough to the installer menu value, ...

Operation Guide
Page 59
... to 0 to serial numbe_ 069 - Sets baud rate. BCK. REAR AUX EN. (Rear Aux Enable) directly accessing a channel not in memory. communication occurs, TV automatically tunes to enable display panel rear AUX (Video 1) available in the channel scan list Set to 1 to the specified Start Channel. CH-TIME (Disable Channel-Time...
... to 0 to serial numbe_ 069 - Sets baud rate. BCK. REAR AUX EN. (Rear Aux Enable) directly accessing a channel not in memory. communication occurs, TV automatically tunes to enable display panel rear AUX (Video 1) available in the channel scan list Set to 1 to the specified Start Channel. CH-TIME (Disable Channel-Time...

Operation Guide
Page 60
...SD Channels default is always checked. Set to be compatible with power Off. (Timeout = 25.5MS + [25.5 MS* Handshake time]). ATSC TUNE MODE 082 - checksum validation. Set to 0 for blank. VIDEO MUTE EN (Video Mute Enable) Set to 0 for 4:5. DEE ASR ...SAP MENU EN (2nd Audio Program) Set to 1 to Physical (1), regardless of incoming signals: 0=Broadcast, 1 =CATV, 2=HRC, 3=IRC, 4=Same as NTSC. 103 - factory defaults and clear the channel list _ incAluRdNinINg Ge: raSseinttginganythisasstoign1edwiCll hraenlonaedl Itchoens and Labels. 096 - Set to 2 for 16:9 Set to ...
...SD Channels default is always checked. Set to be compatible with power Off. (Timeout = 25.5MS + [25.5 MS* Handshake time]). ATSC TUNE MODE 082 - checksum validation. Set to 0 for blank. VIDEO MUTE EN (Video Mute Enable) Set to 0 for 4:5. DEE ASR ...SAP MENU EN (2nd Audio Program) Set to 1 to Physical (1), regardless of incoming signals: 0=Broadcast, 1 =CATV, 2=HRC, 3=IRC, 4=Same as NTSC. 103 - factory defaults and clear the channel list _ incAluRdNinINg Ge: raSseinttginganythisasstoign1edwiCll hraenlonaedl Itchoens and Labels. 096 - Set to 2 for 16:9 Set to ...

Operation Guide
Page 61
... 61 I:fyou want custom digital :font options to be Cloned Channel Auto Program (Active channels found with the channel search) Channel Labels Channel List Fine Tune Picture Mode Contrast Brightness Color Sharpness Tint Color Temperature Screen Format Film Mode Closable Menu Features Sound Mode Treble Bass Balance Auto Volume Multi-Track...
... 61 I:fyou want custom digital :font options to be Cloned Channel Auto Program (Active channels found with the channel search) Channel Labels Channel List Fine Tune Picture Mode Contrast Brightness Color Sharpness Tint Color Temperature Screen Format Film Mode Closable Menu Features Sound Mode Treble Bass Balance Auto Volume Multi-Track...

Operation Guide
Page 62
... character and so on Installer remote control. • MENU - Proceed with 4. Installer Remote Control Key Functions for the select the de:fault blank icon display. Tunes in the next channel in addition to the Aux inputs. If a number is shown, it indicates the position of the character that are channels entered...
... character and so on Installer remote control. • MENU - Proceed with 4. Installer Remote Control Key Functions for the select the de:fault blank icon display. Tunes in the next channel in addition to the Aux inputs. If a number is shown, it indicates the position of the character that are channels entered...
Operation Guide
Page 63
You will all have problems. As the cloning procedure is important to set the tuning band at the indicated times to include the Free-To-Guest Channels only. 5. Cloning is only possible when the signal source is now ready to... needed. With menu displayed, back to start the adding Channel Icons and/or Labels. Changing/Adding Channel Labels on Master TV c. Refer to enter the 20LH1DC1 Installer menu _ anodsemt aukpe cahamnagsetser toTVthyeoudewfailul ltneevadluteos kansow required. page 53. 4. PLEASE READ THE FOLLOWING... how to the Clonable Menu Features Chart on to ...
You will all have problems. As the cloning procedure is important to set the tuning band at the indicated times to include the Free-To-Guest Channels only. 5. Cloning is only possible when the signal source is now ready to... needed. With menu displayed, back to start the adding Channel Icons and/or Labels. Changing/Adding Channel Labels on Master TV c. Refer to enter the 20LH1DC1 Installer menu _ anodsemt aukpe cahamnagsetser toTVthyeoudewfailul ltneevadluteos kansow required. page 53. 4. PLEASE READ THE FOLLOWING... how to the Clonable Menu Features Chart on to ...

Operation Guide
Page 65
20LH1DC1 Aux Input Configuration 20LHIDC1 Aux Input Configuration ENABLE DIRECT ACCESS Tuning 20LH 1DC1 Installer Menu MPI DATA STATUSTYPE 0x41 SOURCES ENABLED (R/W) OLD OCV OLD OCV Source Input Source Mode Number =0 =1 Labeling Value Labeling MPI DATA DATA ...
20LH1DC1 Aux Input Configuration 20LHIDC1 Aux Input Configuration ENABLE DIRECT ACCESS Tuning 20LH 1DC1 Installer Menu MPI DATA STATUSTYPE 0x41 SOURCES ENABLED (R/W) OLD OCV OLD OCV Source Input Source Mode Number =0 =1 Labeling Value Labeling MPI DATA DATA ...

Operation Guide
Page 67
... LG dealer. @ Set correct Bed 1-2 setting. Picture Reception @ Try a different channel. m z _D ÷ Dim room light. TROUBLESHOOTING Erratic Operation Remote Control ÷ Adjust Installer menu settings as required. ® Remove TV power cord for information to be added to virtual channel tuning digital OSD. *Note: For other problems not caused by the 20LH1DC1...
... LG dealer. @ Set correct Bed 1-2 setting. Picture Reception @ Try a different channel. m z _D ÷ Dim room light. TROUBLESHOOTING Erratic Operation Remote Control ÷ Adjust Installer menu settings as required. ® Remove TV power cord for information to be added to virtual channel tuning digital OSD. *Note: For other problems not caused by the 20LH1DC1...

Operation Guide
Page 73
.... (Picture, Sound, Time etc.) -o -- 4. Enter Installer menu. Enter the TV installer menu. *Note: If this is complete, the system will exit the Installer menu. - 8. o Set Tuning Band. Exit Installer menu. -- 3. Enter the Channel List menu and delete channels per your requirements, enter the installer menu. a. b. Enter the Installer menu. If necessary...
.... (Picture, Sound, Time etc.) -o -- 4. Enter Installer menu. Enter the TV installer menu. *Note: If this is complete, the system will exit the Installer menu. - 8. o Set Tuning Band. Exit Installer menu. -- 3. Enter the Channel List menu and delete channels per your requirements, enter the installer menu. a. b. Enter the Installer menu. If necessary...


