
Owners Manual
Page 1
LCD TV OWNER'S MANUAL MODELS: 15LC1R * 20LC1R * Internet Home Page : http://www.lge.com http://www.lg.ca ENERGYSATR is a set of the set . Retain it for energy efficiency. P/NO : 38289U0559C (0601-REV00) Printed in Korea has determined that this product meets ...
LCD TV OWNER'S MANUAL MODELS: 15LC1R * 20LC1R * Internet Home Page : http://www.lge.com http://www.lg.ca ENERGYSATR is a set of the set . Retain it for energy efficiency. P/NO : 38289U0559C (0601-REV00) Printed in Korea has determined that this product meets ...
Owners Manual
Page 2
... receiving antenna. - NO USER SERVICEABLE PARTS INSIDE. Consult the dealer or an experienced radio/TV technician for proper grounding and, in the literature accompanying the appliance. NOTE TO CABLE/TV INSTALLER: This reminder is connected. - Connect the equipment into an outlet on , the user... magnitude to constitute a risk of electric shock to correct the interference by turning the equipment off and on a circuit different from LG Electronics Corporation. This equipment generates, uses and can be determined by one or more of the building, as practical. The code...
... receiving antenna. - NO USER SERVICEABLE PARTS INSIDE. Consult the dealer or an experienced radio/TV technician for proper grounding and, in the literature accompanying the appliance. NOTE TO CABLE/TV INSTALLER: This reminder is connected. - Connect the equipment into an outlet on , the user... magnitude to constitute a risk of electric shock to correct the interference by turning the equipment off and on a circuit different from LG Electronics Corporation. This equipment generates, uses and can be determined by one or more of the building, as practical. The code...
Owners Manual
Page 4
Use only with TV. - However, they be visible on the screen. Check the specification page of this product contains a small amount of mercury. The fluorescent lamp used , use of ... when unused for long periods of these conditions could result in electric shock or fire. When a cart is turned on the monitor's performance. - If the TV feels cold to the regulations of time. b. Servicing is damaged, liquid has been spilled or objects have fallen into the apparatus, the apparatus has been...
Use only with TV. - However, they be visible on the screen. Check the specification page of this product contains a small amount of mercury. The fluorescent lamp used , use of ... when unused for long periods of these conditions could result in electric shock or fire. When a cart is turned on the monitor's performance. - If the TV feels cold to the regulations of time. b. Servicing is damaged, liquid has been spilled or objects have fallen into the apparatus, the apparatus has been...
Owners Manual
Page 5
...'t fall over 12 External Equipment Connections . .13~16 Antenna Connection 13 VCR Setup 14 Cable TV Setup 14 External A/V Source Setup 15 DVD Setup 15 DTV Setup 16 PC Setup 16 Operation TV Operation Overview 17 Menu Language Selection 17 Channel Menu Options Memorizing the Channels with EZ Scan . ...Mode 26 Key Lock 26 Power indicator 27 Caption/Text 27 Captions 27 Lock Menu Options Lock Menu Setup 29 Screen Menu Options (15LC1R* only) . .30 Maintenance 31 Product Specifications 31 Troubleshooting Checklist 32 After reading this manual, keep it handy for future reference. 5
...'t fall over 12 External Equipment Connections . .13~16 Antenna Connection 13 VCR Setup 14 Cable TV Setup 14 External A/V Source Setup 15 DVD Setup 15 DTV Setup 16 PC Setup 16 Operation TV Operation Overview 17 Menu Language Selection 17 Channel Menu Options Memorizing the Channels with EZ Scan . ...Mode 26 Key Lock 26 Power indicator 27 Caption/Text 27 Captions 27 Lock Menu Options Lock Menu Setup 29 Screen Menu Options (15LC1R* only) . .30 Maintenance 31 Product Specifications 31 Troubleshooting Checklist 32 After reading this manual, keep it handy for future reference. 5
Owners Manual
Page 6
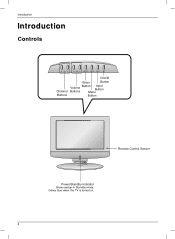
Introduction Introduction Controls CH VOL ENTER MENU INPUT /I On/Off Enter Button Channel Volume Buttons Button Input Button Menu Buttons Button Remote Control Sensor Power/Standby Indicator Glows amber in Standby mode, Glows blue when the TV is turned on. 6
Introduction Introduction Controls CH VOL ENTER MENU INPUT /I On/Off Enter Button Channel Volume Buttons Button Input Button Menu Buttons Button Remote Control Sensor Power/Standby Indicator Glows amber in Standby mode, Glows blue when the TV is turned on. 6
Owners Manual
Page 8
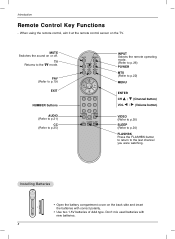
.... Installing Batteries • Open the battery compartment cover on the back side and insert the batteries with new batteries. 8 MUTE Switches the sound on the TV. Don't mix used batteries with correct polarity. • Use two 1.5V batteries of AAA type. FAV (Refer to p.19) EXIT NUMBER buttons AUDIO ... CH D / E (Channel button) VOL F / G (Volume button) VIDEO (Refer to p.20) SLEEP (Refer to p.24) FLASHBK Press the FLASHBK button to return to the TV mode. When using the remote control, aim it at the remote control sensor on or off. Introduction Remote Control Key Functions -
.... Installing Batteries • Open the battery compartment cover on the back side and insert the batteries with new batteries. 8 MUTE Switches the sound on the TV. Don't mix used batteries with correct polarity. • Use two 1.5V batteries of AAA type. FAV (Refer to p.19) EXIT NUMBER buttons AUDIO ... CH D / E (Channel button) VOL F / G (Volume button) VIDEO (Refer to p.20) SLEEP (Refer to p.24) FLASHBK Press the FLASHBK button to return to the TV mode. When using the remote control, aim it at the remote control sensor on or off. Introduction Remote Control Key Functions -
Owners Manual
Page 9
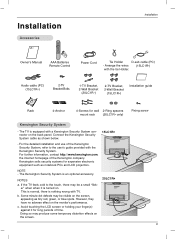
... the back panel. Connect the Kensington Security System cable as notebook PCs and LCD projectors. The TV is nothing wrong with the tie Holder. (15LC1R*) Audio cable (PC) (15LC1R*) 2-TV Bracket Bolts 1-TV Bracket, 2-Wall Bracket (20LC1R*) 2-TV Bracket, 2-Wall Bracket (15LC1R*) Installation guide Rack 4-Anchor 4-Screws for long periods of time. Doing so may be a small...
... the back panel. Connect the Kensington Security System cable as notebook PCs and LCD projectors. The TV is nothing wrong with the tie Holder. (15LC1R*) Audio cable (PC) (15LC1R*) 2-TV Bracket Bolts 1-TV Bracket, 2-Wall Bracket (20LC1R*) 2-TV Bracket, 2-Wall Bracket (15LC1R*) Installation guide Rack 4-Anchor 4-Screws for long periods of time. Doing so may be a small...

Owners Manual
Page 11
Installation Instruction Continued Installation Connection of the panel in various ways for maximum comfort. • Tilt range 12 Be careful that your display Adjust the position of TV 1. Note: Here shown may be used. 2. For the best reception an outdoor aerial should be somewhat different from your set. ( ) Positioning your hands are not pressed down when tilting the screen. 11 To connect an additional equipment, see the External Equipment Connections section. 3. Connect the power cord. Connect the aerial cable to the socket marked +75 Ω on the back.
Installation Instruction Continued Installation Connection of the panel in various ways for maximum comfort. • Tilt range 12 Be careful that your display Adjust the position of TV 1. Note: Here shown may be used. 2. For the best reception an outdoor aerial should be somewhat different from your set. ( ) Positioning your hands are not pressed down when tilting the screen. 11 To connect an additional equipment, see the External Equipment Connections section. 3. Connect the power cord. Connect the aerial cable to the socket marked +75 Ω on the back.

Owners Manual
Page 12
... people. Secure the bracket with the bolt (not provided as shown in the forward direction. Accessories / 20LC1R* 15LC1R* 2-TV Bracket Bolts 1-TV Bracket, 2-Wall Bracket 2-TV Brackets, 2-Wall Bracket The Product Back Side 1 2 The Product Back Side 3 15LC1R* 15LC1R* 1. Use a sturdy rope (not provided as parts of the product, must purchase separately) to the wall as...
... people. Secure the bracket with the bolt (not provided as shown in the forward direction. Accessories / 20LC1R* 15LC1R* 2-TV Bracket Bolts 1-TV Bracket, 2-Wall Bracket 2-TV Brackets, 2-Wall Bracket The Product Back Side 1 2 The Product Back Side 3 15LC1R* 15LC1R* 1. Use a sturdy rope (not provided as parts of the product, must purchase separately) to the wall as...

Owners Manual
Page 13
Typical wall antenna jack used in apartment buildings, connect the antenna cable as shown to the antenna jack on the TV. - If using 75Ω round cable, do not bend the bronze wire. If signal needs to tighten. 75Ω Round Cable Copper Wire NPUT ANT ... Buildings 300Ω Flat Wire Wall Connection Jack Antenna Converter Antenna Jack - This type of wall antenna jack.) Turn clockwise to be split for two TVs, use an VHF antenna signal splitter for the type of antenna is commonly used in single family dwellings. Connecting to tighten. If you have a 300...
Typical wall antenna jack used in apartment buildings, connect the antenna cable as shown to the antenna jack on the TV. - If using 75Ω round cable, do not bend the bronze wire. If signal needs to tighten. 75Ω Round Cable Copper Wire NPUT ANT ... Buildings 300Ω Flat Wire Wall Connection Jack Antenna Converter Antenna Jack - This type of wall antenna jack.) Turn clockwise to be split for two TVs, use an VHF antenna signal splitter for the type of antenna is commonly used in single family dwellings. Connecting to tighten. If you have a 300...
Owners Manual
Page 14
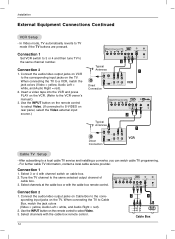
... VCR, match the jack colors (Video = yellow, Audio Left = white, and Audio Right = red). 2. Connect the audio/video output jacks on the TV. Use the INPUT button on rear panel, select the Video external input source.) COMPONENT (DTV/DVD IN) AUDIO PC INPUT ANT IN ( 75 ) PC...SOUND H/P VIDEO IN S-VIDEO 2 Typical Antennas ANT IN ANT OUT S-VIDEO OUT Direct CH3 IN CH4 VIDEO (R) AUDIO(L) Connection 1 VCR Cable TV Setup - Tune the TV channel to S-VIDEO on the remote control to select Video. (If connected to the same selected output channel of cable box. 3. Use the ...
... VCR, match the jack colors (Video = yellow, Audio Left = white, and Audio Right = red). 2. Connect the audio/video output jacks on the TV. Use the INPUT button on rear panel, select the Video external input source.) COMPONENT (DTV/DVD IN) AUDIO PC INPUT ANT IN ( 75 ) PC...SOUND H/P VIDEO IN S-VIDEO 2 Typical Antennas ANT IN ANT OUT S-VIDEO OUT Direct CH3 IN CH4 VIDEO (R) AUDIO(L) Connection 1 VCR Cable TV Setup - Tune the TV channel to S-VIDEO on the remote control to select Video. (If connected to the same selected output channel of cable box. 3. Use the ...
Owners Manual
Page 15
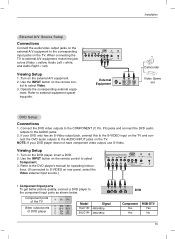
... component video output, use S-Video. Turn on the remote con- Y PB PR Component ports of the TV Video output ports of DVD player Y PB PR Y Pb Pr Y B-Y R-Y Y Cb Cr Y PB PR Model 15LC1R* 20LC1R* Signal 480i/480p 480i/480p (R) AUDIO (L) DVD Component Yes Yes RGB-DTV Yes No 15...a DVD. 2. Refer to external A/V equipment, match the jack colors (Video = yellow, Audio Left = white, and Audio Right = red). Viewing Setup 1. When connecting the TV to the DVD player's manual for operating instruc- NOTE: If your DVD only has an S-Video output jack, connect this to the S-VIDEO input on...
... component video output, use S-Video. Turn on the remote con- Y PB PR Component ports of the TV Video output ports of DVD player Y PB PR Y Pb Pr Y B-Y R-Y Y Cb Cr Y PB PR Model 15LC1R* 20LC1R* Signal 480i/480p 480i/480p (R) AUDIO (L) DVD Component Yes Yes RGB-DTV Yes No 15...a DVD. 2. Refer to external A/V equipment, match the jack colors (Video = yellow, Audio Left = white, and Audio Right = red). Viewing Setup 1. When connecting the TV to the DVD player's manual for operating instruc- NOTE: If your DVD only has an S-Video output jack, connect this to the S-VIDEO input on...
Owners Manual
Page 16
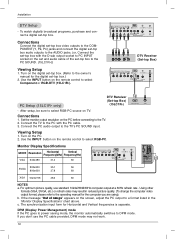
... on the remote control to PC INPUT socket on the digital set -top box.) 2. b. Connect the TV to the PC with the D-sub output socket to select Component or RGB-DTV (15LC1R*). c. If you are using). The synchronization input form for the digital set -top box. (Refer to... box video outputs to the COMPONENT (Y, PB, PR) jacks and connect the digital set-top box audio outputs to the PC SOUND. (15LC1R*)) Viewing Setup 1. Use the INPUT button on the PC before connecting to select RGB-PC. Monitor Display Specifications MODE Resolution Horizontal Vertical Frequency(kHz...
... on the remote control to PC INPUT socket on the digital set -top box.) 2. b. Connect the TV to the PC with the D-sub output socket to select Component or RGB-DTV (15LC1R*). c. If you are using). The synchronization input form for the digital set -top box. (Refer to... box video outputs to the COMPONENT (Y, PB, PR) jacks and connect the digital set-top box audio outputs to the PC SOUND. (15LC1R*)) Viewing Setup 1. Use the INPUT button on the PC before connecting to select RGB-PC. Monitor Display Specifications MODE Resolution Horizontal Vertical Frequency(kHz...

Owners Manual
Page 17
... language of your desired language. Select the viewing source by pressing INPUT. • Note: See page 18 if you have not auto programmed the TV to select your choice. 4. The menus can be shown in the selected language. Press the G button and then use D / E button to...AC Adapter into a power outlet. Menu Language Selection - Press the ENTER button to standby mode. Operation Operation TV Operation Overview 1. Press the G button and then use D / E button to turn the TV on the TV. If you want to select the SPECIAL menu. 2. Press the MENU button and then use D / ...
... language of your desired language. Select the viewing source by pressing INPUT. • Note: See page 18 if you have not auto programmed the TV to select your choice. 4. The menus can be shown in the selected language. Press the G button and then use D / E button to...AC Adapter into a power outlet. Menu Language Selection - Press the ENTER button to standby mode. Operation Operation TV Operation Overview 1. Press the G button and then use D / E button to turn the TV on the TV. If you want to select the SPECIAL menu. 2. Press the MENU button and then use D / ...
Owners Manual
Page 18
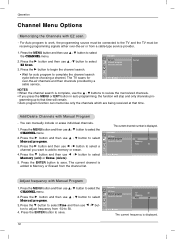
... 5. The current channel is displayed. Press the G button and then use D / E button to begin the channel search. CHANNEL EZ Scan Manual program Favorite channel TV 30 Memory Fine 10 D E FG Á MENU Adjust frequency with Manual Program - D E FG Á MENU NOTES • When the channel search is ...list. Press the E button to select Fine and then use D / E button to select the CHANNEL menu. 2. gramming up to the TV and the TV must be connected to that time. Press the ENTER button to 50. 4. For Auto program to work, the programming source must be receiving ...
... 5. The current channel is displayed. Press the G button and then use D / E button to begin the channel search. CHANNEL EZ Scan Manual program Favorite channel TV 30 Memory Fine 10 D E FG Á MENU Adjust frequency with Manual Program - D E FG Á MENU NOTES • When the channel search is ...list. Press the E button to select Fine and then use D / E button to select the CHANNEL menu. 2. gramming up to the TV and the TV must be connected to that time. Press the ENTER button to 50. 4. For Auto program to work, the programming source must be receiving ...
Owners Manual
Page 19
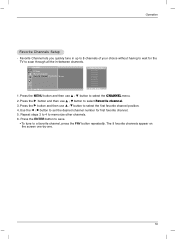
... then use D / E button to select the first favorite channel position. 4. CHANNEL EZ Scan Manual program Favorite channel To set the desired channel number for the TV to scan through all the in up to 8 channels of your choice without having to a favorite channel, press the FAV button repeatedly. Press the ENTER...
... then use D / E button to select the first favorite channel position. 4. CHANNEL EZ Scan Manual program Favorite channel To set the desired channel number for the TV to scan through all the in up to 8 channels of your choice without having to a favorite channel, press the FAV button repeatedly. Press the ENTER...
Owners Manual
Page 20
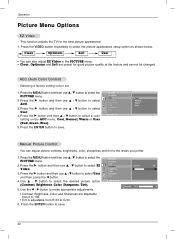
... and then use D / E button to G 50. 6. PICTURE EZ Video 2. Use D / E button to select the picture appearance setup option as shown below. This function adjusts the TV for good picture quality at the factory and cannot be changed. Press the ENTER button to select the PICTURE menu. Use the F / G button to select...
... and then use D / E button to G 50. 6. PICTURE EZ Video 2. Use D / E button to select the picture appearance setup option as shown below. This function adjusts the TV for good picture quality at the factory and cannot be changed. Press the ENTER button to select the PICTURE menu. Use the F / G button to select...
Owners Manual
Page 21
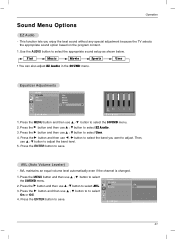
... the SOUND menu. 2. Press the G button and then use D / E button to select the band you enjoy the best sound without any special adjustment because the TV selects the appropriate sound option based on the program content. 1. AVL (Auto Volume Leveler) - AVL maintains an equal volume level automatically even if the channel...
... the SOUND menu. 2. Press the G button and then use D / E button to select the band you enjoy the best sound without any special adjustment because the TV selects the appropriate sound option based on the program content. 1. AVL (Auto Volume Leveler) - AVL maintains an equal volume level automatically even if the channel...

Owners Manual
Page 22
...; Balance is not clear or in poor signal reception areas. • Stereo, SAP mode are available only if included on the broadcast signal. 22 The TV can receive MTS stereo programs and any SAP (Secondary Audio Program) that accompanies the stereo program, if the broadcaster transmits an additional sound signal as...
...; Balance is not clear or in poor signal reception areas. • Stereo, SAP mode are available only if included on the broadcast signal. 22 The TV can receive MTS stereo programs and any SAP (Secondary Audio Program) that accompanies the stereo program, if the broadcaster transmits an additional sound signal as...
Owners Manual
Page 23
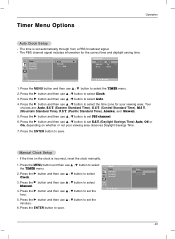
... the clock manually. 1. If the time on whether or not your viewing area. TIMER Clock Off timer On timer Auto off D E F Á MENU Auto Manual - - : - - TV 1 D.S.T. Auto D E FG Á MENU D E FG Á MENU 1. Press the G button and then use D / E button to set the minutes. 6. Press the G button and then use D / E button...
... the clock manually. 1. If the time on whether or not your viewing area. TIMER Clock Off timer On timer Auto off D E F Á MENU Auto Manual - - : - - TV 1 D.S.T. Auto D E FG Á MENU D E FG Á MENU 1. Press the G button and then use D / E button to set the minutes. 6. Press the G button and then use D / E button...


