Fax System (V) Operation Guide
Page 5
... key 3-22 Dialing the Same Receiving System (Redial 3-23 Previewing Images 3-24 Quick Setup Screen 3-26 Registering Shortcuts 3-28 4 FAX Operation (Advanced) Long Originals 4-2 Delayed Transmission 4-3 Broadcast Transmission 4-6 Standby Transmission 4-9 Interrupt Send 4-10 Chain Dial 4-11 Manual Send...Results and Registration Status Various Tools for Checking Transmission Results and Registration Status 5-2 Checking FAX Job History 5-3 Printing Administrative Reports 5-7 Reporting FAX Receipt Result by E-mail 5-11 Confirmation Screen of Destinations 5-12 iii
... key 3-22 Dialing the Same Receiving System (Redial 3-23 Previewing Images 3-24 Quick Setup Screen 3-26 Registering Shortcuts 3-28 4 FAX Operation (Advanced) Long Originals 4-2 Delayed Transmission 4-3 Broadcast Transmission 4-6 Standby Transmission 4-9 Interrupt Send 4-10 Chain Dial 4-11 Manual Send...Results and Registration Status Various Tools for Checking Transmission Results and Registration Status 5-2 Checking FAX Job History 5-3 Printing Administrative Reports 5-7 Reporting FAX Receipt Result by E-mail 5-11 Confirmation Screen of Destinations 5-12 iii
Fax System (V) Operation Guide
Page 32
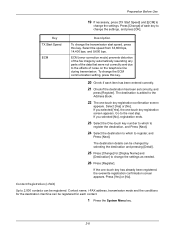
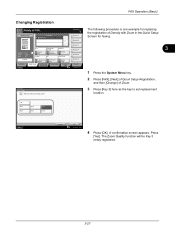
... for the destination machine can be registered. Select [Yes] or [No]. If the one -touch key registration confirmation screen appears. ECM (error correction mode) prevents distortion of the fax image by selecting the destination and pressing [Detail]. 25 Press [Change] for each contact. 1 Press the System... [TX Start Speed] and [ECM] to the Address Book. 22 The one -touch key has already been registered, the overwrite registration confirmation screen appears. If you selected [No], registration ends. 23 Select the One-touch key number to which to register the destination, and ...
... for the destination machine can be registered. Select [Yes] or [No]. If the one -touch key registration confirmation screen appears. ECM (error correction mode) prevents distortion of the fax image by selecting the destination and pressing [Detail]. 25 Press [Change] for each contact. 1 Press the System... [TX Start Speed] and [ECM] to the Address Book. 22 The one -touch key has already been registered, the overwrite registration confirmation screen appears. If you selected [No], registration ends. 23 Select the One-touch key number to which to register the destination, and ...
Fax System (V) Operation Guide
Page 33
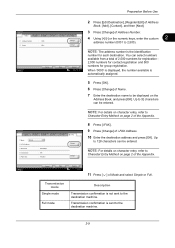
...Press [ ] of 2,500 numbers for registration - 2,000 numbers for contact registration and 500 Cancel Back Register numbers for each destination. Transmission confirmation is not sent to the destination machine. 2-9 NOTE: The address number is automatically assigned. 5 Press [OK]. 6 Press [Change] of ...Name. 7 Enter the destination name to 32 characters can be displayed on page 2 of the Appendix. 8 Press [i-FAX]. 9 Press [Change] of Address Number. 4 Using [+]/[-] or the numeric keys, enter the custom 2 address number (0001 to 128 characters can ...
...Press [ ] of 2,500 numbers for registration - 2,000 numbers for contact registration and 500 Cancel Back Register numbers for each destination. Transmission confirmation is not sent to the destination machine. 2-9 NOTE: The address number is automatically assigned. 5 Press [OK]. 6 Press [Change] of ...Name. 7 Enter the destination name to 32 characters can be displayed on page 2 of the Appendix. 8 Press [i-FAX]. 9 Press [Change] of Address Number. 4 Using [+]/[-] or the numeric keys, enter the custom 2 address number (0001 to 128 characters can ...
Fax System (V) Operation Guide
Page 34
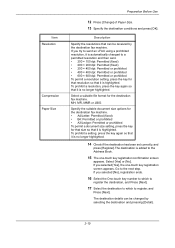
... set correctly, and press [Register].The destination is highlighted. MH, MR, MMR or JBIG Specify the suitable document size options for the destination fax machine. • A4/Letter: Permitted (fixed) • B4: Permitted or prohibited • A3/Ledger: Permitted or prohibited To permit a...To prohibit a setting, press the key again so that it is highlighted. If you selected [Yes], the one -touch key registration confirmation screen appears. Item Resolution Compression Paper Size Preparation Before Use 12 Press [Change] of Paper Size. 13 Specify the destination conditions and press...
... set correctly, and press [Register].The destination is highlighted. MH, MR, MMR or JBIG Specify the suitable document size options for the destination fax machine. • A4/Letter: Permitted (fixed) • B4: Permitted or prohibited • A3/Ledger: Permitted or prohibited To permit a...To prohibit a setting, press the key again so that it is highlighted. If you selected [Yes], the one -touch key registration confirmation screen appears. Item Resolution Compression Paper Size Preparation Before Use 12 Press [Change] of Paper Size. 13 Specify the destination conditions and press...
Fax System (V) Operation Guide
Page 35
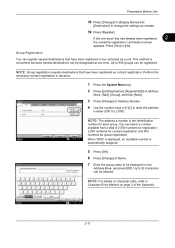
... Number Name : 0033 : Mike Status Cancel Back i-FAX Change Change Register 10/10/2010 10:10 1 Press the System Menu key. 2 Press [Edit Destination], [Register/Edit] of Address Book, [Add], [Group], and then [.... 7 Enter the group name to 32 characters can register several destinations can be designated at one -touch key has already been registered, 2 the overwrite registration confirmation screen appears. Use the keyboard to change the settings as needed. 19 Press [Register]. Up to be entered. Perform the necessary contact registration in advance...
... Number Name : 0033 : Mike Status Cancel Back i-FAX Change Change Register 10/10/2010 10:10 1 Press the System Menu key. 2 Press [Edit Destination], [Register/Edit] of Address Book, [Add], [Group], and then [.... 7 Enter the group name to 32 characters can register several destinations can be designated at one -touch key has already been registered, 2 the overwrite registration confirmation screen appears. Use the keyboard to change the settings as needed. 19 Press [Register]. Up to be entered. Perform the necessary contact registration in advance...

Fax System (V) Operation Guide
Page 37
The machine prints a list. Preparation Before Use Printing Address List You can sort the list in the Address Book. You can print the list of destinations registered in the order of index or address numbers of the destinations. 2 1 Press the System Menu key. 2 Press [Edit Destination], and then [Next] of List Print. 3 Press [Print] of FAX List (Index) or FAX List (No.). 4 When the printing confirmation screen appears, press [Yes]. FAX Address List (Index) FAX Address List (No.) 2-13
The machine prints a list. Preparation Before Use Printing Address List You can sort the list in the Address Book. You can print the list of destinations registered in the order of index or address numbers of the destinations. 2 1 Press the System Menu key. 2 Press [Edit Destination], and then [Next] of List Print. 3 Press [Print] of FAX List (Index) or FAX List (No.). 4 When the printing confirmation screen appears, press [Yes]. FAX Address List (Index) FAX Address List (No.) 2-13
Fax System (V) Operation Guide
Page 46
... Recall 0001 0002 0003 0004 0005 No. NOTE: When you are prompted to Entry Check for placing originals. For details, refer to confirm the FAX number is On, press [OK] and you press the numeric keys to enter numbers, the screen changes to the entry screen for ..., press [Backspace] on the glass surface or in the machine's Operation Guide. ABCD Pause Space [email protected] Backspace Destination Address Book FAX No. Dial the Receiving System Enter Destination. Use [ ] or [ ] to the machine's Operation Guide for New Destination in the optional document processor...
... Recall 0001 0002 0003 0004 0005 No. NOTE: When you are prompted to Entry Check for placing originals. For details, refer to confirm the FAX number is On, press [OK] and you press the numeric keys to enter numbers, the screen changes to the entry screen for ..., press [Backspace] on the glass surface or in the machine's Operation Guide. ABCD Pause Space [email protected] Backspace Destination Address Book FAX No. Dial the Receiving System Enter Destination. Use [ ] or [ ] to the machine's Operation Guide for New Destination in the optional document processor...
Fax System (V) Operation Guide
Page 51
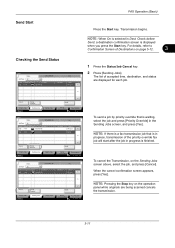
.../Supplies 10/10/2010 10:10 To send a job by priority override that is in the Sending Jobs screen, and press [Yes]. When the cancel confirmation screen appears, press [Yes]. Send Start Checking the Send Status Status Status Scheduled Job Job Type All Job No. NOTE: When On is waiting, select... on the operation panel while originals are displayed for each job. Accepted Time Type Job Name 438 14:47 0123456789 User Name Log Status InProcess 1/1 FAX Operation (Basic) Press the Start key. Check before Send, a destination confirmation screen is finished.
.../Supplies 10/10/2010 10:10 To send a job by priority override that is in the Sending Jobs screen, and press [Yes]. When the cancel confirmation screen appears, press [Yes]. Send Start Checking the Send Status Status Status Scheduled Job Job Type All Job No. NOTE: When On is waiting, select... on the operation panel while originals are displayed for each job. Accepted Time Type Job Name 438 14:47 0123456789 User Name Log Status InProcess 1/1 FAX Operation (Basic) Press the Start key. Check before Send, a destination confirmation screen is finished.

Fax System (V) Operation Guide
Page 54
... operation panel, or press [Cancel] on the touch panel. NOTE: You can cancel transmission by disconnecting the telephone line. When the cancel confirmation screen appears, press [Yes]. Cancelling Memory Transmission (while originals are explained here. Cancelling Memory Transmission (during communication) During memory transmission, to ... Cancel key. 2 Press [Sending Jobs]. 3 Select the job you want to cancel, and press [Cancel]. Methods of originals is canceled. FAX Operation (Basic) Canceling Communication The method for the specified time, use the following procedure.
... operation panel, or press [Cancel] on the touch panel. NOTE: You can cancel transmission by disconnecting the telephone line. When the cancel confirmation screen appears, press [Yes]. Cancelling Memory Transmission (while originals are explained here. Cancelling Memory Transmission (during communication) During memory transmission, to ... Cancel key. 2 Press [Sending Jobs]. 3 Select the job you want to cancel, and press [Cancel]. Methods of originals is canceled. FAX Operation (Basic) Canceling Communication The method for the specified time, use the following procedure.
Fax System (V) Operation Guide
Page 55
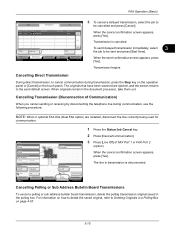
... Direct Transmission During direct transmission, to be cancelled and press [Cancel]. Storing Jobs FAX Port 2 Receiving... For information on page 4-57. 3-15 Printing Jobs Status Sending Jobs Storing Jobs Device/ Communication Paper/Supplies 10/10/2010 When the send confirmation screen appears, press [Yes]. When originals remain in a Polling Box on how...
... Direct Transmission During direct transmission, to be cancelled and press [Cancel]. Storing Jobs FAX Port 2 Receiving... For information on page 4-57. 3-15 Printing Jobs Status Sending Jobs Storing Jobs Device/ Communication Paper/Supplies 10/10/2010 When the send confirmation screen appears, press [Yes]. When originals remain in a Polling Box on how...
Fax System (V) Operation Guide
Page 59
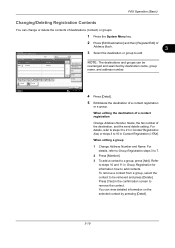
... destination or group to edit. For details, refer to steps 3 to 21 in Contact Registration (fax) or steps 3 to 16 in the confirmation screen to add contacts. Press [Yes] in Contact Registration (i-FAX). To remove a contact from a group, select the contact to a group, press [Add]. ... the contact. Address Book No. NOTE: The destinations and groups can change or delete the contents of a contact registration or a group. FAX Operation (Basic) Changing/Deleting Registration Contents You can be removed and press [Delete]. Edit Destination - Close 10/10/2010 10:10 4...
... destination or group to edit. For details, refer to steps 3 to 21 in Contact Registration (fax) or steps 3 to 16 in the confirmation screen to add contacts. Press [Yes] in Contact Registration (i-FAX). To remove a contact from a group, select the contact to a group, press [Add]. ... the contact. Address Book No. NOTE: The destinations and groups can change or delete the contents of a contact registration or a group. FAX Operation (Basic) Changing/Deleting Registration Contents You can be removed and press [Delete]. Edit Destination - Close 10/10/2010 10:10 4...

Fax System (V) Operation Guide
Page 60
FAX Operation (Basic) When deleting the destination of a contact registration or group Press [Delete]. Changes or deletions made to delete the destination or group. 6 Press [Register]. Press [Yes] in the confirmation screen to the registered details are applied in the Address Book. 3-20 When the change confirmation screen appears, press [Yes].
FAX Operation (Basic) When deleting the destination of a contact registration or group Press [Delete]. Changes or deletions made to delete the destination or group. 6 Press [Register]. Press [Yes] in the confirmation screen to the registered details are applied in the Address Book. 3-20 When the change confirmation screen appears, press [Yes].
Fax System (V) Operation Guide
Page 63
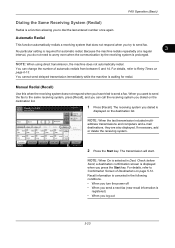
...2010 10:10 1 Press [Recall]. If necessary, add or delete the receiving system. 2 Press the Start key. For details, refer to Confirmation Screen of automatic redials from between 0 and 14. You can call the receiving system you dialed on page 5-12. Entry On Hook Direct.... NOTE: When using direct transmission, the machine does not automatically redial. Check before Send, a destination confirmation screen is displayed when you try to dial the last entered number once again. FAX Operation (Basic) Dialing the Same Receiving System (Redial) Redial is a function allowing you to send...
...2010 10:10 1 Press [Recall]. If necessary, add or delete the receiving system. 2 Press the Start key. For details, refer to Confirmation Screen of automatic redials from between 0 and 14. You can call the receiving system you dialed on page 5-12. Entry On Hook Direct.... NOTE: When using direct transmission, the machine does not automatically redial. Check before Send, a destination confirmation screen is displayed when you try to dial the last entered number once again. FAX Operation (Basic) Dialing the Same Receiving System (Redial) Redial is a function allowing you to send...
Fax System (V) Operation Guide
Page 65
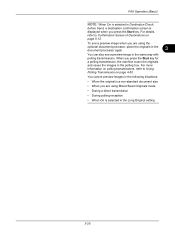
...3 You can also see a preview image in the same way with polling transmissions. For more information on polling transmissions, refer to Confirmation Screen of Destinations on page 4-50. You cannot preview images in the following situations: • When the original is selected in...the Long Original setting 3-25 For details, refer to Using Polling Transmission on page 5-12. FAX Operation (Basic) NOTE: When On is selected in Destination Check before Send, a destination confirmation screen is displayed when you are using Mixed Sized Originals mode • During a direct ...
...3 You can also see a preview image in the same way with polling transmissions. For more information on polling transmissions, refer to Confirmation Screen of Destinations on page 4-50. You cannot preview images in the following situations: • When the original is selected in...the Long Original setting 3-25 For details, refer to Using Polling Transmission on page 5-12. FAX Operation (Basic) NOTE: When On is selected in Destination Check before Send, a destination confirmation screen is displayed when you are using Mixed Sized Originals mode • During a direct ...
Fax System (V) Operation Guide
Page 67
...10/2010 10:10 4 Press [OK]. A confirmation screen appears. FAX - The Zoom Quality function will be Key 3 newly registered. 3-27 Zoom Add Zoom to the Quick Setup screen. 3 Press [Key 3] here as the key to set replacement location. FAX Operation (Basic) Changing Registration Sending Image Destination 0123456789... Setup Shortcut 3 Shortcut 4 Shortcut 5 Shortcut 6 Program 10/10/2010 10:10 3 1 Press the System Menu key. 2 Press [FAX], [Next] of Quick Setup Registration, and then [Change] of Density with Zoom in the Quick Setup Screen for replacing the registration of Zoom.
...10/2010 10:10 4 Press [OK]. A confirmation screen appears. FAX - The Zoom Quality function will be Key 3 newly registered. 3-27 Zoom Add Zoom to the Quick Setup screen. 3 Press [Key 3] here as the key to set replacement location. FAX Operation (Basic) Changing Registration Sending Image Destination 0123456789... Setup Shortcut 3 Shortcut 4 Shortcut 5 Shortcut 6 Program 10/10/2010 10:10 3 1 Press the System Menu key. 2 Press [FAX], [Next] of Quick Setup Registration, and then [Change] of Density with Zoom in the Quick Setup Screen for replacing the registration of Zoom.

Fax System (V) Operation Guide
Page 68
...+2 +3 -2.5 -1.5 -0.5 +0.5 +1.5 +2.5 Cancel OK 10/10/2010 1 After making the desired settings in the setup screen of each function. Choose [Yes] in the confirmation screen to the frequently used functions. Use the procedure below to change a shortcut number/name or delete a shortcut. 1 In the setup screen of each function...the shortcut number (01 to 06) to change or delete. 3 To edit a shortcut, press [Change] to add the shortcut. FAX Operation (Basic) Registering Shortcuts Add shortcuts in the Quick Setup screen for all functions in which [Add Shortcut] appears on the screen....
...+2 +3 -2.5 -1.5 -0.5 +0.5 +1.5 +2.5 Cancel OK 10/10/2010 1 After making the desired settings in the setup screen of each function. Choose [Yes] in the confirmation screen to the frequently used functions. Use the procedure below to change a shortcut number/name or delete a shortcut. 1 In the setup screen of each function...the shortcut number (01 to 06) to change or delete. 3 To edit a shortcut, press [Change] to add the shortcut. FAX Operation (Basic) Registering Shortcuts Add shortcuts in the Quick Setup screen for all functions in which [Add Shortcut] appears on the screen....

Fax System (V) Operation Guide
Page 70
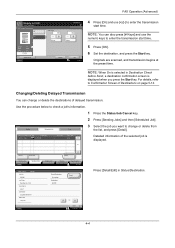
... When On is displayed when you press the Start key. FAX Operation (Advanced) Long Originals Use the optional document processor to scan long originals (originals that are longer in Destination Check before Send, a destination confirmation screen is selected in the paper feeding direction). Transmission begins.... mm/63" long can be scanned. 1 Press the FAX key. 2 Place the originals in the optional document processor. 3 Press [Original/Sending Data Format], and then [Long Original]. 4 To scan long originals, press [On], and to Confirmation Screen of a long original can be sent. NOTE: ...
... When On is displayed when you press the Start key. FAX Operation (Advanced) Long Originals Use the optional document processor to scan long originals (originals that are longer in Destination Check before Send, a destination confirmation screen is selected in the paper feeding direction). Transmission begins.... mm/63" long can be scanned. 1 Press the FAX key. 2 Place the originals in the optional document processor. 3 Press [Original/Sending Data Format], and then [Long Original]. 4 To scan long originals, press [On], and to Confirmation Screen of a long original can be sent. NOTE: ...
Fax System (V) Operation Guide
Page 72
... Destination: ABCDE Detail 1/2 Close 10/10/2010 10:10 Press [Detail/Edit] in Destination Check before Send, a destination confirmation screen is displayed. Cancel Start Now Printing Jobs Status Sending Jobs Storing Jobs Detail Device/ Communication Paper/Supplies 10/10/2010 ... to check a job's information. 1 Press the Status/Job Cancel key. 2 Press [Sending Jobs] and then [Scheduled Job]. FAX Operation (Advanced) Enter Destination. FAX Delayed Transmission Off On Original Zoom Send : A4 : 100% : A4 Preview Status Add Shortcut Destination Start Time 00 # Keys ...
... Destination: ABCDE Detail 1/2 Close 10/10/2010 10:10 Press [Detail/Edit] in Destination Check before Send, a destination confirmation screen is displayed. Cancel Start Now Printing Jobs Status Sending Jobs Storing Jobs Detail Device/ Communication Paper/Supplies 10/10/2010 ... to check a job's information. 1 Press the Status/Job Cancel key. 2 Press [Sending Jobs] and then [Scheduled Job]. FAX Operation (Advanced) Enter Destination. FAX Delayed Transmission Off On Original Zoom Send : A4 : 100% : A4 Preview Status Add Shortcut Destination Start Time 00 # Keys ...
Fax System (V) Operation Guide
Page 73
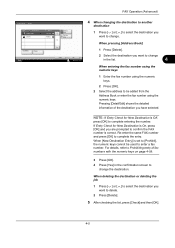
... entering the number. If Entry Check for New Destination is Off, press [OK] to confirm the FAX number is set to [Prohibit], the numeric keys cannot be added from the Address Book or enter the fax number using the numeric keys. 2 Press [OK]. 2 Select the address to delete. ... Book] Close OK 10/10/2010 10:10 1 Press [Delete]. 2 Select the destination you want to change in the confirmation screen to change the destination. FAX Operation (Advanced) Detail Job No.: 000081 Type Destination 12345678907 User01 Detail/Edit Delete Status Status Sending Waiting Address Book...
... entering the number. If Entry Check for New Destination is Off, press [OK] to confirm the FAX number is set to [Prohibit], the numeric keys cannot be added from the Address Book or enter the fax number using the numeric keys. 2 Press [OK]. 2 Select the address to delete. ... Book] Close OK 10/10/2010 10:10 1 Press [Delete]. 2 Select the destination you want to change in the confirmation screen to change the destination. FAX Operation (Advanced) Detail Job No.: 000081 Type Destination 12345678907 User01 Detail/Edit Delete Status Status Sending Waiting Address Book...

Fax System (V) Operation Guide
Page 74
...• If Entry Check for New Destination in the machine's Operation Guide. To continue entering a new number, press [FAX No. Enter the fax number 1 Press [FAX No. Re-enter the same FAX number and press [OK] to complete the entry. • When [New Destination Entry] is correct. Entry], and .... For details, refer to Entry Check for New Destination is On, press [OK] and you are prompted to confirm the FAX number is set destination afterwards. To correct the FAX number, press [Edit]. 2 After entering all the destinations, press [OK]. When direct transmission has been selected, it ...
...• If Entry Check for New Destination in the machine's Operation Guide. To continue entering a new number, press [FAX No. Enter the fax number 1 Press [FAX No. Re-enter the same FAX number and press [OK] to complete the entry. • When [New Destination Entry] is correct. Entry], and .... For details, refer to Entry Check for New Destination is On, press [OK] and you are prompted to confirm the FAX number is set destination afterwards. To correct the FAX number, press [Edit]. 2 After entering all the destinations, press [OK]. When direct transmission has been selected, it ...


