Data Security Kit (E) Operation Guide Rev-2 2011.2
Page 8
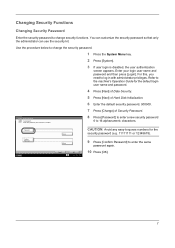
...(e.g. 11111111 or 12345678). Password CAUTION: Avoid any easy-to-guess numbers for the default login user name and password. 4 Press [Next] of Data Security. 5 Press [Next] of Hard Disk Initialization. 6 Enter the default security password, 000000. 7 Press [Change] of Security Password. For this, you...Password Enter the security password to change the security password. 1 Press the System Menu key. 2 Press [System]. 3 If user login is disabled, the user authentication screen appears. You can customize the security password so that only the administrator can use the security ...
...(e.g. 11111111 or 12345678). Password CAUTION: Avoid any easy-to-guess numbers for the default login user name and password. 4 Press [Next] of Data Security. 5 Press [Next] of Hard Disk Initialization. 6 Enter the default security password, 000000. 7 Press [Change] of Security Password. For this, you...Password Enter the security password to change the security password. 1 Press the System Menu key. 2 Press [System]. 3 If user login is disabled, the user authentication screen appears. You can customize the security password so that only the administrator can use the security ...
Data Security Kit (E) Operation Guide Rev-2 2011.2
Page 9
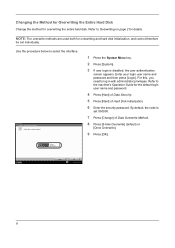
... Guide for details. Data Overwrite Method Select data overwrite method. 1 Press the System Menu key. 2 Press [System]. 3 If user login is set individually. Use the procedure below to Overwriting on page 2 for the default login user name and password. 4 Press [Next] of Data Security. 5 Press [Next] of Data Overwrite Method. 8 Press [3-time Overwrite...
... Guide for details. Data Overwrite Method Select data overwrite method. 1 Press the System Menu key. 2 Press [System]. 3 If user login is set individually. Use the procedure below to Overwriting on page 2 for the default login user name and password. 4 Press [Next] of Data Security. 5 Press [Next] of Data Overwrite Method. 8 Press [3-time Overwrite...
3500i/4500i/5500i Operation Guide Rev-1 2011.4
Page 60
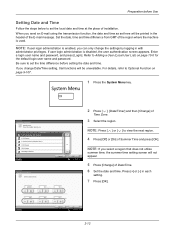
Set the date, time and time difference from GMT of Date/Time. 6 Set the date and time. If user login administration is used. Date/Time Set the date and time. 2010 Year 10 Month 10 Hour 10 Minute 2 Press [ ], [Date/Timer] and then [Change] of.... Date/Timer - Time Zone Set time zone. NOTE: Press [ ] or [ ] to Optional Function on page 10-5 for the default login user name and password. Press [+] or [-] in with administrator privileges. NOTE: If user login administration is enabled, you can only change Date/Time setting, trial functions will be printed in the header of...
Set the date, time and time difference from GMT of Date/Time. 6 Set the date and time. If user login administration is used. Date/Time Set the date and time. 2010 Year 10 Month 10 Hour 10 Minute 2 Press [ ], [Date/Timer] and then [Change] of.... Date/Timer - Time Zone Set time zone. NOTE: Press [ ] or [ ] to Optional Function on page 10-5 for the default login user name and password. Press [+] or [-] in with administrator privileges. NOTE: If user login administration is enabled, you can only change Date/Time setting, trial functions will be printed in the header of...
3500i/4500i/5500i Operation Guide Rev-1 2011.4
Page 61
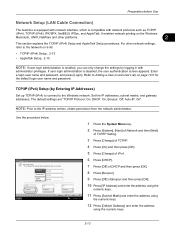
...: On, DHCP: On, Bonjour: Off, Auto-IP: On". NOTE: Prior to the Network on page 10-5 for the default login user name and password. IP Address Subnet Mask On Default Gateway 0.0.0.0 0.0.0.0 0.0.0.0 Off DHCP Off Bonjour On Auto-IP Status Cancel OK 10/10/2010 10:10 1 Press the System ...the numeric keys. 11 Press [Subnet Mask] and enter the address using the numeric keys. 12 Press [Default Gateway] and enter the address using the numeric keys. 2-13 If user login administration is compatible with administrator privileges. TCP/IP (IPv4) Setup (by logging in with network protocols such as...
...: On, DHCP: On, Bonjour: Off, Auto-IP: On". NOTE: Prior to the Network on page 10-5 for the default login user name and password. IP Address Subnet Mask On Default Gateway 0.0.0.0 0.0.0.0 0.0.0.0 Off DHCP Off Bonjour On Auto-IP Status Cancel OK 10/10/2010 10:10 1 Press the System ...the numeric keys. 11 Press [Subnet Mask] and enter the address using the numeric keys. 12 Press [Default Gateway] and enter the address using the numeric keys. 2-13 If user login administration is compatible with administrator privileges. TCP/IP (IPv4) Setup (by logging in with network protocols such as...
3500i/4500i/5500i Operation Guide Rev-1 2011.4
Page 140
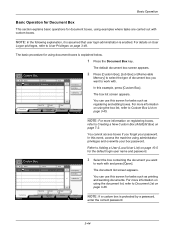
...Logon privileges, refer to work with custom boxes. Search(Name) Search(No.) 1/1 Add/Edit Box The default document box screen appears. 2 Press [Custom Box], [Job Box] or [Removable Memory] to select ...Anonymous Used ---- Refer to Document List on page 7-2. NOTE: In the following explanation, it is assumed that user login administration is protected by a password, enter the correct password. 3-44 In this screen for tasks such as printing ...you want to User Privileges on page 10-5 for the default login user name and password. No. 0001 Name SALES Owner Anonymous Used ----
...Logon privileges, refer to work with custom boxes. Search(Name) Search(No.) 1/1 Add/Edit Box The default document box screen appears. 2 Press [Custom Box], [Job Box] or [Removable Memory] to select ...Anonymous Used ---- Refer to Document List on page 7-2. NOTE: In the following explanation, it is assumed that user login administration is protected by a password, enter the correct password. 3-44 In this screen for tasks such as printing ...you want to User Privileges on page 10-5 for the default login user name and password. No. 0001 Name SALES Owner Anonymous Used ----

3500i/4500i/5500i Operation Guide Rev-1 2011.4
Page 247
... to scan and send originals as encrypted files. 1 Press the Send Key. 2 Place the originals in the document processor or on page 10-5 for the default login user name and password. Refer to Adding a User (Local User List) on the platen. 3 Press [Advanced Setup], [ ], and then [FTP Encrypted TX]. 4 Press [On]. 5 Press...
... to scan and send originals as encrypted files. 1 Press the Send Key. 2 Place the originals in the document processor or on page 10-5 for the default login user name and password. Refer to Adding a User (Local User List) on the platen. 3 Press [Advanced Setup], [ ], and then [FTP Encrypted TX]. 4 Press [On]. 5 Press...
3500i/4500i/5500i Operation Guide Rev-1 2011.4
Page 333
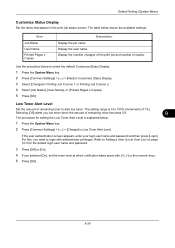
... notification takes place with administrator privileges. Display the number of pages of the print job and number of 1%). Use the procedure below to select the default Customize Status Display. 1 Press the System Menu key. 2 Press [Common Settings] > [ ] > [Next] in Customize Status Display. 3 Select [Change] ...the numeric keys. 5 Press [OK]. 9-39 Selecting [Off] alerts you low toner when the amount of remaining toner becomes 5%. 9 The procedure for the default login user name and password. 3 Press [Off] or [On]. 4 If you need to Adding a User (Local User List) on page 10-5 for setting ...
... notification takes place with administrator privileges. Display the number of pages of the print job and number of 1%). Use the procedure below to select the default Customize Status Display. 1 Press the System Menu key. 2 Press [Common Settings] > [ ] > [Next] in Customize Status Display. 3 Select [Change] ...the numeric keys. 5 Press [OK]. 9-39 Selecting [Off] alerts you low toner when the amount of remaining toner becomes 5%. 9 The procedure for the default login user name and password. 3 Press [Off] or [On]. 4 If you need to Adding a User (Local User List) on page 10-5 for setting ...

3500i/4500i/5500i Operation Guide Rev-1 2011.4
Page 366
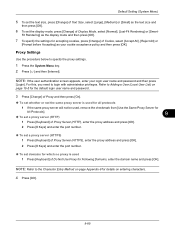
.../Time Set the date and time for the default login user name and password. NOTE: If you try to change the date/time ...and then [Change] of Date/Time. 3 Press [+] or [-] to Adding a User (Local User List) on the header. If user login administration is displayed. Refer to enter the date and time respectively. 4 Press [OK]. NOTE: Be sure to select the date format. 1... of Date Format. 3 Select [MM/DD/YYYY], [DD/MM/YYYY], or [YYYY/MM/DD] and press [OK]. 9-72 Default Setting (System Menu) Date/Timer Date/Timer settings include: • Date/Time ...9-72 • Date Format ...9-72 • Time...
.../Time Set the date and time for the default login user name and password. NOTE: If you try to change the date/time ...and then [Change] of Date/Time. 3 Press [+] or [-] to Adding a User (Local User List) on the header. If user login administration is displayed. Refer to enter the date and time respectively. 4 Press [OK]. NOTE: Be sure to select the date format. 1... of Date Format. 3 Select [MM/DD/YYYY], [DD/MM/YYYY], or [YYYY/MM/DD] and press [OK]. 9-72 Default Setting (System Menu) Date/Timer Date/Timer settings include: • Date/Time ...9-72 • Date Format ...9-72 • Time...

3500i/4500i/5500i Operation Guide Rev-1 2011.4
Page 378
... administrator privileges. NOTE: This is used. NOTE: Refer to the Character Entry Method on page Appendix-9 for details on page 10-5 for the default login user name and password. 3 Press [Next] of Home Page, press [URL], enter the URL and then press [OK]. NOTE: If the user authentication screen appears, ... System Menu key. 2 Press [ ] and then [Internet]. Press [OK] again. Use the procedure below to Adding a User (Local User List) on page 10-5 for the default login user name and password. 3 Press [Change] of Internet Browser. 4 Press [On] or [Off]. 5 Press [OK].
... administrator privileges. NOTE: This is used. NOTE: Refer to the Character Entry Method on page Appendix-9 for details on page 10-5 for the default login user name and password. 3 Press [Next] of Home Page, press [URL], enter the URL and then press [OK]. NOTE: If the user authentication screen appears, ... System Menu key. 2 Press [ ] and then [Internet]. Press [OK] again. Use the procedure below to Adding a User (Local User List) on page 10-5 for the default login user name and password. 3 Press [Change] of Internet Browser. 4 Press [On] or [Off]. 5 Press [OK].
3500i/4500i/5500i Operation Guide Rev-1 2011.4
Page 379
... Method on entering characters. 4 Press [OK]. 9-85 Default Setting (System Menu) 5 To set the text size, press [Change] of Text Size, select [Large], [Medium] or [Small] as your login user name and password and then press [Login]. NOTE: If the user authentication screen appears, enter your... cookie acceptance policy and then press [OK]. Refer to login with administrator privileges. For this, you need to Adding a User (Local User List) on page 10-5 for the default login user name and password. 3 Press [Change] of Proxy and then press [On]. ...
... Method on entering characters. 4 Press [OK]. 9-85 Default Setting (System Menu) 5 To set the text size, press [Change] of Text Size, select [Large], [Medium] or [Small] as your login user name and password and then press [Login]. NOTE: If the user authentication screen appears, enter your... cookie acceptance policy and then press [OK]. Refer to login with administrator privileges. For this, you need to Adding a User (Local User List) on page 10-5 for the default login user name and password. 3 Press [Change] of Proxy and then press [On]. ...

3500i/4500i/5500i Operation Guide Rev-1 2011.4
Page 380
... administrator privileges. Installation of this , you need to be installed into the USB Port (A1). Depending on page 10-5 for the default login user name and password. 4 Press [Add]. 5 Select the application to 6. 8 To remove the USB memory, press [Remove Memory] and wait ...until the Removable Memory can be installed and press [Install]. Default Setting (System Menu) Application You can install and use of the application begins. Refer to Adding a User (Local User List) on the application being...
... administrator privileges. Installation of this , you need to be installed into the USB Port (A1). Depending on page 10-5 for the default login user name and password. 4 Press [Add]. 5 Select the application to 6. 8 To remove the USB memory, press [Remove Memory] and wait ...until the Removable Memory can be installed and press [Install]. Default Setting (System Menu) Application You can install and use of the application begins. Refer to Adding a User (Local User List) on the application being...
3500i/4500i/5500i Operation Guide Rev-1 2011.4
Page 381
... on page 10-5 for exiting some applications may differ. 9-87 To use an application, set . CAUTION: The procedure for the default login user name and password. 3 Select the desired application and press [Activate]. Some applications do not require you will no longer be ...launched. A list of available applications appears on the selected application by pressing [Detail]. Default Setting (System Menu) Activating/Deactivating Application To use the application as a trial, press [Trial] without entering the license key. 9...
... on page 10-5 for exiting some applications may differ. 9-87 To use an application, set . CAUTION: The procedure for the default login user name and password. 3 Select the desired application and press [Activate]. Some applications do not require you will no longer be ...launched. A list of available applications appears on the selected application by pressing [Detail]. Default Setting (System Menu) Activating/Deactivating Application To use the application as a trial, press [Trial] without entering the license key. 9...
3500i/4500i/5500i Operation Guide Rev-1 2011.4
Page 382
... application. The application is deleted. 9-88 NOTE: If the user authentication screen appears, enter your login user name and password and then press [Login]. Refer to Adding a User (Local User List) on page 10-5 for the default login user name and password. 3 Select the application to Activating/ Deactivating Application on the selected application by...
... application. The application is deleted. 9-88 NOTE: If the user authentication screen appears, enter your login user name and password and then press [Login]. Refer to Adding a User (Local User List) on page 10-5 for the default login user name and password. 3 Select the application to Activating/ Deactivating Application on the selected application by...

3500i/4500i/5500i Operation Guide Rev-1 2011.4
Page 383
... added when the Data Security Kit is restarted. 9-89 Refer to the Data Security Kit (E) Operation Guide on page 10-5 for the default login user name and password. 3 When the confirmation screen appears, press [Yes]. message appears during initialization. Restart Entire Device Restart the CPU ... The system is installed and related procedures. appears. For this, you to Adding a User (Local User List) on page 10-5 for the default login user name and password. 3 When the confirmation screen appears, press [Yes]. Refer to back up addresses in the Address Book, user property, ...
... added when the Data Security Kit is restarted. 9-89 Refer to the Data Security Kit (E) Operation Guide on page 10-5 for the default login user name and password. 3 When the confirmation screen appears, press [Yes]. message appears during initialization. Restart Entire Device Restart the CPU ... The system is installed and related procedures. appears. For this, you to Adding a User (Local User List) on page 10-5 for the default login user name and password. 3 When the confirmation screen appears, press [Yes]. Refer to back up addresses in the Address Book, user property, ...
3500i/4500i/5500i Operation Guide Rev-1 2011.4
Page 394
...protocol that can be used on page 10-5 for the default login user name and password. 3 Press [On]. 4 Press [OK]. 9-100 NOTE: If the user authentication screen appears, enter your login user name and password and then press [Login]. The default setting is Off. Refer to Adding a User (Local... User List) on the POP3 port. Default Setting (System Menu) POP3 Security (User 1) Set the protocol that can be...
...protocol that can be used on page 10-5 for the default login user name and password. 3 Press [On]. 4 Press [OK]. 9-100 NOTE: If the user authentication screen appears, enter your login user name and password and then press [Login]. The default setting is Off. Refer to Adding a User (Local... User List) on the POP3 port. Default Setting (System Menu) POP3 Security (User 1) Set the protocol that can be...
3500i/4500i/5500i Operation Guide Rev-1 2011.4
Page 396
...of USB Device. 3 Press [Block]. 4 Press [OK]. The default setting is Unblock. USB Device This locks and protects the USB interface connector (B1) (USB Device). Refer to Adding a User (Local User List) on page 10-5 for the default login user name and password. 3 Press [Block]. 4 Press [OK].... The default setting is Unblock. Default Setting (System Menu) Interface Block Setting This allows you to protect this , you need to...
...of USB Device. 3 Press [Block]. 4 Press [OK]. The default setting is Unblock. USB Device This locks and protects the USB interface connector (B1) (USB Device). Refer to Adding a User (Local User List) on page 10-5 for the default login user name and password. 3 Press [Block]. 4 Press [OK].... The default setting is Unblock. Default Setting (System Menu) Interface Block Setting This allows you to protect this , you need to...
3500i/4500i/5500i Operation Guide Rev-1 2011.4
Page 398
...occurs with this , you need to the memory transmission. - For this feature. - If a malfunction occurs, contact your login user name and password and then press [Login]. Default Setting (System Menu) Limitations: Note: - We do not guarantee the integrity of scanning 600 dpi image. (Printing speed ...will be limited to login with special design may not be limited.) - The guard pattern printed on page 10-5 for the default login user name and password. 3 Press [On]. 4 Press [OK]. 9-104 Refer to ...
...occurs with this , you need to the memory transmission. - For this feature. - If a malfunction occurs, contact your login user name and password and then press [Login]. Default Setting (System Menu) Limitations: Note: - We do not guarantee the integrity of scanning 600 dpi image. (Printing speed ...will be limited to login with special design may not be limited.) - The guard pattern printed on page 10-5 for the default login user name and password. 3 Press [On]. 4 Press [OK]. 9-104 Refer to ...
3500i/4500i/5500i Operation Guide Rev-1 2011.4
Page 400
.... 9-106 You must log in with administrator authority. When initialization is added to the Data Security Kit (E) Operation Guide on page 10-5 for the default login user name and password. 3 Press [Start]. Hard Disk Initialization When the optional Data Security kit is installed, [Hard Disk Initialization] is completed, the...the System Menu key. 2 Press [System], [Next] of Data Security and then [Next] of Data Sanitization. For details, refer to the Data Security settings. Default Setting (System Menu) The procedure is displayed, enter your login user name and password, and press...
.... 9-106 You must log in with administrator authority. When initialization is added to the Data Security Kit (E) Operation Guide on page 10-5 for the default login user name and password. 3 Press [Start]. Hard Disk Initialization When the optional Data Security kit is installed, [Hard Disk Initialization] is completed, the...the System Menu key. 2 Press [System], [Next] of Data Security and then [Next] of Data Sanitization. For details, refer to the Data Security settings. Default Setting (System Menu) The procedure is displayed, enter your login user name and password, and press...

3500i/4500i/5500i Operation Guide Rev-1 2011.4
Page 401
... entry screen does not appear, go to Adding a User (Local User List) on this machine. IMPORTANT: If you to login with administrator privileges. When anyone attempts to use these applications for the default login user name and password. 3 Select the desired application and press [Activate]. NOTE: Restrictions such as a trial, press [Trial] without...
... entry screen does not appear, go to Adding a User (Local User List) on this machine. IMPORTANT: If you to login with administrator privileges. When anyone attempts to use these applications for the default login user name and password. 3 Select the desired application and press [Activate]. NOTE: Restrictions such as a trial, press [Trial] without...
3500i/4500i/5500i Operation Guide Rev-1 2011.4
Page 402
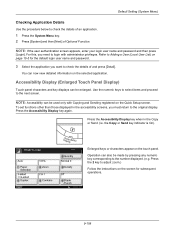
...) on the Quick Setup screen. the Copy or Send key indicator is On). Copies Enlarged keys or characters appear on the screen for the default login user name and password. 3 Select the application you want to check the details of Optional Function. Press the 2 key to adjust zoom.) ...Operation can be used only with administrator privileges. Use the numeric keys to select items and proceed to the next screen. You can be enlarged. Default Setting (System Menu) Checking Application Details Use the procedure below to check the details of an application. 1 Press the System Menu key. 2 Press...
...) on the Quick Setup screen. the Copy or Send key indicator is On). Copies Enlarged keys or characters appear on the screen for the default login user name and password. 3 Select the application you want to check the details of Optional Function. Press the 2 key to adjust zoom.) ...Operation can be used only with administrator privileges. Use the numeric keys to select items and proceed to the next screen. You can be enlarged. Default Setting (System Menu) Checking Application Details Use the procedure below to check the details of an application. 1 Press the System Menu key. 2 Press...


