KM-NET ADMIN Operation Guide for Ver 2.0
Page 32
... to 250%. Menu options for each group of printing devices, or groups can place printing device icons on the toolbar. Select a size percentage from the list, from the map viewer. 1 Click Map Background. 2 Select Clear Background. 3 Click OK. If the image is imported, you import an image of the ... Auto Fit to display in the map viewer. You can be used . Printing device icons that are still in the icon waiting area may cover part of the Map Background Image You can add or replace a map background. 1 Click the Map Background button, and then select Add/Replace Background. 2 In...
... to 250%. Menu options for each group of printing devices, or groups can place printing device icons on the toolbar. Select a size percentage from the list, from the map viewer. 1 Click Map Background. 2 Select Clear Background. 3 Click OK. If the image is imported, you import an image of the ... Auto Fit to display in the map viewer. You can be used . Printing device icons that are still in the icon waiting area may cover part of the Map Background Image You can add or replace a map background. 1 Click the Map Background button, and then select Add/Replace Background. 2 In...
KM-NET Viewer Operation Guide Rev-5.2-2010.10
Page 21
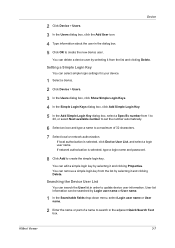
3 Device The Device menu is used for various parts of the device itself, and the Asset number which may differ depending on the device, and then in the RAM disk. Device Properties The Properties ... currently contain. Counters This area shows a variety of counters for different types of the printing device. The settings can be taken. Firmware Versions This area lists the versions of firmware for finding devices and managing device settings. Asset This area shows the MAC address of the network adapter in the view...
3 Device The Device menu is used for various parts of the device itself, and the Asset number which may differ depending on the device, and then in the RAM disk. Device Properties The Properties ... currently contain. Counters This area shows a variety of counters for different types of the printing device. The settings can be taken. Firmware Versions This area lists the versions of firmware for finding devices and managing device settings. Asset This area shows the MAC address of the network adapter in the view...
KM-NET Viewer Operation Guide Rev-5.2-2010.10
Page 25
...in all dialog boxes. Adding One Touch Keys You can be searched by pressing one touch keys that can create a list of One Touch Keys for contacts or groups by Number, Name, E-mail, FTP, SMB, FAX number or Internet FAX... address. 1 In the Searchable fields drop-down list box, choose the field to follow this pattern. Destination Click Add. To delete an entry from the One Touch Keys ... contact or group information. Device The naming continues to search. 2 Enter the name or part of 100, or select Next available number.
...in all dialog boxes. Adding One Touch Keys You can be searched by pressing one touch keys that can create a list of One Touch Keys for contacts or groups by Number, Name, E-mail, FTP, SMB, FAX number or Internet FAX... address. 1 In the Searchable fields drop-down list box, choose the field to follow this pattern. Destination Click Add. To delete an entry from the One Touch Keys ... contact or group information. Device The naming continues to search. 2 Enter the name or part of 100, or select Next available number.
KM-NET Viewer Operation Guide Rev-5.2-2010.10
Page 27
... 4 In the Simple Login Keys dialog box, click Add Simple Login Key. 5 In the Add Simple Login Key dialog box, select a Specific number from the list and clicking Delete. Setting a Simple Login Key You can delete a device user by selecting it from 1 to 20, or select Next available number to set... to create the simple login key. Searching the Device User List You can edit a simple login key by Login user name or User name. 1 In the Searchable fields drop-down menu, select Login user name or User name. 2 Enter the name or part of 32 characters. 7 Select local or network authorization. If...
... 4 In the Simple Login Keys dialog box, click Add Simple Login Key. 5 In the Add Simple Login Key dialog box, select a Specific number from the list and clicking Delete. Setting a Simple Login Key You can delete a device user by selecting it from 1 to 20, or select Next available number to set... to create the simple login key. Searching the Device User List You can edit a simple login key by Login user name or User name. 1 In the Searchable fields drop-down menu, select Login user name or User name. 2 Enter the name or part of 32 characters. 7 Select local or network authorization. If...
KM-NET Viewer Operation Guide Rev-5.2-2010.10
Page 28
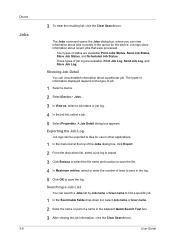
...name to save in the log. 5 Click OK to find a specific job. 1 In the Searchable fields drop-down list, select Job name or User name. 2 Enter the name or part of job log are available: Print Jobs Status, Send Job Status, Store Job Status, and Scheduled Job Status. Four types... of job. 1 Select a device. 2 Select Device > Jobs. 3 In View as, select a job status or job log. 4 In the job list, select a job. 5 Select Properties...
...name to save in the log. 5 Click OK to find a specific job. 1 In the Searchable fields drop-down list, select Job name or User name. 2 Enter the name or part of job log are available: Print Jobs Status, Send Job Status, Store Job Status, and Scheduled Job Status. Four types... of job. 1 Select a device. 2 Select Device > Jobs. 3 In View as, select a job status or job log. 4 In the job list, select a job. 5 Select Properties...
KM-NET Viewer Operation Guide Rev-5.2-2010.10
Page 30
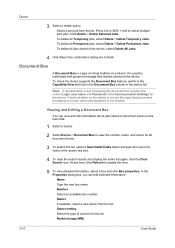
...in the Document Box column in the confirmation dialog box to select multiple print jobs. Owner If available, select a new owner from the list. To delete all or part of a value in document boxes on the hard disk. 1 Select a device. 2 Select Device > Document Box to manage files ... Press Ctrl or Shift + click to finish. Number Select an available box number. Device 3 Select a delete option: Select a print job from the list. To delete all Permanent jobs, select Delete > Delete Permanent Jobs. It is not needed. To delete all Temporary jobs, select Delete > Delete Temporary...
...in the Document Box column in the confirmation dialog box to select multiple print jobs. Owner If available, select a new owner from the list. To delete all or part of a value in document boxes on the hard disk. 1 Select a device. 2 Select Device > Document Box to manage files ... Press Ctrl or Shift + click to finish. Number Select an available box number. Device 3 Select a delete option: Select a print job from the list. To delete all Permanent jobs, select Delete > Delete Permanent Jobs. It is not needed. To delete all Temporary jobs, select Delete > Delete Temporary...
KM-NET Viewer Operation Guide Rev-5.2-2010.10
Page 32
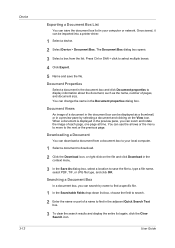
Document Views An image of a name to find a specific file. 1 In the Searchable fields drop-down list box, choose the field to search. 2 Enter the name or part of a document in the document box can be imported into a printer driver. 1 Select a device. 2 Select Device > Document Box. Searching a ...Document Box dialog box opens. 3 Select a box from a document box to your computer or network. Downloading a Document You can download a document from the list. Press Ctrl or Shift + click to select multiple boxes. 4 Click Export. 5 Name and save the file to, type a file name, select PDF...
Document Views An image of a name to find a specific file. 1 In the Searchable fields drop-down list box, choose the field to search. 2 Enter the name or part of a document in the document box can be imported into a printer driver. 1 Select a device. 2 Select Device > Document Box. Searching a ...Document Box dialog box opens. 3 Select a box from a document box to your computer or network. Downloading a Document You can download a document from the list. Press Ctrl or Shift + click to select multiple boxes. 4 Click Export. 5 Name and save the file to, type a file name, select PDF...
KM-NET Viewer Operation Guide Rev-5.2-2010.10
Page 33
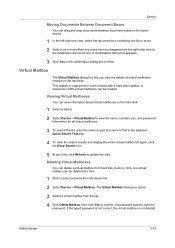
... > Virtual Mailbox. If the typed password is not correct, the virtual mailbox is supported for all virtual mailboxes. 3 To search the list, enter the name or part of a name to find in the confirmation dialog box to the destination document box. A confirmation dialog box appears. 3 Click Yes in... the adjacent Quick Search Text box. 4 To clear the search results and display the entire virtual mailbox list again, click the Clear Search icon....
... > Virtual Mailbox. If the typed password is not correct, the virtual mailbox is supported for all virtual mailboxes. 3 To search the list, enter the name or part of a name to find in the confirmation dialog box to the destination document box. A confirmation dialog box appears. 3 Click Yes in... the adjacent Quick Search Text box. 4 To clear the search results and display the entire virtual mailbox list again, click the Clear Search icon....
Kyocera Command Center Operation Guide Rev 6.3
Page 30
... items among the following three Action Settings items in a FAX box, click both items and set the processes. When you want to the Requirement List. Note the SSL protocol must also be appended. • Page Separate Specifies whether to split the fax into files as many as destination, Sender...have set to On, specify the number of the condition under which you want to enable encryption for example printing and saving in the lower part of pages. Select On to split the fax. (This item has effect when the forwarding destination is added to execute multiple forwarding processes at...
... items among the following three Action Settings items in a FAX box, click both items and set the processes. When you want to the Requirement List. Note the SSL protocol must also be appended. • Page Separate Specifies whether to split the fax into files as many as destination, Sender...have set to On, specify the number of the condition under which you want to enable encryption for example printing and saving in the lower part of pages. Select On to split the fax. (This item has effect when the forwarding destination is added to execute multiple forwarding processes at...
180/220 Operation Guide Rev-2
Page 4
Contents Contents 1 Part Names Operation Panel 1-2 Message Display 1-4 Machine 1-6 2 Preparation before Use Check bundled items 2-2 Loading Paper 2-3 Loading Originals 2-13 3 Basic Operation Power On/Off...6-2 Job Accounting Operation Procedures 6-3 Department ID Code Registration 6-4 Deleting Department ID Codes 6-5 Clearing the Job Accounting Count 6-6 Printing the Job Accounting List 6-7 How to set Job Accounting 6-8 Making copies in Job Accounting Mode 6-9 7 Maintenance Cleaning 7-2 Toner Container and Waste Toner Box Replacement 7-6 ii OPERATION GUIDE
Contents Contents 1 Part Names Operation Panel 1-2 Message Display 1-4 Machine 1-6 2 Preparation before Use Check bundled items 2-2 Loading Paper 2-3 Loading Originals 2-13 3 Basic Operation Power On/Off...6-2 Job Accounting Operation Procedures 6-3 Department ID Code Registration 6-4 Deleting Department ID Codes 6-5 Clearing the Job Accounting Count 6-6 Printing the Job Accounting List 6-7 How to set Job Accounting 6-8 Making copies in Job Accounting Mode 6-9 7 Maintenance Cleaning 7-2 Toner Container and Waste Toner Box Replacement 7-6 ii OPERATION GUIDE
180/220 Operation Guide Rev-2
Page 28
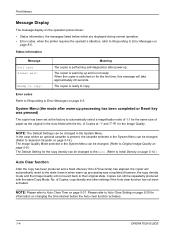
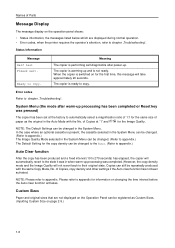
... the Image Quality will take approximately 20 seconds. Please refer to Auto Clear Time on page 5-21. Part Names Message Display The message display on the operation panel shows: • Status information, the messages listed below which are displayed during normal operation. • Error codes, when the printer requires the operator's attention...
... the Image Quality will take approximately 20 seconds. Please refer to Auto Clear Time on page 5-21. Part Names Message Display The message display on the operation panel shows: • Status information, the messages listed below which are displayed during normal operation. • Error codes, when the printer requires the operator's attention...
180/220 Operation Guide Rev-2
Page 158
... 8-10 Document processor 8-13 Jam location indicators 8-9 Multi purpose tray 8-10 Optional cassette 8-14 Paper output slot 8-12 Precaution 8-9 Paper Length Guide 2-5 Paper Width Guides 2-4 Part Names 1-1 Photo density adjustment 5-11 Photo processing 5-13 Platen Placing Originals 2-13 Power Off 3-2 Power On 3-2 PPM Appendix-17 Preparation 2-1 Printing the job accounting...
... 8-10 Document processor 8-13 Jam location indicators 8-9 Multi purpose tray 8-10 Optional cassette 8-14 Paper output slot 8-12 Precaution 8-9 Paper Length Guide 2-5 Paper Width Guides 2-4 Part Names 1-1 Photo density adjustment 5-11 Photo processing 5-13 Platen Placing Originals 2-13 Power Off 3-2 Power On 3-2 PPM Appendix-17 Preparation 2-1 Printing the job accounting...

Operation Guide
Page 3
...Platen 2-10 Loading Originals in the Document Processor 2-11 Originals Supported by the Document Processor 2-11 Originals Not Supported by the Document Processor 2-11 Part Names of the Document Processor 2-11 How to Load Originals ...2-12 Turning Power On ...2-13 User Interface language ...2-14 3 Basic Operation 3-1 Basic... Job Accounting Operation Procedures 4-2 Department ID Code Registration 4-2 Deleting Department ID Codes 4-3 Clearing the Job Accounting Count 4-3 Printing the Job Accounting List 4-3 How to set Job Accounting ...4-4 Making copies in Job Accounting Mode 4-4 i
...Platen 2-10 Loading Originals in the Document Processor 2-11 Originals Supported by the Document Processor 2-11 Originals Not Supported by the Document Processor 2-11 Part Names of the Document Processor 2-11 How to Load Originals ...2-12 Turning Power On ...2-13 User Interface language ...2-14 3 Basic Operation 3-1 Basic... Job Accounting Operation Procedures 4-2 Department ID Code Registration 4-2 Deleting Department ID Codes 4-3 Clearing the Job Accounting Count 4-3 Printing the Job Accounting List 4-3 How to set Job Accounting ...4-4 Making copies in Job Accounting Mode 4-4 i
Operation Guide
Page 25
... to copy. Error codes Refer to automatically select a magnification ratio of 1:1 for information on page 2-9.) 1-6 Names of Parts Message Display The message display on the operation panel shows: • Status information, the messages listed below which are not displayed on the Operation Panel can be registered as the original in the Auto...
... to copy. Error codes Refer to automatically select a magnification ratio of 1:1 for information on page 2-9.) 1-6 Names of Parts Message Display The message display on the operation panel shows: • Status information, the messages listed below which are not displayed on the Operation Panel can be registered as the original in the Auto...


