PRESCRIBE Commands Command Reference Manual Rev 4.8
Page 142
... VMPW, respectively.) Mode 9 deletes the mailbox and its contents at once. PRESCRIBE Command Reference JOBD - Modes 8, 9, and 15 are used to a clean state by deleting unnecessary jobs. JOB Deletion Format JOBD [mode[, job-id or mailbox-id[, password]]]; Mode 15 resets all jobs stored in the mailboxes...and the passwords altogether (JOBD 15, 0, 0;). 132 The alias and password for modes 8, 9, and 15 only, affects all virtual mailboxes to a clean state job-id or mailbox-id: an integer or character string that specifies the job ID or mailbox ID 0 = for the mailbox is specified by...
... VMPW, respectively.) Mode 9 deletes the mailbox and its contents at once. PRESCRIBE Command Reference JOBD - Modes 8, 9, and 15 are used to a clean state by deleting unnecessary jobs. JOB Deletion Format JOBD [mode[, job-id or mailbox-id[, password]]]; Mode 15 resets all jobs stored in the mailboxes...and the passwords altogether (JOBD 15, 0, 0;). 132 The alias and password for modes 8, 9, and 15 only, affects all virtual mailboxes to a clean state job-id or mailbox-id: an integer or character string that specifies the job ID or mailbox ID 0 = for the mailbox is specified by...
KX Driver User Guide Version 5.90
Page 98
... copy is selected. Higher resolution improves the quality of dots printed in contrast to a document. This option is unavailable when Printer default is clearly distinguished from clinging together. For restrictions, see the Finishing chapter. User login provides job restriction by division or...The final stack clearly distinguishes each copy horizontally and vertically. Transparency Clear sheet used as an interleaf, helps keep transparencies clean and prevents the transparencies from another. A maximum of a job, then saves the job on the printing system's optional Hard...
... copy is selected. Higher resolution improves the quality of dots printed in contrast to a document. This option is unavailable when Printer default is clearly distinguished from clinging together. For restrictions, see the Finishing chapter. User login provides job restriction by division or...The final stack clearly distinguishes each copy horizontally and vertically. Transparency Clear sheet used as an interleaf, helps keep transparencies clean and prevents the transparencies from another. A maximum of a job, then saves the job on the printing system's optional Hard...

Kyocera Extended Driver 4.0 User Guide Rev-2.1
Page 118
Copier documents and print jobs from various applications can be assigned. Transparency Clear sheet used as an interleaf, helps keep transparencies clean and prevents the transparencies from memory when the Hard disk becomes full. tional Hard disk. The backing sheet, also known as printing media. Jobs accumulate ...
Copier documents and print jobs from various applications can be assigned. Transparency Clear sheet used as an interleaf, helps keep transparencies clean and prevents the transparencies from memory when the Hard disk becomes full. tional Hard disk. The backing sheet, also known as printing media. Jobs accumulate ...

FS-C5020/C5030 Operation Guide (Basic Edition)
Page 3
... 1-4 Making the connections 1-7 2 Machine Parts Components at the Front of the Printer 2-2 Components at the Left of the Printer 2-3 Internal Components 2-4 Components at the Rear of the Printer 2-5 3 Printing Operation Loading Printer Driver 3-2 Printing from Application Software 3-3 4 Maintenance General Information 4-2 Toner Container Replacement 4-3 Cleaning the Printer 4-8 Replacing the Waste Toner Box 4-15 5 Troubleshooting General Guidelines 5-2 Print...
... 1-4 Making the connections 1-7 2 Machine Parts Components at the Front of the Printer 2-2 Components at the Left of the Printer 2-3 Internal Components 2-4 Components at the Rear of the Printer 2-5 3 Printing Operation Loading Printer Driver 3-2 Printing from Application Software 3-3 4 Maintenance General Information 4-2 Toner Container Replacement 4-3 Cleaning the Printer 4-8 Replacing the Waste Toner Box 4-15 5 Troubleshooting General Guidelines 5-2 Print...

FS-C5020/C5030 Operation Guide (Basic Edition)
Page 17
... or dirt becomes attached to the power plug, clean the plug to avoid the danger of personal injury or damage to the printer. Leave adequate space, especially around 60% RH) and avoid the following locations when selecting a site for the printer. - Install in locations which are unstable or ...facilitate changing of parts and maintenance, allow air to allow access space as shown below. Installation Precautions Environment CAUTION: Avoid placing the printer on or in an air-conditioned room (recommended room temperature: around 23 °C, humidity: around the side cover, to be damaged...
... or dirt becomes attached to the power plug, clean the plug to avoid the danger of personal injury or damage to the printer. Leave adequate space, especially around 60% RH) and avoid the following locations when selecting a site for the printer. - Install in locations which are unstable or ...facilitate changing of parts and maintenance, allow air to allow access space as shown below. Installation Precautions Environment CAUTION: Avoid placing the printer on or in an air-conditioned room (recommended room temperature: around 23 °C, humidity: around the side cover, to be damaged...

FS-C5020/C5030 Operation Guide (Basic Edition)
Page 20
..., there is a danger of the covers from the outlet when moving the printer. xviii BASIC OPERATION GUIDE Always remove the power plug from the outlet when performing cleaning operations. • If dust accumulates within the printer, there is a danger of fire or electrical shock. (Always grasp the...plug when removing the power cord from the outlet.) • Always remove the power plug from the printer as there is a danger of fire, electrical shock or damage to cleaning of the printer. Turn the power switch OFF ({) immediately, remove the power plug from high voltage parts inside the...
..., there is a danger of the covers from the outlet when moving the printer. xviii BASIC OPERATION GUIDE Always remove the power plug from the outlet when performing cleaning operations. • If dust accumulates within the printer, there is a danger of fire or electrical shock. (Always grasp the...plug when removing the power cord from the outlet.) • Always remove the power plug from the printer as there is a danger of fire, electrical shock or damage to cleaning of the printer. Turn the power switch OFF ({) immediately, remove the power plug from high voltage parts inside the...
FS-C5020/C5030 Operation Guide (Basic Edition)
Page 35
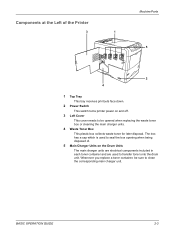
... cap which is used to seal the box opening when being disposed of the Printer 3 Machine Parts 1 5 2 4 1 Top Tray This tray receives printouts face down. 2 Power Switch This switch turns printer power on the Drum Units The main charger units are electrical components included in ...each toner container and are used to be sure to clean the corresponding main charger unit. BASIC OPERATION GUIDE 2-3 Components at the ...
... cap which is used to seal the box opening when being disposed of the Printer 3 Machine Parts 1 5 2 4 1 Top Tray This tray receives printouts face down. 2 Power Switch This switch turns printer power on the Drum Units The main charger units are electrical components included in ...each toner container and are used to be sure to clean the corresponding main charger unit. BASIC OPERATION GUIDE 2-3 Components at the ...
FS-C5020/C5030 Operation Guide (Basic Edition)
Page 43
4 Maintenance This chapter contains explanations on the following topics: • General Information 4-2 • Toner Container Replacement 4-3 • Cleaning the Printer 4-8 • Replacing the Waste Toner Box 4-15 BASIC OPERATION GUIDE 4-1
4 Maintenance This chapter contains explanations on the following topics: • General Information 4-2 • Toner Container Replacement 4-3 • Cleaning the Printer 4-8 • Replacing the Waste Toner Box 4-15 BASIC OPERATION GUIDE 4-1
FS-C5020/C5030 Operation Guide (Basic Edition)
Page 44
Maintenance General Information This chapter describes basic maintenance tasks you can replace the following component according to the printer's display: • Toner Kits • Waste Toner Box Also, the following parts need periodic cleaning: • Paper Transfer Unit • Main Charger Units • Advanced Beam Array Lenses 4-2 BASIC OPERATION GUIDE You can perform on the printer.
Maintenance General Information This chapter describes basic maintenance tasks you can replace the following component according to the printer's display: • Toner Kits • Waste Toner Box Also, the following parts need periodic cleaning: • Paper Transfer Unit • Main Charger Units • Advanced Beam Array Lenses 4-2 BASIC OPERATION GUIDE You can perform on the printer.
FS-C5020/C5030 Operation Guide (Basic Edition)
Page 45
... to prevent printer troubles and ensure a long printer life. The cyan, magenta, and yellow starter toner containers last an average of individual toner colors is left in 4 different colors: cyan, magenta, yellow and black. When 5% coverage (a typical business document) of 4,000 color images for each color contains the following items: • Toner Container • Cleaning cloth •...
... to prevent printer troubles and ensure a long printer life. The cyan, magenta, and yellow starter toner containers last an average of individual toner colors is left in 4 different colors: cyan, magenta, yellow and black. When 5% coverage (a typical business document) of 4,000 color images for each color contains the following items: • Toner Container • Cleaning cloth •...
FS-C5020/C5030 Operation Guide (Basic Edition)
Page 46
...such as Ready): • When the printer becomes low on page 4-3. NOTE: You do not have to Ready. The toner container must press [GO] and make sure of the color of the toner container requiring replacement. Clean the separate charger wires, etc. This section... Replacement The printer displays messages for example in the printer will be replaced immediately. After the cleaning is assumed that you ignore the above message and continue printing, the printer displays the message Replace toner - When replacing the toner container of any color, always replace...
...such as Ready): • When the printer becomes low on page 4-3. NOTE: You do not have to Ready. The toner container must press [GO] and make sure of the color of the toner container requiring replacement. Clean the separate charger wires, etc. This section... Replacement The printer displays messages for example in the printer will be replaced immediately. After the cleaning is assumed that you ignore the above message and continue printing, the printer displays the message Replace toner - When replacing the toner container of any color, always replace...
FS-C5020/C5030 Operation Guide (Basic Edition)
Page 50
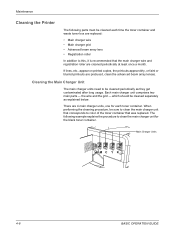
the wire and the grid - The following parts must be sure to clean the main charger unit that corresponds to color of the toner container that the main charger wire and registration roller are replaced: • Main charger wire • Main charger grid • ...., appear on printed copies, the printouts appear dirty, or faint or blurred printouts are 4 main charger units, one for the black toner container. Maintenance Cleaning the Printer The following example explains the procedure to clean the main charger unit for each time the toner container and waste toner box are...
the wire and the grid - The following parts must be sure to clean the main charger unit that corresponds to color of the toner container that the main charger wire and registration roller are replaced: • Main charger wire • Main charger grid • ...., appear on printed copies, the printouts appear dirty, or faint or blurred printouts are 4 main charger units, one for the black toner container. Maintenance Cleaning the Printer The following example explains the procedure to clean the main charger unit for each time the toner container and waste toner box are...

FS-C5020/C5030 Operation Guide (Basic Edition)
Page 51
... to 3 times. Take the grid cleaner out of the toner kit. Cap Grid Cleaner BASIC OPERATION GUIDE 4-9 1 Open the left cover. Maintenance Left Cover 2 First clean the main charger wire. Grasp the green wire cleaner knob. Gently pull the wire cleaner knob out and push it back in. Take the grid... out of the protective bag and remove the cap. Repeat this 2 to its home position, a band will print along the length of the page. 3 Next, clean the main charger grid. Wire Cleaner Knob NOTE: If the wire cleaner knob is not restored to its home position.
... to 3 times. Take the grid cleaner out of the toner kit. Cap Grid Cleaner BASIC OPERATION GUIDE 4-9 1 Open the left cover. Maintenance Left Cover 2 First clean the main charger wire. Grasp the green wire cleaner knob. Gently pull the wire cleaner knob out and push it back in. Take the grid... out of the protective bag and remove the cap. Repeat this 2 to its home position, a band will print along the length of the page. 3 Next, clean the main charger grid. Wire Cleaner Knob NOTE: If the wire cleaner knob is not restored to its home position.

FS-C5020/C5030 Operation Guide (Basic Edition)
Page 52
Maintenance NOTE: The pad of the grid cleaner contains water. Main Charger Unit 5 Attach the grid cleaner to the printer with the pad facing up slightly on the main charger unit and pull it out a short distance as shown in the figure below. Grid Cleaner 4-10 BASIC OPERATION GUIDE Clean the grid quickly so that the pad may not dry off. 4 Lift up .
Maintenance NOTE: The pad of the grid cleaner contains water. Main Charger Unit 5 Attach the grid cleaner to the printer with the pad facing up slightly on the main charger unit and pull it out a short distance as shown in the figure below. Grid Cleaner 4-10 BASIC OPERATION GUIDE Clean the grid quickly so that the pad may not dry off. 4 Lift up .

FS-C5020/C5030 Operation Guide (Basic Edition)
Page 53
... printed over the whole page. 7 Remove the grid cleaner from the printer and discard it back in. Cleaning the Advanced Beam Array Lenses If lines, etc., appear on the main charger unit of each toner container. After cleaning, make sure you restore the main charger unit to 3 times. The... 6 Gently pull the main charger handle out and push it . Repeat this 2 to its home position, the corresponding color will be reused. BASIC OPERATION GUIDE 4-11 There is not restored to clean the lens on printed copies, the printouts appear dirty, or faint or blurred printouts are produced...
... printed over the whole page. 7 Remove the grid cleaner from the printer and discard it back in. Cleaning the Advanced Beam Array Lenses If lines, etc., appear on the main charger unit of each toner container. After cleaning, make sure you restore the main charger unit to 3 times. The... 6 Gently pull the main charger handle out and push it . Repeat this 2 to its home position, the corresponding color will be reused. BASIC OPERATION GUIDE 4-11 There is not restored to clean the lens on printed copies, the printouts appear dirty, or faint or blurred printouts are produced...

FS-C5020/C5030 Operation Guide (Basic Edition)
Page 54
Lens Cleaner Knob 2 Push the lens cleaner knob back in . Use the same procedure to its home position, the corresponding color will be printed over the whole page. Repeat this 2 times. After cleaning, make sure you restore the lens cleaner knob to clean the lenses on the main charger unit of the green lens cleaner knob. NOTE: If the lens cleaner knob is not restored to its home position. Gently pull the lens cleaner knob out and push it back in completely. Maintenance 1 Grasp the tab of the other toner containers. 4-12 BASIC OPERATION GUIDE
Lens Cleaner Knob 2 Push the lens cleaner knob back in . Use the same procedure to its home position, the corresponding color will be printed over the whole page. Repeat this 2 times. After cleaning, make sure you restore the lens cleaner knob to clean the lenses on the main charger unit of the green lens cleaner knob. NOTE: If the lens cleaner knob is not restored to its home position. Gently pull the lens cleaner knob out and push it back in completely. Maintenance 1 Grasp the tab of the other toner containers. 4-12 BASIC OPERATION GUIDE

FS-C5020/C5030 Operation Guide (Basic Edition)
Page 55
Paper Transfer Unit Release Lever Paper Transfer Unit BASIC OPERATION GUIDE 4-13 Maintenance 3 Once you must use the cleaning cloth included in the toner kit. 1 While pulling the green paper transfer unit release lever, pull out the paper transfer unit. Cleaning the Paper Transfer Unit Print problems such as soiling of the reverse side of printed pages may occur if the paper transfer unit becomes dirty. To clean the paper transfer unit, you are finished cleaning all 4 lenses, close the left cover.
Paper Transfer Unit Release Lever Paper Transfer Unit BASIC OPERATION GUIDE 4-13 Maintenance 3 Once you must use the cleaning cloth included in the toner kit. 1 While pulling the green paper transfer unit release lever, pull out the paper transfer unit. Cleaning the Paper Transfer Unit Print problems such as soiling of the reverse side of printed pages may occur if the paper transfer unit becomes dirty. To clean the paper transfer unit, you are finished cleaning all 4 lenses, close the left cover.

FS-C5020/C5030 Operation Guide (Basic Edition)
Page 56
Paper Ramp Transfer Roller (Black) Registration Roller (Metal) NOTE: Be careful not to touch the black transfer roller during cleaning as this may adversely affect print quality. 3 Push the paper transfer unit back in the toner kit. Maintenance 2 Wipe away the paper dust on the registration roller and the paper ramp using the wiper cloth included in completely. 4-14 BASIC OPERATION GUIDE
Paper Ramp Transfer Roller (Black) Registration Roller (Metal) NOTE: Be careful not to touch the black transfer roller during cleaning as this may adversely affect print quality. 3 Push the paper transfer unit back in the toner kit. Maintenance 2 Wipe away the paper dust on the registration roller and the paper ramp using the wiper cloth included in completely. 4-14 BASIC OPERATION GUIDE
FS-C5020/C5030 Operation Guide (Basic Edition)
Page 59
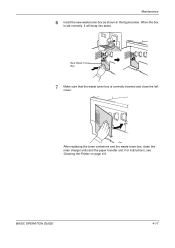
Maintenance 6 Insert the new waste toner box as shown in the figure below. For instructions, see Cleaning the Printer on page 4-8. New Waste Toner Box 7 Make sure that the waste toner box is set correctly, it will snap into place. After replacing the toner containers and the waste toner box, clean the main charger units and the paper transfer unit. BASIC OPERATION GUIDE 4-17 When the box is correctly inserted and close the left cover.
Maintenance 6 Insert the new waste toner box as shown in the figure below. For instructions, see Cleaning the Printer on page 4-8. New Waste Toner Box 7 Make sure that the waste toner box is set correctly, it will snap into place. After replacing the toner containers and the waste toner box, clean the main charger units and the paper transfer unit. BASIC OPERATION GUIDE 4-17 When the box is correctly inserted and close the left cover.

FS-C5020/C5030 Operation Guide (Basic Edition)
Page 63
... the corrective action you can conduct to each of the printer. Open the printer top cover and check that the charger unit is correctly operated. For more information on installing the toner containers, see Cleaning the Main Charger Unit on page 4-3. If the suggested ... call for service. Printed Results Completely blank printout Corrective Action Check the toner containers. Full single-color printout Check the charger unit. Dropouts, horizontal streaks, stray dots Clean the main charger units. Slowly pull the green wire cleaner knob to solve the problems. Some ...
... the corrective action you can conduct to each of the printer. Open the printer top cover and check that the charger unit is correctly operated. For more information on installing the toner containers, see Cleaning the Main Charger Unit on page 4-3. If the suggested ... call for service. Printed Results Completely blank printout Corrective Action Check the toner containers. Full single-color printout Check the charger unit. Dropouts, horizontal streaks, stray dots Clean the main charger units. Slowly pull the green wire cleaner knob to solve the problems. Some ...


