PRESCRIBE Commands Command Reference Manual Rev 4.8
Page 124
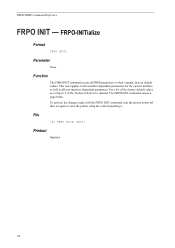
... then on again or reset the printer using the control panel keys. Parameter None Function The FRPO INIT command resets all FRPO parameters to the interface dependent parameters for the current interface as well as all non-interface dependent parameters. PRESCRIBE Command Reference FRPO INIT - This reset applies to their original, factory default values. Printout Omitted...
... then on again or reset the printer using the control panel keys. Parameter None Function The FRPO INIT command resets all FRPO parameters to the interface dependent parameters for the current interface as well as all non-interface dependent parameters. PRESCRIBE Command Reference FRPO INIT - This reset applies to their original, factory default values. Printout Omitted...
PRESCRIBE Commands Technical Reference Manual - Rev. 4.7
Page 107
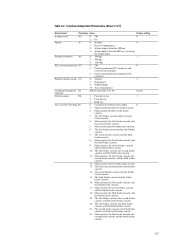
Interface-independent Parameters (Sheet 3 of 7) Environment Parameter Value Factory setting Ecoprint level N6 0: Off 0 2: On Duplex N7 0: Normal 0 1: Reverse output pages. 2: Allows duplex from the MP tray. 3: Allows duplex from 33 to 99 82 (R) Default stacker R0 1: Face-down tray 1 2: Face-up tray 3: Bulk tray Auto cassette switching ... output pages. Printing resolution N8 0: 300 dpi 1 1: 600 dpi 3: 1200 dpi PCL resource protection N9 0: Off 0 1: Protects permanent PCL resources and resets the environment. 2: Protects permanent and temporary PCL resources.
Interface-independent Parameters (Sheet 3 of 7) Environment Parameter Value Factory setting Ecoprint level N6 0: Off 0 2: On Duplex N7 0: Normal 0 1: Reverse output pages. 2: Allows duplex from the MP tray. 3: Allows duplex from 33 to 99 82 (R) Default stacker R0 1: Face-down tray 1 2: Face-up tray 3: Bulk tray Auto cassette switching ... output pages. Printing resolution N8 0: 300 dpi 1 1: 600 dpi 3: 1200 dpi PCL resource protection N9 0: Off 0 1: Protects permanent PCL resources and resets the environment. 2: Protects permanent and temporary PCL resources.
PRESCRIBE Commands Technical Reference Manual - Rev. 4.7
Page 133
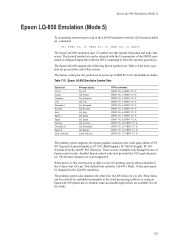
...French), and PC 865 (Norway). When power is first switched on or after a reset, the printing system always defaults in all). The printing system also emulates the other four LQ-850 fonts (five in...6; These fonts can be selected by embedded commands in the word processing software or using an Epson LQ-850 printer driver. Table 7.10. FRPO U7, 0; FRPO U7, 0; FRPO U6, 4; FRPO U6, 5; FRPO...The Epson LQ-850 emulation uses 13 symbol sets that include both plain and italic characters. The factory setting for all five fonts. 7-21 Epson LQ-850 Emulation Symbol Sets Symbol set can be ...
...French), and PC 865 (Norway). When power is first switched on or after a reset, the printing system always defaults in all). The printing system also emulates the other four LQ-850 fonts (five in...6; These fonts can be selected by embedded commands in the word processing software or using an Epson LQ-850 printer driver. Table 7.10. FRPO U7, 0; FRPO U7, 0; FRPO U6, 4; FRPO U6, 5; FRPO...The Epson LQ-850 emulation uses 13 symbol sets that include both plain and italic characters. The factory setting for all five fonts. 7-21 Epson LQ-850 Emulation Symbol Sets Symbol set can be ...
PRESCRIBE Commands Technical Reference Manual - Rev. 4.7
Page 152
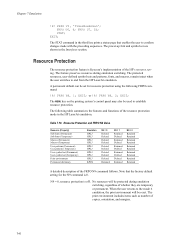
... Table 7.19. FRPO U6, 9; Resource Protection The resource protection feature is Kyocera's implementation of copies, orientation, and margins. 7-40 The feature preserves resources ...protection mode in the third line prints a status page that the factory default setting for resource protection using the following table summarizes the features and... N9 = 0, resource protection is 0. The STAT command in the HP LaserJet emulation. A permanent default can be reset. Chapter 7 Emulation !R! Resource Protection and FRPO N9 Value Resource (Property) Soft fonts (Permanent)...
... Table 7.19. FRPO U6, 9; Resource Protection The resource protection feature is Kyocera's implementation of copies, orientation, and margins. 7-40 The feature preserves resources ...protection mode in the third line prints a status page that the factory default setting for resource protection using the following table summarizes the features and... N9 = 0, resource protection is 0. The STAT command in the HP LaserJet emulation. A permanent default can be reset. Chapter 7 Emulation !R! Resource Protection and FRPO N9 Value Resource (Property) Soft fonts (Permanent)...
PRESCRIBE Commands Technical Reference Manual - Rev. 4.7
Page 156
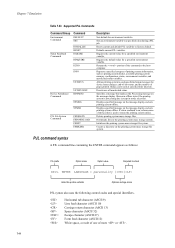
... system memory, configuration, status, environment variables, and unsolicited status variables. Defaults current PJL variables. Displays specified message on the message display. Downloads files to factory default. Requires the current value for a specified environment variable. Shown in offline... printing system mass storage file system. Supported PJL Commands Command Group Environment Commands Command DEFAULT SET Status Readback Commands INITIALIZE RESET INQUIRE DINQUIRE ECHO INFO USTATUS Device Attendance Commands USTATUSOFF RDYMSG OPMSG STMSG PJL File System...
... system memory, configuration, status, environment variables, and unsolicited status variables. Defaults current PJL variables. Displays specified message on the message display. Downloads files to factory default. Requires the current value for a specified environment variable. Shown in offline... printing system mass storage file system. Supported PJL Commands Command Group Environment Commands Command DEFAULT SET Status Readback Commands INITIALIZE RESET INQUIRE DINQUIRE ECHO INFO USTATUS Device Attendance Commands USTATUSOFF RDYMSG OPMSG STMSG PJL File System...
KX Driver Operation Guide Rev. 1.3.1
Page 89
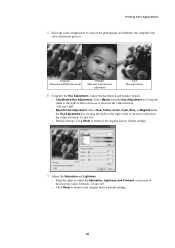
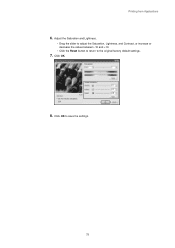
... increase or decrease the values between -10 and +10. • Default settings: Click Reset to return to the original factory default settings. 7 Adjust the Saturation and Lightness. • Drag the slider to the original factory default settings. 85 Or drag the slider to the right or left to ...increase or decrease the value between -10 and +10. • Click Reset to return to adjust the Saturation, Lightness, and Contrast, or increase...
... increase or decrease the values between -10 and +10. • Default settings: Click Reset to return to the original factory default settings. 7 Adjust the Saturation and Lightness. • Drag the slider to the original factory default settings. 85 Or drag the slider to the right or left to ...increase or decrease the value between -10 and +10. • Click Reset to return to adjust the Saturation, Lightness, and Contrast, or increase...

Kyocera Extended Driver 4.0 User Guide Rev-2.1
Page 106
... reset the printer driver to open the Add Profile dialog box. 3 4 Enter a Name for Print on your computer and to save printer driver settings as optional components from the Kyocera Printer Installation Wizard. Note: The Device Settings tab options cannot be saved in each Printing Preferences tab. 1 2 Click Profile. 2 3 Click Add to default settings, select the Factory Default...
... reset the printer driver to open the Add Profile dialog box. 3 4 Enter a Name for Print on your computer and to save printer driver settings as optional components from the Kyocera Printer Installation Wizard. Note: The Device Settings tab options cannot be saved in each Printing Preferences tab. 1 2 Click Profile. 2 3 Click Add to default settings, select the Factory Default...
Kyocera Extended Driver 3.x User Guide Rev-1.4
Page 84
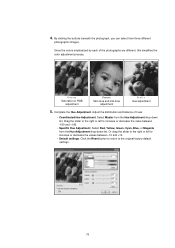
... Master from three different photographic images. Complete the Hue Adjustment. Or drag the slider to the right or left to the original factory default settings. 78 Crayons Saturation or RGB adjustment Portrait Skin tone and mid-tone adjustment Fruits Hue adjustment 5. Drag the slider to the... right or left to increase or decrease the values between -10 and +10. • Default settings: Click the Reset button to return to increase or decrease the value between -180 and +180. • Specific Hue Adjustment: Select Red, Yellow, Green...
... Master from three different photographic images. Complete the Hue Adjustment. Or drag the slider to the right or left to the original factory default settings. 78 Crayons Saturation or RGB adjustment Portrait Skin tone and mid-tone adjustment Fruits Hue adjustment 5. Drag the slider to the... right or left to increase or decrease the values between -10 and +10. • Default settings: Click the Reset button to return to increase or decrease the value between -180 and +180. • Specific Hue Adjustment: Select Red, Yellow, Green...
Kyocera Extended Driver 3.x User Guide Rev-1.4
Page 85
Adjust the Saturation and Lightness. • Drag the slider to adjust the Saturation, Lightness, and Contrast, or increase or decrease the values between -10 and +10. • Click the Reset button to return to save the settings. 79 Click OK. 8. Printing from Applications 6. Click OK to the original factory default settings. 7.
Adjust the Saturation and Lightness. • Drag the slider to adjust the Saturation, Lightness, and Contrast, or increase or decrease the values between -10 and +10. • Click the Reset button to return to save the settings. 79 Click OK. 8. Printing from Applications 6. Click OK to the original factory default settings. 7.
IB-2x Quick Configuration Guide Rev 2.2
Page 14
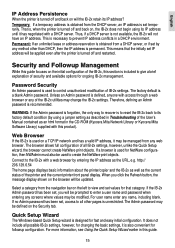
...an Admin password is to reset the IB-2x back to recover is recommended. WARNING: If the Admin password is forgotten, the only way to its factory default condition (by using its ... 15 The factory default is necessary to view and set by entering the IP address as the URL, e.g. http:// 206.129.6.54 The home page displays basic information about the printer/copier and ... For more information, see Using the Quick Setup Wizard earlier in the CD-ROM (Kyocera Mita Network Library or Kyocera Mita Software Library) supplied with access through a web browser or any name, including ...
...an Admin password is to reset the IB-2x back to recover is recommended. WARNING: If the Admin password is forgotten, the only way to its factory default condition (by using its ... 15 The factory default is necessary to view and set by entering the IP address as the URL, e.g. http:// 206.129.6.54 The home page displays basic information about the printer/copier and ... For more information, see Using the Quick Setup Wizard earlier in the CD-ROM (Kyocera Mita Network Library or Kyocera Mita Software Library) supplied with access through a web browser or any name, including ...
IB-2x Quick Configuration Guide Rev 2.2
Page 16
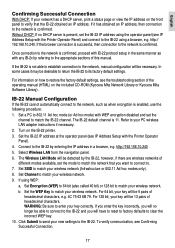
... manual configuration will be able to connect to the IB-22 and you will have to reset to factory defaults to clear the incorrect WEP key. 10. Select Wireless LAN from the navigation panel. ...necessary. Refer to match your wireless network. Turn on the included CD-ROM (Kyocera Mita Network Library or Kyocera Mita Software Library). Set Encryption (WEP) to 64 bit (also called 40...IB-22 cannot automatically connect to the network, such as with the Printer Operator Panel) and connect to restore the factory default settings, see Confirming Successful Connection. 17 Set a PC to the ...
... manual configuration will be able to connect to the IB-22 and you will have to reset to factory defaults to clear the incorrect WEP key. 10. Select Wireless LAN from the navigation panel. ...necessary. Refer to match your wireless network. Turn on the included CD-ROM (Kyocera Mita Network Library or Kyocera Mita Software Library). Set Encryption (WEP) to 64 bit (also called 40...IB-22 cannot automatically connect to the network, such as with the Printer Operator Panel) and connect to restore the factory default settings, see Confirming Successful Connection. 17 Set a PC to the ...


