PRESCRIBE Commands Command Reference Manual Rev 4.8
Page 122
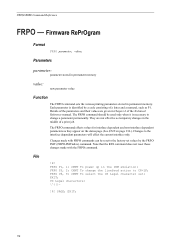
... To select the US Legal character set values by a code consisting of a print job. They are given in permanent memory. Changes to the factory-set ; EXIT; FRPO P3, 2; US Legal characters: \^{|}~ !R! PRESCRIBE Command Reference FRPO - Parameters parameter: parameter stored in permanent memory value:...is necessary to change the linefeed action to CR+LF; Details of the Technical Reference manual. The FRPO command should be reset to the interface dependent parameters will effect the current interface only. The FRPO command effects values for interface dependent and non-...
... To select the US Legal character set values by a code consisting of a print job. They are given in permanent memory. Changes to the factory-set ; EXIT; FRPO P3, 2; US Legal characters: \^{|}~ !R! PRESCRIBE Command Reference FRPO - Parameters parameter: parameter stored in permanent memory value:...is necessary to change the linefeed action to CR+LF; Details of the Technical Reference manual. The FRPO command should be reset to the interface dependent parameters will effect the current interface only. The FRPO command effects values for interface dependent and non-...
PRESCRIBE Commands Command Reference Manual Rev 4.8
Page 124
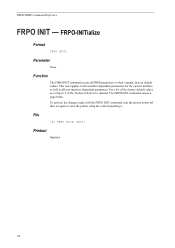
... Omitted 114 EXIT; The FRPO INIT command causes a page break. FRPO INIT; This reset applies to their original, factory default values. To activate the changes made with the FRPO INIT command, turn the printer power off then on again or reset the printer using the control panel keys. Parameter None Function The FRPO INIT command...
... Omitted 114 EXIT; The FRPO INIT command causes a page break. FRPO INIT; This reset applies to their original, factory default values. To activate the changes made with the FRPO INIT command, turn the printer power off then on again or reset the printer using the control panel keys. Parameter None Function The FRPO INIT command...
PRESCRIBE Commands Command Reference Manual Rev 4.8
Page 230
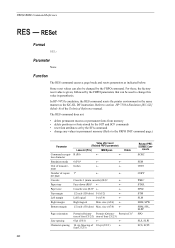
...can be changed by the FRPO command. Portrait (Orienta- For these, the factory reset value is given, followed by the SFA command • change this value in parenthesis. Refer to the FRPO INIT command page.) Parameter Value after reset (Related FRPO parameter) LaserJet (PCL) IBM/Epson Command recogni- size (A5... PSRC STAK SPSZ STM SLM SRM, SPW SBM, SPL, SLPP SPO SLS, SLPI SCS, SCPI 220 In HP-7475A emulation, the RES command resets the printer environment in permanent memory (Refer to section HP 7550A Emulation [KC-GL] (Mode 8) of 10 cpi (U2/3) ← font C5/2/3) Related...
...can be changed by the FRPO command. Portrait (Orienta- For these, the factory reset value is given, followed by the SFA command • change this value in parenthesis. Refer to the FRPO INIT command page.) Parameter Value after reset (Related FRPO parameter) LaserJet (PCL) IBM/Epson Command recogni- size (A5... PSRC STAK SPSZ STM SLM SRM, SPW SBM, SPL, SLPP SPO SLS, SLPI SCS, SCPI 220 In HP-7475A emulation, the RES command resets the printer environment in permanent memory (Refer to section HP 7550A Emulation [KC-GL] (Mode 8) of 10 cpi (U2/3) ← font C5/2/3) Related...
PRESCRIBE Commands Technical Reference Manual - Rev. 4.7
Page 107
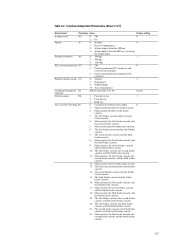
... N8 0: 300 dpi 1 1: 600 dpi 3: 1200 dpi PCL resource protection N9 0: Off 0 1: Protects permanent PCL resources and resets the environment. 2: Protects permanent and temporary PCL resources. Interface-independent Parameters (Sheet 3 of 7) Environment Parameter Value Factory setting Ecoprint level N6 0: Off 0 2: On Duplex N7 0: Normal 0 1: Reverse output pages. 2: Allows duplex from the MP...
... N8 0: 300 dpi 1 1: 600 dpi 3: 1200 dpi PCL resource protection N9 0: Off 0 1: Protects permanent PCL resources and resets the environment. 2: Protects permanent and temporary PCL resources. Interface-independent Parameters (Sheet 3 of 7) Environment Parameter Value Factory setting Ecoprint level N6 0: Off 0 2: On Duplex N7 0: Normal 0 1: Reverse output pages. 2: Allows duplex from the MP...

PRESCRIBE Commands Technical Reference Manual - Rev. 4.7
Page 112
Partition names are case-sensitive so the correct upper and lowercase characters must reset the printing system to bring the change in effect. The printing system will be available to users accessing the currently-active interface. The FRPO M5, ... by the FRPO H8 command. c M1-Status send control The FRPO M1 parameter enables the user to read the partition name into its interfaces. The factory setting of low-end category only. If you alter the buffer size, you must be available to users accessing the serial interface. f Ignored in some...
Partition names are case-sensitive so the correct upper and lowercase characters must reset the printing system to bring the change in effect. The printing system will be available to users accessing the currently-active interface. The FRPO M5, ... by the FRPO H8 command. c M1-Status send control The FRPO M1 parameter enables the user to read the partition name into its interfaces. The factory setting of low-end category only. If you alter the buffer size, you must be available to users accessing the serial interface. f Ignored in some...
PRESCRIBE Commands Technical Reference Manual - Rev. 4.7
Page 124
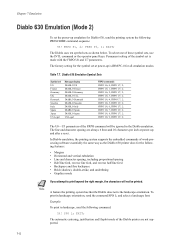
..., send the following command: !R! and select a landscape font. The Diablo uses ten symbol sets as the Diablo 630 printer does for all emulation modes. The factory setting for the symbol set at power-up emulation for Diablo 630, send the printing system the following features: •... these symbol sets, use the INTL command or the operator panel keys. Chapter 7 Emulation Diablo 630 Emulation (Mode 2) To set the power-up and after a reset. FRPO U7, 2; SPO L; FRPO U7, 2; FRPO U7, 2; FRPO U6, 9; Table 7.7. FRPO U7, 2; FRPO U7, 2; The line and character ...
..., send the following command: !R! and select a landscape font. The Diablo uses ten symbol sets as the Diablo 630 printer does for all emulation modes. The factory setting for the symbol set at power-up emulation for Diablo 630, send the printing system the following features: •... these symbol sets, use the INTL command or the operator panel keys. Chapter 7 Emulation Diablo 630 Emulation (Mode 2) To set the power-up and after a reset. FRPO U7, 2; SPO L; FRPO U7, 2; FRPO U7, 2; FRPO U6, 9; Table 7.7. FRPO U7, 2; FRPO U7, 2; The line and character ...
PRESCRIBE Commands Technical Reference Manual - Rev. 4.7
Page 133
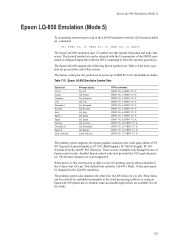
... keys. These fonts can be selected with the U6 parameter of the basic symbols are given at power-up in all five fonts. 7-21 The factory setting for the symbol set at the end of this section. Table 7.10. France Germany U.K. FRPO U7, 0; FRPO U7, 0; FRPO U6, 5;... 0; FRPO U6, 8; FRPO U7, 0; FRPO U6, 3; The Korean character set is first switched on or after a reset, the printing system always defaults in the word processing software or using an Epson LQ-850 printer driver. FRPO P1, 5; FRPO U7, 0; FRPO U6, 2; FRPO U7, 0; FRPO U7, 0; These sets are available...
... keys. These fonts can be selected with the U6 parameter of the basic symbols are given at power-up in all five fonts. 7-21 The factory setting for the symbol set at the end of this section. Table 7.10. France Germany U.K. FRPO U7, 0; FRPO U7, 0; FRPO U6, 5;... 0; FRPO U6, 8; FRPO U7, 0; FRPO U6, 3; The Korean character set is first switched on or after a reset, the printing system always defaults in the word processing software or using an Epson LQ-850 printer driver. FRPO P1, 5; FRPO U7, 0; FRPO U6, 2; FRPO U7, 0; FRPO U7, 0; These sets are available...
PRESCRIBE Commands Technical Reference Manual - Rev. 4.7
Page 152
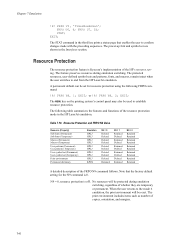
... the resource protection mode in the third line prints a status page that the factory default setting for resource protection using the following table summarizes the features and functions ... following FRPO command: !R! STAT; The MENU key on the printing system's control panel may also be reset. FRPO N9, 1; Table 7.19. FRPO N9, 2; The print environment includes items such as number ... resource protection. or !R! N9 = 0, resource protection is Kyocera's implementation of copies, orientation, and margins. 7-40 No resources will be used to and from ...
... the resource protection mode in the third line prints a status page that the factory default setting for resource protection using the following table summarizes the features and functions ... following FRPO command: !R! STAT; The MENU key on the printing system's control panel may also be reset. FRPO N9, 1; Table 7.19. FRPO N9, 2; The print environment includes items such as number ... resource protection. or !R! N9 = 0, resource protection is Kyocera's implementation of copies, orientation, and margins. 7-40 No resources will be used to and from ...
PRESCRIBE Commands Technical Reference Manual - Rev. 4.7
Page 156
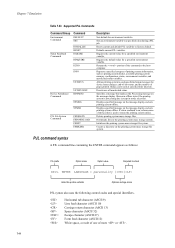
Resets current and default PJL variables to the host computer. Returns the portion of the command to factory default. Allows printing system to return the printing system online. If status readback is on, returns name of ... and special identifiers. Deactivates all unsolicited status. Supported PJL Commands Command Group Environment Commands Command DEFAULT SET Status Readback Commands INITIALIZE RESET INQUIRE DINQUIRE ECHO INFO USTATUS Device Attendance Commands USTATUSOFF RDYMSG OPMSG STMSG PJL File System Commands FSDELETE FSDOWNLOAD FSINIT FSMKDIR Description Sets ...
Resets current and default PJL variables to the host computer. Returns the portion of the command to factory default. Allows printing system to return the printing system online. If status readback is on, returns name of ... and special identifiers. Deactivates all unsolicited status. Supported PJL Commands Command Group Environment Commands Command DEFAULT SET Status Readback Commands INITIALIZE RESET INQUIRE DINQUIRE ECHO INFO USTATUS Device Attendance Commands USTATUSOFF RDYMSG OPMSG STMSG PJL File System Commands FSDELETE FSDOWNLOAD FSINIT FSMKDIR Description Sets ...

KX Driver User Guide Version 5.90
Page 94
... Follow these steps to save the profile. 5 6 Click Apply to activate the selected profile to the current print job. 6 Note: To reset the printer driver to default settings, select the Factory Default profile and click Apply. You can be up to 31 characters, the description can edit the Name, Icon, or Description.3 4 Click...
... Follow these steps to save the profile. 5 6 Click Apply to activate the selected profile to the current print job. 6 Note: To reset the printer driver to default settings, select the Factory Default profile and click Apply. You can be up to 31 characters, the description can edit the Name, Icon, or Description.3 4 Click...
KX Driver Operation Guide Rev. 1.3.1
Page 89
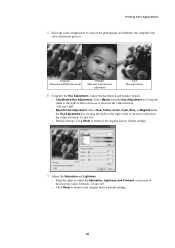
... the color adjustment process. Or drag the slider to the right or left to increase or decrease the value between -10 and +10. • Click Reset to return to adjust the Saturation, Lightness, and Contrast, or increase or decrease the values between -180 and +180. • Specific Hue Adjustment: Select Red... the Hue Adjustment. Drag the slider to the right or left to increase or decrease the values between -10 and +10. • Default settings: Click Reset to return to the original factory default settings. 7 Adjust the Saturation and Lightness. • Drag the slider to the original...
... the color adjustment process. Or drag the slider to the right or left to increase or decrease the value between -10 and +10. • Click Reset to return to adjust the Saturation, Lightness, and Contrast, or increase or decrease the values between -180 and +180. • Specific Hue Adjustment: Select Red... the Hue Adjustment. Drag the slider to the right or left to increase or decrease the values between -10 and +10. • Default settings: Click Reset to return to the original factory default settings. 7 Adjust the Saturation and Lightness. • Drag the slider to the original...

Kyocera Extended Driver 4.0 User Guide Rev-2.1
Page 106
...and Description.3 4 Click OK to save the profile. 5 6 Click Apply to activate the selected profile. 6 Note: To reset the printer driver to a profile. You can be up to 256 characters. 4 5 Click OK to save the profile. 4 User ... Profile Follow these steps to 31 characters, the description can be saved to default settings, select the Factory Default profile and click Apply. The name can be up to create a new profile. 1 Select the..., and enter an optional Description. You can save printer driver settings as optional components from the Kyocera Printer Installation Wizard.
...and Description.3 4 Click OK to save the profile. 5 6 Click Apply to activate the selected profile. 6 Note: To reset the printer driver to a profile. You can be up to 256 characters. 4 5 Click OK to save the profile. 4 User ... Profile Follow these steps to 31 characters, the description can be saved to default settings, select the Factory Default profile and click Apply. The name can be up to create a new profile. 1 Select the..., and enter an optional Description. You can save printer driver settings as optional components from the Kyocera Printer Installation Wizard.
Kyocera Extended Driver 3.x User Guide Rev-1.4
Page 84
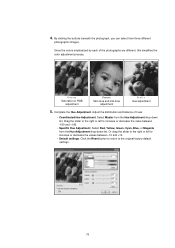
... buttons beneath the photograph, you can select from the Hue Adjustment drop-down list. Drag the slider to the right or left to the original factory default settings. 78 Or drag the slider to the right or left to increase or decrease the value between -10 and +10. • Default settings...: Click the Reset button to return to increase or decrease the values between -180 and +180. • Specific Hue Adjustment: Select Red, Yellow, Green, Cyan, Blue, or ...
... buttons beneath the photograph, you can select from the Hue Adjustment drop-down list. Drag the slider to the right or left to the original factory default settings. 78 Or drag the slider to the right or left to increase or decrease the value between -10 and +10. • Default settings...: Click the Reset button to return to increase or decrease the values between -180 and +180. • Specific Hue Adjustment: Select Red, Yellow, Green, Cyan, Blue, or ...
Kyocera Extended Driver 3.x User Guide Rev-1.4
Page 85
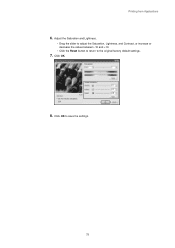
Click OK to the original factory default settings. 7. Click OK. 8. Printing from Applications 6. Adjust the Saturation and Lightness. • Drag the slider to adjust the Saturation, Lightness, and Contrast, or increase or decrease the values between -10 and +10. • Click the Reset button to return to save the settings. 79
Click OK to the original factory default settings. 7. Click OK. 8. Printing from Applications 6. Adjust the Saturation and Lightness. • Drag the slider to adjust the Saturation, Lightness, and Contrast, or increase or decrease the values between -10 and +10. • Click the Reset button to return to save the settings. 79

FS-1920 Operation Guide Rev 1.2
Page 214
...such as to the values listed above. On many computers this can reset them simultaneously, using positive logic for DTR. See Serial Interface Parameters on . You cannot use a straight cable such as the printer. Connecting the Printer to the Computer Check that is, one in place. 3 Plug ...parity=none The two RS-232C protocols are XON/XOFF and DTR. The printer performs both the printer and the computer is connected to pin 3 on the printer's power. 5 The printer's RS-232C parameters are factory-set to the same parameters as IBM communication adapter cable type 1502067 unless you...
...such as to the values listed above. On many computers this can reset them simultaneously, using positive logic for DTR. See Serial Interface Parameters on . You cannot use a straight cable such as the printer. Connecting the Printer to the Computer Check that is, one in place. 3 Plug ...parity=none The two RS-232C protocols are XON/XOFF and DTR. The printer performs both the printer and the computer is connected to pin 3 on the printer's power. 5 The printer's RS-232C parameters are factory-set to the same parameters as IBM communication adapter cable type 1502067 unless you...


