Operation Guide
Page 7
...Density...1-95 Total Printed Pages...1-96 Toner Counter Resetting ...1-96 Message Language...1-97 Automatic Form Feed Timeout...1-99 Sleep Timer Setting ...1-100 Printer Resetting ...1-102 Resource Protection ...1-103 Alarm (Buzzer) Setting...1-104 Auto Continue Setting ...1-105 Chapter 2 Paper Selection 2-1 General Guidelines ... Replacement ...3-2 Toner Container Replacement Interval 3-2 Replenishing Toner ...3-3 Waste Toner Box Replacement ...3-6 Replacing the Waste Toner Box...3-6 Cleaning ...3-9 Cleaning the Charger Wire ...3-9 Cleaning the Charger Grid...3-10 Paper Transfer Unit...3-12 vi
...Density...1-95 Total Printed Pages...1-96 Toner Counter Resetting ...1-96 Message Language...1-97 Automatic Form Feed Timeout...1-99 Sleep Timer Setting ...1-100 Printer Resetting ...1-102 Resource Protection ...1-103 Alarm (Buzzer) Setting...1-104 Auto Continue Setting ...1-105 Chapter 2 Paper Selection 2-1 General Guidelines ... Replacement ...3-2 Toner Container Replacement Interval 3-2 Replenishing Toner ...3-3 Waste Toner Box Replacement ...3-6 Replacing the Waste Toner Box...3-6 Cleaning ...3-9 Cleaning the Charger Wire ...3-9 Cleaning the Charger Grid...3-10 Paper Transfer Unit...3-12 vi
Operation Guide
Page 123
... lead to illegible printing, misfeeding, and paper jams, and can cause such paper to turn out clean, crisp printed copies consistently. General Guidelines Selecting the Right Paper Laser printing is not the same. Use of the Paper Avoid using paper with lint, clay, or ... with a surface coating or other fibers. 2-3 Bond paper should have as smooth and even a surface as the paper passes through the printer it undergoes considerable sliding, bending, and twisting motions. Remember that has been coated or surface-treated and contains plastic or carbon. A highquality...
... lead to illegible printing, misfeeding, and paper jams, and can cause such paper to turn out clean, crisp printed copies consistently. General Guidelines Selecting the Right Paper Laser printing is not the same. Use of the Paper Avoid using paper with lint, clay, or ... with a surface coating or other fibers. 2-3 Bond paper should have as smooth and even a surface as the paper passes through the printer it undergoes considerable sliding, bending, and twisting motions. Remember that has been coated or surface-treated and contains plastic or carbon. A highquality...

Operation Guide
Page 132
This chapter explains the following topics: • Toner Container Replacement • Waste Toner Box Replacement • Cleaning 3-1 Chapter 3 Maintenance 3 This chapter explains how to replace the toner container and how to clean parts such as the registration roller and charger wire.
This chapter explains the following topics: • Toner Container Replacement • Waste Toner Box Replacement • Cleaning 3-1 Chapter 3 Maintenance 3 This chapter explains how to replace the toner container and how to clean parts such as the registration roller and charger wire.
Operation Guide
Page 133
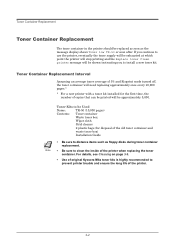
... need replacing approximately once every 10,000 pages.* * For a new printer with a toner kit installed for disposal of the printer when replacing the toner container. For details, see Cleaning on page 3-9. • Use of original Kyocera Mita toner kits is highly recommended to clean the inside of the old toner container and waste toner box...
... need replacing approximately once every 10,000 pages.* * For a new printer with a toner kit installed for disposal of the printer when replacing the toner container. For details, see Cleaning on page 3-9. • Use of original Kyocera Mita toner kits is highly recommended to clean the inside of the old toner container and waste toner box...
Operation Guide
Page 136
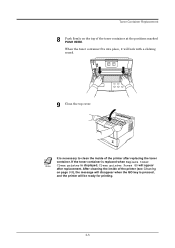
... will appear after replacing the toner container. If the toner container is replaced when Replace toner Note Clean printer is necessary to clean the inside of the printer (see Cleaning on the top of the printer after replacement. After cleaning the inside of the toner container at the positions marked PUSH HERE. Toner Container Replacement 8 Push firmly...
... will appear after replacing the toner container. If the toner container is replaced when Replace toner Note Clean printer is necessary to clean the inside of the printer (see Cleaning on the top of the printer after replacement. After cleaning the inside of the toner container at the positions marked PUSH HERE. Toner Container Replacement 8 Push firmly...

Operation Guide
Page 139
New Waste Toner Box 7 Ensure that it fits into place. The printer parts must be locked when it is replaced, reset the toner counter (see Toner Counter Resetting on page 3-9. 8 When the toner container is correctly inserted and close the left cover. See Cleaning on page 1-96). 3-8 Waste Toner Box Replacement 6 Insert the new waste toner box as shown in the figure below. The box will be cleaned when replacing the toner container.
New Waste Toner Box 7 Ensure that it fits into place. The printer parts must be locked when it is replaced, reset the toner counter (see Toner Counter Resetting on page 3-9. 8 When the toner container is correctly inserted and close the left cover. See Cleaning on page 1-96). 3-8 Waste Toner Box Replacement 6 Insert the new waste toner box as shown in the figure below. The box will be cleaned when replacing the toner container.
Operation Guide
Page 140
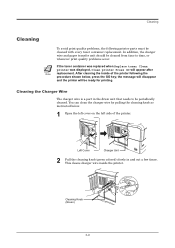
... Note replacement. If the toner container was replaced when Replace toner Clean printer was displayed, Clean printer Press GO will be cleaned with every toner container replacement. You can clean the charger wire by pulling the cleaning knob as instructed below , press the GO key; Cleaning Knob (Green) 3-9 Cleaning the Charger Wire The charger wire is a part in and...
... Note replacement. If the toner container was replaced when Replace toner Clean printer was displayed, Clean printer Press GO will be cleaned with every toner container replacement. You can clean the charger wire by pulling the cleaning knob as instructed below , press the GO key; Cleaning Knob (Green) 3-9 Cleaning the Charger Wire The charger wire is a part in and...

Operation Guide
Page 141
... grid cleaner pad is a part located at the top, as instructed below. 1 Take the grid cleaner from protective bag in the figure. 3-10 Grid Cleaner Cleaning Cleaning the Charger Grid The charger grid is supplied with the pad at the bottom of the charger unit, which also needs to the... printer and pull out the charger unit as shown in the new toner kit, and remove the cap. Note 2 Attach the grid cleaner to the printer with water soaked. You should use a grid cleaner attaching it to be cleaned. Perform the following procedure before the pad...
... grid cleaner pad is a part located at the top, as instructed below. 1 Take the grid cleaner from protective bag in the figure. 3-10 Grid Cleaner Cleaning Cleaning the Charger Grid The charger grid is supplied with the pad at the bottom of the charger unit, which also needs to the... printer and pull out the charger unit as shown in the new toner kit, and remove the cap. Note 2 Attach the grid cleaner to the printer with water soaked. You should use a grid cleaner attaching it to be cleaned. Perform the following procedure before the pad...

Operation Guide
Page 142
The grid cleaner is easier to pull out the charger unit for the first time if it . Cleaning 3 Slowly pull out and then push back in the figure. This cleans grid part underneath the charger unit. (1) (3) (2) Charger Unit 4 Remove the grid cleaner from the printer and dispose of it is raised slightly, as shown in the charger unit at least 5 times. It is not re-usable. 3-11
The grid cleaner is easier to pull out the charger unit for the first time if it . Cleaning 3 Slowly pull out and then push back in the figure. This cleans grid part underneath the charger unit. (1) (3) (2) Charger Unit 4 Remove the grid cleaner from the printer and dispose of it is raised slightly, as shown in the charger unit at least 5 times. It is not re-usable. 3-11

Operation Guide
Page 143
Paper Transfer Unit Release Lever (green colored) Paper Transfer Unit 3-12 Cleaning 5 After cleaning the charger wire and grid, push the charger unit all the way in the following manner. 1 While pulling the paper transfer unit release lever (green colored), pull out the paper transfer unit. Paper Transfer Unit To avoid print quality problems due to paper dust and debris, clean the paper transfer unit in and close the left cover.
Paper Transfer Unit Release Lever (green colored) Paper Transfer Unit 3-12 Cleaning 5 After cleaning the charger wire and grid, push the charger unit all the way in the following manner. 1 While pulling the paper transfer unit release lever (green colored), pull out the paper transfer unit. Paper Transfer Unit To avoid print quality problems due to paper dust and debris, clean the paper transfer unit in and close the left cover.

Operation Guide
Page 144
Wiper Cloth Paper Ramp Registration Roller [Metal] Paper Transfer Unit Be careful not to touch the transfer roller (the black roller) during cleaning as this may adversely affect print quality. Transfer Roller [Black] See Note below. Note 3-13 Cleaning 2 Wipe away the paper dust on the registration roller and the paper ramp using the wiper cloth included in the toner kit.
Wiper Cloth Paper Ramp Registration Roller [Metal] Paper Transfer Unit Be careful not to touch the transfer roller (the black roller) during cleaning as this may adversely affect print quality. Transfer Roller [Black] See Note below. Note 3-13 Cleaning 2 Wipe away the paper dust on the registration roller and the paper ramp using the wiper cloth included in the toner kit.
Operation Guide
Page 147
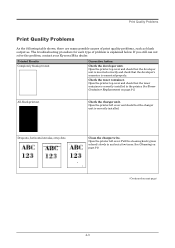
...solve the problem, contact your Kyocera Mita dealer. Open the printer top cover and check that the toner container is connected properly. Open the printer left cover. Dropouts, horizontal streaks, stray dots Clean the charger wire. Check the toner container. Open the printer top cover and check that ...Quality Problems As the following table shows, there are many possible causes of problem is correctly installed. Pull the cleaning knob (green colored) slowly in the printer. See Cleaning on page 3-9. (Continued on page 3-2. All-black printout Check the charger unit.
...solve the problem, contact your Kyocera Mita dealer. Open the printer top cover and check that the toner container is connected properly. Open the printer left cover. Dropouts, horizontal streaks, stray dots Clean the charger wire. Check the toner container. Open the printer top cover and check that ...Quality Problems As the following table shows, there are many possible causes of problem is correctly installed. Pull the cleaning knob (green colored) slowly in the printer. See Cleaning on page 3-9. (Continued on page 3-2. All-black printout Check the charger unit.
Operation Guide
Page 148
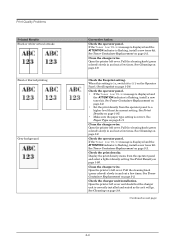
...Replacement on page 1-95. Print Quality Problems Printed Results Black or white vertical streaks Faint or blurred printing Grey background. Clean the charger wire. Open the printer left cover. Display the print density menu from the operator panel to Off on the Operator Panel. (See Ecoprint ...page 3-2. • Set the print density from the operator panel and select a lighter density setting. See Cleaning on page 3-9. (Continued on page 3-2. Check the Ecoprint setting. Open the printer's left cover and check that the charger unit is flashing, install a new toner kit. Pull the...
...Replacement on page 1-95. Print Quality Problems Printed Results Black or white vertical streaks Faint or blurred printing Grey background. Clean the charger wire. Open the printer left cover. Display the print density menu from the operator panel to Off on the Operator Panel. (See Ecoprint ...page 3-2. • Set the print density from the operator panel and select a lighter density setting. See Cleaning on page 3-9. (Continued on page 3-2. Check the Ecoprint setting. Open the printer's left cover and check that the charger unit is flashing, install a new toner kit. Pull the...

Operation Guide
Page 149
... or command syntax. 4-5 Check the file or program. If the problem occurs only with toner, try printing several pages. Printed Results Dirt on page 3-9. See Cleaning on the top edge or back of the paper Characters out of position. If the transfer roller is dirty with a specific file or program, the... most likely cause is being caused by a PRESCRIBE command error. Pull out the paper transfer unit and check for toner on the paper ramp. Clean the paper ramp using a soft, dry, lintfree cloth. Print Quality Problems Corrective Action Check the paper chute and the ramp.
... or command syntax. 4-5 Check the file or program. If the problem occurs only with toner, try printing several pages. Printed Results Dirt on page 3-9. See Cleaning on the top edge or back of the paper Characters out of position. If the transfer roller is dirty with a specific file or program, the... most likely cause is being caused by a PRESCRIBE command error. Pull out the paper transfer unit and check for toner on the paper ramp. Clean the paper ramp using a soft, dry, lintfree cloth. Print Quality Problems Corrective Action Check the paper chute and the ramp.

Operation Guide
Page 151
... turns on and the READY indicator goes off the printer, disconnect the power cord, and contact your Kyocera Mita dealer. Call service ####:0123456 The ATTENTION indicator turns on next page) 4-7 Clean printer Press GO Please clean the inside of the printer, press the GO key and the printer will be propery inserted into the face-down output...
... turns on and the READY indicator goes off the printer, disconnect the power cord, and contact your Kyocera Mita dealer. Call service ####:0123456 The ATTENTION indicator turns on next page) 4-7 Clean printer Press GO Please clean the inside of the printer, press the GO key and the printer will be propery inserted into the face-down output...
Operation Guide
Page 152
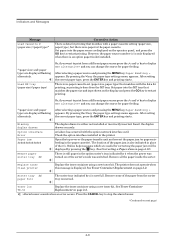
... paper in the paper cassette). and you want to print from the MP tray. The location of the paper jam is still paper in the printer. appears. After setting alternately. the correct paper type, press the ENTER key and printing starts. ;Ò Missing duplex drawer The duplex drawer is... data for paper feeding. *(paper size) and (paper type) are displayed flashing appears. Remove all the paper inside the sorter. ;Ò Replace toner Clean printer Replace the toner container using a new toner kit. The printer does not operate when this message is now full.
... paper in the paper cassette). and you want to print from the MP tray. The location of the paper jam is still paper in the printer. appears. After setting alternately. the correct paper type, press the ENTER key and printing starts. ;Ò Missing duplex drawer The duplex drawer is... data for paper feeding. *(paper size) and (paper type) are displayed flashing appears. Remove all the paper inside the sorter. ;Ò Replace toner Clean printer Replace the toner container using a new toner kit. The printer does not operate when this message is now full.

Operation Guide
Page 155
... (The page may break in place of the data. Clean up files. 05: Specified file not on CompactFlash card. ;Ò06: No memory for use by CompactFlash card. Expand printer memory. Print overrun Press GO The data transferred to the printer was too complex to print on page 1-91. Note:... mode is set to ensure correct reading of time. Clean up files. 05: Specified file not on disk. ;Ò06: No memory for use of time. Expand printer memory. Note: We recommend that you follow the reading procedure from the printer's operator panel. Try adding more option feeders are installed...
... (The page may break in place of the data. Clean up files. 05: Specified file not on CompactFlash card. ;Ò06: No memory for use by CompactFlash card. Expand printer memory. Print overrun Press GO The data transferred to the printer was too complex to print on page 1-91. Note:... mode is set to ensure correct reading of time. Clean up files. 05: Specified file not on disk. ;Ò06: No memory for use of time. Expand printer memory. Note: We recommend that you follow the reading procedure from the printer's operator panel. Try adding more option feeders are installed...
Operation Guide
Page 215
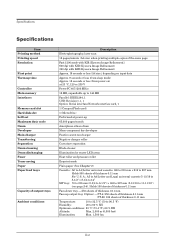
... Self test Maximum duty cycle Drum Developer Main charger Transferring Separation Drum cleaning Drum discharging Fuser Toner saving Paper Paper feed trays Capacity of output trays Ambient conditions Description Electrophotography, laser scan 18 pages/minute (A4 size) when printing multiple copies of... the same page Fast 1200 mode with KIR [Kyocera Image Refinement] 600 dpi with KIR (Kyocera Image Refinement) 300 dpi with KIR (Kyocera Image Refinement) Approx. 19 ...
... Self test Maximum duty cycle Drum Developer Main charger Transferring Separation Drum cleaning Drum discharging Fuser Toner saving Paper Paper feed trays Capacity of output trays Ambient conditions Description Electrophotography, laser scan 18 pages/minute (A4 size) when printing multiple copies of... the same page Fast 1200 mode with KIR [Kyocera Image Refinement] 600 dpi with KIR (Kyocera Image Refinement) 300 dpi with KIR (Kyocera Image Refinement) Approx. 19 ...
Operation Guide
Page 221
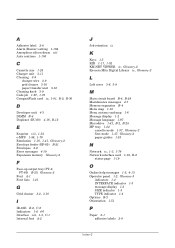
... (Buzzer) setting 1-104 Amorphous silicon drum viii Auto continue 1-105 C Cassette size 1-24 Charger unit 3-11 Cleaning 3-9 charger wire 3-9 grid cleaner 3-10 paper transfer unit 3-12 Cleaning knob 3-9 Code job 1-67, 1-72 CompactFlash card ix, 1-81, B-2, B-30 D Developer unit 4-3 DIMM... C-6 Indicators 1-4, 4-6 Interface viii, 1-3, C-1 Internal font A-2 J Job retention ix K Keys 1-5 KIR 1-17, 1-52 KM-NET VIEWER ix, Glossary-2 Kyocera Mita Digital Library ix, Glossary-2 L Left cover 3-6, 3-9 M Main circuit board B-4, B-28 Maintenance messages 4-7 Memory expansion B-4 Menu map 1-12 Menu system ...
... (Buzzer) setting 1-104 Amorphous silicon drum viii Auto continue 1-105 C Cassette size 1-24 Charger unit 3-11 Cleaning 3-9 charger wire 3-9 grid cleaner 3-10 paper transfer unit 3-12 Cleaning knob 3-9 Code job 1-67, 1-72 CompactFlash card ix, 1-81, B-2, B-30 D Developer unit 4-3 DIMM... C-6 Indicators 1-4, 4-6 Interface viii, 1-3, C-1 Internal font A-2 J Job retention ix K Keys 1-5 KIR 1-17, 1-52 KM-NET VIEWER ix, Glossary-2 Kyocera Mita Digital Library ix, Glossary-2 L Left cover 3-6, 3-9 M Main circuit board B-4, B-28 Maintenance messages 4-7 Memory expansion B-4 Menu map 1-12 Menu system ...


