FS-1028MFP/1128MFP Operation Guide Rev-3
Page 22
...or expand this warranty, the Customer must immediately notify the Authorized Kyocera Dealer from date of three years or 100,000 copies/prints, whichever first occurs. xx OPERATION GUIDE Maintenance Kits consist of Kyocera. Warranty (USA) FS-1028MFP/FS-1128MFP MULTIFUNCTIONAL PRODUCT LIMITED WARRANTY Kyocera Mita America, Inc. Replacement Maintenance Kits have had the serial.... This warranty gives the Customer specific legal rights. In order to obtain performance of this warranty on behalf of the developing unit, the drum unit, the transfer belt, and the fixing unit.
...or expand this warranty, the Customer must immediately notify the Authorized Kyocera Dealer from date of three years or 100,000 copies/prints, whichever first occurs. xx OPERATION GUIDE Maintenance Kits consist of Kyocera. Warranty (USA) FS-1028MFP/FS-1128MFP MULTIFUNCTIONAL PRODUCT LIMITED WARRANTY Kyocera Mita America, Inc. Replacement Maintenance Kits have had the serial.... This warranty gives the Customer specific legal rights. In order to obtain performance of this warranty on behalf of the developing unit, the drum unit, the transfer belt, and the fixing unit.
FS-1028MFP/1128MFP Operation Guide Rev-3
Page 345
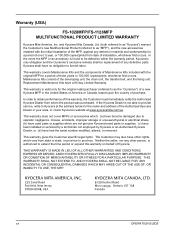
...the toner container out of the machine. 3 Remove the drum unit from the metal registration roller. NOTE: The drum unit is sensitive to touch the transfer roller (black) during cleaning. Never expose the drum unit to light for more than five minutes. 4 Place the drum unit flat on end. 9 5 Use a clean,... lint free cloth to clean dust and dirt away from the machine by holding the green levers with both hands. IMPORTANT: Do not place the drum unit on a clean...
...the toner container out of the machine. 3 Remove the drum unit from the metal registration roller. NOTE: The drum unit is sensitive to touch the transfer roller (black) during cleaning. Never expose the drum unit to light for more than five minutes. 4 Place the drum unit flat on end. 9 5 Use a clean,... lint free cloth to clean dust and dirt away from the machine by holding the green levers with both hands. IMPORTANT: Do not place the drum unit on a clean...
FS-1028MFP/1128MFP Operation Guide Rev-3
Page 346
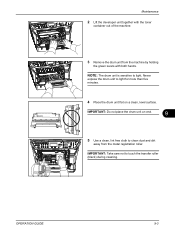
...for the first time. After cleaning, make sure you restore the main charger cleaner to its home position. 7 When cleaning is complete, return the drum unit to the original position. 8 Return the developer unit to its position, aligning the guides at both ends with the slots in the machine. ...Then, close the front cover. 9-4 OPERATION GUIDE Maintenance 6 On the drum unit, slide the main charger cleaner (green) back and forth 2 or 3 times to clean the charger wire, then return it to its original position ...
...for the first time. After cleaning, make sure you restore the main charger cleaner to its home position. 7 When cleaning is complete, return the drum unit to the original position. 8 Return the developer unit to its position, aligning the guides at both ends with the slots in the machine. ...Then, close the front cover. 9-4 OPERATION GUIDE Maintenance 6 On the drum unit, slide the main charger cleaner (green) back and forth 2 or 3 times to clean the charger wire, then return it to its original position ...
FS-1028MFP/1128MFP Operation Guide Rev-3
Page 349
... machine. Maintenance Prolonged Non-Use and Moving of the Machine Prolonged Non-use If you ship the machine, remove and pack the developer unit and drum unit in a plastic bag and ship them separately from the wall outlet. WARNING: If you ever leave the machine unused for a long period of time...
... machine. Maintenance Prolonged Non-Use and Moving of the Machine Prolonged Non-use If you ship the machine, remove and pack the developer unit and drum unit in a plastic bag and ship them separately from the wall outlet. WARNING: If you ever leave the machine unused for a long period of time...
FS-1028MFP/1128MFP Operation Guide Rev-3
Page 354
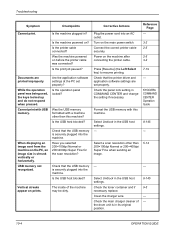
... change the setting if necessary. Check the toner container and if necessary replace. The inside of the drum unit is securely plugged into the machine. Check the panel lock setting in the USB host settings. - KYOCERA COMMAND CENTER Operation Guide 8-145 - 5-14 - 8-145 9-5 - - 10-4 OPERATION GUIDE While the operation panel was connected...
... change the setting if necessary. Check the toner container and if necessary replace. The inside of the drum unit is securely plugged into the machine. Check the panel lock setting in the USB host settings. - KYOCERA COMMAND CENTER Operation Guide 8-145 - 5-14 - 8-145 9-5 - - 10-4 OPERATION GUIDE While the operation panel was connected...

FS-1028MFP/1128MFP Operation Guide Rev-3
Page 364
Remove any partially fed paper. 2 Open the front cover, and lift the developer unit together with the toner container out of the machine. NOTE: The drum is hot. Troubleshooting Inside the Machine 1 Pull the paper cassette all the way out of the machine. 3 Remove the drum unit from the machine by holding the green levers with both hands. Do not touch it, as it may result in burn injury. Never expose the drum unit to light. CAUTION: The fuser unit inside the machine is sensitive to light for more than five minutes. 10-14 OPERATION GUIDE
Remove any partially fed paper. 2 Open the front cover, and lift the developer unit together with the toner container out of the machine. NOTE: The drum is hot. Troubleshooting Inside the Machine 1 Pull the paper cassette all the way out of the machine. 3 Remove the drum unit from the machine by holding the green levers with both hands. Do not touch it, as it may result in burn injury. Never expose the drum unit to light. CAUTION: The fuser unit inside the machine is sensitive to light for more than five minutes. 10-14 OPERATION GUIDE
FS-1028MFP/1128MFP Operation Guide Rev-3
Page 365
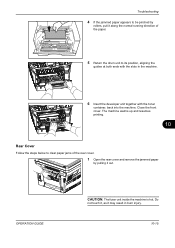
... rear cover. 1 Open the rear cover and remove the jammed paper by rollers, pull it along the normal running direction of the paper. 5 Return the drum unit to be pinched by pulling it out. OPERATION GUIDE CAUTION: The fuser unit inside the machine is hot. Troubleshooting 4 If the jammed paper appears...
... rear cover. 1 Open the rear cover and remove the jammed paper by rollers, pull it along the normal running direction of the paper. 5 Return the drum unit to be pinched by pulling it out. OPERATION GUIDE CAUTION: The fuser unit inside the machine is hot. Troubleshooting 4 If the jammed paper appears...

FS-1028MFP/1128MFP Operation Guide Rev-3
Page 420
Do not use paper such as it may damage the drum. Choosing the Appropriate Paper This section describes guidelines for the optional cassettes. however, avoid coated paper or paper with a smooth and even surface; These paper ... of these conditions will not only deliver poor copies but may also cause jams and shorten the useful life of printing and may damage the drum or fusing unit. Ingredient Do not use paper that has a rough surface or paper fiber lint, or that contains plastic or carbon. Corner angles must...
Do not use paper such as it may damage the drum. Choosing the Appropriate Paper This section describes guidelines for the optional cassettes. however, avoid coated paper or paper with a smooth and even surface; These paper ... of these conditions will not only deliver poor copies but may also cause jams and shorten the useful life of printing and may damage the drum or fusing unit. Ingredient Do not use paper that has a rough surface or paper fiber lint, or that contains plastic or carbon. Corner angles must...
FS-1028MFP/1128MFP Operation Guide Rev-3
Page 424
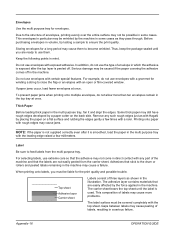
... from the multi purpose tray. Top sheet Adhesive layer Carrier sheet Labels consist of envelope in the illustration. Storing envelopes for winding a string to the drum or rollers and peeled labels remaining in a serious failure. To prevent paper jams when printing onto multiple envelopes, do not use them to feed labels...
... from the multi purpose tray. Top sheet Adhesive layer Carrier sheet Labels consist of envelope in the illustration. Storing envelopes for winding a string to the drum or rollers and peeled labels remaining in a serious failure. To prevent paper jams when printing onto multiple envelopes, do not use them to feed labels...
FS-1028MFP/1128MFP Operation Guide Rev-3
Page 426
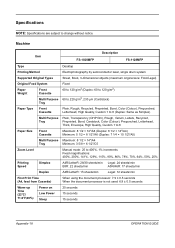
Machine Item FS-1028MFP Description FS-1128MFP Type Printing Method Supported Original Types Desktop Electrophotography by semiconductor laser, single drum system Sheet, Book, 3-dimensional objects (maximum original size: Folio/Legal) Original Feed System Paper Weight Front Cassette Multi Purpose Tray Paper Type Front Cassette Multi ...
Machine Item FS-1028MFP Description FS-1128MFP Type Printing Method Supported Original Types Desktop Electrophotography by semiconductor laser, single drum system Sheet, Book, 3-dimensional objects (maximum original size: Folio/Legal) Original Feed System Paper Weight Front Cassette Multi Purpose Tray Paper Type Front Cassette Multi ...

FS-1028MFP/1128MFP Quick Guide
Page 16
Remove any partially fed paper. 2. Never expose the developer unit to light. Open the front cover, and lift the developer unit together with both hands. Pull the paper cassette all the way out of the machine. 3. Remove the drum unit from the printer by holding the green levers with the toner container out of the machine. Inside the Machine 1. IMPORTANT: The drum is sensitive to light for more than five minutes. 16
Remove any partially fed paper. 2. Never expose the developer unit to light. Open the front cover, and lift the developer unit together with both hands. Pull the paper cassette all the way out of the machine. 3. Remove the drum unit from the printer by holding the green levers with the toner container out of the machine. Inside the Machine 1. IMPORTANT: The drum is sensitive to light for more than five minutes. 16
FS-1028MFP/1128MFP Quick Guide
Page 17
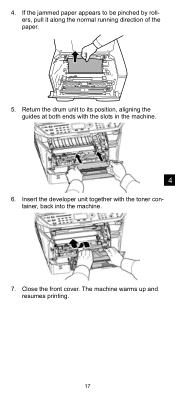
If the jammed paper appears to its position, aligning the guides at both ends with the toner container, back into the machine. 7. Insert the developer unit together with the slots in the machine. 4 6. Close the front cover. Return the drum unit to be pinched by rollers, pull it along the normal running direction of the paper. 5. The machine warms up and resumes printing. 17 4.
If the jammed paper appears to its position, aligning the guides at both ends with the toner container, back into the machine. 7. Insert the developer unit together with the slots in the machine. 4 6. Close the front cover. Return the drum unit to be pinched by rollers, pull it along the normal running direction of the paper. 5. The machine warms up and resumes printing. 17 4.

FS-1028MFP/1128MFP Quick Guide
Page 22
... from the metal registration roller. IMPORTANT: Take care not to light. NOTE: The drum is sensitive to touch the transfer roller (black) during cleaning. 6. Do not place the drum unit on a clean, level surface. Place the drum unit flat on end. 5. Use a clean, lint free cloth to light for more ...minutes. 4. 3. Never expose the developer unit to clean dust and dirt away from the printer by holding the green levers with both hands. On the drum unit, slide the charger cleaner (green) back and forth 2 or 3 times to clean the charger wire, then return it to its original position (...
... from the metal registration roller. IMPORTANT: Take care not to light. NOTE: The drum is sensitive to touch the transfer roller (black) during cleaning. 6. Do not place the drum unit on a clean, level surface. Place the drum unit flat on end. 5. Use a clean, lint free cloth to light for more ...minutes. 4. 3. Never expose the developer unit to clean dust and dirt away from the printer by holding the green levers with both hands. On the drum unit, slide the charger cleaner (green) back and forth 2 or 3 times to clean the charger wire, then return it to its original position (...

FS-1028MFP/1128MFP Quick Guide
Page 23
Return the developer unit to its home position. 7. Then, close the front cover. 5 23 IMPORTANT: Remove the fixing tape on the charger cleaner before cleaning for the first time. When cleaning is complete, return the drum unit to its position, aligning the guides at both ends with the slots in the printer. After cleaning, make sure you restore the charger cleaner to the original position. 8.
Return the developer unit to its home position. 7. Then, close the front cover. 5 23 IMPORTANT: Remove the fixing tape on the charger cleaner before cleaning for the first time. When cleaning is complete, return the drum unit to its position, aligning the guides at both ends with the slots in the printer. After cleaning, make sure you restore the charger cleaner to the original position. 8.

Service Manual
Page 9
... grease or solvents. • Do not remove the ozone filter, if any, from the wall outlet immediately...3.Miscellaneous WARNING • Never attempt to heat the drum or expose it with care by following the instructions below Use only a small amount of solvent at a time, being careful not to spill. If necessary...
... grease or solvents. • Do not remove the ozone filter, if any, from the wall outlet immediately...3.Miscellaneous WARNING • Never attempt to heat the drum or expose it with care by following the instructions below Use only a small amount of solvent at a time, being careful not to spill. If necessary...
Service Manual
Page 12
...trouble error codes ...1-4-34 1-5 Assembly and Disassembly 1-5-1 Precautions for assembly and disassembly 1-5-1 (1) Precautions ...1-5-1 (2) Drum...1-5-1 (3) Toner ...1-5-1 (4) How to tell a genuine Kyocera Mita toner container 1-5-2 1-5-2 Outer covers ...1-5-3 (1) Detaching and refitting the left cover and right cover 1-5-3...PWB 1-5-27 1-5-5 Developing section...1-5-29 (1) Detaching and refitting the developing unit 1-5-29 1-5-6 Drum section...1-5-30 (1) Detaching and refitting the drum unit 1-5-30 (2) Detaching and refitting the main charger unit 1-5-31 1-5-7 Transfer/separation section...
...trouble error codes ...1-4-34 1-5 Assembly and Disassembly 1-5-1 Precautions for assembly and disassembly 1-5-1 (1) Precautions ...1-5-1 (2) Drum...1-5-1 (3) Toner ...1-5-1 (4) How to tell a genuine Kyocera Mita toner container 1-5-2 1-5-2 Outer covers ...1-5-3 (1) Detaching and refitting the left cover and right cover 1-5-3...PWB 1-5-27 1-5-5 Developing section...1-5-29 (1) Detaching and refitting the developing unit 1-5-29 1-5-6 Drum section...1-5-30 (1) Detaching and refitting the drum unit 1-5-30 (2) Detaching and refitting the main charger unit 1-5-31 1-5-7 Transfer/separation section...
Service Manual
Page 15
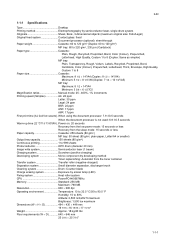
...paper, Letter/A4 or smaller) Output tray capacity 150 sheets (80 g/m2) Continuous printing 1 to 999 sheets Photoconductor OPC drum (diameter 30 mm) Image write system Semiconductor laser (1 beam) Charging system Scorotron (positive charging) Developing system Mono component dry ...system Transfer roller (negative-charged) Separation system Small diameter separation, discharger brush Cleaning system Drum: Counter blade Charge erasing system Exposure by semiconductor laser, single drum system Originals Sheet, Book, 3-dimensional objects (maximum original size: Folio/Legal) Original feed...
...paper, Letter/A4 or smaller) Output tray capacity 150 sheets (80 g/m2) Continuous printing 1 to 999 sheets Photoconductor OPC drum (diameter 30 mm) Image write system Semiconductor laser (1 beam) Charging system Scorotron (positive charging) Developing system Mono component dry ...system Transfer roller (negative-charged) Separation system Small diameter separation, discharger brush Cleaning system Drum: Counter blade Charge erasing system Exposure by semiconductor laser, single drum system Originals Sheet, Book, 3-dimensional objects (maximum original size: Folio/Legal) Original feed...
Service Manual
Page 20
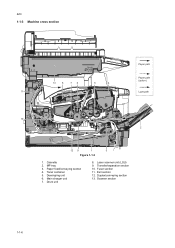
Main charger unit 7. Exit section 12. MP tray 3. Toner container 5. Paper feed/conveying section 4. Drum unit 8. Transfer/separation section 10. 2JN 1-1-3 Machine cross section Paper path 13 8 76 5 4 Paper path (option) 11 Light path 10 2 12 9 1 3 Figure 1-1-3 1. Fuser section 11. Developing unit 6. Laser scanner unit (LSU) 9. Scanner section 1-1-6 Duplex/conveying section 13. Cassette 2.
Main charger unit 7. Exit section 12. MP tray 3. Toner container 5. Paper feed/conveying section 4. Drum unit 8. Transfer/separation section 10. 2JN 1-1-3 Machine cross section Paper path 13 8 76 5 4 Paper path (option) 11 Light path 10 2 12 9 1 3 Figure 1-1-3 1. Fuser section 11. Developing unit 6. Laser scanner unit (LSU) 9. Scanner section 1-1-6 Duplex/conveying section 13. Cassette 2.
Service Manual
Page 30
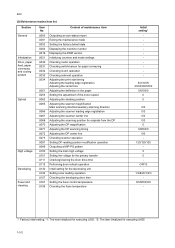
... reading position modification operation Outputting a MIP-PG pattern Setting the main high voltage Setting the voltage for the primary transfer Checking/clearing the drum drive time Performing drum refresh operation Initial setting for the developing unit Setting toner loading operation Checking the developing drive time Setting the fuser control temperature Checking the...
... reading position modification operation Outputting a MIP-PG pattern Setting the main high voltage Setting the voltage for the primary transfer Checking/clearing the drum drive time Performing drum refresh operation Initial setting for the developing unit Setting toner loading operation Checking the developing drive time Setting the fuser control temperature Checking the...

Service Manual
Page 56
... engine output characteristics. Press the start key. Select [HTFM1], [HTFM2], [Dither1] or [Dither2] using MIP-PG pattern output (without scanning). Mono-Level To check the drum quality. 256-Level 1 dot-Level To check resolution reproducibility in the machine. Purpose To check copier status other than scanner when adjusting image printing, using...
... engine output characteristics. Press the start key. Select [HTFM1], [HTFM2], [Dither1] or [Dither2] using MIP-PG pattern output (without scanning). Mono-Level To check the drum quality. 256-Level 1 dot-Level To check resolution reproducibility in the machine. Purpose To check copier status other than scanner when adjusting image printing, using...


