Kyocera Fs1028mfp Fuser - FS 1028MFP
Kyocera Fs1028mfp Fuser
View Results Below
Free Kyocera FS-1028MFP manuals!
Problems with Kyocera FS-1028MFP?
Ask a Question
Free Kyocera FS-1028MFP manuals!
Problems with Kyocera FS-1028MFP?
Ask a Question
Related Manual Pages


Similar Questions


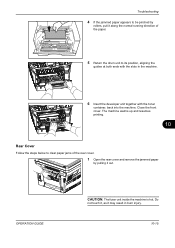
Changeing The Fuser Unit In A Kyocera Fs-c5030n Printer.
How do I change the fuser unit in this printer?
How do I change the fuser unit in this printer?
(Posted by toddnadelle 11 years ago)
