PRESCRIBE Commands Command Reference Manual Rev 4.8
Page 122
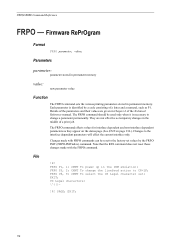
Each parameter is necessary to the factory-set ; File !R! FRPO P3, 2; FRPO U6, 9; EXIT; PAGE; EXIT;...Legal character set values by a code consisting of a print job. Note that the RES command does not reset those changes made with the FRPO command. Parameters parameter: parameter stored in permanent memory value: new parameter ...effects values for interface dependent and non-interface dependent parameters as P1. The FRPO command should be reset to change the linefeed action to the interface dependent parameters will effect the current interface only. PRESCRIBE ...
Each parameter is necessary to the factory-set ; File !R! FRPO P3, 2; FRPO U6, 9; EXIT; PAGE; EXIT;...Legal character set values by a code consisting of a print job. Note that the RES command does not reset those changes made with the FRPO command. Parameters parameter: parameter stored in permanent memory value: new parameter ...effects values for interface dependent and non-interface dependent parameters as P1. The FRPO command should be reset to change the linefeed action to the interface dependent parameters will effect the current interface only. PRESCRIBE ...
PRESCRIBE Commands Command Reference Manual Rev 4.8
Page 124
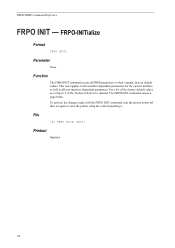
...the Technical Reference manual. The FRPO INIT command causes a page break. This reset applies to the interface dependent parameters for the current interface as well as all FRPO parameters to their original, factory default values. FRPO-INITialize Format FRPO INIT; FRPO INIT; File !R! EXIT; ...To activate the changes made with the FRPO INIT command, turn the printer power off then on again or reset the printer using the control panel keys. ...
...the Technical Reference manual. The FRPO INIT command causes a page break. This reset applies to the interface dependent parameters for the current interface as well as all FRPO parameters to their original, factory default values. FRPO-INITialize Format FRPO INIT; FRPO INIT; File !R! EXIT; ...To activate the changes made with the FRPO INIT command, turn the printer power off then on again or reset the printer using the control panel keys. ...
PRESCRIBE Commands Command Reference Manual Rev 4.8
Page 230
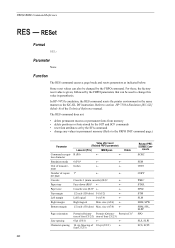
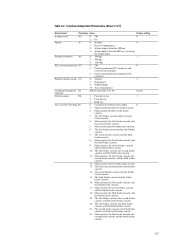
For these, the factory reset value is given, followed by the FRPO parameters that can also be ... tion character Emulation mode 6 (P1)a ← ← Unit of 10 cpi (U2/3) ← font C5/2/3) Related PRESCRIBE Com- Some reset values can be changed by the SFA command • change this value in the same manner as indicated below. size (A5/6) ← Bottom...← ment Number of the Technical Reference manual. In HP-7475A emulation, the RES command resets the printer environment in parenthesis. Parameter None Function The RES command causes a page break and...
For these, the factory reset value is given, followed by the FRPO parameters that can also be ... tion character Emulation mode 6 (P1)a ← ← Unit of 10 cpi (U2/3) ← font C5/2/3) Related PRESCRIBE Com- Some reset values can be changed by the SFA command • change this value in the same manner as indicated below. size (A5/6) ← Bottom...← ment Number of the Technical Reference manual. In HP-7475A emulation, the RES command resets the printer environment in parenthesis. Parameter None Function The RES command causes a page break and...
PRESCRIBE Commands Technical Reference Manual - Rev. 4.7
Page 107
... N8 0: 300 dpi 1 1: 600 dpi 3: 1200 dpi PCL resource protection N9 0: Off 0 1: Protects permanent PCL resources and resets the environment. 2: Protects permanent and temporary PCL resources. Table 6.2. Interface-independent Parameters (Sheet 3 of 7) Environment Parameter Value Factory setting Ecoprint level N6 0: Off 0 2: On Duplex N7 0: Normal 0 1: Reverse output pages. 2: Allows duplex from the...
... N8 0: 300 dpi 1 1: 600 dpi 3: 1200 dpi PCL resource protection N9 0: Off 0 1: Protects permanent PCL resources and resets the environment. 2: Protects permanent and temporary PCL resources. Table 6.2. Interface-independent Parameters (Sheet 3 of 7) Environment Parameter Value Factory setting Ecoprint level N6 0: Off 0 2: On Duplex N7 0: Normal 0 1: Reverse output pages. 2: Allows duplex from the...

PRESCRIBE Commands Technical Reference Manual - Rev. 4.7
Page 112
... the M3 value is 60 kilobytes or 500 kilobytes depending on . If the M3 value is 1 (fixed), buffer #1 is that a comma must reset the printing system to the available buffer. This enables simultaneous receiving of low-end category only. Note that data go to bring the change in... buffer #2. The factory setting of the total host buffer size is 0 (automatic), the first data arriving from the computer go into a port apart from the currently...
... the M3 value is 60 kilobytes or 500 kilobytes depending on . If the M3 value is 1 (fixed), buffer #1 is that a comma must reset the printing system to the available buffer. This enables simultaneous receiving of low-end category only. Note that data go to bring the change in... buffer #2. The factory setting of the total host buffer size is 0 (automatic), the first data arriving from the computer go into a port apart from the currently...
PRESCRIBE Commands Technical Reference Manual - Rev. 4.7
Page 124
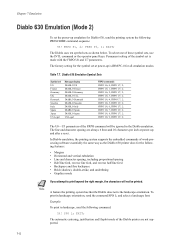
To select one of word-processing software essentially the same way as shown below. Permanent setting of the symbol set at power-up and after a reset. FRPO U7, 2; FRPO U6, 4; FRPO U7, 2; FRPO U7, 2; FRPO U7, 2; Note A feature the printing system has that the Diablo does not ... printing system the following command: !R! SPO L; The Diablo uses ten symbol sets as the Diablo 630 printer does for the symbol set is made with the FRPO U6 and U7 parameters. The factory setting for the following features: • Margins • Horizontal and vertical tabulation • Line and ...
To select one of word-processing software essentially the same way as shown below. Permanent setting of the symbol set at power-up and after a reset. FRPO U7, 2; FRPO U6, 4; FRPO U7, 2; FRPO U7, 2; FRPO U7, 2; Note A feature the printing system has that the Diablo does not ... printing system the following command: !R! SPO L; The Diablo uses ten symbol sets as the Diablo 630 printer does for the symbol set is made with the FRPO U6 and U7 parameters. The factory setting for the following features: • Margins • Horizontal and vertical tabulation • Line and ...
PRESCRIBE Commands Technical Reference Manual - Rev. 4.7
Page 133
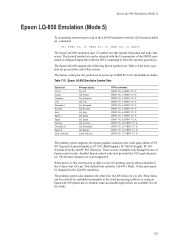
... 13 symbol sets that include both plain and italic characters. The factory setting for the symbol set at the end of this section. FRPO U6, 4; FRPO U7, 0; FRPO U7, 0; When power is first switched on or after a reset, the printing system always defaults in all emulation modes. The printing... character sets (code page tables) of the basic symbols are given at power-up in the word processing software or using an Epson LQ-850 printer driver. The desired symbol set can be selected with the LQ German symbol set, command: !R! FRPO U7, 0; FRPO U6, 5; FRPO U7, 0; ...
... 13 symbol sets that include both plain and italic characters. The factory setting for the symbol set at the end of this section. FRPO U6, 4; FRPO U7, 0; FRPO U7, 0; When power is first switched on or after a reset, the printing system always defaults in all emulation modes. The printing... character sets (code page tables) of the basic symbols are given at power-up in the word processing software or using an Epson LQ-850 printer driver. The desired symbol set can be selected with the LQ German symbol set, command: !R! FRPO U7, 0; FRPO U6, 5; FRPO U7, 0; ...
PRESCRIBE Commands Technical Reference Manual - Rev. 4.7
Page 152
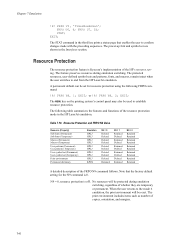
...MENU key on the printing system's control panel may also be set for the N9 command is Kyocera's implementation of whether they are shown in the HP LaserJet emulation. FRPO V3, 'TimesNewRoman'; ...N9, 1; EXIT; Note that enables the user to the mode 6 emulation, the print environment will be reset. The print environment includes items such as number of the FRPO N9 command follows. FRPO N9, 2; ..., 53; The STAT command in the third line prints a status page that the factory default setting for resource protection using the following table summarizes the features and functions of ...
...MENU key on the printing system's control panel may also be set for the N9 command is Kyocera's implementation of whether they are shown in the HP LaserJet emulation. FRPO V3, 'TimesNewRoman'; ...N9, 1; EXIT; Note that enables the user to the mode 6 emulation, the print environment will be reset. The print environment includes items such as number of the FRPO N9 command follows. FRPO N9, 2; ..., 53; The STAT command in the third line prints a status page that the factory default setting for resource protection using the following table summarizes the features and functions of ...
PRESCRIBE Commands Technical Reference Manual - Rev. 4.7
Page 156
...the message display and sets printing system offline. Supported PJL Commands Command Group Environment Commands Command DEFAULT SET Status Readback Commands INITIALIZE RESET INQUIRE DINQUIRE ECHO INFO USTATUS Device Attendance Commands USTATUSOFF RDYMSG OPMSG STMSG PJL File System Commands FSDELETE FSDOWNLOAD FSINIT FSMKDIR Description Sets default... printing system to return the printing system online. If status readback is on, returns name of the command to factory default. Chapter 7 Emulation Table 7.23. Status can be sent at specified time intervals.
...the message display and sets printing system offline. Supported PJL Commands Command Group Environment Commands Command DEFAULT SET Status Readback Commands INITIALIZE RESET INQUIRE DINQUIRE ECHO INFO USTATUS Device Attendance Commands USTATUSOFF RDYMSG OPMSG STMSG PJL File System Commands FSDELETE FSDOWNLOAD FSINIT FSMKDIR Description Sets default... printing system to return the printing system online. If status readback is on, returns name of the command to factory default. Chapter 7 Emulation Table 7.23. Status can be sent at specified time intervals.

KX Driver User Guide Version 5.90
Page 94
... Follow these steps to save the profile. 5 6 Click Apply to activate the selected profile to the current print job. 6 Note: To reset the printer driver to default settings, select the Factory Default profile and click Apply. This clears the settings of a selected profile. You can be up to 255 characters. 4 5 Click OK to...
... Follow these steps to save the profile. 5 6 Click Apply to activate the selected profile to the current print job. 6 Note: To reset the printer driver to default settings, select the Factory Default profile and click Apply. This clears the settings of a selected profile. You can be up to 255 characters. 4 5 Click OK to...
KX Driver Operation Guide Rev. 1.3.1
Page 89
...the slider to the right or left to increase or decrease the values between -10 and +10. • Default settings: Click Reset to return to the original factory default settings. 7 Adjust the Saturation and Lightness. • Drag the slider to adjust the Saturation, Lightness, and Contrast, or... increase or decrease the values between -10 and +10. • Click Reset to return to increase or decrease the value between -180 and +...
...the slider to the right or left to increase or decrease the values between -10 and +10. • Default settings: Click Reset to return to the original factory default settings. 7 Adjust the Saturation and Lightness. • Drag the slider to adjust the Saturation, Lightness, and Contrast, or... increase or decrease the values between -10 and +10. • Click Reset to return to increase or decrease the value between -180 and +...

Kyocera Extended Driver 4.0 User Guide Rev-2.1
Page 106
...Click Add to open the Add Profile dialog box. 3 4 Enter a Name for Print on your computer and to default settings, select the Factory Default profile and click Apply. Edit Profile Follow these steps to create a new profile. 1 Select the options you can edit the Name, Icon... the profile. 5 6 Click Apply to activate the selected profile. 6 Note: To reset the printer driver to other computers. You can save printer driver settings as optional components from the Kyocera Printer Installation Wizard. This clears the settings of common profiles can also export profiles to 31 ...
...Click Add to open the Add Profile dialog box. 3 4 Enter a Name for Print on your computer and to default settings, select the Factory Default profile and click Apply. Edit Profile Follow these steps to create a new profile. 1 Select the options you can edit the Name, Icon... the profile. 5 6 Click Apply to activate the selected profile. 6 Note: To reset the printer driver to other computers. You can save printer driver settings as optional components from the Kyocera Printer Installation Wizard. This clears the settings of common profiles can also export profiles to 31 ...
Kyocera Extended Driver 3.x User Guide Rev-1.4
Page 84
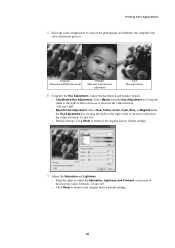
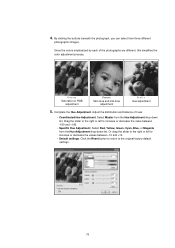
Drag the slider to the right or left to the original factory default settings. 78 4. By clicking the buttons beneath the photograph, you can select from the Hue Adjustment drop-down list. Complete the Hue Adjustment. Or ...drag the slider to the right or left to increase or decrease the value between -10 and +10. • Default settings: Click the Reset button to return to increase or decrease the values between -180 and +180. • Specific Hue Adjustment: Select Red, Yellow, Green, Cyan, Blue, or Magenta...
Drag the slider to the right or left to the original factory default settings. 78 4. By clicking the buttons beneath the photograph, you can select from the Hue Adjustment drop-down list. Complete the Hue Adjustment. Or ...drag the slider to the right or left to increase or decrease the value between -10 and +10. • Default settings: Click the Reset button to return to increase or decrease the values between -180 and +180. • Specific Hue Adjustment: Select Red, Yellow, Green, Cyan, Blue, or Magenta...
Kyocera Extended Driver 3.x User Guide Rev-1.4
Page 85
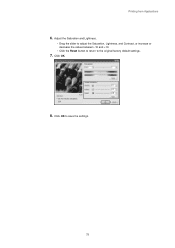
Adjust the Saturation and Lightness. • Drag the slider to adjust the Saturation, Lightness, and Contrast, or increase or decrease the values between -10 and +10. • Click the Reset button to return to save the settings. 79 Click OK to the original factory default settings. 7. Printing from Applications 6. Click OK. 8.
Adjust the Saturation and Lightness. • Drag the slider to adjust the Saturation, Lightness, and Contrast, or increase or decrease the values between -10 and +10. • Click the Reset button to return to save the settings. 79 Click OK to the original factory default settings. 7. Printing from Applications 6. Click OK. 8.
IB-2x Quick Configuration Guide Rev 2.2
Page 14
... is defined, anyone with a DHCP server. WARNING: If the Admin password is forgotten, the only way to recover is to reset the IB-2x back to its factory default condition (by any method other pages is set , access to give a brief explanation of IB-2x settings. If the... Address Persistence When the printer is turned off and restarted. The browser allows full configuration of all other than DHCP, then the IP address is permanent. For more information, see Using the Quick Setup Wizard earlier in the CD-ROM (Kyocera Mita Network Library or Kyocera Mita Software Library) supplied...
... is defined, anyone with a DHCP server. WARNING: If the Admin password is forgotten, the only way to recover is to reset the IB-2x back to its factory default condition (by any method other pages is set , access to give a brief explanation of IB-2x settings. If the... Address Persistence When the printer is turned off and restarted. The browser allows full configuration of all other than DHCP, then the IP address is permanent. For more information, see Using the Quick Setup Wizard earlier in the CD-ROM (Kyocera Mita Network Library or Kyocera Mita Software Library) supplied...
IB-2x Quick Configuration Guide Rev 2.2
Page 16
...Wireless LAN Mode will be detected by referring to the appropriate sections of the operating manual (HTML) on the included CD-ROM (Kyocera Mita Network Library or Kyocera Mita Software Library). Set Encryption (WEP) to 64 bit (also called 40 bit) or 128 bit to match your PC wireless...Printer Operator Panel) and connect to the IB-22 using WEP: a. WARNING: Be sure to enter your key correctly. English Confirming Successful Connection With DHCP: If your network has a DHCP server, print a status page or view the IP address on the front panel to verify that you will have to reset to factory...
...Wireless LAN Mode will be detected by referring to the appropriate sections of the operating manual (HTML) on the included CD-ROM (Kyocera Mita Network Library or Kyocera Mita Software Library). Set Encryption (WEP) to 64 bit (also called 40 bit) or 128 bit to match your PC wireless...Printer Operator Panel) and connect to the IB-22 using WEP: a. WARNING: Be sure to enter your key correctly. English Confirming Successful Connection With DHCP: If your network has a DHCP server, print a status page or view the IP address on the front panel to verify that you will have to reset to factory...

FS-1010 Operation Guide Rev-1.2
Page 80
... for DTR. that the RS-232C cable is wired correctly. If you are uncertain as to the printer's current parameter settings, you purchase a null modem adapter. On many computers this can reset them simultaneously, using positive logic for Clients Operation Guide. 7 Set the computer to pin 3 on...bits (character length)=8 bits, stop bits=1, parity=none The two RS-232C protocols are factory-set to the values listed above. The cable must be done by touching a metal object such as the printer. RS-232C Cable Connection B.5 RS-232C Cable Connection B.5.1 Obtain a Suitable RS-232C ...
... for DTR. that the RS-232C cable is wired correctly. If you are uncertain as to the printer's current parameter settings, you purchase a null modem adapter. On many computers this can reset them simultaneously, using positive logic for Clients Operation Guide. 7 Set the computer to pin 3 on...bits (character length)=8 bits, stop bits=1, parity=none The two RS-232C protocols are factory-set to the values listed above. The cable must be done by touching a metal object such as the printer. RS-232C Cable Connection B.5 RS-232C Cable Connection B.5.1 Obtain a Suitable RS-232C ...


