
IB-51 WEB Browser Management Guide
Page 1
... newer Safari 2 or newer 1-3. file:///C:/Tom/PDF/IB-51/IB-51%20Setup%20Guide%20HTML%20English/card_homepa... 10/2/2012 Windows 2000 (32bit) - Apple Macintosh OS X 10.x 1-2. Login to manage the IB-51 using a web browser. 1. Using a Web Browser to Manage the IB-51 Page 1 of 22 Using a Web Browser to Manage the...
... newer Safari 2 or newer 1-3. file:///C:/Tom/PDF/IB-51/IB-51%20Setup%20Guide%20HTML%20English/card_homepa... 10/2/2012 Windows 2000 (32bit) - Apple Macintosh OS X 10.x 1-2. Login to manage the IB-51 using a web browser. 1. Using a Web Browser to Manage the IB-51 Page 1 of 22 Using a Web Browser to Manage the...

IB-51 WEB Browser Management Guide
Page 11
... logged on with Novell or Microsoft NetWare Client as desired. If none are connected by the NetWare utility. A password can be set to 255 seconds. 4-8. Login requires that are registered, network discovery is supported with administrator rights. Shows the print server name. StartTLS - To activate the configuration, the Encryption needs to...
... logged on with Novell or Microsoft NetWare Client as desired. If none are connected by the NetWare utility. A password can be set to 255 seconds. 4-8. Login requires that are registered, network discovery is supported with administrator rights. Shows the print server name. StartTLS - To activate the configuration, the Encryption needs to...
IB-51 WEB Browser Management Guide
Page 13
...Items Scheduled Report Interval Description In Recipient Address 1-3, enter recipients' e-mail addresses. Only if errors meeting your designated login user name and login password will a message be entered. file:///C:/Tom/PDF/IB-51/IB-51%20Setup%20Guide%20HTML%20English/card_homepa... 10/2/2012...You can be sent at the designated times to the designated e-mail addresses. SMTP over SSL Authentication Protocol Authenticate as Login User Name Login Password Sender Address Signature For designating the SMTP port number. (Default setting is used . To activate the configuration, the...
...Items Scheduled Report Interval Description In Recipient Address 1-3, enter recipients' e-mail addresses. Only if errors meeting your designated login user name and login password will a message be entered. file:///C:/Tom/PDF/IB-51/IB-51%20Setup%20Guide%20HTML%20English/card_homepa... 10/2/2012...You can be sent at the designated times to the designated e-mail addresses. SMTP over SSL Authentication Protocol Authenticate as Login User Name Login Password Sender Address Signature For designating the SMTP port number. (Default setting is used . To activate the configuration, the...
IB-51 WEB Browser Management Guide
Page 14
...confirm that user. For designating the maximum size of 22 Run once now - Using a Web Browser to 64 characters). Designate the user account login name (up to a POP3 server. Designate the password for e-mail messages at the designated hour. - Enable this account (up to the ...Off). Additionally, you can connect to 64 characters). Item User 1-3 E-mail Address POP3 Server Name POP3 Port Number POP3 Server Timeout Login User Name Login Password Use APOP Test Delete e-mail after they are correctly configured. Designate the POP3 server name (up to Manage the IB-51 Page...
...confirm that user. For designating the maximum size of 22 Run once now - Using a Web Browser to 64 characters). Designate the user account login name (up to a POP3 server. Designate the password for e-mail messages at the designated hour. - Enable this account (up to the ...Off). Additionally, you can connect to 64 characters). Item User 1-3 E-mail Address POP3 Server Name POP3 Port Number POP3 Server Timeout Login User Name Login Password Use APOP Test Delete e-mail after they are correctly configured. Designate the POP3 server name (up to Manage the IB-51 Page...

IB-51 WEB Browser Management Guide
Page 16
... (NO) compatibility with HP Web Jetadmin. 4-16. Item LDAP Settings Shared Address Book LDAP LDAP Encryption LDAP Server Name LDAP Port Number Search Timeout Login User Name Login Password Description Enable (on) or disable (off) the LDAP server. LDAP over SSL - Specifies the user name. Select the events that it to the...
... (NO) compatibility with HP Web Jetadmin. 4-16. Item LDAP Settings Shared Address Book LDAP LDAP Encryption LDAP Server Name LDAP Port Number Search Timeout Login User Name Login Password Description Enable (on) or disable (off) the LDAP server. LDAP over SSL - Specifies the user name. Select the events that it to the...
Card Authentication Kit (B) Operation Guide Rev 2013.1
Page 2
... your dealer or service representative, and register "Machine No." Confirm the product name CARD AUTHENTICATION KIT(B) and press [Yes]. NOTE:For User Login setting, refer to Management in with the product to issue the License Key. This product enables you need the License Key. Installation Procedure 1...details, refer to the To register the ID card information. Enter your machine and "Product ID" indicated on . When you enable User Login on the machine, you need to register the ID card information in the Local User List you are pre-registered on the License Certificate ...
... your dealer or service representative, and register "Machine No." Confirm the product name CARD AUTHENTICATION KIT(B) and press [Yes]. NOTE:For User Login setting, refer to Management in with the product to issue the License Key. This product enables you need the License Key. Installation Procedure 1...details, refer to the To register the ID card information. Enter your machine and "Product ID" indicated on . When you enable User Login on the machine, you need to register the ID card information in the Local User List you are pre-registered on the License Certificate ...

Card Authentication Kit (B) Operation Guide Rev 2013.1
Page 3
...Hold the ID card to be registered over the card reader. The confirmation screen appears. 8 Press [Yes]. To register the ID card information To login using the login user name. The confirmation screen appears. 7 Press [Yes]. Completed. Follow the steps below . 1 Perform the step 1 to 3 of To ... System Menu key. Registering/deleting the ID card information The procedures below are to register or delete the card information of Keyboard Login, and login using the ID card registered with administrator privileges or using the ID card, you need to register the ID card information in...
...Hold the ID card to be registered over the card reader. The confirmation screen appears. 8 Press [Yes]. To register the ID card information To login using the login user name. The confirmation screen appears. 7 Press [Yes]. Completed. Follow the steps below . 1 Perform the step 1 to 3 of To ... System Menu key. Registering/deleting the ID card information The procedures below are to register or delete the card information of Keyboard Login, and login using the ID card registered with administrator privileges or using the ID card, you need to register the ID card information in...

Card Authentication Kit (B) Operation Guide Rev 2013.1
Page 4
...been set to the procedure of Keyboard Login, and login using the ID card registered with administrator privileges or using the login user name. 2 Press [User Login/ Job Accounting]. Refer to Login or refer to the procedure of Keyboard Login, and login using the ID card registered with ... ID card. NOTE: If User Login is disabled, the ID Card Login screen appears. Keyboard Login setting You can login by entering the login user name and login password without using the ID card. Refer to Login or refer to On, the Login Password entry screen is authenticated. NOTE...
...been set to the procedure of Keyboard Login, and login using the ID card registered with administrator privileges or using the login user name. 2 Press [User Login/ Job Accounting]. Refer to Login or refer to the procedure of Keyboard Login, and login using the ID card registered with ... ID card. NOTE: If User Login is disabled, the ID Card Login screen appears. Keyboard Login setting You can login by entering the login user name and login password without using the ID card. Refer to Login or refer to On, the Login Password entry screen is authenticated. NOTE...

Data Security Kit (E) Operation Guide Rev-4 2013.1
Page 8
...enter a new security password 6 to log in with administrator privileges. Security Password Set password. Use the procedure below to -guess numbers for the default login user name and password. 4 Press [Next] of Data Security. 5 Press [Next] of Hard Disk Initialization. 6 Enter the default security password,... password to change the security password. 1 Press the [System Menu] key. 2 Press [System/Network]. 3 If user login is disabled, the user authentication screen appears. You can customize the security password so that only the administrator can use the security kit.
...enter a new security password 6 to log in with administrator privileges. Security Password Set password. Use the procedure below to -guess numbers for the default login user name and password. 4 Press [Next] of Data Security. 5 Press [Next] of Hard Disk Initialization. 6 Enter the default security password,... password to change the security password. 1 Press the [System Menu] key. 2 Press [System/Network]. 3 If user login is disabled, the user authentication screen appears. You can customize the security password so that only the administrator can use the security kit.
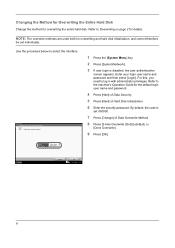
Data Security Kit (E) Operation Guide Rev-4 2013.1
Page 9
... below to log in with administrator privileges. System/Network - Changing the Method for Overwriting the Entire Hard Disk Change the method for the default login user name and password. 4 Press [Next] of Data Security. 5 Press [Next] of Data Overwrite Method. 8 Press [3-time Overwrite (...DoD)] (default) or [Once Overwrite]. 9 Press [OK]. Enter your login user name and password and then press [Login]. NOTE: The overwrite methods are used both for details. Refer to Overwriting on page 2 for overwriting and hard disk initialization...
... below to log in with administrator privileges. System/Network - Changing the Method for Overwriting the Entire Hard Disk Change the method for the default login user name and password. 4 Press [Next] of Data Security. 5 Press [Next] of Data Overwrite Method. 8 Press [3-time Overwrite (...DoD)] (default) or [Once Overwrite]. 9 Press [OK]. Enter your login user name and password and then press [Login]. NOTE: The overwrite methods are used both for details. Refer to Overwriting on page 2 for overwriting and hard disk initialization...

Data Security Kit (E) Operation Guide Rev-4 2013.1
Page 10
... System Initialization: Execute Security Password: ********** Change 1 Press the [System Menu] key. 2 Press [System/Network]. 3 If the user authentication screen appears, enter the login user name and login password, and press [Login]. System Initialization Overwrite all the data stored in the system when disposing of System Initialization. 8 Press [Yes] on the screen to initialize...
... System Initialization: Execute Security Password: ********** Change 1 Press the [System Menu] key. 2 Press [System/Network]. 3 If the user authentication screen appears, enter the login user name and login password, and press [Login]. System Initialization Overwrite all the data stored in the system when disposing of System Initialization. 8 Press [Yes] on the screen to initialize...

KYOCERA Net Direct Print User Guide Rev-3.5
Page 16
... use job accounting function, click Job Accounting to check. Job Accounting To use user login function, click User Login to check. Select Use Specific Account ID when always printing with same ID. Select Prompt for User ID when printing with several different IDs. Returns ... Prompt for Account ID when printing with several different IDs. This prompt you to enter the Account ID at each time you print on user login function, refer to their initial state. 12 KYOCERA Net Direct Print For details on the printing system.
... use job accounting function, click Job Accounting to check. Job Accounting To use user login function, click User Login to check. Select Use Specific Account ID when always printing with same ID. Select Prompt for User ID when printing with several different IDs. Returns ... Prompt for Account ID when printing with several different IDs. This prompt you to enter the Account ID at each time you print on user login function, refer to their initial state. 12 KYOCERA Net Direct Print For details on the printing system.

Kyocera NET ADMIN Operation Guide for Ver 3.1
Page 3
... of Earlier Versions 1-3 Installing the New Version 3.x 1-3 Restoring a Database in Version 3.x 1-3 Restore Files Manually ...1-4 Server Installation ...1-4 Installing KYOCERA Net Admin 1-4 PostgreSQL Files ...1-5 Uninstalling KYOCERA Net Admin 1-5 Removing PostgreSQL Files 1-6 Remote Agent Installation ...1-6 RPC Connections for Remote Agent Installation 1-6 Stand-alone Agent Installation 1-7 USB Device... a Local Device Agent 1-9 Multi-Set Template Editor Installation 1-10 Installing the Multi-Set Template Editor 1-10 KYOCERA Net Admin Login ...1-10 Starting and Logging In ...1-11...
... of Earlier Versions 1-3 Installing the New Version 3.x 1-3 Restoring a Database in Version 3.x 1-3 Restore Files Manually ...1-4 Server Installation ...1-4 Installing KYOCERA Net Admin 1-4 PostgreSQL Files ...1-5 Uninstalling KYOCERA Net Admin 1-5 Removing PostgreSQL Files 1-6 Remote Agent Installation ...1-6 RPC Connections for Remote Agent Installation 1-6 Stand-alone Agent Installation 1-7 USB Device... a Local Device Agent 1-9 Multi-Set Template Editor Installation 1-10 Installing the Multi-Set Template Editor 1-10 KYOCERA Net Admin Login ...1-10 Starting and Logging In ...1-11...
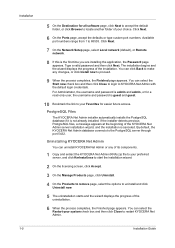
Kyocera NET ADMIN Operation Guide for Ver 3.1
Page 8
...you are installing the application, the Password page appears. You can select the Start now check box and then click Close to login to KYOCERA Net Admin with the default login credentials. Click Next. 7 On the Network Setup page, select Local network (default), or Remote network. 8 If this is... canceled. By default, the KYOCERA Net Admin database connects to 65535. You can select the Restart your choice. Type a valid password and then click ...
...you are installing the application, the Password page appears. You can select the Start now check box and then click Close to login to KYOCERA Net Admin with the default login credentials. Click Next. 7 On the Network Setup page, select Local network (default), or Remote network. 8 If this is... canceled. By default, the KYOCERA Net Admin database connects to 65535. You can select the Restart your choice. Type a valid password and then click ...
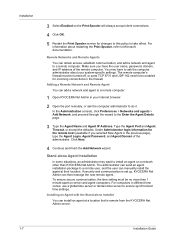
Kyocera NET ADMIN Operation Guide for Ver 3.1
Page 10
Make sure you selected New Agent in the previous page), type the Agent Login, Agent Password, and Agent Domain of the remote computer. Under Administrator login information for the remote host (available if you have to Microsoft documentation. Type the Agent Port and Agent ..., password, domain, and IP address of the administrator. The administrator can manually install the agent at a location that is set up, KYOCERA Net Admin can obtain access, establish communication, and add a network and agent to take effect. In the Administration console, click Preferences >...
Make sure you selected New Agent in the previous page), type the Agent Login, Agent Password, and Agent Domain of the remote computer. Under Administrator login information for the remote host (available if you have to Microsoft documentation. Type the Agent Port and Agent ..., password, domain, and IP address of the administrator. The administrator can manually install the agent at a location that is set up, KYOCERA Net Admin can obtain access, establish communication, and add a network and agent to take effect. In the Administration console, click Preferences >...

Kyocera NET ADMIN Operation Guide for Ver 3.1
Page 11
...for the USB connection and LDA to computers in the device list the same way as network-connected devices. Leave the administrator login information blank. KYOCERA Net Admin 3.1 1-8 The progress of the installation is the default). 4 On the Installation Completed page, click Close to ...support several USB connected devices at the path above to the computer first, then the LDA. Installation 1 Copy the folder C:\Program Files\Kyocera\NetAdmin\Admin\install\agent\standalone-install (C drive is the default) to exit the wizard. Note: A security certificate is created during the...
...for the USB connection and LDA to computers in the device list the same way as network-connected devices. Leave the administrator login information blank. KYOCERA Net Admin 3.1 1-8 The progress of the installation is the default). 4 On the Installation Completed page, click Close to ...support several USB connected devices at the path above to the computer first, then the LDA. Installation 1 Copy the folder C:\Program Files\Kyocera\NetAdmin\Admin\install\agent\standalone-install (C drive is the default) to exit the wizard. Note: A security certificate is created during the...
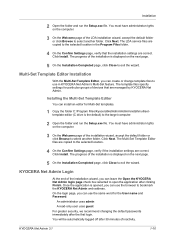
Kyocera NET ADMIN Operation Guide for Ver 3.1
Page 13
... Confirm Settings page, verify if the installation settings are correct. Installing the Multi-Set Template Editor You can leave the Open the KYOCERA Net Admin login page check box selected to use the same word for the User name and Password: An administrator uses admin A read-only user... editor for particular groups of the installation wizard, you can create or change template files to open the application after the first login. KYOCERA Net Admin Login At the end of devices that the installation settings are correct. You must have administrator rights on the next page. 5 On...
... Confirm Settings page, verify if the installation settings are correct. Installing the Multi-Set Template Editor You can leave the Open the KYOCERA Net Admin login page check box selected to use the same word for the User name and Password: An administrator uses admin A read-only user... editor for particular groups of the installation wizard, you can create or change template files to open the application after the first login. KYOCERA Net Admin Login At the end of devices that the installation settings are correct. You must have administrator rights on the next page. 5 On...
Kyocera NET ADMIN Operation Guide for Ver 3.1
Page 14
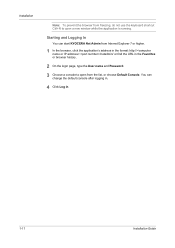
... default console after logging in. 4 Click Log in the Favorites or browser history. 2 On the login page, type the User name and Password. 3 Choose a console to open from the list, or choose Default Console. You can start KYOCERA Net Admin from Internet Explorer 7 or higher. 1 In the browser, click the application's address...
... default console after logging in. 4 Click Log in the Favorites or browser history. 2 On the login page, type the User name and Password. 3 Choose a console to open from the list, or choose Default Console. You can start KYOCERA Net Admin from Internet Explorer 7 or higher. 1 In the browser, click the application's address...

PRESCRIBE Commands Command Reference Manual Rev 5.1
Page 255
... capacity and data type are used. 245 A command error results and the command has no effect if parameters other than the above are listed, with login file names for file data output in separate columns. Parameter medium: 0 = hard disk or RAM disk A = memory card E = EPROM Function The RWER L command explicitly prints...
... capacity and data type are used. 245 A command error results and the command has no effect if parameters other than the above are listed, with login file names for file data output in separate columns. Parameter medium: 0 = hard disk or RAM disk A = memory card E = EPROM Function The RWER L command explicitly prints...

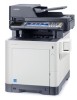
ECOSYS M6035cidn/M6535cidn Operation Guide
Page 4
Enter key and Quick No. Search key 2-20 Help Screen ...2-21 Login/Logout ...2-22 Login ...2-22 Logout ...2-23 Default Settings of the Machine 2-24 Setting Date and Time 2-24 Network Setup (LAN Cable Connection 2-25 Energy Saver function ...2-27 Sleep ...
Enter key and Quick No. Search key 2-20 Help Screen ...2-21 Login/Logout ...2-22 Login ...2-22 Logout ...2-23 Default Settings of the Machine 2-24 Setting Date and Time 2-24 Network Setup (LAN Cable Connection 2-25 Energy Saver function ...2-27 Sleep ...


