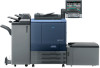
IC-601 Color Centro User Guide
Page 2
... procedure ...2-7 3 Precautions for Installation 3.1 3.2 3.2.1 3.2.2 Introduction ...3-2 Installer ...3-2 Operating environment of the installer 3-2 Settings of this machine ...3-3 4 Installation of Color Centro 4.1 Introduction ...4-2 4.2 Installing Color Centro ...4-2 5 Basic Information 5.1 5.1.1 5.2 5.2.1 5.2.2 5.3 Launch Color Centro ...5-2 Login ...5-2 Screens of Color Centro...5-4 [Launcher] screen...5-4 Function Screens ...5-5 Exit from Color Centro...5-10 6 How to Use Color Centro 6.1 6.1.1 6.2 6.2.1 6.3 6.3.1 6.3.2 6.3.3 6.4 6.4.1 6.4.2 Color Setting of the...
... procedure ...2-7 3 Precautions for Installation 3.1 3.2 3.2.1 3.2.2 Introduction ...3-2 Installer ...3-2 Operating environment of the installer 3-2 Settings of this machine ...3-3 4 Installation of Color Centro 4.1 Introduction ...4-2 4.2 Installing Color Centro ...4-2 5 Basic Information 5.1 5.1.1 5.2 5.2.1 5.2.2 5.3 Launch Color Centro ...5-2 Login ...5-2 Screens of Color Centro...5-4 [Launcher] screen...5-4 Function Screens ...5-5 Exit from Color Centro...5-10 6 How to Use Color Centro 6.1 6.1.1 6.2 6.2.1 6.3 6.3.1 6.3.2 6.3.3 6.4 6.4.1 6.4.2 Color Setting of the...

IC-601 Color Centro User Guide
Page 4
......11-11 Export from the Image Controller 11-12 Import (Register) to the Image Controller 11-12 Create the CMYK Target Profile 11-14 Launch Color Centro Profiler ...11-15 Set the Profile Name and the Destination 11-16 Select the Measurement Method 11-17 Chart Measurement ...11-18 Select... Information ...11-23 Export from the Image Controller 11-24 Import (Register) to the Image Controller 11-25 Create the Printer Profile ...11-26 Launch Color Centro Profiler ...11-27 Set the Profile Name and the Destination 11-28 Select Measurement Method / Paper Setting 11-29 Chart Measurement ...11-...
......11-11 Export from the Image Controller 11-12 Import (Register) to the Image Controller 11-12 Create the CMYK Target Profile 11-14 Launch Color Centro Profiler ...11-15 Set the Profile Name and the Destination 11-16 Select the Measurement Method 11-17 Chart Measurement ...11-18 Select... Information ...11-23 Export from the Image Controller 11-24 Import (Register) to the Image Controller 11-25 Create the Printer Profile ...11-26 Launch Color Centro Profiler ...11-27 Set the Profile Name and the Destination 11-28 Select Measurement Method / Paper Setting 11-29 Chart Measurement ...11-...

IC-601 Color Centro User Guide
Page 5
...Import (Register) to the Image Controller 11-38 Create the RGB-CMYK Device Link Profile 11-39 Launch Color Centro Profiler ...11-40 Set the Profile Name and the Destination 11-41 Determine the Profiles...-44 Confirm and Complete the Profile 11-45 Edit the RGB-CMYK Device Link Profile 11-46 Launch Color Centro Profiler ...11-47 Set the Profile Name and the Destination 11-48 Adjust the Point...Import (Register) to the Image Controller 11-58 Create the CMYK-CMYK Device Link Profile 11-59 Launch Color Centro Profiler ...11-60 Set the Profile Name and the Destination 11-61 Determine the Profiles...
...Import (Register) to the Image Controller 11-38 Create the RGB-CMYK Device Link Profile 11-39 Launch Color Centro Profiler ...11-40 Set the Profile Name and the Destination 11-41 Determine the Profiles...-44 Confirm and Complete the Profile 11-45 Edit the RGB-CMYK Device Link Profile 11-46 Launch Color Centro Profiler ...11-47 Set the Profile Name and the Destination 11-48 Adjust the Point...Import (Register) to the Image Controller 11-58 Create the CMYK-CMYK Device Link Profile 11-59 Launch Color Centro Profiler ...11-60 Set the Profile Name and the Destination 11-61 Determine the Profiles...
IC-601 Color Centro User Guide
Page 6
...Configuration ...13-12 Import (Register) / Export the Color Configuration 13-13 Reset the Default Color Configuration 13-14 Create the Profile Set ...13-15 Launch Color Centro Profiler ...13-16 Specify the Profile Set Name ...13-16 Determine the Profiles...13-17 Customize the Color Conversions 13-18 Enter the...the Destination 13-34 Execute the Measurement Feedback 13-35 Complete the Profile Set ...13-38 Adjust the Color Conversions of Profile Set 13-39 Launch Color Centro Profiler ...13-40 Set the Profile Set Name and the Destination 13-41 Adjust the Point Color / Profile Curve 13-42 ...
...Configuration ...13-12 Import (Register) / Export the Color Configuration 13-13 Reset the Default Color Configuration 13-14 Create the Profile Set ...13-15 Launch Color Centro Profiler ...13-16 Specify the Profile Set Name ...13-16 Determine the Profiles...13-17 Customize the Color Conversions 13-18 Enter the...the Destination 13-34 Execute the Measurement Feedback 13-35 Complete the Profile Set ...13-38 Adjust the Color Conversions of Profile Set 13-39 Launch Color Centro Profiler ...13-40 Set the Profile Set Name and the Destination 13-41 Adjust the Point Color / Profile Curve 13-42 ...

IC-601 Color Centro User Guide
Page 27
... and click [OK]. In this case, select the option corresponding to your network. 1 Select [Start] ->[All Programs] -> [KONICA MINOLTA] -> [Color Centro] -> [KONICA MINOLTA Color Centro]. % Or double-click the short cut key on the Desktop screen. [Login] screen and [Launcher] screen appears. %... [Launcher] screen is not available until login is 30081, separate the IP address and the port number with a colon, and enter "192.168.0.1:30081". 5-2 You cannot launch...
... and click [OK]. In this case, select the option corresponding to your network. 1 Select [Start] ->[All Programs] -> [KONICA MINOLTA] -> [Color Centro] -> [KONICA MINOLTA Color Centro]. % Or double-click the short cut key on the Desktop screen. [Login] screen and [Launcher] screen appears. %... [Launcher] screen is not available until login is 30081, separate the IP address and the port number with a colon, and enter "192.168.0.1:30081". 5-2 You cannot launch...
IC-601 Color Centro User Guide
Page 28
... have connected to page 14-2. The input number is kept even after exiting Color Centro. % When you click [Help], the [Help] screen appears. IC-601 5-3 5.1 Launch Color Centro 5 % You can select the IP address and the port number which were used before, from [Current Destination].
... have connected to page 14-2. The input number is kept even after exiting Color Centro. % When you click [Help], the [Help] screen appears. IC-601 5-3 5.1 Launch Color Centro 5 % You can select the IP address and the port number which were used before, from [Current Destination].
IC-601 Color Centro User Guide
Page 29
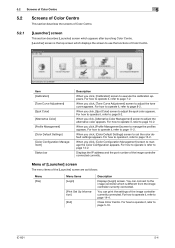
... of Color Centro 5 5.2 Screens of Color Centro This section describes the screens of Color Centro. 5.2.1 [Launcher] screen This section describes [Launcher] screen which appears after launching Color Centro. [Launcher] screen is the top screen which is different from the image controller currently connected. For how to operate it , refer to manage...
... of Color Centro 5 5.2 Screens of Color Centro This section describes the screens of Color Centro. 5.2.1 [Launcher] screen This section describes [Launcher] screen which appears after launching Color Centro. [Launcher] screen is the top screen which is different from the image controller currently connected. For how to operate it , refer to manage...
IC-601 Color Centro User Guide
Page 30
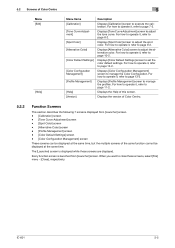
... to operate it , refer to page 13-2. Displays the Help of the same function cannot be displayed at the same time. The [Launcher] screen is launched from [Launcher] screen. - [Calibration] screen - [Tone Curve Adjustment] screen - [Spot Color] screen - [Alternative Color] screen - [Profile Management] screen - [Color Default Settings] screen - [Color Configuration Management...
... to operate it , refer to page 13-2. Displays the Help of the same function cannot be displayed at the same time. The [Launcher] screen is launched from [Launcher] screen. - [Calibration] screen - [Tone Curve Adjustment] screen - [Spot Color] screen - [Alternative Color] screen - [Profile Management] screen - [Color Default Settings] screen - [Color Configuration Management...
IC-601 Color Centro User Guide
Page 35
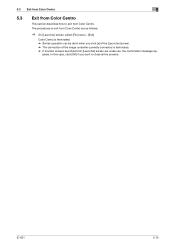
In this case, click [OK] if you click [x] of the [Launcher] screen. % The connection of the image controller currently connected is terminated. % If function screens launched from [Launcher] screen are as follows; % On [Launcher] screen, select [File] menu - [Exit]. 5.3 Exit from Color Centro 5 5.3 Exit from Color Centro This section describes how ...
In this case, click [OK] if you click [x] of the [Launcher] screen. % The connection of the image controller currently connected is terminated. % If function screens launched from [Launcher] screen are as follows; % On [Launcher] screen, select [File] menu - [Exit]. 5.3 Exit from Color Centro 5 5.3 Exit from Color Centro This section describes how ...
IC-601 Color Centro User Guide
Page 46
... first display of [Calibration] screen, [Use "Color Density Control" (RU)] is not checked. % The last status of this check mark is succeeded to the next launch of the reference value from [Use "Color Density Control" (RU)] on Color Centro. Determining the necessity of the fine adjustment of this screen. % Go to...
... first display of [Calibration] screen, [Use "Color Density Control" (RU)] is not checked. % The last status of this check mark is succeeded to the next launch of the reference value from [Use "Color Density Control" (RU)] on Color Centro. Determining the necessity of the fine adjustment of this screen. % Go to...
IC-601 Color Centro User Guide
Page 56
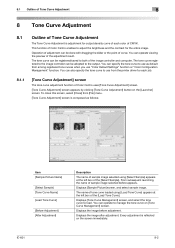
... of the [Load Tone Curve]. Displays [Tone Curve Management] screen, and select the tone curve to both of the image controller and computer. From subsequent launching, the name of sample image selected before adjustment. You can be registered/saved to load. Every adjustment is reflected on the [Launcher] screen. 8.1 Outline of...
... of the [Load Tone Curve]. Displays [Tone Curve Management] screen, and select the tone curve to both of the image controller and computer. From subsequent launching, the name of sample image selected before adjustment. You can be registered/saved to load. Every adjustment is reflected on the [Launcher] screen. 8.1 Outline of...

IC-601 Color Centro User Guide
Page 64
... connect another image controller, the [Login] screen appears. Makes a duplication of the list. When [Controller] is selected on the tree view, "*" mark is added after launching Color Centro, the list is selected from the list. Sorts the content of the [Tone Curve Management] screen can be sorted by the selected list...
... connect another image controller, the [Login] screen appears. Makes a duplication of the list. When [Controller] is selected on the tree view, "*" mark is added after launching Color Centro, the list is selected from the list. Sorts the content of the [Tone Curve Management] screen can be sorted by the selected list...

IC-601 Color Centro User Guide
Page 79
In general, the name of the ink provided by the application with the changed name. On launching this function, to adjust manually the selected spot color using [Table] appears in the left box of Color Centro uses [Spot Color] screen. [Spot Color] ...
In general, the name of the ink provided by the application with the changed name. On launching this function, to adjust manually the selected spot color using [Table] appears in the left box of Color Centro uses [Spot Color] screen. [Spot Color] ...
IC-601 Color Centro User Guide
Page 83
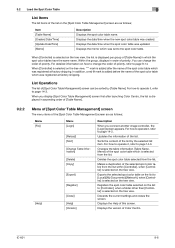
...] Menu [Login] [Reload] [Sort] [Change Table Information] [Delete] [Copy] [Export] [Register] [Close] [Help] [Version] Description When you display [Spot Color Table Management] screen first after launching Color Centro, the list is added after the name of the list by [Table Name]. For how to operate it , refer to the spot color...
...] Menu [Login] [Reload] [Sort] [Change Table Information] [Delete] [Copy] [Export] [Register] [Close] [Help] [Version] Description When you display [Spot Color Table Management] screen first after launching Color Centro, the list is added after the name of the list by [Table Name]. For how to operate it , refer to the spot color...

IC-601 Color Centro User Guide
Page 115
According to the selection of the image controller connected currently. When [Controller] is selected on the tree view, "*" mark is added after launching Color Centro, the list is displayed in ascending order of [Profile Name] (in case of [Controller]), or [File Name] (in the tree format. In addition, a ...
According to the selection of the image controller connected currently. When [Controller] is selected on the tree view, "*" mark is added after launching Color Centro, the list is displayed in ascending order of [Profile Name] (in case of [Controller]), or [File Name] (in the tree format. In addition, a ...

IC-601 Color Centro User Guide
Page 126
...Calculation * Calculation is as required. - [Next]: Click this button when you want to create the new CMYK target profile by launching Color Centro Profiler. Complete The following buttons appear on how to suspend and restart your operation temporarily and restart thereafter. 11.4 ... of Procedure Name and Destination Settings * Use Measurement Instrument. The setting you can skip the Chart Measurement by launching Color Centro Profiler. The wizard screen appears by Measurement Data File. Measurement Setting Chart Measurement * You can create the CMYK target...
...Calculation * Calculation is as required. - [Next]: Click this button when you want to create the new CMYK target profile by launching Color Centro Profiler. Complete The following buttons appear on how to suspend and restart your operation temporarily and restart thereafter. 11.4 ... of Procedure Name and Destination Settings * Use Measurement Instrument. The setting you can skip the Chart Measurement by launching Color Centro Profiler. The wizard screen appears by Measurement Data File. Measurement Setting Chart Measurement * You can create the CMYK target...
IC-601 Color Centro User Guide
Page 127
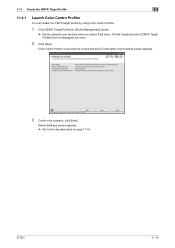
IC-601 11-15 11.4 Create the CMYK Target Profile 11 11.4.1 Launch Color Centro Profiler You can be done when you select [File] menu - [Profile Type] and select [CMYK Target Profile] from the displayed sub menu. 2 Click [New]. Color Centro Profiler is launched as wizard and then [Confirmation of procedure] screen appears. 3 Confirm the contents, click [Next]. [Name Settings] screen appears. % Go to the step described on [Profile Management] screen. % Similar operation can create the CMYK target profile by using Color Centro Profiler. 1 Click [CMYK Target Profile] on page 11-16.
IC-601 11-15 11.4 Create the CMYK Target Profile 11 11.4.1 Launch Color Centro Profiler You can be done when you select [File] menu - [Profile Type] and select [CMYK Target Profile] from the displayed sub menu. 2 Click [New]. Color Centro Profiler is launched as wizard and then [Confirmation of procedure] screen appears. 3 Confirm the contents, click [Next]. [Name Settings] screen appears. % Go to the step described on [Profile Management] screen. % Similar operation can create the CMYK target profile by using Color Centro Profiler. 1 Click [CMYK Target Profile] on page 11-16.
IC-601 Color Centro User Guide
Page 132
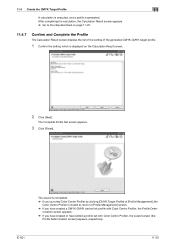
... closed to return to [Profile Management] screen. % If you have edited a profile set with Color Centro Profiler, the Profile Deter- mination screen appears. % If you launched Color Centro Profiler by clicking [CMYK Target Profile] of the generated CMYK-CMYK target profile. 1 Confirm the setting which is generated. IC-601 11-20...
... closed to return to [Profile Management] screen. % If you have edited a profile set with Color Centro Profiler, the Profile Deter- mination screen appears. % If you launched Color Centro Profiler by clicking [CMYK Target Profile] of the generated CMYK-CMYK target profile. 1 Confirm the setting which is generated. IC-601 11-20...
IC-601 Color Centro User Guide
Page 138
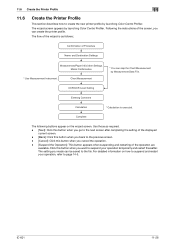
...]: This button appears when suspending and restarting of the wizard is executed. Use those as follows; Chart Measurement * You can skip the Chart Measurement by launching Color Centro Profiler. The setting you can be saved to the file. IC-601 11-26 11.6 Create the Printer Profile 11 11.6 Create the... File. Following the instructions of Procedure Name and Destination Settings Measurement/Paper Info/other Settings Model Confirmation * Use Measurement Instrument. The wizard screen appears by launching Color Centro Profiler.
...]: This button appears when suspending and restarting of the wizard is executed. Use those as follows; Chart Measurement * You can skip the Chart Measurement by launching Color Centro Profiler. The setting you can be saved to the file. IC-601 11-26 11.6 Create the Printer Profile 11 11.6 Create the... File. Following the instructions of Procedure Name and Destination Settings Measurement/Paper Info/other Settings Model Confirmation * Use Measurement Instrument. The wizard screen appears by launching Color Centro Profiler.
IC-601 Color Centro User Guide
Page 139
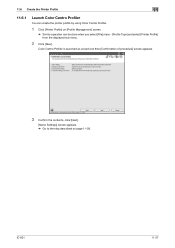
IC-601 11-27 11.6 Create the Printer Profile 11 11.6.1 Launch Color Centro Profiler You can be done when you select [File] menu - [Profile Type] and select [Printer Profile] from the displayed sub menu. 2 Click [New]. Color Centro Profiler is launched as wizard and then [Confirmation of procedure] screen appears. 3 Confirm the contents, click [Next]. [Name Settings] screen appears. % Go to the step described on [Profile Management] screen. % Similar operation can create the printer profile by using Color Centro Profiler. 1 Click [Printer Profile] on page 11-28.
IC-601 11-27 11.6 Create the Printer Profile 11 11.6.1 Launch Color Centro Profiler You can be done when you select [File] menu - [Profile Type] and select [Printer Profile] from the displayed sub menu. 2 Click [New]. Color Centro Profiler is launched as wizard and then [Confirmation of procedure] screen appears. 3 Confirm the contents, click [Next]. [Name Settings] screen appears. % Go to the step described on [Profile Management] screen. % Similar operation can create the printer profile by using Color Centro Profiler. 1 Click [Printer Profile] on page 11-28.