AU-201H User Guide
Page 5
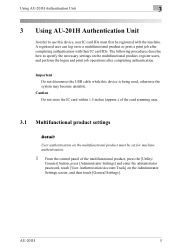
... Do not store the IC card within 1.5 inches (approx.) of the multifunctional product, press the [Utility/ Counter] button, press [Administrator Settings] and enter the administrator password, touch [User Authentication/Account Track] on the multifunctional product must first be registered with their IC card IDs. A registered user can log on the multifunctional...
... Do not store the IC card within 1.5 inches (approx.) of the multifunctional product, press the [Utility/ Counter] button, press [Administrator Settings] and enter the administrator password, touch [User Authentication/Account Track] on the multifunctional product must first be registered with their IC card IDs. A registered user can log on the multifunctional...
AU-201H User Guide
Page 7
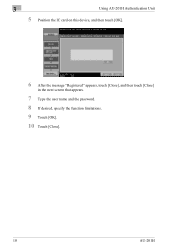
...& Print function, refer to a multifunctional product" on page 25. If "OFF" is possible by positioning the IC card. Card Authentication + Password: Logon is selected, the Touch & Print function cannot be used . - For details on logging on, refer to "Logging on to "Touch...Print function. - Under "Operation Settings", select the logon method after completed authentication once when multiple documents are registered with "Card Authentication + Password" selected, the Touch & Print function cannot be used . - Print Each Job: Select this setting to print one document saved in ...
...& Print function, refer to a multifunctional product" on page 25. If "OFF" is possible by positioning the IC card. Card Authentication + Password: Logon is selected, the Touch & Print function cannot be used . - For details on logging on, refer to "Logging on to "Touch...Print function. - Under "Operation Settings", select the logon method after completed authentication once when multiple documents are registered with "Card Authentication + Password" selected, the Touch & Print function cannot be used . - Print Each Job: Select this setting to print one document saved in ...
AU-201H User Guide
Page 10
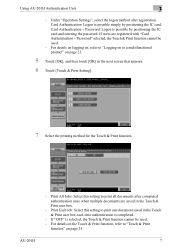
3 Using AU-201H Authentication Unit 5 Position the IC card on this device, and then touch [OK]. 6 After the message "Registered" appears, touch [Close], and then touch [Close] in the next screen that appears. 7 Type the user name and the password. 8 If desired, specify the function limitations. 9 Touch [OK]. 10 Touch [Close]. 10 AU-201H
3 Using AU-201H Authentication Unit 5 Position the IC card on this device, and then touch [OK]. 6 After the message "Registered" appears, touch [Close], and then touch [Close] in the next screen that appears. 7 Type the user name and the password. 8 If desired, specify the function limitations. 9 Touch [OK]. 10 Touch [Close]. 10 AU-201H
AU-201H User Guide
Page 20
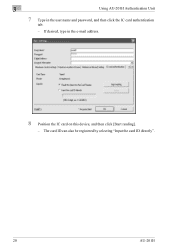
3 Using AU-201H Authentication Unit 7 Type in the e-mail address. 8 Position the IC card on this device, and then click [Start reading]. - The card ID can also be registered by selecting "Input the card ID directly". 20 AU-201H If desired, type in the user name and password, and then click the IC card authentication tab. -
3 Using AU-201H Authentication Unit 7 Type in the e-mail address. 8 Position the IC card on this device, and then click [Start reading]. - The card ID can also be registered by selecting "Input the card ID directly". 20 AU-201H If desired, type in the user name and password, and then click the IC card authentication tab. -
AU-201H User Guide
Page 24
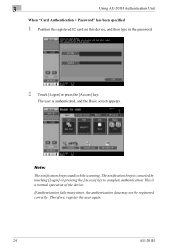
Note: The notification beep sounds while scanning. 3 Using AU-201H Authentication Unit When "Card Authentication + Password" has been specified 1 Position the registered IC card on this device, and then type in the password. 2 Touch [Login] or press the [Access] key. Therefore, register the user again. 24 AU-201H This is authenticated, and the...
Note: The notification beep sounds while scanning. 3 Using AU-201H Authentication Unit When "Card Authentication + Password" has been specified 1 Position the registered IC card on this device, and then type in the password. 2 Touch [Login] or press the [Access] key. Therefore, register the user again. 24 AU-201H This is authenticated, and the...
AU-201H User Guide
Page 28
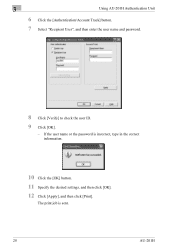
The print job is incorrect, type in the correct information. 10 Click the [OK] button. 11 Specify the desired settings, and then click [OK]. 12 Click [Apply], and then click [Print]. If the user name or the password is sent. 28 AU-201H 3 Using AU-201H Authentication Unit 6 Click the [Authentication/Account Track] button. 7 Select "Recipient User", and then enter the user name and password. 8 Click [Verify] to check the user ID. 9 Click [OK]. -
The print job is incorrect, type in the correct information. 10 Click the [OK] button. 11 Specify the desired settings, and then click [OK]. 12 Click [Apply], and then click [Print]. If the user name or the password is sent. 28 AU-201H 3 Using AU-201H Authentication Unit 6 Click the [Authentication/Account Track] button. 7 Select "Recipient User", and then enter the user name and password. 8 Click [Verify] to check the user ID. 9 Click [OK]. -
AU-201H User Guide
Page 31
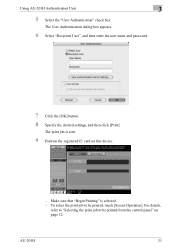
Make sure that "Begin Printing" is sent. 9 Position the registered IC card on page 32. To select the print job to be printed, touch [Screen Operation]. The print job is selected. - Using AU-201H Authentication Unit 3 5 Select the "User Authentication" check box. AU-201H 31 For details, refer to "Selecting the print job to be printed from the control panel" on this device. - The User Authentication dialog box appears. 6 Select "Recipient User", and then enter the user name and password. 7 Click the [OK] button. 8 Specify the desired settings, and then click [Print].
Make sure that "Begin Printing" is sent. 9 Position the registered IC card on page 32. To select the print job to be printed, touch [Screen Operation]. The print job is selected. - Using AU-201H Authentication Unit 3 5 Select the "User Authentication" check box. AU-201H 31 For details, refer to "Selecting the print job to be printed from the control panel" on this device. - The User Authentication dialog box appears. 6 Select "Recipient User", and then enter the user name and password. 7 Click the [OK] button. 8 Specify the desired settings, and then click [Print].
AU-201H User Guide
Page 38
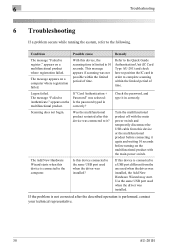
...the scanning time is connected to 10 seconds. Use the same USB port used when the driver was selected: Is the password typed in correctly? appears on a computer where registration failed. If this device is limited to the computer. This message appears.... 38 AU-201H 6 Troubleshooting 6 Troubleshooting If a problem occurs while running the system, refer to Authenticate." If "Card Authentication + Password" was installed. Was the multifunctional product restarted after the described operation is not corrected after this device connected to it? Logon failed. ...
...the scanning time is connected to 10 seconds. Use the same USB port used when the driver was selected: Is the password typed in correctly? appears on a computer where registration failed. If this device is limited to the computer. This message appears.... 38 AU-201H 6 Troubleshooting 6 Troubleshooting If a problem occurs while running the system, refer to Authenticate." If "Card Authentication + Password" was installed. Was the multifunctional product restarted after the described operation is not corrected after this device connected to it? Logon failed. ...
PageScope Authentication Manager User Manual
Page 5
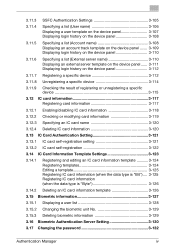
....1 Displaying a user list 3-128 3.15.2 Changing the biometric unit No 3-129 3.15.3 Deleting biometric information 3-129 3.16 Biometric Authentication Server Setting 3-130 3.17 Changing the password 3-132 Authentication Manager iv
....1 Displaying a user list 3-128 3.15.2 Changing the biometric unit No 3-129 3.15.3 Deleting biometric information 3-129 3.16 Biometric Authentication Server Setting 3-130 3.17 Changing the password 3-132 Authentication Manager iv
PageScope Authentication Manager User Manual
Page 7
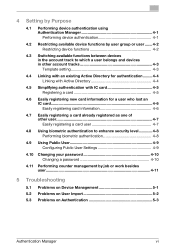
... 4-7 Easily registering a card user 4-7 4.8 Using biometric authentication to enhance security level 4-8 Performing biometric authentication 4-8 4.9 Using Public User 4-9 Configuring Public User Settings 4-9 4.10 Changing your password 4-10 Changing a password 4-10 4.11 Performing counter management by job or work besides user...4-11 5 Troubleshooting 5.1 Problems on Device Management 5-1 5.2 Problems on User Import 5-2 5.3 Problems on Authentication...
... 4-7 Easily registering a card user 4-7 4.8 Using biometric authentication to enhance security level 4-8 Performing biometric authentication 4-8 4.9 Using Public User 4-9 Configuring Public User Settings 4-9 4.10 Changing your password 4-10 Changing a password 4-10 4.11 Performing counter management by job or work besides user...4-11 5 Troubleshooting 5.1 Problems on Device Management 5-1 5.2 Problems on User Import 5-2 5.3 Problems on Authentication...
PageScope Authentication Manager User Manual
Page 21
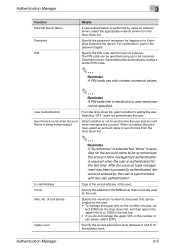
...authentication is required when the user is authenticated for logging on the number of use boxes that is normally used to log in the password again. Specify the access permission level (between 0 and 5) for the address book. The PIN code can only contain numerical values.... 2 Reminder A PIN code that is identical to 64 numerals. Authentication Manager 3 Function External Server Name Password PIN Details If user authentication is performed by the user is synchronized with the user authentication. For confirmation, type in to Enterprise Suite...
...authentication is required when the user is authenticated for logging on the number of use boxes that is normally used to log in the password again. Specify the access permission level (between 0 and 5) for the address book. The PIN code can only contain numerical values.... 2 Reminder A PIN code that is identical to 64 numerals. Authentication Manager 3 Function External Server Name Password PIN Details If user authentication is performed by the user is synchronized with the user authentication. For confirmation, type in to Enterprise Suite...
PageScope Authentication Manager User Manual
Page 23
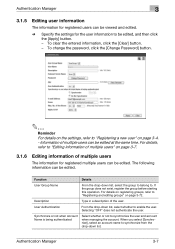
... edited at the same time. User Authentication From the drop-down list, select the group to belong to enable the user. To change the password, click the [Change Password] button. 2 Reminder For details on the settings, refer to "Registering a new user" on page 3-72. The following information can be edited, and then...
... edited at the same time. User Authentication From the drop-down list, select the group to belong to enable the user. To change the password, click the [Change Password] button. 2 Reminder For details on the settings, refer to "Registering a new user" on page 3-72. The following information can be edited, and then...
PageScope Authentication Manager User Manual
Page 26
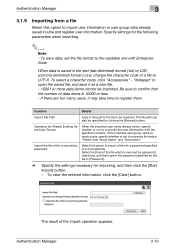
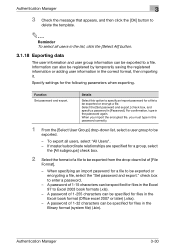
...for Already Existing Users/User Groups When the imported user name already exists, specify whether or not to overwrite the user information with a password specified or a encrypted file. The file path can also be imported. Authentication Manager 3 3.1.9 Importing from a file Select this option to... import a file with the specified contents. If the imported user group name already exists, specify whether or not to overwrite the data in [Password]. % Specify the settings necessary for the following parameters when importing. 2 Note - If there are too many users, it as a new file...
...for Already Existing Users/User Groups When the imported user name already exists, specify whether or not to overwrite the user information with a password specified or a encrypted file. The file path can also be imported. Authentication Manager 3 3.1.9 Importing from a file Select this option to... import a file with the specified contents. If the imported user group name already exists, specify whether or not to overwrite the data in [Password]. % Specify the settings necessary for the following parameters when importing. 2 Note - If there are too many users, it as a new file...
PageScope Authentication Manager User Manual
Page 27
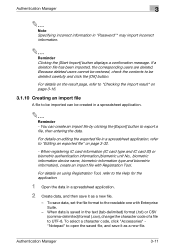
... data, and then save data, set the file format to "Editing an exported file" on page 3-32. - For details on editing the exported file in "Password"" may import incorrect information. 2 Reminder Clicking the [Start Import] button displays a confirmation message. Authentication Manager 3-11 To save it as a new file. -
... data, and then save data, set the file format to "Editing an exported file" on page 3-32. - For details on editing the exported file in "Password"" may import incorrect information. 2 Reminder Clicking the [Start Import] button displays a confirmation message. Authentication Manager 3-11 To save it as a new file. -
PageScope Authentication Manager User Manual
Page 29
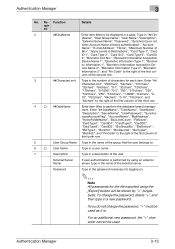
... Enter item titles to the right of the first column of the first col- ric Information 1", "Biometric Information Acquisition De- For an additional new password, the "+" character cannot be used . Enter "## CharacterLimit", "256chars", "64chars", "127chars", "32chars", "64chars", "0-1", "32chars", "129chars", "...64chars", "0- 10", "752chars", "64chars", "0-10", "752chars", and "64chars" to perform the database-based management. To change the password, "+" must be used as it is being authenticated", "Account Name", "E-mail Address", "Home", "Maximum Number of characters for ...
... Enter item titles to the right of the first column of the first col- ric Information 1", "Biometric Information Acquisition De- For an additional new password, the "+" character cannot be used . Enter "## CharacterLimit", "256chars", "64chars", "127chars", "32chars", "64chars", "0-1", "32chars", "129chars", "...64chars", "0- 10", "752chars", "64chars", "0-10", "752chars", and "64chars" to perform the database-based management. To change the password, "+" must be used as it is being authenticated", "Account Name", "E-mail Address", "Home", "Maximum Number of characters for ...
PageScope Authentication Manager User Manual
Page 36
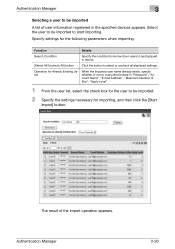
The result of user information registered in the specified devices appears. Select the user to be displayed in "Password", "Account Name", "E-mail Address", "Maximum Number of Box", "Apply Level". 1 From the user list, select the check box for the user to be imported A list ...
The result of user information registered in the specified devices appears. Select the user to be displayed in "Password", "Account Name", "E-mail Address", "Maximum Number of Box", "Apply Level". 1 From the user list, select the check box for the user to be imported A list ...

PageScope Authentication Manager User Manual
Page 38
...Displays the access permission level for the address book. Displays the account track information of Box Apply Level 3 Details Displays the password. Authentication Manager 3-22 The password is not managed. When you do not synchronize the user and account when managing the account, "Do Not Synchronize" is ...value is not displayed, the maximum number of boxes that the user belongs to is specified. Displays the e-mail address. Authentication Manager Function Password Account Name E-mail Address Maximum Number of the user. "None" is displayed if no account name is specified.
...Displays the access permission level for the address book. Displays the account track information of Box Apply Level 3 Details Displays the password. Authentication Manager 3-22 The password is not managed. When you do not synchronize the user and account when managing the account, "Do Not Synchronize" is ...value is not displayed, the maximum number of boxes that the user belongs to is specified. Displays the e-mail address. Authentication Manager Function Password Account Name E-mail Address Maximum Number of the user. "None" is displayed if no account name is specified.
PageScope Authentication Manager User Manual
Page 46
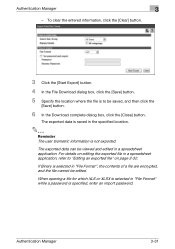
...registered by temporarily saving the registered information or adding user information in the Binary format (system file) (.bin). When specifying an import password for files in the correct format, then importing it. To export all users in the Excel 97 to Excel 2003 book formats (....template. 2 Reminder To select all users, select "All Users". - Specify settings for a file to enter a password. - Select the [Set password and export.] check box, and specify a password in the password again. When you import the encrypted file, you must type in this option to specify an import...
...registered by temporarily saving the registered information or adding user information in the Binary format (system file) (.bin). When specifying an import password for files in the correct format, then importing it. To export all users in the Excel 97 to Excel 2003 book formats (....template. 2 Reminder To select all users, select "All Users". - Specify settings for a file to enter a password. - Select the [Set password and export.] check box, and specify a password in the password again. When you import the encrypted file, you must type in this option to specify an import...
PageScope Authentication Manager User Manual
Page 47
When opening a file for which XLS or XLSX is specified, enter an import password. For details on editing the exported file in "File Format" while a password is selected in a spreadsheet application, refer to be edited. Authentication Manager 3-31 Authentication Manager 3 - If Binary is to "Editing an exported file" on page 3-32. ...
When opening a file for which XLS or XLSX is specified, enter an import password. For details on editing the exported file in "File Format" while a password is selected in a spreadsheet application, refer to be edited. Authentication Manager 3-31 Authentication Manager 3 - If Binary is to "Editing an exported file" on page 3-32. ...
PageScope Authentication Manager User Manual
Page 56
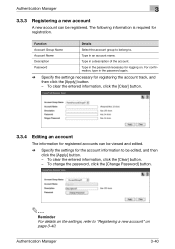
...for registering the account track, and then click the [Apply] button. - Account Name Type in the password necessary for logging on page 3-40. The following information is required for registration. Password Type in an account name. To clear the entered information, click the [Clear] button. 3.3.4 Editing...3 3.3.3 Registering a new account A new account can be viewed and edited. % Specify the settings for the account information to . To change the password, click the [Change Password] button. 2 Reminder For details on the settings, refer to "Registering a new account" on .
...for registering the account track, and then click the [Apply] button. - Account Name Type in the password necessary for logging on page 3-40. The following information is required for registration. Password Type in an account name. To clear the entered information, click the [Clear] button. 3.3.4 Editing...3 3.3.3 Registering a new account A new account can be viewed and edited. % Specify the settings for the account information to . To change the password, click the [Change Password] button. 2 Reminder For details on the settings, refer to "Registering a new account" on .


