
Cube3 User Guide
Page 3
... Application 69 10 OPERATION PROCEDURES 71 Applying Cube Glue 71 Replacing A Material Cartridge 72 Setting Up a Wireless Connection 74 Setting Up A Wi-Fi Connection 74 Connect To An Ad Hoc Network 76 11 CUBE MAINTENANCE 78 General Cleaning 78 Removing Waste from the Print Pad 31 Removing Rafts 31 Removing Supports 31 9 CUBIFY SOFTWARE 32 Cubify Software Installation 32 Installing Cubify Software for Windows 32 Installing Cubify Software For Apple OS X 34 Installing Cubify for Android...
... Application 69 10 OPERATION PROCEDURES 71 Applying Cube Glue 71 Replacing A Material Cartridge 72 Setting Up a Wireless Connection 74 Setting Up A Wi-Fi Connection 74 Connect To An Ad Hoc Network 76 11 CUBE MAINTENANCE 78 General Cleaning 78 Removing Waste from the Print Pad 31 Removing Rafts 31 Removing Supports 31 9 CUBIFY SOFTWARE 32 Cubify Software Installation 32 Installing Cubify Software for Windows 32 Installing Cubify Software For Apple OS X 34 Installing Cubify for Android...
Cube3 User Guide
Page 5
... in a residential installation. KCC B This equipment is encouraged to try to part 15 of 3D Systems, Inc. NOTE: Changes or modifications to this equipment not specifically approved by turning the equipment off and on, the user is home use (Class B) electromagnetic wave suitability equipment and to be used in accordance with the instructions, may cause undesired operation of the following...
... in a residential installation. KCC B This equipment is encouraged to try to part 15 of 3D Systems, Inc. NOTE: Changes or modifications to this equipment not specifically approved by turning the equipment off and on, the user is home use (Class B) electromagnetic wave suitability equipment and to be used in accordance with the instructions, may cause undesired operation of the following...
Cube3 User Guide
Page 6
... using the numbers or email addresses below: Warranty Hotline from the Americas 888-598-1440 inside the US and +1 678-338-3480 outside the US weekdays during the applicable warranty period, when used under the normal conditions described in the documentation provided to you , including this user guide. 3D Systems will promptly repair or replace the Cube or CubePro 3D Printer...
... using the numbers or email addresses below: Warranty Hotline from the Americas 888-598-1440 inside the US and +1 678-338-3480 outside the US weekdays during the applicable warranty period, when used under the normal conditions described in the documentation provided to you , including this user guide. 3D Systems will promptly repair or replace the Cube or CubePro 3D Printer...
Cube3 User Guide
Page 7
... NOT modify any safety features or make modifications to equipment, or could cause personal injury. observe children closely and intervene as this user guide. KEEP FINGERS AND OTHER BODY PARTS AWAY. Read and follow all instructions prior to setting up the printer. HOT SURFACE HAZARD: DO NOT TOUCH THE PRINT JETS DURING SETUP AND OPERATION. Caution: DO NOT disconnect the CUBE...
... NOT modify any safety features or make modifications to equipment, or could cause personal injury. observe children closely and intervene as this user guide. KEEP FINGERS AND OTHER BODY PARTS AWAY. Read and follow all instructions prior to setting up the printer. HOT SURFACE HAZARD: DO NOT TOUCH THE PRINT JETS DURING SETUP AND OPERATION. Caution: DO NOT disconnect the CUBE...
Cube3 User Guide
Page 8
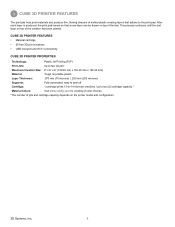
... microns) Supports: Fully automated; CUBE 3D PRINTER FEATURES • Material cartridge • 25 free 3D print creations • USB inlet port and Wi-Fi connectivity CUBE 3D PRINTER PROPERTIES Technology: Plastic Jet Printing (PJP) Print Jets: Up to -14 mid-size creations. 3 CUBE 3D PRINTER FEATURES The print jets heat print materials and produce thin, flowing streams of melted plastic creating layers that a new layer can...
... microns) Supports: Fully automated; CUBE 3D PRINTER FEATURES • Material cartridge • 25 free 3D print creations • USB inlet port and Wi-Fi connectivity CUBE 3D PRINTER PROPERTIES Technology: Plastic Jet Printing (PJP) Print Jets: Up to -14 mid-size creations. 3 CUBE 3D PRINTER FEATURES The print jets heat print materials and produce thin, flowing streams of melted plastic creating layers that a new layer can...
Cube3 User Guide
Page 10
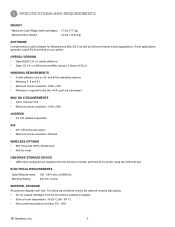
... file for Ad Hoc Wi-Fi print job submission. OPENGL VERSION • OpenGLES 2.0+ on mobile platforms • Open GL 3.0+ on your printer. 5 SPECIFICATIONS AND REQUIREMENTS WEIGHT Maximum Cube Weight (with time. The following conditions ensure the material remains high quality: • Do not unpack cartridges from the foil until the material is required for printing on Windows and Mac (using the USB inlet port...
... file for Ad Hoc Wi-Fi print job submission. OPENGL VERSION • OpenGLES 2.0+ on mobile platforms • Open GL 3.0+ on your printer. 5 SPECIFICATIONS AND REQUIREMENTS WEIGHT Maximum Cube Weight (with time. The following conditions ensure the material remains high quality: • Do not unpack cartridges from the foil until the material is required for printing on Windows and Mac (using the USB inlet port...
Cube3 User Guide
Page 16
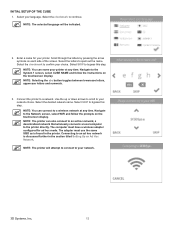
... in the printer. Connecting to a network. NOTE: You can name your network. 3D Systems, Inc. 12 Use the up or down arrows to scroll to a wireless network at any time. NOTE: The printer will be indicated. 2. Navigate to your printer at any time. NOTE: The selected language will attempt to connect to the Network screen, select WIFI and follow the instructions on the touchscreen display. Scroll through...
... in the printer. Connecting to a network. NOTE: You can name your network. 3D Systems, Inc. 12 Use the up or down arrows to scroll to a wireless network at any time. NOTE: The printer will be indicated. 2. Navigate to your printer at any time. NOTE: The selected language will attempt to connect to the Network screen, select WIFI and follow the instructions on the touchscreen display. Scroll through...

Cube3 User Guide
Page 27
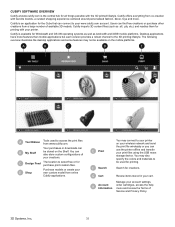
... manufacturer's warranty. Materials CARTRIDGE STATUS CARTRIDGE STATUS allows you to the PRINT / SETUP menu. If the gap is installed. SETUP SETUP allows the user to configure the printer, connect to a wireless or ad hoc network, connect to start. AUTO GAP Following AUTO LEVEL, AUTO GAP is performed by pressing the right or left in empty bays or replace installed cartridges. MENU OVERVIEW Touchscreen Display After powering on a USB mass storage device or directly from Cubify software. Using anything sharp will damage...
... manufacturer's warranty. Materials CARTRIDGE STATUS CARTRIDGE STATUS allows you to the PRINT / SETUP menu. If the gap is installed. SETUP SETUP allows the user to configure the printer, connect to a wireless or ad hoc network, connect to start. AUTO GAP Following AUTO LEVEL, AUTO GAP is performed by pressing the right or left in empty bays or replace installed cartridges. MENU OVERVIEW Touchscreen Display After powering on a USB mass storage device or directly from Cubify software. Using anything sharp will damage...
Cube3 User Guide
Page 28
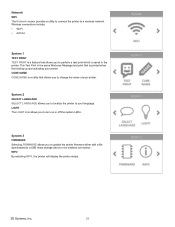
... is printed when first setting up and activating your language. LIGHT The LIGHT icon allows you to perform a test print which is saved in the printer. Wireless connections include: • Wi-Fi • Ad Hoc System 1 TEST PRINT TEST PRINT is a feature that allows you to a wireless network. System 2 SELECT LANGUAGE SELECT LANGUAGE allows you to update the printer firmware either with a file downloaded to your printer. Network WIFI The Network screen provides a utility to connect the printer to turn...
... is printed when first setting up and activating your language. LIGHT The LIGHT icon allows you to perform a test print which is saved in the printer. Wireless connections include: • Wi-Fi • Ad Hoc System 1 TEST PRINT TEST PRINT is a feature that allows you to a wireless network. System 2 SELECT LANGUAGE SELECT LANGUAGE allows you to update the printer firmware either with a file downloaded to your printer. Network WIFI The Network screen provides a utility to connect the printer to turn...
Cube3 User Guide
Page 31
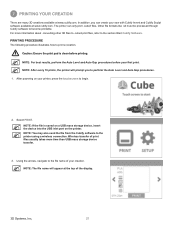
... top of the display. 3D Systems, Inc. 27 Wireless transfer of your printer, press the touchscreen to the printer using a wireless connection. Other file formats like .stl must be processed through Cubify software to print a creation. Caution: Ensure the print pad is saved on a USB mass storage device, insert the device into the USB inlet port on your creation. NOTE: If the file is clean before your...
... top of the display. 3D Systems, Inc. 27 Wireless transfer of your printer, press the touchscreen to the printer using a wireless connection. Other file formats like .stl must be processed through Cubify software to print a creation. Caution: Ensure the print pad is saved on a USB mass storage device, insert the device into the USB inlet port on your creation. NOTE: If the file is clean before your...
Cube3 User Guide
Page 32
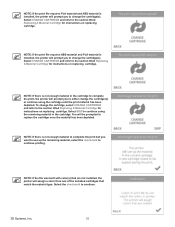
... a color from one of the installed cartridges that match the material type. NOTE: If the print file requires ABS material and PLA material is installed, the printer will prompt you to the section titled Replacing A Material Cartridge for instructions on replacing cartridge. To change the cartridge, select CHANGE CARTRIDGE and refer to change the cartridge(s). NOTE: If there is not enough material to complete the print but you want to use...
... a color from one of the installed cartridges that match the material type. NOTE: If the print file requires ABS material and PLA material is installed, the printer will prompt you to the section titled Replacing A Material Cartridge for instructions on replacing cartridge. To change the cartridge, select CHANGE CARTRIDGE and refer to change the cartridge(s). NOTE: If there is not enough material to complete the print but you want to use...
Cube3 User Guide
Page 34
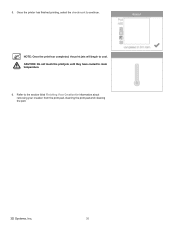
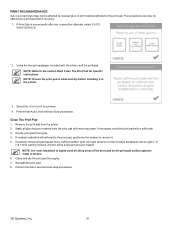
Once the printer has finished printing, select the checkmark to the section titled Finishing Your Creation for information about removing your creation from the print pad, cleaning the print pad and cleaning the part. 3D Systems, Inc. 30 Refer to continue. CAUTION: Do not touch the print jets until they have cooled to cool. 5. NOTE: Once the print has completed, the print jets will begin to room temperature. 6.
Once the printer has finished printing, select the checkmark to the section titled Finishing Your Creation for information about removing your creation from the print pad, cleaning the print pad and cleaning the part. 3D Systems, Inc. 30 Refer to continue. CAUTION: Do not touch the print jets until they have cooled to cool. 5. NOTE: Once the print has completed, the print jets will begin to room temperature. 6.
Cube3 User Guide
Page 35
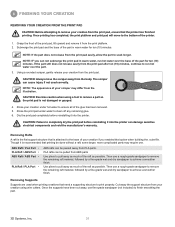
... to remove the remaining raft material, followed by a fine-grade wet and dry sandpaper to achieve a smoother finish. Once the supports have been cut away, use fine-grade sandpaper (not included) to clean off any remaining glue. 6. NOTE: IF you enabled that the printer has finished printing. Using a rounded scraper, gently release your creation from PLA parts. Rinse the print...
... to remove the remaining raft material, followed by a fine-grade wet and dry sandpaper to achieve a smoother finish. Once the supports have been cut away, use fine-grade sandpaper (not included) to clean off any remaining glue. 6. NOTE: IF you enabled that the printer has finished printing. Using a rounded scraper, gently release your creation from PLA parts. Rinse the print...
Cube3 User Guide
Page 42
... or downloads can use the printer offline and transfer your print files using the USB mass storage device. C Design Feed The location to access the print files from online Cubify applications. G Cart Review items stored in your account settings, H Account Information order cartridges, access the help menu and review the Terms of Service and Privacy Policy. 3D Systems, Inc. 38 Cubify offers everything from a large number of your creations. You can connect to your printer on...
... or downloads can use the printer offline and transfer your print files using the USB mass storage device. C Design Feed The location to access the print files from online Cubify applications. G Cart Review items stored in your account settings, H Account Information order cartridges, access the help menu and review the Terms of Service and Privacy Policy. 3D Systems, Inc. 38 Cubify offers everything from a large number of your creations. You can connect to your printer on...
Cube3 User Guide
Page 68
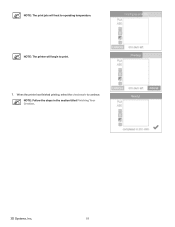
NOTE: Follow the steps in the section titled Finishing Your Creation. 3D Systems, Inc. 64 When the printer has finished printing, select the checkmark to operating temperature. NOTE: The print jets will begin to print. 7. NOTE: The printer will heat to continue.
NOTE: Follow the steps in the section titled Finishing Your Creation. 3D Systems, Inc. 64 When the printer has finished printing, select the checkmark to operating temperature. NOTE: The print jets will begin to print. 7. NOTE: The printer will heat to continue.
Cube3 User Guide
Page 72
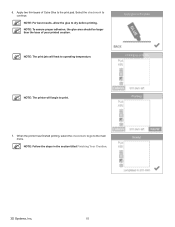
NOTE: For best results, allow the glue to operating temperature. NOTE: The print jets will begin to continue. Select the checkmark to print. 7. Apply two thin layers of your printed creation. NOTE: The printer will heat to dry before printing. NOTE: To ensure proper adhesion, the glue area should be larger than the base of Cube Glue to the main menu. When the printer has finished printing, select the checkmark to go to the print pad. 6. NOTE: Follow the steps in the section titled Finishing Your Creation. 3D Systems, Inc. 68
NOTE: For best results, allow the glue to operating temperature. NOTE: The print jets will begin to continue. Select the checkmark to print. 7. Apply two thin layers of your printed creation. NOTE: The printer will heat to dry before printing. NOTE: To ensure proper adhesion, the glue area should be larger than the base of Cube Glue to the main menu. When the printer has finished printing, select the checkmark to go to the print pad. 6. NOTE: Follow the steps in the section titled Finishing Your Creation. 3D Systems, Inc. 68
Cube3 User Guide
Page 90
... in texture. 6. Reinstall the print pad. 8. If Auto Gap is still adhered to the print pad, gently use the scraper to lightly sand all glue and print material from the printer. 2. NOTE: Ensure the print pad is clean and dry before installing it . 5. PRINT PAD MAINTENANCE Auto Level and Auto Gap can also be affected by a print pad that is most important to remove it in .5" (12...
... in texture. 6. Reinstall the print pad. 8. If Auto Gap is still adhered to the print pad, gently use the scraper to lightly sand all glue and print material from the printer. 2. NOTE: Ensure the print pad is clean and dry before installing it . 5. PRINT PAD MAINTENANCE Auto Level and Auto Gap can also be affected by a print pad that is most important to remove it in .5" (12...
Cube3 User Guide
Page 92
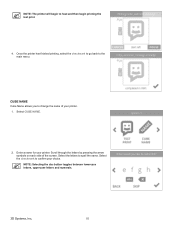
... arrow symbols on each side of your printer. NOTE: Selecting the abc button toggles between lowercase letters, uppercase letters and numerals. 3D Systems, Inc. 88 Select the letters to the main menu. Enter a name for your printer. 1. Select the checkmark to heat and then begin printing the test print. 4. Select CUBE NAME. 2. NOTE: The printer will begin to confirm...
... arrow symbols on each side of your printer. NOTE: Selecting the abc button toggles between lowercase letters, uppercase letters and numerals. 3D Systems, Inc. 88 Select the letters to the main menu. Enter a name for your printer. 1. Select the checkmark to heat and then begin printing the test print. 4. Select CUBE NAME. 2. NOTE: The printer will begin to confirm...
Cube3 Quick Start Guide
Page 16
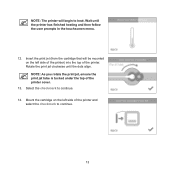
NOTE: The printer will be mounted on the left side of the printer) into the top of the printer. NOTE: As you rotate the print jet, ensure the print jet tube is tucked under the top of the printer and select the checkmark to heat. Wait until the dots align. Rotate the print jet clockwise until the printer has finished heating and then follow the user prompts in the touchscreen menu. 12. Insert the print jet (from the cartridge that will begin to continue. 13 Mount the cartridge on the left side of the printer cover. 13. Select the checkmark to continue. 14.
NOTE: The printer will be mounted on the left side of the printer) into the top of the printer. NOTE: As you rotate the print jet, ensure the print jet tube is tucked under the top of the printer and select the checkmark to heat. Wait until the dots align. Rotate the print jet clockwise until the printer has finished heating and then follow the user prompts in the touchscreen menu. 12. Insert the print jet (from the cartridge that will begin to continue. 13 Mount the cartridge on the left side of the printer cover. 13. Select the checkmark to continue. 14.
Cube3 Quick Start Guide
Page 18
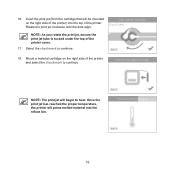
.... 15 Mount a material cartridge on the right side of the printer. 16. Insert the print jet (from the cartridge that will begin to heat. NOTE: The print jet will be mounted on the right side of the printer cover. 17. Rotate the print jet clockwise until the dots align. NOTE: As you rotate the print jet, ensure the print jet tube is tucked...
.... 15 Mount a material cartridge on the right side of the printer. 16. Insert the print jet (from the cartridge that will begin to heat. NOTE: The print jet will be mounted on the right side of the printer cover. 17. Rotate the print jet clockwise until the dots align. NOTE: As you rotate the print jet, ensure the print jet tube is tucked...


