
Cube3 User Guide
Page 2
... INFORMATION 1 FCC NOTICE 1 KCC 1 COMPLIANCE 1 WARRANTY 2 LIMITATION OF LIABILITY 2 EXTENDED WARRANTY 2 2 IMPORTANT SAFETY INFORMATION 3 Safety Symbols and Definitions 3 Safety Guidelines 3 3 CUBE 3D PRINTER FEATURES 4 Cube 3D Printer Features 4 Cube 3D Printer Properties 4 4 AT A GLANCE 5 5 SPECIFICATIONS AND REQUIREMENTS 6 Weight 6 Software 6 OpenGL Version 6 Windows Requirements 6 MAC OS X Requirements 6 Android 6 iOS 6 Wireless Options 6 USB Mass Storage...
... INFORMATION 1 FCC NOTICE 1 KCC 1 COMPLIANCE 1 WARRANTY 2 LIMITATION OF LIABILITY 2 EXTENDED WARRANTY 2 2 IMPORTANT SAFETY INFORMATION 3 Safety Symbols and Definitions 3 Safety Guidelines 3 3 CUBE 3D PRINTER FEATURES 4 Cube 3D Printer Features 4 Cube 3D Printer Properties 4 4 AT A GLANCE 5 5 SPECIFICATIONS AND REQUIREMENTS 6 Weight 6 Software 6 OpenGL Version 6 Windows Requirements 6 MAC OS X Requirements 6 Android 6 iOS 6 Wireless Options 6 USB Mass Storage...

Cube3 User Guide
Page 3
... Removing your Creation from the Jet Wiper Purge Bins 78 Replacing the Jet Wipers 79 Procedure 79 Draft 52 Connecting Cubify To Your Printer 54 Connecting Cubify To Your Printer Manually 54 Printing A Model Via Wireless Connection 62 Printing From A Desktop Application 62 Printing From A Mobile Application 65 Saving A Model to A Mass...
... Removing your Creation from the Jet Wiper Purge Bins 78 Replacing the Jet Wipers 79 Procedure 79 Draft 52 Connecting Cubify To Your Printer 54 Connecting Cubify To Your Printer Manually 54 Printing A Model Via Wireless Connection 62 Printing From A Desktop Application 62 Printing From A Mobile Application 65 Saving A Model to A Mass...

Cube3 User Guide
Page 4
Print Pad Calibration 81 Auto Level 81 Gap Verification 84 Manual Gap Adjustment 85 Print Pad Maintenance 86 Clean The Print Pad 86 Test Print 87 Cube Name 88 Updating the Cube Firmware 89 Updating Firmware Using Wi-F.i 89 Updating Firmware Using USB 92 Repacking the Printer 94 Contacting Support 96 12 CUBIFY SUSTAINABILITY PROGRAM 97
Print Pad Calibration 81 Auto Level 81 Gap Verification 84 Manual Gap Adjustment 85 Print Pad Maintenance 86 Clean The Print Pad 86 Test Print 87 Cube Name 88 Updating the Cube Firmware 89 Updating Firmware Using Wi-F.i 89 Updating Firmware Using USB 92 Repacking the Printer 94 Contacting Support 96 12 CUBIFY SUSTAINABILITY PROGRAM 97
Cube3 User Guide
Page 5
...based on a circuit different from and two types of the FCC Rules. COMPLIANCE This equipment conforms with the limits for help. This printer is no guarantee that interference will not occur in the family to radio communications. All rights reserved. Use of the Cubify.com website constitutes..., enjoy the freedom to change without notice. CAN ICES-3 (B)/NMB-3(B) This device complies with other creative partners • Buy the Cube 3D Printer, print cartridges, and supplies COPYRIGHT INFORMATION ©2014 by one or more of 3D Systems, Inc. This document is the property of the ...
...based on a circuit different from and two types of the FCC Rules. COMPLIANCE This equipment conforms with the limits for help. This printer is no guarantee that interference will not occur in the family to radio communications. All rights reserved. Use of the Cubify.com website constitutes..., enjoy the freedom to change without notice. CAN ICES-3 (B)/NMB-3(B) This device complies with other creative partners • Buy the Cube 3D Printer, print cartridges, and supplies COPYRIGHT INFORMATION ©2014 by one or more of 3D Systems, Inc. This document is the property of the ...
Cube3 User Guide
Page 6
...THE REASON. TO THE MAXIMUM EXTENT PERMITTED BY LAW, 3D SYSTEMS EXPRESSLY DISCLAIMS ALL OTHER WARRANTIES FOR THE CUBE OR CUBEPRO 3D PRINTER AND EACH OF ITS COMPONENTS, WHETHER THOSE WARRANTIES ARE EXPRESS, IMPLIED OR STATUTORY, INCLUDING WARRANTIES OF MERCHANTABILITY AND FITNESS FOR INTENDED ...by email at [email protected]. 3D Systems, Inc. 2 com. For consumers who are in addition to you purchased your Cube 3D printer is activated. This warranty excludes (i) normal consumable or expendable parts (such as Material Cartridges), (ii) repairs required during the warranty period ...
...THE REASON. TO THE MAXIMUM EXTENT PERMITTED BY LAW, 3D SYSTEMS EXPRESSLY DISCLAIMS ALL OTHER WARRANTIES FOR THE CUBE OR CUBEPRO 3D PRINTER AND EACH OF ITS COMPONENTS, WHETHER THOSE WARRANTIES ARE EXPRESS, IMPLIED OR STATUTORY, INCLUDING WARRANTIES OF MERCHANTABILITY AND FITNESS FOR INTENDED ...by email at [email protected]. 3D Systems, Inc. 2 com. For consumers who are in addition to you purchased your Cube 3D printer is activated. This warranty excludes (i) normal consumable or expendable parts (such as Material Cartridges), (ii) repairs required during the warranty period ...
Cube3 User Guide
Page 7
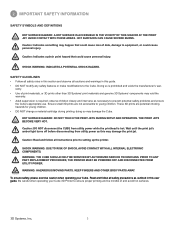
... SHOCK HAZARD. Caution: Read and follow all cautions and warnings in this section and observe all safety precautions as necessary to setting up the printer. ranty. • Use of and avoid hot surfaces. 3D Systems, Inc. 3 WARNING: THE CUBE SHOULD ONLY BE SERVICED BY AUTHORIZED SERVICE...before disconnecting from utility power while the printhead is prohibited and voids the manufacturer's war- PRIOR TO ANY PART REPLACEMENT PROCEDURE, THE PRINTER MUST BE POWERED OFF AND DISCONNECTED FROM UTILITY POWER. KEEP FINGERS AND OTHER BODY PARTS AWAY. Doing so is hot. Caution: DO...
... SHOCK HAZARD. Caution: Read and follow all cautions and warnings in this section and observe all safety precautions as necessary to setting up the printer. ranty. • Use of and avoid hot surfaces. 3D Systems, Inc. 3 WARNING: THE CUBE SHOULD ONLY BE SERVICED BY AUTHORIZED SERVICE...before disconnecting from utility power while the printhead is prohibited and voids the manufacturer's war- PRIOR TO ANY PART REPLACEMENT PROCEDURE, THE PRINTER MUST BE POWERED OFF AND DISCONNECTED FROM UTILITY POWER. KEEP FINGERS AND OTHER BODY PARTS AWAY. Doing so is hot. Caution: DO...
Cube3 User Guide
Page 8
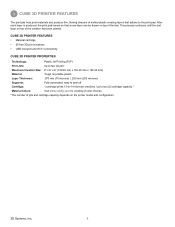
...Visit www.cubify.com for a listing of color choices. *The number of jets and cartridge capacity depends on top of the last. CUBE 3D PRINTER FEATURES • Material cartridge • 25 free 3D print creations • USB inlet port and Wi-Fi connectivity CUBE 3D... Material: Tough recyclable plastic Layer Thickness: .070 mm (70 microns) | .200 mm (200 microns) Supports: Fully automated; Up to the print pad. 3 CUBE 3D PRINTER FEATURES The print jets heat print materials and produce thin, flowing streams of melted plastic creating layers that a new layer can be drawn on the...
...Visit www.cubify.com for a listing of color choices. *The number of jets and cartridge capacity depends on top of the last. CUBE 3D PRINTER FEATURES • Material cartridge • 25 free 3D print creations • USB inlet port and Wi-Fi connectivity CUBE 3D... Material: Tough recyclable plastic Layer Thickness: .070 mm (70 microns) | .200 mm (200 microns) Supports: Fully automated; Up to the print pad. 3 CUBE 3D PRINTER FEATURES The print jets heat print materials and produce thin, flowing streams of melted plastic creating layers that a new layer can be drawn on the...
Cube3 User Guide
Page 10
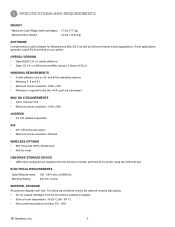
... with WPS Infrastructure • Ad Hoc mode USB MASS STORAGE DEVICE • USB mass storage device (supplied with the printer) to transfer print files to the printer using 3.2 library of GLU) WINDOWS REQUIREMENTS • Cubify software runs on 32- ELECTRICAL REQUIREMENTS Outlet Requirements Electrical Rating:... at 50/60 Hz 24V DC, 5 amp. OPENGL VERSION • OpenGLES 2.0+ on mobile platforms • Open GL 3.0+ on your printer. The following conditions ensure the material remains high quality: • Do not unpack cartridges from the foil until the material is required for ...
... with WPS Infrastructure • Ad Hoc mode USB MASS STORAGE DEVICE • USB mass storage device (supplied with the printer) to transfer print files to the printer using 3.2 library of GLU) WINDOWS REQUIREMENTS • Cubify software runs on 32- ELECTRICAL REQUIREMENTS Outlet Requirements Electrical Rating:... at 50/60 Hz 24V DC, 5 amp. OPENGL VERSION • OpenGLES 2.0+ on mobile platforms • Open GL 3.0+ on your printer. The following conditions ensure the material remains high quality: • Do not unpack cartridges from the foil until the material is required for ...
Cube3 User Guide
Page 12
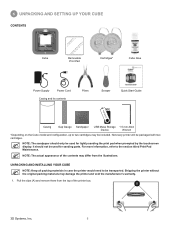
...not be included. UNPACKING AND INSTALLING YOUR CUBE NOTE: Keep all packing materials in case the printer would need to two cartridges may be used for sanding parts. Shipping the printer without the original packing materials may differ from the illustrations. Pull the clips (A) and remove them... from the top of the contents may damage the printer and void the manufacturer's warranty. 1. It should only be packaged with two cartridges. Not every printer will be used for lightly sanding the print pad when prompted by the touchscreen display....
...not be included. UNPACKING AND INSTALLING YOUR CUBE NOTE: Keep all packing materials in case the printer would need to two cartridges may be used for sanding parts. Shipping the printer without the original packing materials may differ from the illustrations. Pull the clips (A) and remove them... from the top of the contents may damage the printer and void the manufacturer's warranty. 1. It should only be packaged with two cartridges. Not every printer will be used for lightly sanding the print pad when prompted by the touchscreen display....
Cube3 User Guide
Page 13
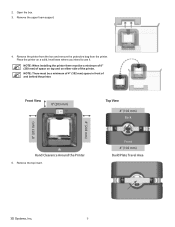
...There must be a minimum of 4" (102 mm) space in front of and behind the printer. Open the box. 3. NOTE: When installing the printer there must be a minimum of 8" (203 mm) of the printer. Place the printer on either side of space on top and on a solid, level base where you intend to... use it. Remove the top insert. 2. Front View 8" (203 mm) Top View 4" (102 mm) Back 8" (203 mm) 8" (203 mm) Hand Clearance Around the Printer 5. Front 4" (102 mm...
...There must be a minimum of 4" (102 mm) space in front of and behind the printer. Open the box. 3. NOTE: When installing the printer there must be a minimum of 8" (203 mm) of the printer. Place the printer on either side of space on top and on a solid, level base where you intend to... use it. Remove the top insert. 2. Front View 8" (203 mm) Top View 4" (102 mm) Back 8" (203 mm) 8" (203 mm) Hand Clearance Around the Printer 5. Front 4" (102 mm...
Cube3 User Guide
Page 14
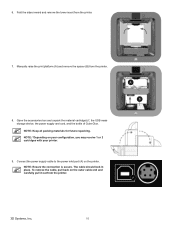
... the power supply cable to the power inlet port (A) on your configuration, you may receive 1 or 2 cartridges with your printer. 9. Open the accessories box and unpack the material cartridge(s)*, the USB mass storage device, the power supply and cord, and the bottle of Cube ... A B A 3D Systems, Inc. 10 Manually raise the print platform (A) and remove the spacer (B) from the printer. To remove the cable, pull back on the outer cable end and carefully pull it out from the printer. 8. NOTE: Keep all packing materials for future repacking. The cable should lock in place. Fold the...
... the power supply cable to the power inlet port (A) on your configuration, you may receive 1 or 2 cartridges with your printer. 9. Open the accessories box and unpack the material cartridge(s)*, the USB mass storage device, the power supply and cord, and the bottle of Cube ... A B A 3D Systems, Inc. 10 Manually raise the print platform (A) and remove the spacer (B) from the printer. To remove the cable, pull back on the outer cable end and carefully pull it out from the printer. 8. NOTE: Keep all packing materials for future repacking. The cable should lock in place. Fold the...
Cube3 User Guide
Page 15
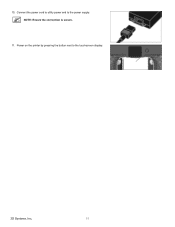
NOTE: Ensure the connection is secure. 11. Power on the printer by pressing the button next to the power supply. 10. Connect the power cord to utility power and to the touchscreen display. 3D Systems, Inc. 11
NOTE: Ensure the connection is secure. 11. Power on the printer by pressing the button next to the power supply. 10. Connect the power cord to utility power and to the touchscreen display. 3D Systems, Inc. 11
Cube3 User Guide
Page 16
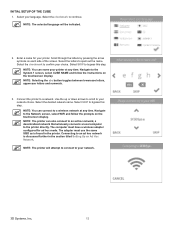
... The selected language will attempt to connect to confirm your network choice. Enter a name for ad hoc mode. Select the checkmark to your printer at any time. NOTE: Selecting the abc button toggles between lowercase letters, uppercase letters and numerals. 3. Use the up or down arrows ...3D Systems, Inc. 12 INITIAL SETUP OF THE CUBE 1. The computer must use the same SSID as is discussed further in the printer. Select your printer. The adapter must have a wireless adapter configured for your language. Select SKIP to your choice. Select SKIP to an ad hoc ...
... The selected language will attempt to connect to confirm your network choice. Enter a name for ad hoc mode. Select the checkmark to your printer at any time. NOTE: Selecting the abc button toggles between lowercase letters, uppercase letters and numerals. 3. Use the up or down arrows ...3D Systems, Inc. 12 INITIAL SETUP OF THE CUBE 1. The computer must use the same SSID as is discussed further in the printer. Select your printer. The adapter must have a wireless adapter configured for your language. Select SKIP to your choice. Select SKIP to an ad hoc ...
Cube3 User Guide
Page 17
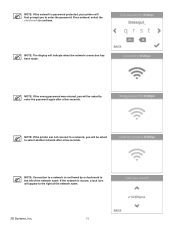
NOTE: If the printer can not connect to a network, you will be asked to enter the password again after a few seconds. NOTE: Connection to a network is confirmed by a checkmark ... appear to enter the password. NOTE: The display will indicate when the network connection has been made. NOTE: If the network is password protected, your printer will first prompt you to the right of the network name.
NOTE: If the printer can not connect to a network, you will be asked to enter the password again after a few seconds. NOTE: Connection to a network is confirmed by a checkmark ... appear to enter the password. NOTE: The display will indicate when the network connection has been made. NOTE: If the network is password protected, your printer will first prompt you to the right of the network name.
Cube3 User Guide
Page 18
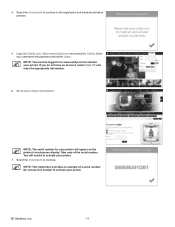
...www.cubify.com/activate. NOTE: You must be logged in to www.cubify.com and select My Cubify. Go to continue. 4. Enter your printer. Do not use this number to activate your username and password and select Login. Go to Cubify.com. If you do not have an account..., select SIGN UP and enter the appropriate information. 6. NOTE: The serial number for your printer. 3D Systems, Inc. 14 Log in to www.cubify.com to activate your printer will need it to the registration and warranty activation process. 5. Select the checkmark to continue to activate ...
...www.cubify.com/activate. NOTE: You must be logged in to www.cubify.com and select My Cubify. Go to continue. 4. Enter your printer. Do not use this number to activate your username and password and select Login. Go to Cubify.com. If you do not have an account..., select SIGN UP and enter the appropriate information. 6. NOTE: The serial number for your printer. 3D Systems, Inc. 14 Log in to www.cubify.com to activate your printer will need it to the registration and warranty activation process. 5. Select the checkmark to continue to activate ...
Cube3 User Guide
Page 19
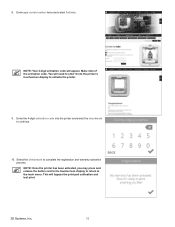
You will need to enter it into the printer and select the checkmark to activate the printer. 9. Enter the 4-digit activation code into the printer's touchscreen display to continue. 10. NOTE: Once the printer has been activated, you may press and release the button next to the touchscreen display to return to complete the registration...
You will need to enter it into the printer and select the checkmark to activate the printer. 9. Enter the 4-digit activation code into the printer's touchscreen display to continue. 10. NOTE: Once the printer has been activated, you may press and release the button next to the touchscreen display to return to complete the registration...
Cube3 User Guide
Page 20
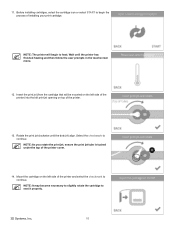
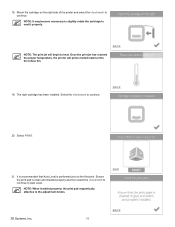
...: It may become necessary to slightly rotate the cartridge to heat. Insert the print jet (from the cartridge that will begin the process of the printer and select the checkmark to continue NOTE: As you rotate the print jet, ensure the print jet tube is tucked under the top of the... printer. 13. NOTE: The printer will be mounted on the left side of the printer) into the left print jet opening on the left side of installing your print cartridge. Before installing cartridges, select...
...: It may become necessary to slightly rotate the cartridge to heat. Insert the print jet (from the cartridge that will begin the process of the printer and select the checkmark to continue NOTE: As you rotate the print jet, ensure the print jet tube is tucked under the top of the... printer. 13. NOTE: The printer will be mounted on the left side of the printer) into the left print jet opening on the left side of installing your print cartridge. Before installing cartridges, select...
Cube3 User Guide
Page 21
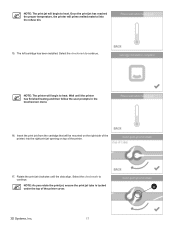
...Select the checkmark to heat. Wait until the dots align. Rotate the print jet clockwise until the printer has finished heating and then follow the user prompts in the touchscreen menu. 16. NOTE: The printer will begin to continue. Select the checkmark to heat. Insert the print jet (from the cartridge... that will prime melted material into the right print jet opening on top of the printer. 17. NOTE: The print jet will begin to continue. A 3D Systems, Inc. 17 The left cartridge has been installed. NOTE: As you ...
...Select the checkmark to heat. Wait until the dots align. Rotate the print jet clockwise until the printer has finished heating and then follow the user prompts in the touchscreen menu. 16. NOTE: The printer will begin to continue. Select the checkmark to heat. Insert the print jet (from the cartridge... that will prime melted material into the right print jet opening on top of the printer. 17. NOTE: The print jet will begin to continue. A 3D Systems, Inc. 17 The left cartridge has been installed. NOTE: As you ...
Cube3 User Guide
Page 22
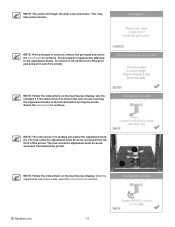
.... Select PRINT. 21. Select the checkmark to heat. Once the print jet has reached the proper temperature, the printer will begin to continue. 20. Mount the cartridge on the right side of the printer and select the checkmark to the adjustment knobs. 3D Systems, Inc. 18 NOTE: When installed properly, the print...
.... Select PRINT. 21. Select the checkmark to heat. Once the print jet has reached the proper temperature, the printer will begin to continue. 20. Mount the cartridge on the right side of the printer and select the checkmark to the adjustment knobs. 3D Systems, Inc. 18 NOTE: When installed properly, the print...
Cube3 User Guide
Page 23
... lock screws securing the adjustment knobs to continue. To remove it, lift up the front of the print pad and pull it out of the printer. Select the checkmark to continue. 2 1 3D Systems, Inc. 19 NOTE: Follow the instructions on the touchscreen display. The lock screw for ...adjustment knob B can be accessed from behind the printer. NOTE: Follow the instructions on the touchscreen display. The lock screw for adjustment knob A can be accessed from the front of the...
... lock screws securing the adjustment knobs to continue. To remove it, lift up the front of the print pad and pull it out of the printer. Select the checkmark to continue. 2 1 3D Systems, Inc. 19 NOTE: Follow the instructions on the touchscreen display. The lock screw for ...adjustment knob B can be accessed from behind the printer. NOTE: Follow the instructions on the touchscreen display. The lock screw for adjustment knob A can be accessed from the front of the...

