
User Manual
Page 1
Kodak EasyShare Z812 IS zoom digital camera User's guide www.kodak.com For interactive tutorials, www.kodak.com/go/howto For help with your camera, www.kodak.com/go/z812support
Kodak EasyShare Z812 IS zoom digital camera User's guide www.kodak.com For interactive tutorials, www.kodak.com/go/howto For help with your camera, www.kodak.com/go/z812support

User Manual
Page 2
Kodak and EasyShare are simulated. P/N 2F6565_en Eastman Kodak Company Rochester, New York 14650 © Eastman Kodak Company, 2007 All screen images are trademarks of Eastman Kodak Company.
Kodak and EasyShare are simulated. P/N 2F6565_en Eastman Kodak Company Rochester, New York 14650 © Eastman Kodak Company, 2007 All screen images are trademarks of Eastman Kodak Company.
User Manual
Page 3
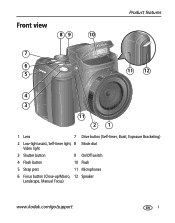
Front view 89 10 7 6 5 Product features 11 12 4 3 11 21 1 Lens 7 Drive button (Self-timer, Burst, Exposure Bracketing) 2 Low-light assist, Self-timer light, 8 Mode dial Video light 3 Shutter button 9 On/Off switch 4 Flash button 10 Flash 5 Strap post 11 Microphones 6 Focus button (Close-up/Macro, 12 Speaker Landscape, Manual Focus) www.kodak.com/go/support i
Front view 89 10 7 6 5 Product features 11 12 4 3 11 21 1 Lens 7 Drive button (Self-timer, Burst, Exposure Bracketing) 2 Low-light assist, Self-timer light, 8 Mode dial Video light 3 Shutter button 9 On/Off switch 4 Flash button 10 Flash 5 Strap post 11 Microphones 6 Focus button (Close-up/Macro, 12 Speaker Landscape, Manual Focus) www.kodak.com/go/support i

User Manual
Page 4
Product features Back view 7 6 5 8 9 10 11 12 13 4 3 21 1 Battery compartment 10 Info button 2 Slot for optional SD card 11 Review button 3 Tripod socket 12 DC-In (3V) 4 Dock connector 13 USB, A/V Out 5 LCD 14 OK button 6 EVF/LCD button 15 7 EVF (Electronic viewfinder) 16 Share button 8 Zoom (Wide Angle/Telephoto) button 17 Menu button 9 Jog dial 18 Delete button 14 15 16 17 18 ,for optional AC adapter ii www.kodak.com/go/support
Product features Back view 7 6 5 8 9 10 11 12 13 4 3 21 1 Battery compartment 10 Info button 2 Slot for optional SD card 11 Review button 3 Tripod socket 12 DC-In (3V) 4 Dock connector 13 USB, A/V Out 5 LCD 14 OK button 6 EVF/LCD button 15 7 EVF (Electronic viewfinder) 16 Share button 8 Zoom (Wide Angle/Telephoto) button 17 Menu button 9 Jog dial 18 Delete button 14 15 16 17 18 ,for optional AC adapter ii www.kodak.com/go/support

User Manual
Page 5
... the lens cap and strap 1 Loading the battery 2 Turning on the camera 3 Setting the language and date/time 3 Storing pictures on an SD card 4 2 Taking pictures/videos 5 Taking a picture 5 Using...with pictures/videos 15 Reviewing pictures and videos 15 Deleting pictures and videos 16 Using the Menu button in Review 17 Using Kodak Perfect Touch technology 18 Cropping pictures 18 Adding sound tags 19 Editing videos 20 Using the histogram to view picture exposure ...multiple pictures/videos 26 Copying pictures and videos 27 What the review icons mean 28 www.kodak.com/go/support iii
... the lens cap and strap 1 Loading the battery 2 Turning on the camera 3 Setting the language and date/time 3 Storing pictures on an SD card 4 2 Taking pictures/videos 5 Taking a picture 5 Using...with pictures/videos 15 Reviewing pictures and videos 15 Deleting pictures and videos 16 Using the Menu button in Review 17 Using Kodak Perfect Touch technology 18 Cropping pictures 18 Adding sound tags 19 Editing videos 20 Using the histogram to view picture exposure ...multiple pictures/videos 26 Copying pictures and videos 27 What the review icons mean 28 www.kodak.com/go/support iii
User Manual
Page 6
... 42 5 Transferring and printing pictures 48 Installing the software 48 Transferring pictures 49 Printing pictures 50 Accessories for your camera 52 6 Troubleshooting 53 7 Getting help 57 Helpful links 57 8 Appendix 59 Camera specifications 59 Care and maintenance 61 Storage capacities 62 Important safety instructions 62 Battery life 63 Upgrading your software and...
... 42 5 Transferring and printing pictures 48 Installing the software 48 Transferring pictures 49 Printing pictures 50 Accessories for your camera 52 6 Troubleshooting 53 7 Getting help 57 Helpful links 57 8 Appendix 59 Camera specifications 59 Care and maintenance 61 Storage capacities 62 Important safety instructions 62 Battery life 63 Upgrading your software and...

User Manual
Page 7
1 Setting up your camera Attaching the lens cap and strap 1 2 www.kodak.com/go/support 1
1 Setting up your camera Attaching the lens cap and strap 1 2 www.kodak.com/go/support 1
User Manual
Page 8
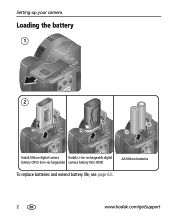
Setting up your camera Loading the battery 1 2 Kodak lithium digital camera Kodak Li-Ion rechargeable digital battery CRV3 (non-rechargeable) camera battery KLIC-8000 AA lithium batteries To replace batteries and extend battery life, see page 63. 2 www.kodak.com/go/support
Setting up your camera Loading the battery 1 2 Kodak lithium digital camera Kodak Li-Ion rechargeable digital battery CRV3 (non-rechargeable) camera battery KLIC-8000 AA lithium batteries To replace batteries and extend battery life, see page 63. 2 www.kodak.com/go/support

User Manual
Page 9
for previous/next field. Turning on the camera Setting up your camera Setting the language and date/time Language: 1 to change. 2 OK to accept. www.kodak.com/go/support 3 OK OK to accept. NOTE: To change . Date/Time: 1 At the prompt, press OK. 2 to change the date/time and language in the future, use the Menu button (see page 37).
for previous/next field. Turning on the camera Setting up your camera Setting the language and date/time Language: 1 to change. 2 OK to accept. www.kodak.com/go/support 3 OK OK to accept. NOTE: To change . Date/Time: 1 At the prompt, press OK. 2 to change the date/time and language in the future, use the Menu button (see page 37).
User Manual
Page 10
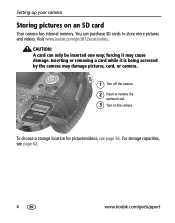
...card. 3 Turn on an SD card Your camera has internal memory. You can only be inserted one way; forcing it is being accessed by the camera may cause damage. To choose a storage location for pictures/videos, see page 62. 4 www.kodak.com/go /z812accessories. CAUTION: A card ...can purchase SD cards to store more pictures and videos. Visit www.kodak.com/go /support For storage capacities, see...
...card. 3 Turn on an SD card Your camera has internal memory. You can only be inserted one way; forcing it is being accessed by the camera may cause damage. To choose a storage location for pictures/videos, see page 62. 4 www.kodak.com/go /z812accessories. CAUTION: A card ...can purchase SD cards to store more pictures and videos. Visit www.kodak.com/go /support For storage capacities, see...
User Manual
Page 11
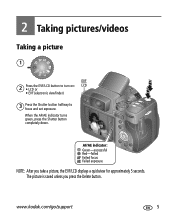
www.kodak.com/go/support 5 2 Taking pictures/videos Taking a picture 1 EVF 2 Press the EVF/LCD button to turn on: • LCD or LCD • EVF (electronic viewfinder) 3 Press the Shutter button halfway to focus and set exposure. The picture is saved unless you take a picture, the EVF/LCD displays a quickview for approximately 5 seconds. AF/AE indicator: Green-successful Red-failed Failed focus Failed exposure NOTE: After you press the Delete button. When the AF/AE indicator turns green, press the Shutter button completely down.
www.kodak.com/go/support 5 2 Taking pictures/videos Taking a picture 1 EVF 2 Press the EVF/LCD button to turn on: • LCD or LCD • EVF (electronic viewfinder) 3 Press the Shutter button halfway to focus and set exposure. The picture is saved unless you take a picture, the EVF/LCD displays a quickview for approximately 5 seconds. AF/AE indicator: Green-successful Red-failed Failed focus Failed exposure NOTE: After you press the Delete button. When the AF/AE indicator turns green, press the Shutter button completely down.
User Manual
Page 12
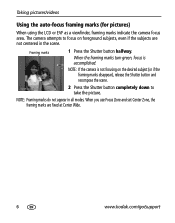
...framing marks (for pictures) When using the LCD or EVF as a viewfinder, framing marks indicate the camera focus area. NOTE: Framing marks do not appear in the scene. Framing marks 1 Press the Shutter button halfway. NOTE:... If the camera is accomplished. The camera attempts to focus on the desired subject (or if the framing marks disappear), release the Shutter button and recompose... focusing on foreground subjects, even if the subjects are fixed at Center Wide. 6 www.kodak.com/go/support
...framing marks (for pictures) When using the LCD or EVF as a viewfinder, framing marks indicate the camera focus area. NOTE: Framing marks do not appear in the scene. Framing marks 1 Press the Shutter button halfway. NOTE:... If the camera is accomplished. The camera attempts to focus on the desired subject (or if the framing marks disappear), release the Shutter button and recompose... focusing on foreground subjects, even if the subjects are fixed at Center Wide. 6 www.kodak.com/go/support

User Manual
Page 13
Taking pictures/videos NOTE: After you press the Delete button. To play/pause the video during the quickview, press OK. The video is saved unless you take a video, the EVF/LCD displays a quickview for approximately 5 seconds. www.kodak.com/go/support 7 Taking a video 1 EVF LCD 2 Press the EVF/LCD button to turn on: • LCD or • EVF (electronic viewfinder) 3 Press the Shutter button completely down and release. To stop recording, press and release the Shutter button again.
Taking pictures/videos NOTE: After you press the Delete button. To play/pause the video during the quickview, press OK. The video is saved unless you take a video, the EVF/LCD displays a quickview for approximately 5 seconds. www.kodak.com/go/support 7 Taking a video 1 EVF LCD 2 Press the EVF/LCD button to turn on: • LCD or • EVF (electronic viewfinder) 3 Press the Shutter button completely down and release. To stop recording, press and release the Shutter button again.
User Manual
Page 14
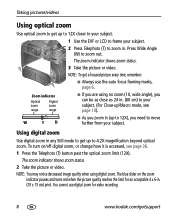
... and turns red when the picture quality reaches the limit for video recording. 8 www.kodak.com/go/support The zoom indicator shows zoom status. 3 Take the picture or video. Using digital zoom Use digital zoom in any Still mode to get up to move further from your subject. The ...zoom out. W T D ■ As you need to 4.2X magnification beyond optical zoom. NOTE: To get a focused picture every time, remember: ■ Always use digital zoom for an acceptable 4 x 6-in . You cannot use the auto focus framing marks, page 6. Press Wide Angle (W) to zoom in . (10 x 15 cm) print.
... and turns red when the picture quality reaches the limit for video recording. 8 www.kodak.com/go/support The zoom indicator shows zoom status. 3 Take the picture or video. Using digital zoom Use digital zoom in any Still mode to get up to move further from your subject. The ...zoom out. W T D ■ As you need to 4.2X magnification beyond optical zoom. NOTE: To get a focused picture every time, remember: ■ Always use digital zoom for an acceptable 4 x 6-in . You cannot use the auto focus framing marks, page 6. Press Wide Angle (W) to zoom in . (10 x 15 cm) print.
User Manual
Page 15
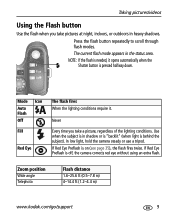
...a picture, regardless of the lighting conditions. If Red Eye Preflash is off, the camera corrects red eye without using an extra flash. Zoom position Wide angle Telephoto Flash distance 1.6-25.6 ft (0.5-7.8 m) 4-14.4 ft (1.2-4.4 m) www.kodak.com/go/support 9 NOTE: If the flash is needed, it . Mode Icon ...automatically when the Shutter button is behind the subject). Press the flash button repeatedly to scroll through flash modes. In low light, hold the camera steady or use a tripod. Use when the subject is in shadow or is "backlit" (when light is pressed halfway down. Taking ...
...a picture, regardless of the lighting conditions. If Red Eye Preflash is off, the camera corrects red eye without using an extra flash. Zoom position Wide angle Telephoto Flash distance 1.6-25.6 ft (0.5-7.8 m) 4-14.4 ft (1.2-4.4 m) www.kodak.com/go/support 9 NOTE: If the flash is needed, it . Mode Icon ...automatically when the Shutter button is behind the subject). Press the flash button repeatedly to scroll through flash modes. In low light, hold the camera steady or use a tripod. Use when the subject is in shadow or is "backlit" (when light is pressed halfway down. Taking ...
User Manual
Page 16
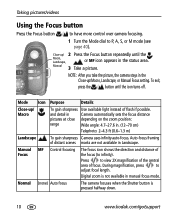
...the Focus button to have more control over camera focusing. 1 Turn the Mode dial to adjust focal length. Close-up/ 2 Press the Focus button repeatedly until the icon turns off. Digital zoom is pressed halfway down. 10 www.kodak.com/go/support Mode Icon Purpose Details ...Close-up /Macro, Landscape, or Manual Focus setting. Normal (none) Auto focus The camera focuses when the Shutter button is not available in...
...the Focus button to have more control over camera focusing. 1 Turn the Mode dial to adjust focal length. Close-up/ 2 Press the Focus button repeatedly until the icon turns off. Digital zoom is pressed halfway down. 10 www.kodak.com/go/support Mode Icon Purpose Details ...Close-up /Macro, Landscape, or Manual Focus setting. Normal (none) Auto focus The camera focuses when the Shutter button is not available in...
User Manual
Page 17
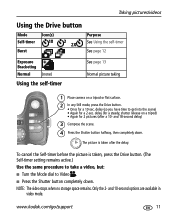
... the same procedure to take a video, but: ■ Turn the Mode dial to get into the scene) • Again for a 10-sec. Only the 2- www.kodak.com/go/support 11 and 18-second delay) 3 Compose the scene. 4 Press the Shutter button halfway, then completely down . Taking pictures/videos Using the Drive... 2 2X Purpose See Using the self-timer See page 12 Exposure Bracketing Normal (none) Using the self-timer See page 13 Normal picture taking 1 Place camera on a tripod) • Again for 2 pictures (after the delay.
... the same procedure to take a video, but: ■ Turn the Mode dial to get into the scene) • Again for a 10-sec. Only the 2- www.kodak.com/go/support 11 and 18-second delay) 3 Compose the scene. 4 Press the Shutter button halfway, then completely down . Taking pictures/videos Using the Drive... 2 2X Purpose See Using the self-timer See page 12 Exposure Bracketing Normal (none) Using the self-timer See page 13 Normal picture taking 1 Place camera on a tripod) • Again for 2 pictures (after the delay.
User Manual
Page 18
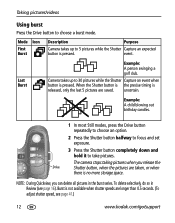
... club. When the Shutter button is the precise timing is not available when shutter speeds are saved. Camera takes up to 30 pictures while the Shutter Capture an event when button is no more storage space.... To delete selectively, do so in the burst series. Mode Icon First Burst Description Purpose Camera takes up to 5 pictures while the Shutter Capture an expected button is pressed. uncertain. Example: A child... Press the Drive button to take pictures. The camera stops taking pictures when you can delete all pictures in Review (see page 41.) 12 www...
... club. When the Shutter button is the precise timing is not available when shutter speeds are saved. Camera takes up to 30 pictures while the Shutter Capture an event when button is no more storage space.... To delete selectively, do so in the burst series. Mode Icon First Burst Description Purpose Camera takes up to 5 pictures while the Shutter Capture an expected button is pressed. uncertain. Example: A child... Press the Drive button to take pictures. The camera stops taking pictures when you can delete all pictures in Review (see page 41.) 12 www...
User Manual
Page 19
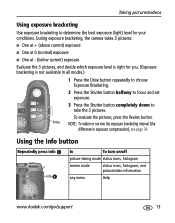
During exposure bracketing, the camera takes 3 pictures: ■ One at + (above current) exposure ■ One at 0 (normal) exposure ■ One at - (below current) exposure Evaluate the 3 pictures, and decide which ... Info In To turn on/off picture-taking mode status icons, histogram review mode status icons, histogram, and picture/video information any menu Help www.kodak.com/go/support 13 Drive NOTE: To widen or narrow the exposure bracketing interval (the difference in all modes.) 1 Press the Drive button repeatedly to...
During exposure bracketing, the camera takes 3 pictures: ■ One at + (above current) exposure ■ One at 0 (normal) exposure ■ One at - (below current) exposure Evaluate the 3 pictures, and decide which ... Info In To turn on/off picture-taking mode status icons, histogram review mode status icons, histogram, and picture/video information any menu Help www.kodak.com/go/support 13 Drive NOTE: To widen or narrow the exposure bracketing interval (the difference in all modes.) 1 Press the Drive button repeatedly to...
User Manual
Page 20
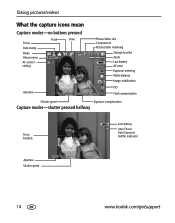
Taking pictures/videos What the capture icons mean Capture modes-no buttons pressed Focus Date stamp Mode Album name AF control setting Flash Drive Aperture Picture/video size Compression Pictures/time remaining Storage location Zoom Low battery AF zone Exposure metering White Balance Image stabilization ISO Flash compensation Shutter speed Exposure compensation Capture modes-shutter pressed halfway Focus brackets Low battery Auto Focus/ Auto Exposure (AF/AE indicator) Aperture Shutter speed 14 www.kodak.com/go/support
Taking pictures/videos What the capture icons mean Capture modes-no buttons pressed Focus Date stamp Mode Album name AF control setting Flash Drive Aperture Picture/video size Compression Pictures/time remaining Storage location Zoom Low battery AF zone Exposure metering White Balance Image stabilization ISO Flash compensation Shutter speed Exposure compensation Capture modes-shutter pressed halfway Focus brackets Low battery Auto Focus/ Auto Exposure (AF/AE indicator) Aperture Shutter speed 14 www.kodak.com/go/support
