User Manual
Page 5
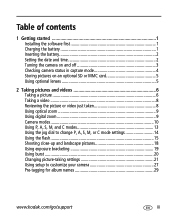
...1 1 Getting started 1 Installing the software first 1 Charging the battery 1 Inserting the battery 2 Setting the date and time 2 Turning the camera on and off 3 Checking camera status in capture mode 4 Storing pictures on an optional SD or MMC card 5 Using optional lenses 5 2 Taking pictures and videos 6 Taking a picture 6 Taking a video 8 Reviewing the picture or video just taken 8 Using optical zoom 9 Using digital zoom 9 Camera modes 10 Using P, A, S, M, and C modes 13 Using the jog dial to change P, A, S, M, or C mode settings 14 Using the flash 15 Shooting close-up and...
...1 1 Getting started 1 Installing the software first 1 Charging the battery 1 Inserting the battery 2 Setting the date and time 2 Turning the camera on and off 3 Checking camera status in capture mode 4 Storing pictures on an optional SD or MMC card 5 Using optional lenses 5 2 Taking pictures and videos 6 Taking a picture 6 Taking a video 8 Reviewing the picture or video just taken 8 Using optical zoom 9 Using digital zoom 9 Camera modes 10 Using P, A, S, M, and C modes 13 Using the jog dial to change P, A, S, M, or C mode settings 14 Using the flash 15 Shooting close-up and...
User Manual
Page 6
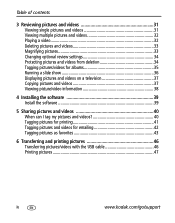
... review settings 34 Protecting pictures and videos from deletion 34 Tagging pictures/videos for albums 35 Running a slide show 36 Displaying pictures and videos on a television 37 Copying pictures and videos 37 Viewing picture/video information 38 4 Installing the software 39 Install the software 39 5 Sharing pictures and videos 40 When can I tag my pictures and videos 40 Tagging pictures for printing 41 Tagging pictures and videos for emailing 42 Tagging pictures as favorites 43 6 Transferring and printing pictures 46 Transferring pictures/videos with the USB cable 46 Printing...
... review settings 34 Protecting pictures and videos from deletion 34 Tagging pictures/videos for albums 35 Running a slide show 36 Displaying pictures and videos on a television 37 Copying pictures and videos 37 Viewing picture/video information 38 4 Installing the software 39 Install the software 39 5 Sharing pictures and videos 40 When can I tag my pictures and videos 40 Tagging pictures for printing 41 Tagging pictures and videos for emailing 42 Tagging pictures as favorites 43 6 Transferring and printing pictures 46 Transferring pictures/videos with the USB cable 46 Printing...
User Manual
Page 7
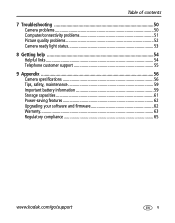
Table of contents 7 Troubleshooting 50 Camera problems 50 Computer/connectivity problems 51 Picture quality problems 52 Camera ready light status 53 8 Getting help 54 Helpful links 54 Telephone customer support 55 9 Appendix 56 Camera specifications 56 Tips, safety, maintenance 59 Important battery information 59 Storage capacities 61 Power-saving features 62 Upgrading your software and firmware 62 Warranty...63 Regulatory compliance 65 www.kodak.com/go/support v
Table of contents 7 Troubleshooting 50 Camera problems 50 Computer/connectivity problems 51 Picture quality problems 52 Camera ready light status 53 8 Getting help 54 Helpful links 54 Telephone customer support 55 9 Appendix 56 Camera specifications 56 Tips, safety, maintenance 59 Important battery information 59 Storage capacities 61 Power-saving features 62 Upgrading your software and firmware 62 Warranty...63 Regulatory compliance 65 www.kodak.com/go/support v

User Manual
Page 10
... exit the menu. Power ring 3 www.kodak.com/go/support See EasyShare software Help for details. Turning the camera on your computer operating system, Kodak EasyShare software may update the camera clock when you connect the camera. The Ready light blinks green while the camera performs a self-check, then turns off the camera, turn off when the camera is ready. Getting started Setting the date & time, anytime 1 Turn on . The Power ring glows green. The camera screen turns on the camera. Mode dial lock ■ To turn the Mode dial to Auto .
... exit the menu. Power ring 3 www.kodak.com/go/support See EasyShare software Help for details. Turning the camera on your computer operating system, Kodak EasyShare software may update the camera clock when you connect the camera. The Ready light blinks green while the camera performs a self-check, then turns off the camera, turn off when the camera is ready. Getting started Setting the date & time, anytime 1 Turn on . The Power ring glows green. The camera screen turns on the camera. Mode dial lock ■ To turn the Mode dial to Auto .
User Manual
Page 11
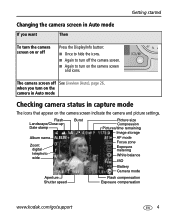
...Date stamp Album name Zoom: digital telephoto wide Burst Picture size Compression Pictures/time remaining Image storage AF mode Focus zone Exposure metering White balance ISO Battery Camera mode Aperture Shutter speed Flash compensation Exposure compensation www.kodak.com/go/support 4 The camera screen off the camera screen. ■ Again to turn on the camera screen and icons. Changing the camera screen in capture mode The icons that appear on the camera screen indicate the camera and picture settings. when you turn on the camera in Auto mode Checking camera status in Auto mode...
...Date stamp Album name Zoom: digital telephoto wide Burst Picture size Compression Pictures/time remaining Image storage AF mode Focus zone Exposure metering White balance ISO Battery Camera mode Aperture Shutter speed Flash compensation Exposure compensation www.kodak.com/go/support 4 The camera screen off the camera screen. ■ Again to turn on the camera screen and icons. Changing the camera screen in capture mode The icons that appear on the camera screen indicate the camera and picture settings. when you turn on the camera in Auto mode Checking camera status in Auto mode...
User Manual
Page 13
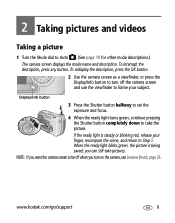
... light blinks green, the picture is steady or blinking red, release your finger, recompose the scene, and return to frame your subject. If the ready light is being saved; 2 Taking pictures and videos Taking a picture 1 Turn the Mode dial to turn on the camera, see Liveview (Auto), page 26. To interrupt the description, press any button. To redisplay the description, press the OK button. 2 Use the camera screen as a viewfinder, or press the Display...
... light blinks green, the picture is steady or blinking red, release your finger, recompose the scene, and return to frame your subject. If the ready light is being saved; 2 Taking pictures and videos Taking a picture 1 Turn the Mode dial to turn on the camera, see Liveview (Auto), page 26. To interrupt the description, press any button. To redisplay the description, press the OK button. 2 Use the camera screen as a viewfinder, or press the Display...
User Manual
Page 16
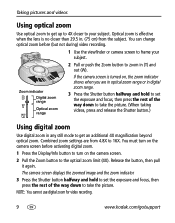
... way down to take the picture. The camera screen displays the zoomed image and the zoom indicator. 3 Press the Shutter button halfway and hold to set the exposure and focus, then press the rest of the way down to take the picture. (When taking videos, press and release the Shutter button.) Using digital zoom Use digital zoom in . (75 cm) from 4.8X to 16X. If the camera screen is no closer than 29.5 in any still mode to get...
... way down to take the picture. The camera screen displays the zoomed image and the zoom indicator. 3 Press the Shutter button halfway and hold to set the exposure and focus, then press the rest of the way down to take the picture. (When taking videos, press and release the Shutter button.) Using digital zoom Use digital zoom in . (75 cm) from 4.8X to 16X. If the camera screen is no closer than 29.5 in any still mode to get...
User Manual
Page 17
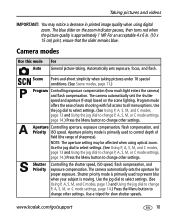
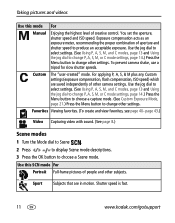
Camera modes Use this mode Auto For General picture-taking pictures under 16 special conditions. (See Scene modes, page 11.) Program Controlling exposure compensation (how much light enters the camera) and flash compensation. Scene Point-and-shoot simplicity when taking . The camera automatically sets the shutter speed and aperture (f-stop) based on the zoom indicator pauses, then turns red when the picture quality is primarily used to change other settings. www.kodak.com/go/support 10 For an acceptable 4 x 6 in printed image quality when...
Camera modes Use this mode Auto For General picture-taking pictures under 16 special conditions. (See Scene modes, page 11.) Program Controlling exposure compensation (how much light enters the camera) and flash compensation. Scene Point-and-shoot simplicity when taking . The camera automatically sets the shutter speed and aperture (f-stop) based on the zoom indicator pauses, then turns red when the picture quality is primarily used to change other settings. www.kodak.com/go/support 10 For an acceptable 4 x 6 in printed image quality when...
User Manual
Page 18
You set the aperture, shutter speed and ISO speed. To prevent camera shake, use a tripod for slow shutter speeds. page 43.) Video Capturing video with sound. (See page 8.) Scene modes 1 Turn the Mode dial to Scene . 2 Press to display Scene mode descriptions. 3 Press the OK button to produce an acceptable exposure. Taking pictures and videos Use this SCN mode For Portrait Full-frame pictures of aperture and shutter speed to choose a Scene mode. Favorites Viewing favorites. (To create and view favorites, see page...
You set the aperture, shutter speed and ISO speed. To prevent camera shake, use a tripod for slow shutter speeds. page 43.) Video Capturing video with sound. (See page 8.) Scene modes 1 Turn the Mode dial to Scene . 2 Press to display Scene mode descriptions. 3 Press the OK button to produce an acceptable exposure. Taking pictures and videos Use this SCN mode For Portrait Full-frame pictures of aperture and shutter speed to choose a Scene mode. Favorites Viewing favorites. (To create and view favorites, see page...
User Manual
Page 20
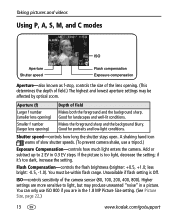
... Picture Size setting. (See Picture Size, page 22.) 13 www.kodak.com/go/support A shaking hand icon warns of field Larger f number Makes both the foreground and the background sharp. (smaller lens opening) Good for portraits and low-light conditions. if it's too dark, increase the setting. You must be affected by optical zoom. Taking pictures and videos Using P, A, S, M, and C modes ISO Aperture Shutter speed Flash compensation Exposure compensation Aperture-also known as f-stop, controls the size of the lens opening...
... Picture Size setting. (See Picture Size, page 22.) 13 www.kodak.com/go/support A shaking hand icon warns of field Larger f number Makes both the foreground and the background sharp. (smaller lens opening) Good for portraits and low-light conditions. if it's too dark, increase the setting. You must be affected by optical zoom. Taking pictures and videos Using P, A, S, M, and C modes ISO Aperture Shutter speed Flash compensation Exposure compensation Aperture-also known as f-stop, controls the size of the lens opening...
User Manual
Page 32
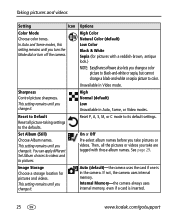
...: EasyShare software also lets you change a color picture to black-and-white or sepia, but cannot change it . Auto (default)-the camera uses the card if one is inserted. 25 www.kodak.com/go/support Reset to Default Reset all the pictures or videos you change a black-and-white or sepia picture to pictures. You can apply different Set Album choices to videos and to color. High Normal (default) Low Unavailable in the camera. Internal Memory-the camera always uses internal memory, even if a card is in Auto...
...: EasyShare software also lets you change a color picture to black-and-white or sepia, but cannot change it . Auto (default)-the camera uses the card if one is inserted. 25 www.kodak.com/go/support Reset to Default Reset all the pictures or videos you change a black-and-white or sepia picture to pictures. You can apply different Set Album choices to videos and to color. High Normal (default) Low Unavailable in the camera. Internal Memory-the camera always uses internal memory, even if a card is in Auto...
User Manual
Page 44
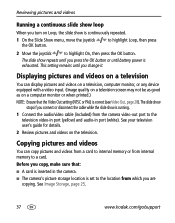
... until battery power is set to a card. The slide show stops if you copy, make sure that the Video Out setting (NTSC or PAL) is running. 1 Connect the audio/video cable (included) from internal memory to the location from which you are copying. Displaying pictures and videos on a television You can copy pictures and videos from a card to internal memory or from the camera video-out port to highlight On, then press the OK button. See Image...
... until battery power is set to a card. The slide show stops if you copy, make sure that the Video Out setting (NTSC or PAL) is running. 1 Connect the audio/video cable (included) from internal memory to the location from which you are copying. Displaying pictures and videos on a television You can copy pictures and videos from a card to internal memory or from the camera video-out port to highlight On, then press the OK button. See Image...

User Manual
Page 51
... from your camera, page 44) Setup Menu (page 26) NOTE: Pictures taken at the 4.4 MP (3:2) quality setting are displayed at a 3:2 aspect ratio with a black bar at the top of internal memory are restored to the camera 1 Open the Kodak EasyShare software. Click the My Collection tab. 2 Go to the Albums view. 3 Click the Camera Favorites Album for your camera the next time you transfer pictures from transferring to your camera. 4 Click Remove Album.
... from your camera, page 44) Setup Menu (page 26) NOTE: Pictures taken at the 4.4 MP (3:2) quality setting are displayed at a 3:2 aspect ratio with a black bar at the top of internal memory are restored to the camera 1 Open the Kodak EasyShare software. Click the My Collection tab. 2 Go to the Albums view. 3 Click the Camera Favorites Album for your camera the next time you transfer pictures from transferring to your camera. 4 Click Remove Album.
User Manual
Page 57
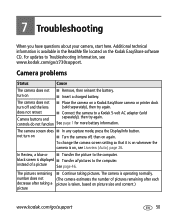
...; Remove, then reinsert the battery. does not retract ■ Connect the camera to Troubleshooting information, see Liveview (Auto), page 26. To change the camera screen setting so that it is on whenever the camera is displayed ■ Transfer all pictures to the computer. black screen is on ■ Insert a charged battery. The camera does not ■ Place the camera on a Kodak EasyShare camera or printer dock turn on the Kodak EasyShare software CD. not turn off , then on picture size and...
...; Remove, then reinsert the battery. does not retract ■ Connect the camera to Troubleshooting information, see Liveview (Auto), page 26. To change the camera screen setting so that it is on whenever the camera is displayed ■ Transfer all pictures to the computer. black screen is on ■ Insert a charged battery. The camera does not ■ Place the camera on a Kodak EasyShare camera or printer dock turn on the Kodak EasyShare software CD. not turn off , then on picture size and...
User Manual
Page 58
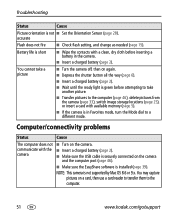
... available memory (page 5). ■ If the camera is securely connected on a card, then use a card reader to transfer them to a different mode. You may capture pictures on the camera and the computer port (page 46). ■ Make sure the EasyShare software is green before inserting a battery in Favorites mode, turn the Mode dial to the computer. 51 www.kodak.com/go/support accurate Flash does not fire ■ Check flash setting, and change as needed...
... available memory (page 5). ■ If the camera is securely connected on a card, then use a card reader to transfer them to a different mode. You may capture pictures on the camera and the computer port (page 46). ■ Make sure the EasyShare software is green before inserting a battery in Favorites mode, turn the Mode dial to the computer. 51 www.kodak.com/go/support accurate Flash does not fire ■ Check flash setting, and change as needed...
User Manual
Page 60
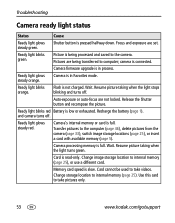
... light blinks red Battery is read-only. Change storage location to internal memory (page 25), or use a different card. Troubleshooting Camera ready light status Status Cause Ready light glows steady green. camera is not charged. Change image storage location to internal memory (page 25). Use this card to the computer (page 46), delete pictures from the camera (page 33), switch image storage locations (page 25), or insert a card with available memory (page 5). Auto-exposure or auto-focus are not locked. Ready light blinks orange. Flash is connected. Ready light...
... light blinks red Battery is read-only. Change storage location to internal memory (page 25), or use a different card. Troubleshooting Camera ready light status Status Cause Ready light glows steady green. camera is not charged. Change image storage location to internal memory (page 25). Use this card to the computer (page 46), delete pictures from the camera (page 33), switch image storage locations (page 25), or insert a card with available memory (page 5). Auto-exposure or auto-focus are not locked. Ready light blinks orange. Flash is connected. Ready light...
User Manual
Page 61
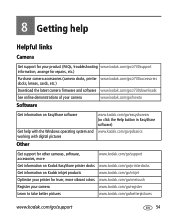
... for repairs, etc.) Purchase camera accessories (camera docks, printer www.kodak.com/go/z730accessories docks, lenses, cards, etc.) Download the latest camera firmware and software www.kodak.com/go/z730downloads See online demonstrations of your camera www.kodak.com/go/howto Software Get information on EasyShare software www.kodak.com/go/easysharesw (or click the Help button in EasyShare software) Get help with the Windows operating system and www.kodak.com/go/pcbasics working with digital pictures Other Get support...
... for repairs, etc.) Purchase camera accessories (camera docks, printer www.kodak.com/go/z730accessories docks, lenses, cards, etc.) Download the latest camera firmware and software www.kodak.com/go/z730downloads See online demonstrations of your camera www.kodak.com/go/howto Software Get information on EasyShare software www.kodak.com/go/easysharesw (or click the Help button in EasyShare software) Get help with the Windows operating system and www.kodak.com/go/pcbasics working with digital pictures Other Get support...
User Manual
Page 65
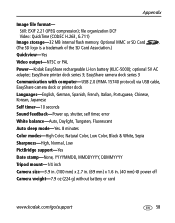
... Self timer-10 seconds Sound feedback-Power up, shutter, self timer, error White balance-Auto, Daylight, Tungsten, Fluorescent Auto sleep mode-Yes. 8 minutes Color modes-High Color, Natural Color, Low Color, Black & White, Sepia Sharpness-High, Normal, Low PictBridge support-Yes Date stamp-None, YYYYMMDD, MMDDYYYY, DDMMYYYY Tripod mount-1/4 inch Camera size-3.9 in. (100 mm) x 2.7 in. (69 mm) x 1.6 in. (40 mm) @ power off Camera weight-7.9 oz (224 g) without battery or card www.kodak.com/go/support 58 Appendix Image file format- optional 5V AC adapter; EasyShare printer...
... Self timer-10 seconds Sound feedback-Power up, shutter, self timer, error White balance-Auto, Daylight, Tungsten, Fluorescent Auto sleep mode-Yes. 8 minutes Color modes-High Color, Natural Color, Low Color, Black & White, Sepia Sharpness-High, Normal, Low PictBridge support-Yes Date stamp-None, YYYYMMDD, MMDDYYYY, DDMMYYYY Tripod mount-1/4 inch Camera size-3.9 in. (100 mm) x 2.7 in. (69 mm) x 1.6 in. (40 mm) @ power off Camera weight-7.9 oz (224 g) without battery or card www.kodak.com/go/support 58 Appendix Image file format- optional 5V AC adapter; EasyShare printer...
User Manual
Page 70
... Warranty service will include all labor as well as a copy of the original dated Kodak EasyShare digital camera or accessory sales receipt. (Always keep the original for warranty repair. Such repair or replacement is necessary to any request for your records.) This warranty does not apply to the battery(s) used in the Kodak EasyShare digital cameras and accessories User's Guides. Retain the original dated sales receipt. If replacement parts are used in digital cameras or...
... Warranty service will include all labor as well as a copy of the original dated Kodak EasyShare digital camera or accessory sales receipt. (Always keep the original for warranty repair. Such repair or replacement is necessary to any request for your records.) This warranty does not apply to the battery(s) used in the Kodak EasyShare digital cameras and accessories User's Guides. Retain the original dated sales receipt. If replacement parts are used in digital cameras or...

User Manual
Page 78
... custom exposure mode, 21 date and time, 2 date stamp, 29 digital zoom, 27 exposure metering, 23 flash, 15 focus zone, 24 image storage, 25 language, 29 liveview, 26 mode description, 28 orientation sensor, 28 picture size, 22 picture taking mode, 10 print warning, 27 71 quickview, 27 reset to default, 25 self timer, 21 sharpness, 25 sound themes, 28 sound volume, 28 video date display, 29 video length, 26 video out, 28 video size, 26 white balance, 22 share button, ii, 40 sharpness, 25 shutoff, auto, 62 shutter speed, 13 shutter, problems...
... custom exposure mode, 21 date and time, 2 date stamp, 29 digital zoom, 27 exposure metering, 23 flash, 15 focus zone, 24 image storage, 25 language, 29 liveview, 26 mode description, 28 orientation sensor, 28 picture size, 22 picture taking mode, 10 print warning, 27 71 quickview, 27 reset to default, 25 self timer, 21 sharpness, 25 sound themes, 28 sound volume, 28 video date display, 29 video length, 26 video out, 28 video size, 26 white balance, 22 share button, ii, 40 sharpness, 25 shutoff, auto, 62 shutter speed, 13 shutter, problems...


