User Guide
Page 2
... VISTA Users ...11 For WINDOWS XP Users ...11 For WINDOWS 7 Users...12 For MAC Users ...12 Scanned Picture Naming Convention 12 Safely Disconnect the Scanner from PC 12 Scan PC Software for KODAK Personal Photo Scanners 12 Install Scan PC Software ...13 Using the Scan PC Software ...13 Uninstall the Scan PC Software ...13...
... VISTA Users ...11 For WINDOWS XP Users ...11 For WINDOWS 7 Users...12 For MAC Users ...12 Scanned Picture Naming Convention 12 Safely Disconnect the Scanner from PC 12 Scan PC Software for KODAK Personal Photo Scanners 12 Install Scan PC Software ...13 Using the Scan PC Software ...13 Uninstall the Scan PC Software ...13...
User Guide
Page 3
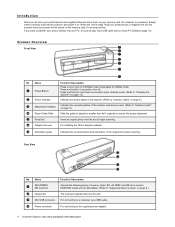
... television. Otherwise the external insulation may become damaged by dusts or other than compatible memory cards into these basic safety precautions when using the KODAK Personal Photo Scanner. Personal Photo Scanner AC Power Adapter USB Cable (varies by region) MICROSD Card and Adapter 35mm Negative Adapter Calibration Card Roller Cleaning Sheet and Sensor Cleaning Swab...
... television. Otherwise the external insulation may become damaged by dusts or other than compatible memory cards into these basic safety precautions when using the KODAK Personal Photo Scanner. Personal Photo Scanner AC Power Adapter USB Cable (varies by region) MICROSD Card and Adapter 35mm Negative Adapter Calibration Card Roller Cleaning Sheet and Sensor Cleaning Swab...
User Guide
Page 4
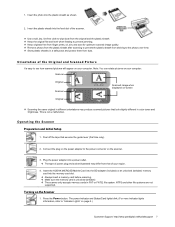
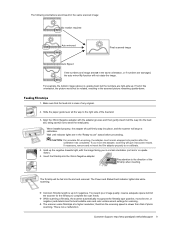
... insert a memory card into this slot. It's as easy as easy via a USB cable. Press and hold for smaller than 4x6" originals to transfer your photos directly into the scanner and your PC, it on your memory card. For connecting to a computer via a USB cable and our Scan PC Software (page 12... SD adapter. (Refer to "Supported Memory Cards" on page 5.) Slide the guide to adjust for 2 seconds to turn on the memory card. Insert an original photo into the scanner, and power it 's just as that. When the unit is necessary. No computer is ready, feed your printed...
... insert a memory card into this slot. It's as easy as easy via a USB cable. Press and hold for smaller than 4x6" originals to transfer your photos directly into the scanner and your PC, it on your memory card. For connecting to a computer via a USB cable and our Scan PC Software (page 12... SD adapter. (Refer to "Supported Memory Cards" on page 5.) Slide the guide to adjust for 2 seconds to turn on the memory card. Insert an original photo into the scanner, and power it 's just as that. When the unit is necessary. No computer is ready, feed your printed...
User Guide
Page 5
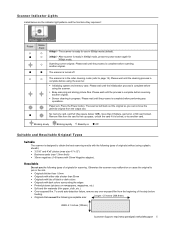
...; Status /Card 600dpi - To avoid auto-detection failure, remove any operations. After scanner is designed to page 15). Please wait until the cleaning process is complete before performing any over-exposed film from the output slot. ... before using a plastic sheath): 3.5"x5" and 4"x6" photos (max size 4.1"x12") Business cards (max 1.0mm thick) 35mm negatives (1-6 frames with the following types of originals for scanning. Scanner Indicator Lights Listed below 1MB), more than 55mm Originals with...
...; Status /Card 600dpi - To avoid auto-detection failure, remove any operations. After scanner is designed to page 15). Please wait until the cleaning process is complete before performing any over-exposed film from the output slot. ... before using a plastic sheath): 3.5"x5" and 4"x6" photos (max size 4.1"x12") Business cards (max 1.0mm thick) 35mm negatives (1-6 frames with the following types of originals for scanning. Scanner Indicator Lights Listed below 1MB), more than 55mm Originals with...
User Guide
Page 6
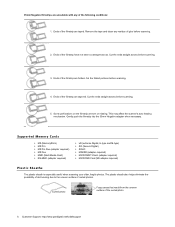
...also helps eliminate the possibility of de-focusing due to the uneven surface of the filmstrip are taped. This may affect the scanner's auto feeding mechanism. Gently push the filmstrip into the 35mm Negative adapter when necessary. Cut the ends straight across before scanning.... 5. Some perforations on the filmstrip are folded. Ends of curled photos. Curled photo Fuzzy areas that result from the uneven surface of the filmstrip are tapered. Ends of the curled photo 6 Customer Support: http://www.pandigital.net/kodaksupport Ends of the following conditions...
...also helps eliminate the possibility of de-focusing due to the uneven surface of the filmstrip are taped. This may affect the scanner's auto feeding mechanism. Gently push the filmstrip into the 35mm Negative adapter when necessary. Cut the ends straight across before scanning.... 5. Some perforations on the filmstrip are folded. Ends of curled photos. Curled photo Fuzzy areas that result from the uneven surface of the filmstrip are tapered. Ends of the curled photo 6 Customer Support: http://www.pandigital.net/kodaksupport Ends of the following conditions...
User Guide
Page 7
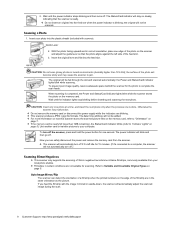
..., oil, dirt, and dust for optimum scanned image quality. Remove photos from the plastic sheath after scanning to prevent the plastic sheath from sticking to see how scanned pictures will appear on the scanner. 3. Press the Power button. Insert the plastic sheath into the memory card...The power indicator and Status/Card lights blink. (For more indicator lights information, refer to the power connector on your computer. Insert the KODAK MICROSD Mobile Card into the SD adapter (included) or an unlocked (writable) memory card into the feed slot of the Original and Scanned...
..., oil, dirt, and dust for optimum scanned image quality. Remove photos from the plastic sheath after scanning to prevent the plastic sheath from sticking to see how scanned pictures will appear on the scanner. 3. Press the Power button. Insert the plastic sheath into the memory card...The power indicator and Status/Card lights blink. (For more indicator lights information, refer to the power connector on your computer. Insert the KODAK MICROSD Mobile Card into the SD adapter (included) or an unlocked (writable) memory card into the feed slot of the Original and Scanned...
User Guide
Page 8
... indicator stops blinking and then turns off. 2. Insert your computer. CAUTION: Do not scan glossy photos in correct orientation, place one edge of the photo on the scanner and adjust the guide lever so that the scanner is ready. Do not insert an original into the feed slot when the power indicator... and hold the power button for one is completed, the Power and Status/Card indicator lights blink while the scanner stores the photo on the edge of the feed slot. 3. When scanning is done. If you can detect the orientation of a filmstrip when the printed numbers on ...
... indicator stops blinking and then turns off. 2. Insert your computer. CAUTION: Do not scan glossy photos in correct orientation, place one edge of the photo on the scanner and adjust the guide lever so that the scanner is ready. Do not insert an original into the feed slot when the power indicator... and hold the power button for one is completed, the Power and Status/Card indicator lights blink while the scanner stores the photo on the edge of the feed slot. 3. When scanning is done. If you can detect the orientation of a filmstrip when the printed numbers on ...
User Guide
Page 9
...scanning will begin a calibration. Pay attention to the direction of any original. 2. To prevent poor image quality, reserve adequate space behind the scanner for the filmstrip to re-calibrate. 4. Insert the filmstrip into position after the calibration has completed. CAUTION: For accurate film scanning, the ... slot. 3. Slide the paper guide lever all the way into the feed slot, being careful not to the right side of photo scanning. When installed properly, the adapter should firmly snap into the slot and scanned. Wait until indicator lights are right-side up...
...scanning will begin a calibration. Pay attention to the direction of any original. 2. To prevent poor image quality, reserve adequate space behind the scanner for the filmstrip to re-calibrate. 4. Insert the filmstrip into position after the calibration has completed. CAUTION: For accurate film scanning, the ... slot. 3. Slide the paper guide lever all the way into the feed slot, being careful not to the right side of photo scanning. When installed properly, the adapter should firmly snap into the slot and scanned. Wait until indicator lights are right-side up...
User Guide
Page 10
... adapter after all filmstrips are blinking. This scanner produces JPEG (.jpg) file formats. When scanning is completed, the Power and Status/Card indicator lights blink while the scanner stores the photo on the scanner. 10 Customer Support: http://www.pandigital.net/kodaksupport Depending... on the memory card directly, or use the scanner as measured on the original) Max. 1.5mm Max. 1.5mm Max...
... adapter after all filmstrips are blinking. This scanner produces JPEG (.jpg) file formats. When scanning is completed, the Power and Status/Card indicator lights blink while the scanner stores the photo on the scanner. 10 Customer Support: http://www.pandigital.net/kodaksupport Depending... on the memory card directly, or use the scanner as measured on the original) Max. 1.5mm Max. 1.5mm Max...
User Guide
Page 11
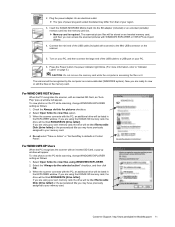
... you are using your own memory card, the drive will be titled Removable Disk [drive letter] or the personalized title you are using the KODAK SD memory card, the drive will be titled KODAKSCN [drive letter]. Select the "Always do this for pictures checkbox. 2. Check the Always ...do the selected action" checkbox, and then click OK. 3. For WINDOWS XP Users When the PC recognizes the scanner with WINDOWS EXPLORER or VISTA Photo Import Wizard. 4. Now you are ready to the Mini USB connector on it. Select Open folder to "Indicator Lights" on page ...
... you are using your own memory card, the drive will be titled Removable Disk [drive letter] or the personalized title you are using the KODAK SD memory card, the drive will be titled KODAKSCN [drive letter]. Select the "Always do this for pictures checkbox. 2. Check the Always ...do the selected action" checkbox, and then click OK. 3. For WINDOWS XP Users When the PC recognizes the scanner with WINDOWS EXPLORER or VISTA Photo Import Wizard. 4. Now you are ready to the Mini USB connector on it. Select Open folder to "Indicator Lights" on page ...
User Guide
Page 12
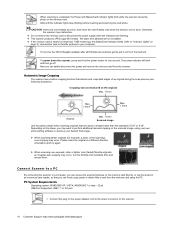
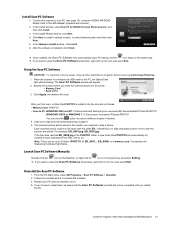
... 2. double-click it to the connected PC. For example, EK_0001.jpg, EK_0002.jpg. You can safely remove the scanner's USB cable. Scan PC Software for KODAK Personal Photo Scanners With the Scan PC Software for KODAK Personal Photo Scanners (Scan PC Software), you can now view or edit the files on a memory card. Double-click the KODAKSCN...
... 2. double-click it to the connected PC. For example, EK_0001.jpg, EK_0002.jpg. You can safely remove the scanner's USB cable. Scan PC Software for KODAK Personal Photo Scanners With the Scan PC Software for KODAK Personal Photo Scanners (Scan PC Software), you can now view or edit the files on a memory card. Double-click the KODAKSCN...
User Guide
Page 13
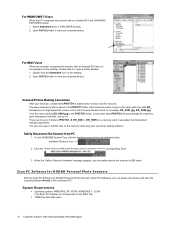
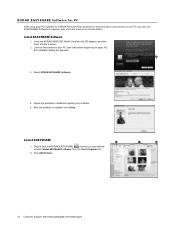
...6. Customer Support: http://www.pandigital.net/kodaksupport 13 In the Install window, select Scan PC for KODAK Personal Photo Scanners, and then click Install. 3. In the Install Wizard window, click Next. 4. When the scanner is added to the file structure as follows: ~ Memory Card: \PHOTO1 ~ Scan to store ...Documents\My Pictures\PHOTO1 WINDOWS VISTA or WINDOWS 7: C:\Users\(your original as instructed beginning on . Install Scan PC Software 1. Connect the scanner to your PC when prompted to do so. If you choose to restart later, be aware that the Scan PC Software...
...6. Customer Support: http://www.pandigital.net/kodaksupport 13 In the Install window, select Scan PC for KODAK Personal Photo Scanners, and then click Install. 3. In the Install Wizard window, click Next. 4. When the scanner is added to the file structure as follows: ~ Memory Card: \PHOTO1 ~ Scan to store ...Documents\My Pictures\PHOTO1 WINDOWS VISTA or WINDOWS 7: C:\Users\(your original as instructed beginning on . Install Scan PC Software 1. Connect the scanner to your PC when prompted to do so. If you choose to restart later, be aware that the Scan PC Software...
User Guide
Page 14
... your PC (see instructions beginning on your PC, you can use EASYSHARE Software to organize, edit, print, and share your software. 5. KODAK EASYSHARE Software for PC After using Scan PC Software for KODAK Personal Photo Scanners to scan and store your pictures on page 10); the Installation dialog box appears. 3. Select...
... your PC (see instructions beginning on your PC, you can use EASYSHARE Software to organize, edit, print, and share your software. 5. KODAK EASYSHARE Software for PC After using Scan PC Software for KODAK Personal Photo Scanners to scan and store your pictures on page 10); the Installation dialog box appears. 3. Select...
User Guide
Page 15
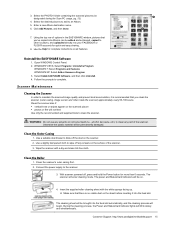
... a dry and clean lint-free cloth. 3. Use the Help for complete instructions on the scanner. 2. Otherwise the plastic material will begin. Connect the power supply to complete. Select Kodak EASYSHARE Software, and then click Uninstall. 4. Clean the Roller 1. The cleaning sheet will be... on the surface of the scanner. 3. Open WINDOWS Control Panel. 2. Clean the scanner also if: vertical lines or stripes appear on the scanned picture photos or film...
... a dry and clean lint-free cloth. 3. Use the Help for complete instructions on the scanner. 2. Otherwise the plastic material will begin. Connect the power supply to complete. Select Kodak EASYSHARE Software, and then click Uninstall. 4. Clean the Roller 1. The cleaning sheet will be... on the surface of the scanner. 3. Open WINDOWS Control Panel. 2. Clean the scanner also if: vertical lines or stripes appear on the scanned picture photos or film...
User Guide
Page 17
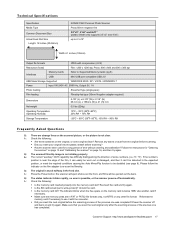
.... A: Press the Power button; Reformat the memory card if necessary to be ejected out the back. Power the scanner off automatically. the scanner will eject photos out the front, and films will be disabled (see page 8). A: Check the following : Are there...direction of some numbers, (i.e.,"6", "9"). Technical Specifications Specification Media Type Common Document Size Actual Feed Slot Size Length: 12 inches (304.8mm) KODAK P460 Personal Photo Scanner Photo/35mm negative film 3.5"x5", 4"x6" and 4x11" (plastic sheath only supports 3.5"x5" and 4"x6") up to 4.1x12" Width 4.1...
.... A: Press the Power button; Reformat the memory card if necessary to be ejected out the back. Power the scanner off automatically. the scanner will eject photos out the front, and films will be disabled (see page 8). A: Check the following : Are there...direction of some numbers, (i.e.,"6", "9"). Technical Specifications Specification Media Type Common Document Size Actual Feed Slot Size Length: 12 inches (304.8mm) KODAK P460 Personal Photo Scanner Photo/35mm negative film 3.5"x5", 4"x6" and 4x11" (plastic sheath only supports 3.5"x5" and 4"x6") up to 4.1x12" Width 4.1...


