User Guide
Page 3
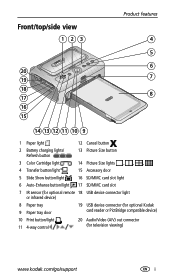
Front/top/side view 123 20 19 18 17 16 15 Product features 4 5 6 7 8 14 13 12 11 10 9 1 Paper light 12 Cancel button 2 Battery charging lights/ Refresh button 13 Picture Size button 3 Color Cartridge light 14 Picture Size lights , , , 4 Transfer button/light ...button/light 17 SD/MMC card slot 7 IR sensor (for optional remote 18 USB device connector light or infrared device) 8 Paper tray 9 Paper tray door 19 USB device connector (for optional Kodak card reader or PictBridge compatible device) 10 Print button/light 11 4-way control 20 Audio/Video (A/V) out connector (for television...
Front/top/side view 123 20 19 18 17 16 15 Product features 4 5 6 7 8 14 13 12 11 10 9 1 Paper light 12 Cancel button 2 Battery charging lights/ Refresh button 13 Picture Size button 3 Color Cartridge light 14 Picture Size lights , , , 4 Transfer button/light ...button/light 17 SD/MMC card slot 7 IR sensor (for optional remote 18 USB device connector light or infrared device) 8 Paper tray 9 Paper tray door 19 USB device connector (for optional Kodak card reader or PictBridge compatible device) 10 Print button/light 11 4-way control 20 Audio/Video (A/V) out connector (for television...
User Guide
Page 5
...for your printer dock plus 2 Installing the custom camera insert 2 Connecting the power 3 Handling and storing the color cartridge 4 Installing and removing the color cartridge 4 Handling and storing the paper 5 Loading the paper 6 Installing and removing the paper tray 6 2 Setting up your EasyShare digital ...Docking and charging your EasyShare digital camera 9 Setting the picture quality 11 Tagging pictures for automatic printing 11 3 Printing without a computer 12 Printing from your EasyShare digital camera 12 Printing from the internal SD/MMC card reader 13 Printing from a Kodak...
...for your printer dock plus 2 Installing the custom camera insert 2 Connecting the power 3 Handling and storing the color cartridge 4 Installing and removing the color cartridge 4 Handling and storing the paper 5 Loading the paper 6 Installing and removing the paper tray 6 2 Setting up your EasyShare digital ...Docking and charging your EasyShare digital camera 9 Setting the picture quality 11 Tagging pictures for automatic printing 11 3 Printing without a computer 12 Printing from your EasyShare digital camera 12 Printing from the internal SD/MMC card reader 13 Printing from a Kodak...
User Guide
Page 6
...software 22 6 Using the printer dock plus with a computer 25 Connecting to a computer 25 Transferring pictures from your Kodak EasyShare digital camera....... 26 Transferring pictures from the internal SD/MMC card reader 27 Transferring pictures from a Kodak card reader 28 Transferring ...Cleaning the paper feed roller 34 Traveling with your printer dock 34 8 Troubleshooting 35 Printing problems 35 Transfer/communication problems 41 Printer dock plus status lights 42 9 Getting help 50 Helpful links 50 Telephone customer support 51 10 Appendix 52 Printer dock plus specifications ...
...software 22 6 Using the printer dock plus with a computer 25 Connecting to a computer 25 Transferring pictures from your Kodak EasyShare digital camera....... 26 Transferring pictures from the internal SD/MMC card reader 27 Transferring pictures from a Kodak card reader 28 Transferring ...Cleaning the paper feed roller 34 Traveling with your printer dock 34 8 Troubleshooting 35 Printing problems 35 Transfer/communication problems 41 Printer dock plus status lights 42 9 Getting help 50 Helpful links 50 Telephone customer support 51 10 Appendix 52 Printer dock plus specifications ...
User Guide
Page 7
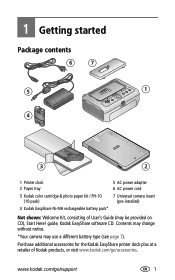
...4 3 2 1 Printer dock 2 Paper tray 5 AC power adapter 6 AC power cord 3 Kodak color cartridge & photo paper kit / PH-10 (10-pack) 7 Universal camera insert (pre-installed) 4 Kodak EasyShare Ni-MH rechargeable battery pack* Not shown: Welcome Kit, consisting of Kodak products, or visit www.kodak.com/go /support... 1 Contents may change without notice. *Your camera may be provided on CD), Start Here! www.kodak.com/go /accessories. Purchase additional accessories for the Kodak EasyShare printer dock plus at a retailer...
...4 3 2 1 Printer dock 2 Paper tray 5 AC power adapter 6 AC power cord 3 Kodak color cartridge & photo paper kit / PH-10 (10-pack) 7 Universal camera insert (pre-installed) 4 Kodak EasyShare Ni-MH rechargeable battery pack* Not shown: Welcome Kit, consisting of Kodak products, or visit www.kodak.com/go /support... 1 Contents may change without notice. *Your camera may be provided on CD), Start Here! www.kodak.com/go /accessories. Purchase additional accessories for the Kodak EasyShare printer dock plus at a retailer...
User Guide
Page 8
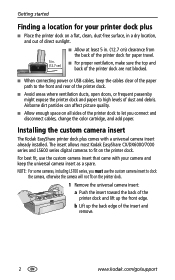
... debris. Installing the custom camera insert The Kodak EasyShare printer dock plus comes with your printer dock plus ■ Place the printer dock on a flat, clean, dust-free surface, in a dry location, and out of direct sunlight. 5 in. (12.7 cm) ■ Allow at least 5 in. (12.7 cm) clearance from the back of the printer dock for paper travel. ■ For proper ventilation, make...
... debris. Installing the custom camera insert The Kodak EasyShare printer dock plus comes with your printer dock plus ■ Place the printer dock on a flat, clean, dust-free surface, in a dry location, and out of direct sunlight. 5 in. (12.7 cm) ■ Allow at least 5 in. (12.7 cm) clearance from the back of the printer dock for paper travel. ■ For proper ventilation, make...

User Guide
Page 10
...you are able to make sure there is no slack in the color cartridge ribbon. Do not force the cartridge in or out of the printer dock. 1 Open the cartridge door on the side of high-temperature environments (such as a vehicle parked in the sun). IMPORTANT: Be careful... Push the cartridge until it "clicks" into place. 4 Close the cartridge door. 4 www.kodak.com/go/support Installing and removing the color cartridge IMPORTANT: Use only Kodak color cartridge & paper kits for your printer dock. To remove slack, push in on the cartridge spool, then rotate the spool clockwise. Getting started...
...you are able to make sure there is no slack in the color cartridge ribbon. Do not force the cartridge in or out of the printer dock. 1 Open the cartridge door on the side of high-temperature environments (such as a vehicle parked in the sun). IMPORTANT: Be careful... Push the cartridge until it "clicks" into place. 4 Close the cartridge door. 4 www.kodak.com/go/support Installing and removing the color cartridge IMPORTANT: Use only Kodak color cartridge & paper kits for your printer dock. To remove slack, push in on the cartridge spool, then rotate the spool clockwise. Getting started...

User Guide
Page 11
...a paper error. www.kodak.com/go/support 5 Make sure the Paper light is depleted, the Color cartridge light glows steady amber. Store paper flat. ■ Keep the paper away from direct sunlight and out of the paper. ■ When storing, remove the paper tray, then close the paper tray cover and paper tray... seconds. ■ When the cartridge is off before attempting to remove the color cartridge. Handling and storing the paper ■ To avoid fingerprints, handle the paper by the edges or by the perforated tabs. IMPORTANT: The color cartridge may lock in the sun). To remove...
...a paper error. www.kodak.com/go/support 5 Make sure the Paper light is depleted, the Color cartridge light glows steady amber. Store paper flat. ■ Keep the paper away from direct sunlight and out of the paper. ■ When storing, remove the paper tray, then close the paper tray cover and paper tray... seconds. ■ When the cartridge is off before attempting to remove the color cartridge. Handling and storing the paper ■ To avoid fingerprints, handle the paper by the edges or by the perforated tabs. IMPORTANT: The color cartridge may lock in the sun). To remove...

User Guide
Page 12
... not touch the glossy side of the paper tray cover. Pull the paper tray out to remove it. 6 www.kodak.com/go /accessories. Purchase Kodak color cartridge & paper kits and other accessories at a retailer of paper. Installing and removing the paper tray 1 Open the paper tray door on the printer dock. 2 Slide the paper tray cover back until it "clicks" into...
... not touch the glossy side of the paper tray cover. Pull the paper tray out to remove it. 6 www.kodak.com/go /accessories. Purchase Kodak color cartridge & paper kits and other accessories at a retailer of paper. Installing and removing the paper tray 1 Open the paper tray door on the printer dock. 2 Slide the paper tray cover back until it "clicks" into...

User Guide
Page 15
...is now powered by the printer dock instead of the camera battery. ■ The Kodak EasyShare Ni-MH rechargeable battery pack and the Kodak EasyShare Li-Ion rechargeable battery charge up your EasyShare digital camera Docking and charging your EasyShare digital camera Docking your Kodak EasyShare digital camera lets you ...dock insert is installed in the printer dock to 3 hours. ■ The Battery charging lights turn on the printer dock, making sure to align the dock connector and locator hole with the camera connector and locator pin. Push down to the front and rear of the paper...
...is now powered by the printer dock instead of the camera battery. ■ The Kodak EasyShare Ni-MH rechargeable battery pack and the Kodak EasyShare Li-Ion rechargeable battery charge up your EasyShare digital camera Docking and charging your EasyShare digital camera Docking your Kodak EasyShare digital camera lets you ...dock insert is installed in the printer dock to 3 hours. ■ The Battery charging lights turn on the printer dock, making sure to align the dock connector and locator hole with the camera connector and locator pin. Push down to the front and rear of the paper...

User Guide
Page 17
... print quantity to other pictures, press to change the Picture Quality setting on your Kodak Easyshare digital camera, see page 30. www.kodak.com/go/support 11 Setting up your EasyShare digital camera Setting the picture quality Before taking pictures, change it. 5 Press the ... automatic printing On your Kodak EasyShare digital camera: 1 Press the Share button. 2 Press to locate a picture. 3 Make sure Print is displayed in the current image storage location, highlight Print All ), then press the OK button. 4 Press to the printer dock paper, preventing unwanted cropping of...
... print quantity to other pictures, press to change the Picture Quality setting on your Kodak Easyshare digital camera, see page 30. www.kodak.com/go/support 11 Setting up your EasyShare digital camera Setting the picture quality Before taking pictures, change it. 5 Press the ... automatic printing On your Kodak EasyShare digital camera: 1 Press the Share button. 2 Press to locate a picture. 3 Make sure Print is displayed in the current image storage location, highlight Print All ), then press the OK button. 4 Press to the printer dock paper, preventing unwanted cropping of...

User Guide
Page 18
... press the Print button, . The first three passes apply layers of yellow, magenta, and cyan colors to do so can cause paper misfeeds or jams. Printing from your EasyShare digital camera 1 Take a picture with your camera user's guide). 2 Place the camera on the camera screen. ■ To ... complete before it is ejected. 3 Printing without printing, press the Cancel button, . 12 www.kodak.com/go/support NOTE: If you want to print, press to print, press the Left/Right control on the printer dock, . The Print light blinks, and printing starts.The paper cycles four times before removing...
... press the Print button, . The first three passes apply layers of yellow, magenta, and cyan colors to do so can cause paper misfeeds or jams. Printing from your EasyShare digital camera 1 Take a picture with your camera user's guide). 2 Place the camera on the camera screen. ■ To ... complete before it is ejected. 3 Printing without printing, press the Cancel button, . 12 www.kodak.com/go/support NOTE: If you want to print, press to print, press the Left/Right control on the printer dock, . The Print light blinks, and printing starts.The paper cycles four times before removing...

User Guide
Page 24
... apply Auto-Enhance to a print job: ■ When setting up , then do not specify the number of copies to print, the printer dock maximizes the use the Kodak EasyShare software on the paper by filling it with multiple copies of the current (or most recent) picture. To change the default so Auto-Enhance is selected...
... apply Auto-Enhance to a print job: ■ When setting up , then do not specify the number of copies to print, the printer dock maximizes the use the Kodak EasyShare software on the paper by filling it with multiple copies of the current (or most recent) picture. To change the default so Auto-Enhance is selected...

User Guide
Page 25
Printing without a computer Removing the perforated tabs from the paper IMPORTANT: Remove perforated tabs only after printing. Paper missing perforated tabs will not feed properly. 1 Fold the tabs up, then down. 2 Remove each tab and discard. www.kodak.com/go/support 19
Printing without a computer Removing the perforated tabs from the paper IMPORTANT: Remove perforated tabs only after printing. Paper missing perforated tabs will not feed properly. 1 Fold the tabs up, then down. 2 Remove each tab and discard. www.kodak.com/go/support 19

User Guide
Page 36
Using the printer dock plus with Kodak EasyShare software 1 Make sure Kodak EasyShare software is installed (see page 22) and the printer dock is connected to your computer (see page 25). 2 Click the My Collection tab. 3 Select the pictures you take advantage of a wide range of ...full color enhancement, red-eye reduction, picture organization, and much more. If there are no pictures on the printer dock are disabled when printing from your camera or memory card before removing paper or the paper tray. This software lets you wish to print. 4 Click the Print at Home tab. 5 Make sure ...
Using the printer dock plus with Kodak EasyShare software 1 Make sure Kodak EasyShare software is installed (see page 22) and the printer dock is connected to your computer (see page 25). 2 Click the My Collection tab. 3 Select the pictures you take advantage of a wide range of ...full color enhancement, red-eye reduction, picture organization, and much more. If there are no pictures on the printer dock are disabled when printing from your camera or memory card before removing paper or the paper tray. This software lets you wish to print. 4 Click the Print at Home tab. 5 Make sure ...

User Guide
Page 37
The Kodak EasyShare printer dock plus with a computer Printing using other applications 1 Make sure the printer driver is installed (see page 22) and the printer dock is set to 4 x 6 in no time. None-to get great, natural color for everyday picture-making (default). Using the printer dock plus features three color mode options: ...or Page Setup from the File menu (depending on your application and operating system). 4 Make sure the printer dock is selected as the current printer and that paper size is connected to your computer (see page 25). 2 Open the pictures you wish to print in...
The Kodak EasyShare printer dock plus with a computer Printing using other applications 1 Make sure the printer driver is installed (see page 22) and the printer dock is set to 4 x 6 in no time. None-to get great, natural color for everyday picture-making (default). Using the printer dock plus features three color mode options: ...or Page Setup from the File menu (depending on your application and operating system). 4 Make sure the printer dock is selected as the current printer and that paper size is connected to your computer (see page 25). 2 Open the pictures you wish to print in...

User Guide
Page 38
... cancel a print during the fourth pass (clear coat), the paper is selected as the current printer. 2 From an application File menu, select Print. 3 Click the drop-down menu, then select Color. 4 Select Kodak Color. 5 Select a color mode option. 6 Click OK when complete. Using the printer dock plus with a computer Windows 98/ME OS: 1 From the Start...
... cancel a print during the fourth pass (clear coat), the paper is selected as the current printer. 2 From an application File menu, select Print. 3 Click the drop-down menu, then select Color. 4 Select Kodak Color. 5 Select a color mode option. 6 Click OK when complete. Using the printer dock plus with a computer Windows 98/ME OS: 1 From the Start...

User Guide
Page 39
... a flat, level surface. 7 Care and maintenance General care CAUTION: Always disconnect the power before cleaning. Store paper flat. www.kodak.com/go/support 33 Do not use harsh or abrasive cleaners or organic solvents on the printer dock or any of its parts. ■To clean, wipe the outside of high-temperature environments (such...
... a flat, level surface. 7 Care and maintenance General care CAUTION: Always disconnect the power before cleaning. Store paper flat. www.kodak.com/go/support 33 Do not use harsh or abrasive cleaners or organic solvents on the printer dock or any of its parts. ■To clean, wipe the outside of high-temperature environments (such...

User Guide
Page 40
..., or use cotton or cotton swabs to clean the print roller. 4 Use the moistened cloth to gently wipe clean the surface of Kodak products, or visit www.kodak.com/go/accessories. 34 www.kodak.com/go/support Traveling with your printer dock IMPORTANT: When traveling, keep the paper feed roller clean. Purchase an AC power cord...
..., or use cotton or cotton swabs to clean the print roller. 4 Use the moistened cloth to gently wipe clean the surface of Kodak products, or visit www.kodak.com/go/accessories. 34 www.kodak.com/go/support Traveling with your printer dock IMPORTANT: When traveling, keep the paper feed roller clean. Purchase an AC power cord...

User Guide
Page 41
... damaged in the ReadMe file located on the Kodak EasyShare software CD. For updates to Troubleshooting information, visit www.kodak.com/go /support 35 Do not use inkjet paper. ■ The paper tray may glow steady amber) Try the following IMPORTANT: Use only Kodak color cartridge & paper kits for your printer dock, start here. 8 Troubleshooting When you have not...
... damaged in the ReadMe file located on the Kodak EasyShare software CD. For updates to Troubleshooting information, visit www.kodak.com/go /support 35 Do not use inkjet paper. ■ The paper tray may glow steady amber) Try the following IMPORTANT: Use only Kodak color cartridge & paper kits for your printer dock, start here. 8 Troubleshooting When you have not...

User Guide
Page 42
... attempting to remove the color cartridge without first clearing the paper error. IMPORTANT: Always check the paper slot on the back of the printer dock for (Paper and/or your printer dock. Make sure the Paper light is jammed IMPORTANT: Use only Kodak color cartridge & paper kits for jammed paper: 3 Remove the paper supply from the ribbon, then re-install the cartridge...
... attempting to remove the color cartridge without first clearing the paper error. IMPORTANT: Always check the paper slot on the back of the printer dock for (Paper and/or your printer dock. Make sure the Paper light is jammed IMPORTANT: Use only Kodak color cartridge & paper kits for jammed paper: 3 Remove the paper supply from the ribbon, then re-install the cartridge...


