User Guide
Page 2
... the host computer 2-2 Installing the Kodak Driver software 2-2 Installing the FireWire cable 2-2 Attaching the power cord 2-3 Powering up the host computer 2-3 Scanner components 2-3 3 Using the Scanner 3-1 Turning the scanner on and off 3-1 Starting and stopping scanning 3-1 Manually pausing and resuming the scanner 3-2 Automatically pausing and resuming the scanner 3-2 Manually ending scanning 3-2 Document preparation 3-3 Adjusting the side guides...
... the host computer 2-2 Installing the Kodak Driver software 2-2 Installing the FireWire cable 2-2 Attaching the power cord 2-3 Powering up the host computer 2-3 Scanner components 2-3 3 Using the Scanner 3-1 Turning the scanner on and off 3-1 Starting and stopping scanning 3-1 Manually pausing and resuming the scanner 3-2 Automatically pausing and resuming the scanner 3-2 Manually ending scanning 3-2 Document preparation 3-3 Adjusting the side guides...
User Guide
Page 3
... multi-feed detection 3-9 Automatic feeding 3-9 Continuous feeding 3-10 Manual feeding 3-10 Feeding documents that require special handling 3-11 Calibrating the scanner 3-11 Image calibration 3-12 Ultrasonics calibration 3-15 4 The Enhanced Printer 4-1 Overview 4-1 Printer ... guides 5-17 6 Troubleshooting 6-1 Indicator lights 6-1 Accessing the Operator Log 6-3 i600 Series Scanners Message listing 6-6 i600 Series Scanners Numerical Message listing 6-11 i700 Series Scanners Message listing 6-12 i700 Series Scanenrs Numerial Message listing 6-18 Problem solving 6-20 Appendix ...
... multi-feed detection 3-9 Automatic feeding 3-9 Continuous feeding 3-10 Manual feeding 3-10 Feeding documents that require special handling 3-11 Calibrating the scanner 3-11 Image calibration 3-12 Ultrasonics calibration 3-15 4 The Enhanced Printer 4-1 Overview 4-1 Printer ... guides 5-17 6 Troubleshooting 6-1 Indicator lights 6-1 Accessing the Operator Log 6-3 i600 Series Scanners Message listing 6-6 i600 Series Scanners Numerical Message listing 6-11 i700 Series Scanners Message listing 6-12 i700 Series Scanenrs Numerial Message listing 6-18 Problem solving 6-20 Appendix ...
User Guide
Page 4
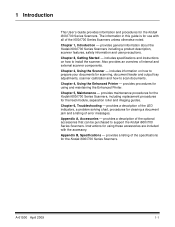
... user precautions. Also provides an overview of the specifications for scanning, document feeder and output tray adjustments, scanner calibration and how to install the scanner. Chapter 1, Introduction - provides maintenance procedures for the Kodak i600/i700 Series Scanners, including replacement procedures for the Kodak i600/i700 Series Scanners. provides a description of the LED indicators, a problem solving chart, procedures...
... user precautions. Also provides an overview of the specifications for scanning, document feeder and output tray adjustments, scanner calibration and how to install the scanner. Chapter 1, Introduction - provides maintenance procedures for the Kodak i600/i700 Series Scanners, including replacement procedures for the Kodak i600/i700 Series Scanners. provides a description of the LED indicators, a problem solving chart, procedures...

User Guide
Page 5
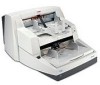
... 90 pages per minute which includes an enhanced printer. • Kodak i750 Scanner is a desktop duplex color scanner with an automatic document feeder that runs at 130 pages per minute which includes an enhanced printer. • Kodak i780 Scanner is a desktop duplex color scanner with an automatic document feeder that you want to scan separately, this feature allows you...
... 90 pages per minute which includes an enhanced printer. • Kodak i750 Scanner is a desktop duplex color scanner with an automatic document feeder that runs at 130 pages per minute which includes an enhanced printer. • Kodak i780 Scanner is a desktop duplex color scanner with an automatic document feeder that you want to scan separately, this feature allows you...
User Guide
Page 6
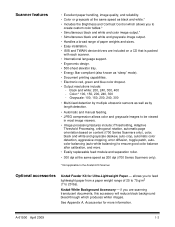
...documents, this accessory will reduce black background bleed-through which allows you to create custom color tables.* • Simultaneous black and white and color image output.* • Simultaneous black and white and grayscale image output. • Handles a broad range of 25 to 75 g/m2 (7 to 20 lbs). Optional accessories Kodak...CD that is packed with each scanner. • International language support. • Ergonomic design. • 500-sheet elevator tray. • Energy Star compliant (also known as "sleep" mode). • Document printing capabilities. • Electronic ...
...documents, this accessory will reduce black background bleed-through which allows you to create custom color tables.* • Simultaneous black and white and color image output.* • Simultaneous black and white and grayscale image output. • Handles a broad range of 25 to 75 g/m2 (7 to 20 lbs). Optional accessories Kodak...CD that is packed with each scanner. • International language support. • Ergonomic design. • 500-sheet elevator tray. • Energy Star compliant (also known as "sleep" mode). • Document printing capabilities. • Electronic ...

User Guide
Page 7
Speed/capacity (throughput) The following speeds (pages per minute) are for color/grayscale and black and white output. Resolution (dpi) Color/ Gray B&W 100 - 150 - 200 200 240 240 300 300 - 400 Landscape Letter i610/i620 i640 i660 80 100 120 80 100 120 80 100 120 53 66 80 53 66 80
Speed/capacity (throughput) The following speeds (pages per minute) are for color/grayscale and black and white output. Resolution (dpi) Color/ Gray B&W 100 - 150 - 200 200 240 240 300 300 - 400 Landscape Letter i610/i620 i640 i660 80 100 120 80 100 120 80 100 120 53 66 80 53 66 80
User Guide
Page 8
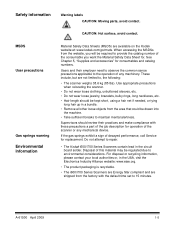
...precautions Gas springs warning Environmental information Material Safety Data Sheets (MSDS) are not limited to 15 minutes. Use appropriate precautions when relocating the scanner. • Do not wear loose clothing, unbuttoned sleeves, etc. • Do not wear loose jewelry, bracelets, bulky rings, long...are shipped from the factory with these precautions a part of the scanner or any machinery. See Chapter 5, "Supplies and accessories" for replacement. Do not attempt to repair. • The Kodak i600/i700 Series Scanners contain lead in a bundle. • Remove all other loose ...
...precautions Gas springs warning Environmental information Material Safety Data Sheets (MSDS) are not limited to 15 minutes. Use appropriate precautions when relocating the scanner. • Do not wear loose clothing, unbuttoned sleeves, etc. • Do not wear loose jewelry, bracelets, bulky rings, long...are shipped from the factory with these precautions a part of the scanner or any machinery. See Chapter 5, "Supplies and accessories" for replacement. Do not attempt to repair. • The Kodak i600/i700 Series Scanners contain lead in a bundle. • Remove all other loose ...
User Guide
Page 10
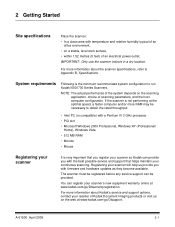
... RAM may be provided. If the scanner is not performing at www.kodak.com/go /DIsupport. System requirements Following is very important that you register your scanner so Kodak can be necessary to Appendix B, Specifications. For more information about Kodak's service and support options, contact your reseller of Kodak Document Imaging products or visit us provide you...
... RAM may be provided. If the scanner is not performing at www.kodak.com/go /DIsupport. System requirements Following is very important that you register your scanner so Kodak can be necessary to Appendix B, Specifications. For more information about Kodak's service and support options, contact your reseller of Kodak Document Imaging products or visit us provide you...
User Guide
Page 11
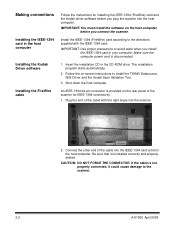
... card in the CD-ROM drive. Connect the other end of the cable into the scanner. 2. Plug the end of the scanner for installing the IEEE-1394 (FireWire) card and the Kodak driver software before you connect the scanner. If the cable is disconnected. 1. Shut down the host computer. Insert the installation CD in...
... card in the CD-ROM drive. Connect the other end of the cable into the scanner. 2. Plug the end of the scanner for installing the IEEE-1394 (FireWire) card and the Kodak driver software before you connect the scanner. If the cable is disconnected. 1. Shut down the host computer. Insert the installation CD in...
User Guide
Page 12
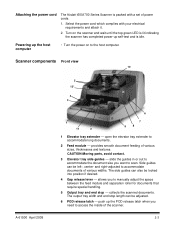
...feed module and separation roller for documents that require special handling. 5 Output tray and end stop length can be locked into position if desired. 4 Gap release lever - Attaching the power cord The Kodak i600/i700 Series Scanner is idle. Select the power ...cord which complies with a set of the scanner. 2-3 The output tray width and end stop - Turn on to accommodate long documents. 2 Feed module - Scanner components Front view 10 A-61500 April 2009 5 12* 4 3...
...feed module and separation roller for documents that require special handling. 5 Output tray and end stop length can be locked into position if desired. 4 Gap release lever - Attaching the power cord The Kodak i600/i700 Series Scanner is idle. Select the power ...cord which complies with a set of the scanner. 2-3 The output tray width and end stop - Turn on to accommodate long documents. 2 Feed module - Scanner components Front view 10 A-61500 April 2009 5 12* 4 3...

User Guide
Page 13
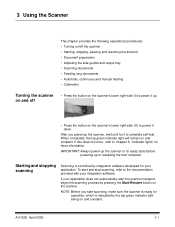
.... 9 Power switch - located underneath the output tray (not shown in the elevator tray. 12* Height Adjustment Wire - flashes when a document has jammed in document stacking. 11 Paper Present Sensor - Refer to bottom as required. 10 Exit deflector (optional) - detects the presence of job). illuminate or... 2009 press the power switch on (I) or off (O) as follows: Illuminates when the power is turned on and the scanner is idle. Press twice to stop scanning (end of documents in photo), this wire can then use used to start scanning. 8 LEDs- 7 Stop/Pause and Start/Resume buttons ...
.... 9 Power switch - located underneath the output tray (not shown in the elevator tray. 12* Height Adjustment Wire - flashes when a document has jammed in document stacking. 11 Paper Present Sensor - Refer to bottom as required. 10 Exit deflector (optional) - detects the presence of job). illuminate or... 2009 press the power switch on (I) or off (O) as follows: Illuminates when the power is turned on and the scanner is idle. Press twice to stop scanning (end of documents in photo), this wire can then use used to start scanning. 8 LEDs- 7 Stop/Pause and Start/Resume buttons ...

User Guide
Page 14
... a time. Pre-separation pad - A-61500 April 2009 2-5 provides smooth document feeding of various sizes and textures one document at a time. the scanner has an upper and lower imaging guide. CAUTION:Hot surface, avoid contact. drive rollers and NFR rollers transport the documents through the paper path. Imaging guides - Rollers - Ink blotter strips - collects residue...
... a time. Pre-separation pad - A-61500 April 2009 2-5 provides smooth document feeding of various sizes and textures one document at a time. the scanner has an upper and lower imaging guide. CAUTION:Hot surface, avoid contact. drive rollers and NFR rollers transport the documents through the paper path. Imaging guides - Rollers - Ink blotter strips - collects residue...

User Guide
Page 15
... sensor Paper Present sensor Power cord connection IEEE-1394 connection Retainer clip Power cord connection - These sensors detect the presence of documents in the elevator tray and documents in the retainer clip located above the connector. 2-6 A-61500 April 2009 provides power to the scanner. See the FireWire instructions packed with six power cords.
... sensor Paper Present sensor Power cord connection IEEE-1394 connection Retainer clip Power cord connection - These sensors detect the presence of documents in the elevator tray and documents in the retainer clip located above the connector. 2-6 A-61500 April 2009 provides power to the scanner. See the FireWire instructions packed with six power cords.
User Guide
Page 16
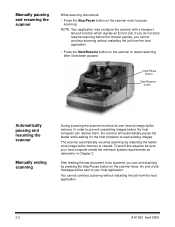
... the scanning process by integration software developed for operation, which is controlled by pressing the Start/Resume button on the scanner. After you start and stop scanning, refer to the documentation provided with your application. Starting and stopping scanning Scanning is indicated by the top green indicator light being on and constant...
... the scanning process by integration software developed for operation, which is controlled by pressing the Start/Resume button on the scanner. After you start and stop scanning, refer to the documentation provided with your application. Starting and stopping scanning Scanning is indicated by the top green indicator light being on and constant...
User Guide
Page 17
... images. You cannot continue scanning without restarting the job from the host application. 3-2 A-61500 April 2009 The scanner automatically resumes scanning by pressing the Stop/Pause button on the scanner twice. After feeding the last document to in Chapter 2. To avoid this situation be sure your host application. NOTE: Your application may configure...
... images. You cannot continue scanning without restarting the job from the host application. 3-2 A-61500 April 2009 The scanner automatically resumes scanning by pressing the Stop/Pause button on the scanner twice. After feeding the last document to in Chapter 2. To avoid this situation be sure your host application. NOTE: Your application may configure...
User Guide
Page 18
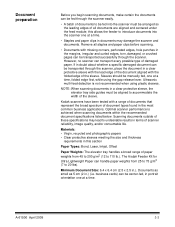
... protective sleeves meeting the size and thickness requirements in .). Remove all documents are aligned and centered under the feed module; NOTE: When scanning documents in a clear protective sleeve, the elevator tray side guides must be transported successfully through the scanner. The Kodak Feeder Kit for Ultra Lightweight Paper can transport every possible type of...
... protective sleeves meeting the size and thickness requirements in .). Remove all documents are aligned and centered under the feed module; NOTE: When scanning documents in a clear protective sleeve, the elevator tray side guides must be transported successfully through the scanner. The Kodak Feeder Kit for Ultra Lightweight Paper can transport every possible type of...

User Guide
Page 23
If you have a Kodak i600 Series Scanner, the short document tray can be ordered from Parts Services. Adjust the side guides as necessary. 3-8 A-61500 April 2009 See Chapter 5, "Supplies and Consumables" for scanning smaller documents. Remove the end stop on the rail of the output... and push it up to the desired position to accommodate your documents. 3. Slide the short document tray on the output tray. 2. Adjusting the optional short document tray The short document tray is standard with the Kodak i700 Series Scanners. This tray is available for ordering information. 1.
If you have a Kodak i600 Series Scanner, the short document tray can be ordered from Parts Services. Adjust the side guides as necessary. 3-8 A-61500 April 2009 See Chapter 5, "Supplies and Consumables" for scanning smaller documents. Remove the end stop on the rail of the output... and push it up to the desired position to accommodate your documents. 3. Slide the short document tray on the output tray. 2. Adjusting the optional short document tray The short document tray is standard with the Kodak i700 Series Scanners. This tray is available for ordering information. 1.

User Guide
Page 24
... you need to press the Start/ Resume button to feed" position. If the document partially covers a sensor, false multi-feeds may damage the scanner. Automatic feeding To scan a batch of the stacked documents. 2. IMPORTANT: Staples and paper clips on and paper is added to the elevator...up in landscape orientation (longer side as the leading edge). Adjust the elevator tray side guides. 4. NOTE: For Kodak i700 Series Scanners, Firmware Version 2.1.1 (or higher): When the i700 Series Scanner is powered-on documents may occur. Adjust the output tray end stop, if necessary.
... you need to press the Start/ Resume button to feed" position. If the document partially covers a sensor, false multi-feeds may damage the scanner. Automatic feeding To scan a batch of the stacked documents. 2. IMPORTANT: Staples and paper clips on and paper is added to the elevator...up in landscape orientation (longer side as the leading edge). Adjust the elevator tray side guides. 4. NOTE: For Kodak i700 Series Scanners, Firmware Version 2.1.1 (or higher): When the i700 Series Scanner is powered-on documents may occur. Adjust the output tray end stop, if necessary.
User Guide
Page 25
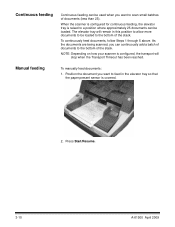
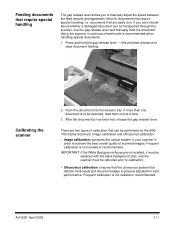
... The elevator tray will stop when the Transport Timeout has been reached. NOTE: Depending on how your scanner is raised to scan small batches of documents (less than 25). Manual feeding To manually feed documents: 1. When the scanner is configured for continuous feeding, the elevator tray is configured, the transport will remain in the...
... The elevator tray will stop when the Transport Timeout has been reached. NOTE: Depending on how your scanner is raised to scan small batches of documents (less than 25). Manual feeding To manually feed documents: 1. When the scanner is configured for continuous feeding, the elevator tray is configured, the transport will remain in the...
User Guide
Page 26
...IMPORTANT: If the White Background Accessory is properly adjusted for documents that can be transported through the scanner, use the gap release lever and manually feed the document. i.e. documents that detects multi-feeds and document edges is installed, it must be replaced with the ... calibration that require special handling; Using the scanner in order to calibration. • Ultrasonics calibration: ensures that the ultrasonics system that are badly torn. Push the document into the elevator tray. Feeding documents that require special handling The gap release lever...
...IMPORTANT: If the White Background Accessory is properly adjusted for documents that can be transported through the scanner, use the gap release lever and manually feed the document. i.e. documents that detects multi-feeds and document edges is installed, it must be replaced with the ... calibration that require special handling; Using the scanner in order to calibration. • Ultrasonics calibration: ensures that the ultrasonics system that are badly torn. Push the document into the elevator tray. Feeding documents that require special handling The gap release lever...


