User Guide
Page 2
... Union 3 People Republic of China 3 1 Introduction 4 Scanner features 4 2 Getting Started 5 What's in the box 5 System requirements 5 Installing the scanner 6 Installing the drivers 7 Windows 2000 7 Windows XP 13 Scanner components 19 3 Using the Scanner 21 Turning the scanner on and off 21 Document preparation 22 Scanning your documents... 22 4 Maintenance 23 Supplies and consumables 23 Cleaning the scanner 23 Daily cleaning procedures 23 Weekly cleaning procedures 25 Replacing the ink cartridge 28 5 Troubleshooting 29 ...
... Union 3 People Republic of China 3 1 Introduction 4 Scanner features 4 2 Getting Started 5 What's in the box 5 System requirements 5 Installing the scanner 6 Installing the drivers 7 Windows 2000 7 Windows XP 13 Scanner components 19 3 Using the Scanner 21 Turning the scanner on and off 21 Document preparation 22 Scanning your documents... 22 4 Maintenance 23 Supplies and consumables 23 Cleaning the scanner 23 Daily cleaning procedures 23 Weekly cleaning procedures 25 Replacing the ink cartridge 28 5 Troubleshooting 29 ...
User Guide
Page 3
Safety information User precautions • When placing the Check Scanner, make sure that could cause the Check Scanner to , the following: • Do not wear loose clothing, unbuttoned sleeves, etc. • Do not wear loose jewelry, bracelets, bulky rings, long ...employer need to observe the common sense precautions applicable to provide the catalog number of the Check Scanner and is located within the Check Scanner, which could be required to the operation of the Kodak Check Scanner or any machinery. When accessing the MSDSs from the area that the electrical power outlet is...
Safety information User precautions • When placing the Check Scanner, make sure that could cause the Check Scanner to , the following: • Do not wear loose clothing, unbuttoned sleeves, etc. • Do not wear loose jewelry, bracelets, bulky rings, long ...employer need to observe the common sense precautions applicable to provide the catalog number of the Check Scanner and is located within the Check Scanner, which could be required to the operation of the Kodak Check Scanner or any machinery. When accessing the MSDSs from the area that the electrical power outlet is...
User Guide
Page 4
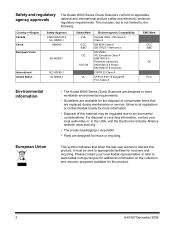
... 15 Subpart B FCC Class A EMC Mark CCC "S&E" CE FCC Environmental information European Union • The Kodak i6000 Series Check Scanners are replaced during maintenance or service; Safety and regulatory agency approvals The Kodak i6000 Series Check Scanners conform to www.kodak.com/go/recycle for additional information on the collection and recovery programs available for this product...
... 15 Subpart B FCC Class A EMC Mark CCC "S&E" CE FCC Environmental information European Union • The Kodak i6000 Series Check Scanners are replaced during maintenance or service; Safety and regulatory agency approvals The Kodak i6000 Series Check Scanners conform to www.kodak.com/go/recycle for additional information on the collection and recovery programs available for this product...
User Guide
Page 6
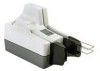
...100 documents per minute. • Kodak i6090 Check Scanner - The information in this User's Guide is for all i6000 Series Check scanners unless otherwise noted. • High quality images that can be connected to your PC. These scanners read Magnetic Ink Character Recognition (...per minute. automatically scans the front and/or back of documents at a time. • Kodak i6060 Check Scanner - 1 Introduction The Kodak i6000 Series Check Scanners are easy-to-use, compact scanners that meet X9B image quality standards • Small, compact size fits easily into environments where ...
...100 documents per minute. • Kodak i6090 Check Scanner - The information in this User's Guide is for all i6000 Series Check scanners unless otherwise noted. • High quality images that can be connected to your PC. These scanners read Magnetic Ink Character Recognition (...per minute. automatically scans the front and/or back of documents at a time. • Kodak i6060 Check Scanner - 1 Introduction The Kodak i6000 Series Check Scanners are easy-to-use, compact scanners that meet X9B image quality standards • Small, compact size fits easily into environments where ...
User Guide
Page 7
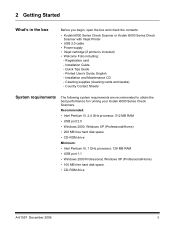
... Tips Guide - Country Contact Sheets System requirements The following system requirements are recommended to obtain the best performance for running your Kodak i6000 Series Check Scanners. Recommended: • Intel Pentium IV, 2.4 GHz processor, 512 MB RAM • USB port 2.0 • Windows ...CD - Registration card - 2 Getting Started What's in the box Before you begin, open the box and check the contents: • Kodak i6000 Series Check Scanner or Kodak i6000 Series Check Scanner with Inkjet Printer • USB 2.0 cable • Power supply • Inkjet cartridge (if printer is ...
... Tips Guide - Country Contact Sheets System requirements The following system requirements are recommended to obtain the best performance for running your Kodak i6000 Series Check Scanners. Recommended: • Intel Pentium IV, 2.4 GHz processor, 512 MB RAM • USB port 2.0 • Windows ...CD - Registration card - 2 Getting Started What's in the box Before you begin, open the box and check the contents: • Kodak i6000 Series Check Scanner or Kodak i6000 Series Check Scanner with Inkjet Printer • USB 2.0 cable • Power supply • Inkjet cartridge (if printer is ...
User Guide
Page 8
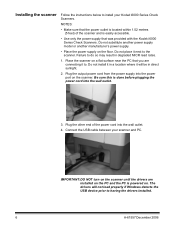
.... 3. The drivers will be in direct sunlight. 2. Connect the USB cable between your Kodak i6000 Series Check Scanners. Be sure this is done before plugging the power cord into the power port on the scanner. IMPORTANT: DO NOT turn on a flat surface near the PC that was provided with ...the Kodak i6000 Series Check Scanners. Place the scanner on the scanner until the drivers are connecting it to. Do not install it in ...
.... 3. The drivers will be in direct sunlight. 2. Connect the USB cable between your Kodak i6000 Series Check Scanners. Be sure this is done before plugging the power cord into the power port on the scanner. IMPORTANT: DO NOT turn on a flat surface near the PC that was provided with ...the Kodak i6000 Series Check Scanners. Place the scanner on the scanner until the drivers are connecting it to. Do not install it in ...

User Guide
Page 11
Remove the installation CD from the CD drive. 9. The Kodak ScanTest Software icon will be placed on the icon to start the ScanTest Software program. A-61557 December 2006 9 Double-click on your desktop. 8. When finished with the installation, turn on PCs running Windows 2000, the software will be plugged into. NOTE: When installing on the scanner. 10. 6. When finished, the following window will need to begin the installation. Click Finish. Click Install to be installed for each USB port that scanner may be displayed: 7.
Remove the installation CD from the CD drive. 9. The Kodak ScanTest Software icon will be placed on the icon to start the ScanTest Software program. A-61557 December 2006 9 Double-click on your desktop. 8. When finished with the installation, turn on PCs running Windows 2000, the software will be plugged into. NOTE: When installing on the scanner. 10. 6. When finished, the following window will need to begin the installation. Click Finish. Click Install to be installed for each USB port that scanner may be displayed: 7.
User Guide
Page 12
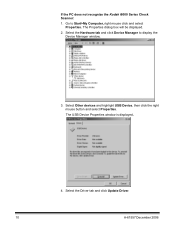
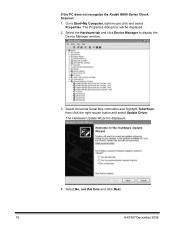
The USB Device Properties window is displayed. 4. The Properties dialog box will be displayed. 2. Select Other devices and highlight USB Device, then click the right mouse button and select Properties. Select the Driver tab and click Update Driver. 10 A-61557 December 2006 Go to display the Device Manager window. 3. Select the Hardware tab and click Device Manager to Start>My Computer, right mouse click and select Properties. If the PC does not recognize the Kodak i6000 Series Check Scanner: 1.
The USB Device Properties window is displayed. 4. The Properties dialog box will be displayed. 2. Select Other devices and highlight USB Device, then click the right mouse button and select Properties. Select the Driver tab and click Update Driver. 10 A-61557 December 2006 Go to display the Device Manager window. 3. Select the Hardware tab and click Device Manager to Start>My Computer, right mouse click and select Properties. If the PC does not recognize the Kodak i6000 Series Check Scanner: 1.

User Guide
Page 17
The Kodak ScanTest Software icon will be placed on your desktop. 8. When finished with the installation, turn on the icon to begin the installation. Double-click on the scanner. 10. Click Install to start the ScanTest Software program. A-61557 December 2006 15 6. Click Finish. Remove the installation CD from the CD drive. 9. When finished, the following window will be displayed: 7.
The Kodak ScanTest Software icon will be placed on your desktop. 8. When finished with the installation, turn on the icon to begin the installation. Double-click on the scanner. 10. Click Install to start the ScanTest Software program. A-61557 December 2006 15 6. Click Finish. Remove the installation CD from the CD drive. 9. When finished, the following window will be displayed: 7.
User Guide
Page 18
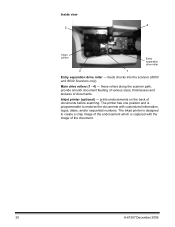
The Properties dialog box will be displayed. 2. If the PC does not recognize the Kodak i6000 Series Check Scanner: 1. Select the Hardware tab and click Device Manager to Start>My Computer, right mouse click and select Properties. Select No, not this time and click Next. 16 A-61557 December 2006 Select Universal Serial Bus controllers and highlight TellerScan then click the right mouse button and select Update Driver. The Hardware Update Wizard is displayed. 4. Go to display the Device Manager window. 3.
The Properties dialog box will be displayed. 2. If the PC does not recognize the Kodak i6000 Series Check Scanner: 1. Select the Hardware tab and click Device Manager to Start>My Computer, right mouse click and select Properties. Select No, not this time and click Next. 16 A-61557 December 2006 Select Universal Serial Bus controllers and highlight TellerScan then click the right mouse button and select Update Driver. The Hardware Update Wizard is displayed. 4. Go to display the Device Manager window. 3.

User Guide
Page 21
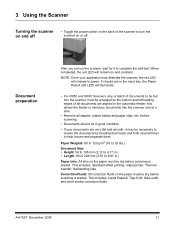
... the power cord to the PC. See Chapter 5, "Indicator lights" for scanning (i6060 and i6090 Scanners only). Power switch - A-61557 December 2006 19 illuminates or flashes indicating scanner status. connects the scanner to the scanner. depending on and off. the scanner has three scanner covers (top, side and back covers) which can be removed for maintenance or...
... the power cord to the PC. See Chapter 5, "Indicator lights" for scanning (i6060 and i6090 Scanners only). Power switch - A-61557 December 2006 19 illuminates or flashes indicating scanner status. connects the scanner to the scanner. depending on and off. the scanner has three scanner covers (top, side and back covers) which can be removed for maintenance or...
User Guide
Page 22
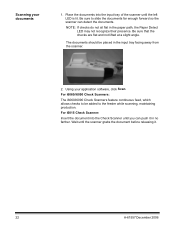
... printer (optional) - The printer has one position and is captured with customized information, logos, dates, and/or sequential numbers. feeds checks into the scanner (i6060 and i6090 Scanners only). these rollers along the scanner path, provide smooth document feeding of various sizes, thicknesses and textures of documents before scanning. prints endorsements on the back of...
... printer (optional) - The printer has one position and is captured with customized information, logos, dates, and/or sequential numbers. feeds checks into the scanner (i6060 and i6090 Scanners only). these rollers along the scanner path, provide smooth document feeding of various sizes, thicknesses and textures of documents before scanning. prints endorsements on the back of...
User Guide
Page 23
... tray, the Paper Detect (left leading edges of the scanner to turn on the scanner, wait for it may be necessary to loosen the documents by bending them back and forth several times to help loosen and separate them. If checks are in .) Paper inks: All inks on the paper...must be arranged so the bottom and left LED) will remain on and constant. When completed, the red LED will illuminate. • For i6060 and i6090 Scanners only. This includes: Liquid Paper®, Tipp-Ex®, Wite-out®, and other similar correction fluids. NOTE: Once your documents are ...
... tray, the Paper Detect (left leading edges of the scanner to turn on the scanner, wait for it may be necessary to loosen the documents by bending them back and forth several times to help loosen and separate them. If checks are in .) Paper inks: All inks on the paper...must be arranged so the bottom and left LED) will remain on and constant. When completed, the red LED will illuminate. • For i6060 and i6090 Scanners only. This includes: Liquid Paper®, Tipp-Ex®, Wite-out®, and other similar correction fluids. NOTE: Once your documents are ...
User Guide
Page 24
... may not recognize their presence. For i6060/i6090 Check Scanners: The i6060/i6090 Check Scanners feature continuous feed, which allows checks to slide the documents far enough forward so the scanner can push it . 22 A-61557 December 2006 For i6015 Check Scanner: Insert the document into the input tray of the scanner until the scanner grabs the document before releasing it in...
... may not recognize their presence. For i6060/i6090 Check Scanners: The i6060/i6090 Check Scanners feature continuous feed, which allows checks to slide the documents far enough forward so the scanner can push it . 22 A-61557 December 2006 For i6015 Check Scanner: Insert the document into the input tray of the scanner until the scanner grabs the document before releasing it in...
User Guide
Page 25
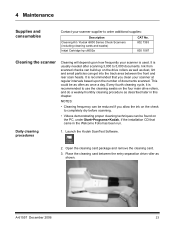
... the drive rollers as well as dust, lint and small particles can be as often as shown. 4 Maintenance Supplies and consumables Contact your scanner supplier to order additional supplies: Description Cleaning Kit / Kodak i6000 Series Check Scanners (including cleaning cards and swabs) Inkjet Cartridge hp c6602a CAT No. 802 7393 830 1087 Cleaning the...
... the drive rollers as well as dust, lint and small particles can be as often as shown. 4 Maintenance Supplies and consumables Contact your scanner supplier to order additional supplies: Description Cleaning Kit / Kodak i6000 Series Check Scanners (including cleaning cards and swabs) Inkjet Cartridge hp c6602a CAT No. 802 7393 830 1087 Cleaning the...

User Guide
Page 27
.... 3. A-61557 December 2006 25 Before starting this procedure, perform the daily cleaning procedure as outlined in the scanner and wiggle it back into place. Lift and remove the side cover. 5. NOTE: Do not remove the exit stop wire out about 4 inches to align ...the exit wire with the holes in the previous section. 2. Pull the exit stop wire from the scanner. Weekly cleaning procedure A weekly cleaning should accidently remove it, when you reinsert it you will need to provide adequate clearance for removing the back cover.
.... 3. A-61557 December 2006 25 Before starting this procedure, perform the daily cleaning procedure as outlined in the scanner and wiggle it back into place. Lift and remove the side cover. 5. NOTE: Do not remove the exit stop wire out about 4 inches to align ...the exit wire with the holes in the previous section. 2. Pull the exit stop wire from the scanner. Weekly cleaning procedure A weekly cleaning should accidently remove it, when you reinsert it you will need to provide adequate clearance for removing the back cover.

User Guide
Page 28
Open the scan tower door. 9. NOTE: Be sure the yellow wires are clear of the scan heads. 10. Lift and remove the back cover. Using the cleaning swab wipe both surfaces of the back cover when you reinstall it. 26 A-61557 December 2006 NOTE: If the back cover does not easily lift up, be sure that holds the scan tower door in place. 8. Replace the back cover first, then the side cover and turn the scanner on. Close the scan tower door and reinstall the thumbscrew. 11. 6. Loosen and remove the thumbscrew that the exit stop wire is pulled out approximately 4 inches. 7.
Open the scan tower door. 9. NOTE: Be sure the yellow wires are clear of the scan heads. 10. Lift and remove the back cover. Using the cleaning swab wipe both surfaces of the back cover when you reinstall it. 26 A-61557 December 2006 NOTE: If the back cover does not easily lift up, be sure that holds the scan tower door in place. 8. Replace the back cover first, then the side cover and turn the scanner on. Close the scan tower door and reinstall the thumbscrew. 11. 6. Loosen and remove the thumbscrew that the exit stop wire is pulled out approximately 4 inches. 7.

User Guide
Page 29
... to install covers at an angle. Clean each drive roller by selecting Eject on the Kodak ScanTest Software window. Selecting Eject will turn the drive rollers for about 5 seconds. 14. Replace the top scanner cover. Launch the Kodak ScanTest Software. 13. Thoroughly clean all of the drive rollers (black and white) with the...
... to install covers at an angle. Clean each drive roller by selecting Eject on the Kodak ScanTest Software window. Selecting Eject will turn the drive rollers for about 5 seconds. 14. Replace the top scanner cover. Launch the Kodak ScanTest Software. 13. Thoroughly clean all of the drive rollers (black and white) with the...

User Guide
Page 30
Turn off the scanner. 2. IMPORTANT: Do not touch the exposed metal chip or the cartridge could be changed when the endorsement print ... c6602a (CAT No. 830 1087). 1. Dispose the empty ink cartridge in accordance with all federal, state and local laws. 5. Remove the scanner top cover. 3. Take the new cartridge out of the ink cartridge holder. 4. Replacing the ink cartridge If you are using the Inkjet Printer... its packaging and remove the protective tape from the cartridge. The ink cartridge should be damaged. 6. Reinstall the scanner top cover. 28 A-61557 December 2006
Turn off the scanner. 2. IMPORTANT: Do not touch the exposed metal chip or the cartridge could be changed when the endorsement print ... c6602a (CAT No. 830 1087). 1. Dispose the empty ink cartridge in accordance with all federal, state and local laws. 5. Remove the scanner top cover. 3. Take the new cartridge out of the ink cartridge holder. 4. Replacing the ink cartridge If you are using the Inkjet Printer... its packaging and remove the protective tape from the cartridge. The ink cartridge should be damaged. 6. Reinstall the scanner top cover. 28 A-61557 December 2006
User Guide
Page 31
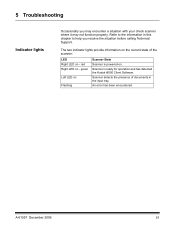
...-on - 5 Troubleshooting Indicator lights Occasionally you resolve the situation before calling Technical Support. Scanner detects the presence of the scanner: LED Right LED on the current state of documents in this chapter to the information in the input tray. red Right ...LED on . An error has been encountered. green Left LED on Flashing Scanner State Scanner is ready for operation and has detected the Kodak t6000 Client Software. The two indicator lights provide information on - Refer to help you may encounter a situation with...
...-on - 5 Troubleshooting Indicator lights Occasionally you resolve the situation before calling Technical Support. Scanner detects the presence of the scanner: LED Right LED on the current state of documents in this chapter to the information in the input tray. red Right ...LED on . An error has been encountered. green Left LED on Flashing Scanner State Scanner is ready for operation and has detected the Kodak t6000 Client Software. The two indicator lights provide information on - Refer to help you may encounter a situation with...


