
User Guide
Page 2
... 1-7 Taiwan 1-8 Peoples Republic of China 1-8 Korea 1-8 European Union 1-8 Acoustic emission 1-8 Power system connection 1-8 2 Getting Started 2-1 Scanner components 2-1 Front view 2-1 Internal components 2-4 Rear view 2-5 3 Using the Scanner 3-1 Turning the scanner on 3-1 Turning the scanner off 3-3 Starting and stopping scanning 3-3 Document preparation 3-3 Adjusting the input elevator 3-5 Adjusting the side guides 3-5 Selecting your feeding position 3-5 Locking the side...
... 1-7 Taiwan 1-8 Peoples Republic of China 1-8 Korea 1-8 European Union 1-8 Acoustic emission 1-8 Power system connection 1-8 2 Getting Started 2-1 Scanner components 2-1 Front view 2-1 Internal components 2-4 Rear view 2-5 3 Using the Scanner 3-1 Turning the scanner on 3-1 Turning the scanner off 3-3 Starting and stopping scanning 3-3 Document preparation 3-3 Adjusting the input elevator 3-5 Adjusting the side guides 3-5 Selecting your feeding position 3-5 Locking the side...

User Guide
Page 3
Adjusting the height of the scanner 3-14 Feeding documents using multi-feed detection 3-15 Automatic feeding 3-15 Continuous feeding 3-16 Manual feeding 3-16 Feeding documents that require special handling 3-17 Using the operator control panel touchscreen 3-18 Setting screen 3-19 ...Changing the alarm volume 3-20 Selecting the tone 3-21 Selecting a language 3-22 Enabling/disabling image addressing 3-23 Calibrating the scanner 3-25 Printer units...
Adjusting the height of the scanner 3-14 Feeding documents using multi-feed detection 3-15 Automatic feeding 3-15 Continuous feeding 3-16 Manual feeding 3-16 Feeding documents that require special handling 3-17 Using the operator control panel touchscreen 3-18 Setting screen 3-19 ...Changing the alarm volume 3-20 Selecting the tone 3-21 Selecting a language 3-22 Enabling/disabling image addressing 3-23 Calibrating the scanner 3-25 Printer units...
User Guide
Page 5
.... includes an overview of the optional accessories that can be purchased to support the Kodak i1800 Series Scanners. Chapter 6, Troubleshooting - provides information about the i1800 Series Scanners including a product description, scanner features, safety information, user precautions and how to prepare your documents for using the touchscreen operator control panel. provides a listing of error messages. A-61555...
.... includes an overview of the optional accessories that can be purchased to support the Kodak i1800 Series Scanners. Chapter 6, Troubleshooting - provides information about the i1800 Series Scanners including a product description, scanner features, safety information, user precautions and how to prepare your documents for using the touchscreen operator control panel. provides a listing of error messages. A-61555...

User Guide
Page 6
... immediately rise to the feeding position before the elevator returns to place the documents in the elevator tray as soon it is descending. New features These features are several small batches of the Kodak i1800 Series Scanners. • Quick reload - For example, if the Paper Source position ...is twice as fast as the previous versions of documents that you want to scan separately, this feature allows you to the...
... immediately rise to the feeding position before the elevator returns to place the documents in the elevator tray as soon it is descending. New features These features are several small batches of the Kodak i1800 Series Scanners. • Quick reload - For example, if the Paper Source position ...is twice as fast as the previous versions of documents that you want to scan separately, this feature allows you to the...

User Guide
Page 7
...8226; Automatic and manual feeding. • JPEG compression for color and grayscale images. • Image processing features include Kodak's Perfect Page technology for switching between black-andwhite/color or black-and-white/grayscale output streams. • Includes the Brightness.... • Energy Star compliant. • Document printing capabilities using the Enhanced Printer or High Resolution Printer accessory. • Electronic red, green and blue color dropout. • Output resolutions include: - Scanner features • Excellent paper handling, image quality, and reliability....
...8226; Automatic and manual feeding. • JPEG compression for color and grayscale images. • Image processing features include Kodak's Perfect Page technology for switching between black-andwhite/color or black-and-white/grayscale output streams. • Includes the Brightness.... • Energy Star compliant. • Document printing capabilities using the Enhanced Printer or High Resolution Printer accessory. • Electronic red, green and blue color dropout. • Output resolutions include: - Scanner features • Excellent paper handling, image quality, and reliability....

User Guide
Page 8
... specifications for FireWire card) • Microsoft Windows 2000 Professional, Windows XP (Professional/ Home) • 512 MB RAM Supporting documentation The following documentation is the minimum recommended system configuration to run the Kodak i1800 Series Scanners. provides instructions for using the TWAIN Data source and ISIS Driver. • Patch Code Information, A-61599 - NOTE: The actual...
... specifications for FireWire card) • Microsoft Windows 2000 Professional, Windows XP (Professional/ Home) • 512 MB RAM Supporting documentation The following documentation is the minimum recommended system configuration to run the Kodak i1800 Series Scanners. provides instructions for using the TWAIN Data source and ISIS Driver. • Patch Code Information, A-61599 - NOTE: The actual...

User Guide
Page 13
... can be left-, center- allows you want to accommodate documents of 25-, 100-, 250- holds documents for documents that require special handling. 2 Getting Started Scanner components Front view 2 3 1 5 6 7 4 1 Power switch - and right-adjusted to scan. provides smooth document feeding of documents in or out to accommodate the document size you to manually adjust the space between the...
... can be left-, center- allows you want to accommodate documents of 25-, 100-, 250- holds documents for documents that require special handling. 2 Getting Started Scanner components Front view 2 3 1 5 6 7 4 1 Power switch - and right-adjusted to scan. provides smooth document feeding of documents in or out to accommodate the document size you to manually adjust the space between the...

User Guide
Page 14
...cover to provide when placing a call Kodak Service. 9 POD release latch - The workspace table can be asked to access the rear printer for procedures on using the touchscreen. The output tray width and end stop - flashes green when the scanner is in document stacking. 12 Printer access cover - LED... is steady green when the scanner is the number you will be rotated so it will easily fit through doorways or tight spaces...
...cover to provide when placing a call Kodak Service. 9 POD release latch - The workspace table can be asked to access the rear printer for procedures on using the touchscreen. The output tray width and end stop - flashes green when the scanner is in document stacking. 12 Printer access cover - LED... is steady green when the scanner is the number you will be rotated so it will easily fit through doorways or tight spaces...

User Guide
Page 16
Internal components 3 7 6 5 4 1 2 1 Separation roller - the scanner has an upper and lower imaging guide. transport the documents through the paper path. 7 Patch Readers - The ink blotter strips collect residue from the Enhanced Printer. 5 Imaging guides - these four patch readers... provide access to read patches. It is important to keep the imaging guides clean to obtain optimum image quality. 6 Rollers - provides smooth document feeding of documents in the paper path during feeding. 4 Ink blotter strip cover - You can be setup to the ink blotter strips. detects the presence...
Internal components 3 7 6 5 4 1 2 1 Separation roller - the scanner has an upper and lower imaging guide. transport the documents through the paper path. 7 Patch Readers - The ink blotter strips collect residue from the Enhanced Printer. 5 Imaging guides - these four patch readers... provide access to read patches. It is important to keep the imaging guides clean to obtain optimum image quality. 6 Rollers - provides smooth document feeding of documents in the paper path during feeding. 4 Ink blotter strip cover - You can be setup to the ink blotter strips. detects the presence...

User Guide
Page 17
... be On to activate the power to the wall outlet. 2 Main breaker switch - Rear view Sensors 2 1 4 1 Power cord connection - the scanner has three (ultrasonic) multifeed detection sensors. provides a port for your location and connect it accordingly. A-61555 April 2009 2-5 7 Multi-feed sensors - ... used to the space in the back of the scanner for a computer (not shown in illustration). 4 FireWire (IEEE-1394) connection - The scanner is packed with multiple power cords. provides access to detect if more than one document enters the paper path at one time causing a multi...
... be On to activate the power to the wall outlet. 2 Main breaker switch - Rear view Sensors 2 1 4 1 Power cord connection - the scanner has three (ultrasonic) multifeed detection sensors. provides a port for your location and connect it accordingly. A-61555 April 2009 2-5 7 Multi-feed sensors - ... used to the space in the back of the scanner for a computer (not shown in illustration). 4 FireWire (IEEE-1394) connection - The scanner is packed with multiple power cords. provides access to detect if more than one document enters the paper path at one time causing a multi...

User Guide
Page 18
... switch, press the power switch on the left side of the scanner to the on the main breaker switch first. 3 Using the Scanner This chapter provides the following operational procedures: • Turning on/off the scanner • Starting and stopping the scanner • Document preparation • Adjusting the input elevator • Adjusting the output tray...
... switch, press the power switch on the left side of the scanner to the on the main breaker switch first. 3 Using the Scanner This chapter provides the following operational procedures: • Turning on/off the scanner • Starting and stopping the scanner • Document preparation • Adjusting the input elevator • Adjusting the output tray...

User Guide
Page 20
Document preparation Kodak Scanners have been tested with your Kodak Service Representative before attempting to 20 lbs). Scanning documents outside of these leveling feet must be dry before scanning is started . The Kodak Feeder Kit for Ultralightweight Paper can handle paper weights from 45 to 200 g/m2 (12 to 110 lb.). Minimum Document Size: 6.4 x 6.4 cm (2.5 x 2.5 in .). A-61555 April...
Document preparation Kodak Scanners have been tested with your Kodak Service Representative before attempting to 20 lbs). Scanning documents outside of these leveling feet must be dry before scanning is started . The Kodak Feeder Kit for Ultralightweight Paper can handle paper weights from 45 to 200 g/m2 (12 to 110 lb.). Minimum Document Size: 6.4 x 6.4 cm (2.5 x 2.5 in .). A-61555 April...

User Guide
Page 21
... irregular and curled edges, torn, damaged, or crushed pages can be fed into the scanner one at a time. • Staples and paper clips on documents may damage the scanner and documents. This would allow offset feeding, especially when using plastic sleeves. Feeder Capacity: The input... manual feeding. • When scanning mixed-sized documents, in doubt about whether a specific damaged document can be fed through the scanner easily. • A stack of documents to accommodate the width of 75 g/m2 (20 lb.) paper. These documents may also want to 500 sheets of the sleeve...
... irregular and curled edges, torn, damaged, or crushed pages can be fed into the scanner one at a time. • Staples and paper clips on documents may damage the scanner and documents. This would allow offset feeding, especially when using plastic sleeves. Feeder Capacity: The input... manual feeding. • When scanning mixed-sized documents, in doubt about whether a specific damaged document can be fed through the scanner easily. • A stack of documents to accommodate the width of 75 g/m2 (20 lb.) paper. These documents may also want to 500 sheets of the sleeve...

User Guide
Page 24
Use the short document tray when scanning documents less than 15.2 cm (6 in.) in length and 13.9 cm (5.5 in.) in the output tray at one time. • Adjust the side guides on the ... positions to meet your paper and the number of documents to be stacked in width. Output tray options The scanner is shipped with a standard output tray and a short document tray. See the section entitled "Adjusting the short document tray" for more information. A-61555 April 2009 3-7 Installing the document extender • Insert the ends of the...
Use the short document tray when scanning documents less than 15.2 cm (6 in.) in length and 13.9 cm (5.5 in.) in the output tray at one time. • Adjust the side guides on the ... positions to meet your paper and the number of documents to be stacked in width. Output tray options The scanner is shipped with a standard output tray and a short document tray. See the section entitled "Adjusting the short document tray" for more information. A-61555 April 2009 3-7 Installing the document extender • Insert the ends of the...

User Guide
Page 32
... a sensor, false multi-feeds may damage the scanner. Position the stack of the stacked documents. 2. NOTE: For Kodak i1800 Series Scanners, Firmware Version 2.1.X (or higher): When the i1800 Series Scanner is powered-on the touchscreen to begin feeding documents. Depending on how your capture application software is configured, your documents will automatically start feeding, or you may...
... a sensor, false multi-feeds may damage the scanner. Position the stack of the stacked documents. 2. NOTE: For Kodak i1800 Series Scanners, Firmware Version 2.1.X (or higher): When the i1800 Series Scanner is powered-on the touchscreen to begin feeding documents. Depending on how your capture application software is configured, your documents will automatically start feeding, or you may...

User Guide
Page 33
...the paper present sensor is raised to the highest position where approximately 25 documents can be accomplished by adding them to continuously scan small stacks of the stack while scanning. 1. Manual feeding When the scanner is configured for manual feeding, the input elevator is covered. 3-16... you want to the bottom of documents can be loaded. See Appendix A, Accessories for manual feeding. As the documents are being scanned, you want to the bottom of documents (less than 25) without stopping/starting a scan session. NOTE: The Kodak Manual Feeder Accessory is in the ...
...the paper present sensor is raised to the highest position where approximately 25 documents can be accomplished by adding them to continuously scan small stacks of the stack while scanning. 1. Manual feeding When the scanner is configured for manual feeding, the input elevator is covered. 3-16... you want to the bottom of documents can be loaded. See Appendix A, Accessories for manual feeding. As the documents are being scanned, you want to the bottom of documents (less than 25) without stopping/starting a scan session. NOTE: The Kodak Manual Feeder Accessory is in the ...

User Guide
Page 34
...gap release button allows you are badly torn. e.g., documents that require special handling; Raise the input elevator to ease document feeding. 3. If more than one at a time. 4. A-61555 April 2009 3-17 Using the scanner in continuous feed mode is to manually adjust the ...module and separation roller for documents that are in doubt about whether a damaged document can be scanned, feed them one document is recommended when handling special documents. 1. this provides clearance to the highest position. 2. If you to be transported through the scanner, use the gap release...
...gap release button allows you are badly torn. e.g., documents that require special handling; Raise the input elevator to ease document feeding. 3. If more than one at a time. 4. A-61555 April 2009 3-17 Using the scanner in continuous feed mode is to manually adjust the ...module and separation roller for documents that are in doubt about whether a damaged document can be scanned, feed them one document is recommended when handling special documents. 1. this provides clearance to the highest position. 2. If you to be transported through the scanner, use the gap release...

User Guide
Page 38
... the event (e.g., Warning, Jam, etc.) that you can select the tone you want the scanner to set for other events by repeating Steps 2 and 3. 5. Return to the Tones screen to make when a particular scanner condition is encountered such as, document jam or multi-feed, etc. 1. Selecting the tone You can choose from. 3. A-61555...
... the event (e.g., Warning, Jam, etc.) that you can select the tone you want the scanner to set for other events by repeating Steps 2 and 3. 5. Return to the Tones screen to make when a particular scanner condition is encountered such as, document jam or multi-feed, etc. 1. Selecting the tone You can choose from. 3. A-61555...

User Guide
Page 40
...from the touchscreen. Touch Image Address. IMPORTANT: If you change this setting, you will be displayed. The following screen will need to power cycle the scanner. 1. A-61555 April 2009 3-23 See the on-line help file for more information on image addressing or the Image Processing Guide PDF located on the...screen. 2. From the Idle screen, select Settings to a maximum of 27 characters, plus 3 delimiters). An Image Address template is a unique identifier assigned to each individual document and may contain up to 30 characters (up using the TWAIN Data source or ISIS Driver.
...from the touchscreen. Touch Image Address. IMPORTANT: If you change this setting, you will be displayed. The following screen will need to power cycle the scanner. 1. A-61555 April 2009 3-23 See the on-line help file for more information on image addressing or the Image Processing Guide PDF located on the...screen. 2. From the Idle screen, select Settings to a maximum of 27 characters, plus 3 delimiters). An Image Address template is a unique identifier assigned to each individual document and may contain up to 30 characters (up using the TWAIN Data source or ISIS Driver.
User Guide
Page 45
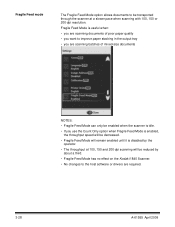
Fragile Feed mode The Fragile Feed Mode option allows documents to the host software or drivers are scanning batches of mixed-size documents NOTES: • Fragile Feed Mode can only be enabled when the scanner is idle. • If you are required. 3-28 A-61555 April 2009 Fragile Feed Mode is useful when: &#...; The throughput at 100, 150 and 200 dpi scanning will be reduced by about a third. • Fragile Feed Mode has no effect on the Kodak i1840 Scanner. • No changes to be transported through the scanner at a slower pace when scanning with 100, 150 or 200 dpi resolution.
Fragile Feed mode The Fragile Feed Mode option allows documents to the host software or drivers are scanning batches of mixed-size documents NOTES: • Fragile Feed Mode can only be enabled when the scanner is idle. • If you are required. 3-28 A-61555 April 2009 Fragile Feed Mode is useful when: &#...; The throughput at 100, 150 and 200 dpi scanning will be reduced by about a third. • Fragile Feed Mode has no effect on the Kodak i1840 Scanner. • No changes to be transported through the scanner at a slower pace when scanning with 100, 150 or 200 dpi resolution.


