User Guide
Page 2
Contents 1 Introduction 1 Scanner features 1 Supporting documentation 2 Safety information 3 User precautions 3 Environmental information 4 European Union 4 EMC statements 4 United States 4 Japan 5 Korean 5 Acoustic emission 5 Power system connection 5 2 Getting Started 6 What's in the box 6 System requirements 6 Installing the scanner 7 Installing the Kodak Driver Software 7 Windows operating systems 7 Linux operating systems 9 Connecting the power cord to the scanner 10 Disconnecting...
Contents 1 Introduction 1 Scanner features 1 Supporting documentation 2 Safety information 3 User precautions 3 Environmental information 4 European Union 4 EMC statements 4 United States 4 Japan 5 Korean 5 Acoustic emission 5 Power system connection 5 2 Getting Started 6 What's in the box 6 System requirements 6 Installing the scanner 7 Installing the Kodak Driver Software 7 Windows operating systems 7 Linux operating systems 9 Connecting the power cord to the scanner 10 Disconnecting...
User Guide
Page 5
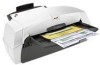
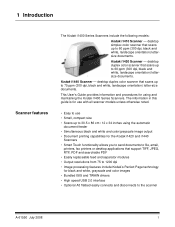
... to 60 ppm (300 dpi, black and white, landscape orientation) lettersize documents. 1 Introduction Scanner features The Kodak i1400 Series Scanners include the following models: Kodak i1410 Scanner - The information in this guide is for the Kodak i1420 and i1440 Scanners • Smart Touch functionality allows you to send documents to file, email, printers, fax printers or desktop applications that scans...
... to 60 ppm (300 dpi, black and white, landscape orientation) lettersize documents. 1 Introduction Scanner features The Kodak i1400 Series Scanners include the following models: Kodak i1410 Scanner - The information in this guide is for the Kodak i1420 and i1440 Scanners • Smart Touch functionality allows you to send documents to file, email, printers, fax printers or desktop applications that scans...

User Guide
Page 6
provides a step-by-step procedure for installing the scanner. • Image Processing Guide - This guide is also available: • Quick Start Guide - explains how to this User's Guide, the following documentation is provided on the installation CD in PDF format and can also be downloaded from the website (www.Kodak.com/go/docimaging). 2 A-61550 July 2008 Supporting documentation In addition to use the basic image processing features.
provides a step-by-step procedure for installing the scanner. • Image Processing Guide - This guide is also available: • Quick Start Guide - explains how to this User's Guide, the following documentation is provided on the installation CD in PDF format and can also be downloaded from the website (www.Kodak.com/go/docimaging). 2 A-61550 July 2008 Supporting documentation In addition to use the basic image processing features.

User Guide
Page 15
Connecting the USB cable The USB cable supplied with the slots. 3. Attach the A end of the scanner. Locate the input tray slots on the back of the cable to fit different document sizes. Align the input tray pins with your PC. Attaching the input tray 1. A-61550 July 2008 11 Attaching... the input and output trays 2. A B 1. The input and output trays can also be adjusted to the proper USB port on your scanner has two different ends....
Connecting the USB cable The USB cable supplied with the slots. 3. Attach the A end of the scanner. Locate the input tray slots on the back of the cable to fit different document sizes. Align the input tray pins with your PC. Attaching the input tray 1. A-61550 July 2008 11 Attaching... the input and output trays 2. A B 1. The input and output trays can also be adjusted to the proper USB port on your scanner has two different ends....

User Guide
Page 17
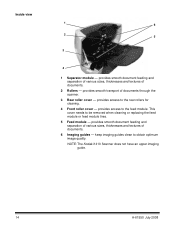
... 21.6 x 27.9 cm (8.5 x 11 inches). 7 Gap release lever - Scanner components Front view 1 7 2 3 4 5 6 1 Scanner cover - illuminates or flashes indicating scanner status. 4 Scanner cover release lever - holds up to 100 documents (20 lb/75 g/m2) in place. 6 Input tray extender - collects the scanned documents. 3 LEDs - push up to open the scanner cover. 5 Input tray - A-61550 July 2008 13 push...
... 21.6 x 27.9 cm (8.5 x 11 inches). 7 Gap release lever - Scanner components Front view 1 7 2 3 4 5 6 1 Scanner cover - illuminates or flashes indicating scanner status. 4 Scanner cover release lever - holds up to 100 documents (20 lb/75 g/m2) in place. 6 Input tray extender - collects the scanned documents. 3 LEDs - push up to open the scanner cover. 5 Input tray - A-61550 July 2008 13 push...
User Guide
Page 18
... image quality. NOTE:The Kodak i1410 Scanner does not have an upper imaging guide. 14 A-61550 July 2008 provides smooth transport of documents. 2 Rollers - keep imaging guides clean to the rear rollers for cleaning. 4 Front roller cover - provides smooth document feeding and separation of various sizes, thicknesses and textures of documents through the scanner. 3 Rear roller cover...
... image quality. NOTE:The Kodak i1410 Scanner does not have an upper imaging guide. 14 A-61550 July 2008 provides smooth transport of documents. 2 Rollers - keep imaging guides clean to the rear rollers for cleaning. 4 Front roller cover - provides smooth document feeding and separation of various sizes, thicknesses and textures of documents through the scanner. 3 Rear roller cover...
User Guide
Page 20
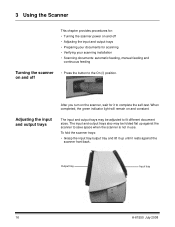
... tray and lift it up against the scanner front/back. Adjusting the input and output trays After you turn on the scanner, wait for scanning • Verifying your documents for it rests against the scanner to save space when the scanner is not in use. Output tray Input... tray 16 A-61550 July 2008 The input and output trays may be adjusted to fit different document sizes. 3 Using the Scanner This chapter provides procedures for: • Turning the scanner power on and off • Adjusting the input and output trays • Preparing your scanning installation...
... tray and lift it up against the scanner front/back. Adjusting the input and output trays After you turn on the scanner, wait for scanning • Verifying your documents for it rests against the scanner to save space when the scanner is not in use. Output tray Input... tray 16 A-61550 July 2008 The input and output trays may be adjusted to fit different document sizes. 3 Using the Scanner This chapter provides procedures for: • Turning the scanner power on and off • Adjusting the input and output trays • Preparing your scanning installation...
User Guide
Page 23
... the width of the rollers. However, no scanner can be manually fed, one at a time, folded edge first, while lifting the gap release lever. If in doubt about whether a specific damaged document can use the optional Kodak i1400 Series A3 Flatbed to scan. • When scanning documents in a clear protective sleeve, the input tray...
... the width of the rollers. However, no scanner can be manually fed, one at a time, folded edge first, while lifting the gap release lever. If in doubt about whether a specific damaged document can use the optional Kodak i1400 Series A3 Flatbed to scan. • When scanning documents in a clear protective sleeve, the input tray...
User Guide
Page 24
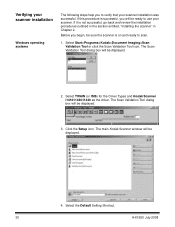
... Kodak Scanner i1410/i1420/i1440 as the driver. Select the Default Setting Shortcut. 20 A-61550 July 2008 The Scan Validation Tool dialog box will be displayed. 4. If this procedure is successful, you will be displayed. 3. The main Kodak Scanner window will be displayed. 2. Verifying your scanner ... is on and ready to scan. 1. Select Start>Programs>Kodak>Document Imaging>Scan Validation Tool or click the Scan Validation Tool icon. The Scan Validation Tool dialog box will be sure the scanner is not successful, go back and review the installation procedures outlined...
... Kodak Scanner i1410/i1420/i1440 as the driver. Select the Default Setting Shortcut. 20 A-61550 July 2008 The Scan Validation Tool dialog box will be displayed. 4. If this procedure is successful, you will be displayed. 3. The main Kodak Scanner window will be displayed. 2. Verifying your scanner ... is on and ready to scan. 1. Select Start>Programs>Kodak>Document Imaging>Scan Validation Tool or click the Scan Validation Tool icon. The Scan Validation Tool dialog box will be sure the scanner is not successful, go back and review the installation procedures outlined...
User Guide
Page 25
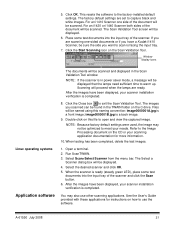
... click the Scan button. 6. Window display icons Linux operating systems Application software The documents will proceed when the lamps are set to the Image Processing document on the Scan Validation Tool. After the images have a Kodak i1410 Scanner, be sure the side you scanned can be found in power saver mode, a message will be scanned...
... click the Scan button. 6. Window display icons Linux operating systems Application software The documents will proceed when the lamps are set to the Image Processing document on the Scan Validation Tool. After the images have a Kodak i1410 Scanner, be sure the side you scanned can be found in power saver mode, a message will be scanned...

User Guide
Page 30
...any unapplied changes. This is run . saves any changes. 26 A-61550 July 2008 If you made on the main Kodak Scanner window. Cancel - closes the Configuration dialog box without saving any changes made changes in the Configuration dialog box and ...settings prior to scanning: if selected, the main Kodak Scanner window will be displayed before the document(s) are scanned, allowing you to select the scanner Setting Shortcut. No - closes the Configuration dialog box. Settings: displays the main Kodak Scanner window allowing you to select a different Setting Shortcut...
...any unapplied changes. This is run . saves any changes. 26 A-61550 July 2008 If you made on the main Kodak Scanner window. Cancel - closes the Configuration dialog box without saving any changes made changes in the Configuration dialog box and ...settings prior to scanning: if selected, the main Kodak Scanner window will be displayed before the document(s) are scanned, allowing you to select the scanner Setting Shortcut. No - closes the Configuration dialog box. Settings: displays the main Kodak Scanner window allowing you to select a different Setting Shortcut...

User Guide
Page 32
By default your documents will be stored within your scanner Setting Shortcut before scanning, check Display settings prior to scanning from the Smart Touch Configuration dialog box... different folder. 7. If you want to change it, enter the folder name or click Browse to saving check box on the main Kodak Scanner window. 10. If desired, add a file name prefix by repeating Steps 2 and 11. 13. Modify other function numbers by entering... on the Configuration dialog box. 9. If desired, select a different Setting Shortcut based on the type of document you want to change your "My...
By default your documents will be stored within your scanner Setting Shortcut before scanning, check Display settings prior to scanning from the Smart Touch Configuration dialog box... different folder. 7. If you want to change it, enter the folder name or click Browse to saving check box on the main Kodak Scanner window. 10. If desired, add a file name prefix by repeating Steps 2 and 11. 13. Modify other function numbers by entering... on the Configuration dialog box. 9. If desired, select a different Setting Shortcut based on the type of document you want to change your "My...

User Guide
Page 36
... you are scanning one-sided documents or if you have a Kodak i1410 Scanner, be sure the side you want to scan into the automatic document feeder in documents may damage the scanner. 1. For faster throughput, feed documents into the input tray of the scanner. Automatic feeding To scan a batch of the stacked documents. 2. Position the documents face down with the leading...
... you are scanning one-sided documents or if you have a Kodak i1410 Scanner, be sure the side you want to scan into the automatic document feeder in documents may damage the scanner. 1. For faster throughput, feed documents into the input tray of the scanner. Automatic feeding To scan a batch of the stacked documents. 2. Position the documents face down with the leading...
User Guide
Page 38
... are accessible through the ISIS Driver or TWAIN Datasource. NOTE: Refer to the Image Processing document on the scanner, or it could result in this guide: • Printer specifications. • Changing print positions. • Replacing the ink cartridge ... on the CD or your scanning application documentation for using a Setting Shortcut (TWAIN GUI). 4 Document Printing This chapter provides instructions for more information about enabling printing and setting up print strings. The Document Printer/Enhanced Printer operates at full scanner speed. any information that may change for...
... are accessible through the ISIS Driver or TWAIN Datasource. NOTE: Refer to the Image Processing document on the scanner, or it could result in this guide: • Printer specifications. • Changing print positions. • Replacing the ink cartridge ... on the CD or your scanning application documentation for using a Setting Shortcut (TWAIN GUI). 4 Document Printing This chapter provides instructions for more information about enabling printing and setting up print strings. The Document Printer/Enhanced Printer operates at full scanner speed. any information that may change for...

User Guide
Page 40
... have the Enhanced Printer, continue with all federal, state and local laws. 1. Lift the printer access door off the scanner. 4. Locate the printer access door on the back of the scanner. 2. If you have a Document Printer, continue with Step 5 in accordance with the next step. After initial installation, replace the ink cartridge when...
... have the Enhanced Printer, continue with all federal, state and local laws. 1. Lift the printer access door off the scanner. 4. Locate the printer access door on the back of the scanner. 2. If you have a Document Printer, continue with Step 5 in accordance with the next step. After initial installation, replace the ink cartridge when...
User Guide
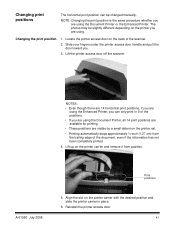
Page 45
...the positions. • If you are visible by a small detent on the printer carrier and remove it from the trailing edge of the document, even if the information has not been completely printed 4. Lift up on the printer rail. • Printing automatically stops approximately ½-inch...be slightly different depending on the printer carrier with the desired position and slide the printer carrier in 9 of the scanner. 2. Align the slot on the printer you are using the Document Printer, all 14 print positions are available for printing. • These positions are using the...
...the positions. • If you are visible by a small detent on the printer carrier and remove it from the trailing edge of the document, even if the information has not been completely printed 4. Lift up on the printer rail. • Printing automatically stops approximately ½-inch...be slightly different depending on the printer carrier with the desired position and slide the printer carrier in 9 of the scanner. 2. Align the slot on the printer you are using the Document Printer, all 14 print positions are available for printing. • These positions are using the...

User Guide
Page 47
.... 8. Lower the scanner cover and press it firmly until it snaps into the channel. 9. Repeat Steps 4-8 for the other strip. 10. Press the adhesive side of the channels. The following supplies are available: Description Document Printer: Printer Ink Cartridges / Black (Qty 10) Document Printer: Kodak Print Ink Blotters (Qty 60) Document Printer: Kodak Printer Ink Cartridge...
.... 8. Lower the scanner cover and press it firmly until it snaps into the channel. 9. Repeat Steps 4-8 for the other strip. 10. Press the adhesive side of the channels. The following supplies are available: Description Document Printer: Printer Ink Cartridges / Black (Qty 10) Document Printer: Kodak Print Ink Blotters (Qty 60) Document Printer: Kodak Printer Ink Cartridge...

User Guide
Page 49
Some document types generate more frequent cleaning than recommended. A-61550 July 2008 45 After cleaning, ...use a vacuum cleaner to remove debris from the rubber tires on a regular basis is normal. 5 Maintenance Cleaning your scanner and preventative maintenance on the feed and separator modules is required to ensure the best possible image quality. Tire debris does... mean that the tires are worn or damaged. NOTES: • Some debris from the scanner. • Using unapproved cleaning fluids or solvents may require more paper dust and debris and may damage the rubber tires...
Some document types generate more frequent cleaning than recommended. A-61550 July 2008 45 After cleaning, ...use a vacuum cleaner to remove debris from the rubber tires on a regular basis is normal. 5 Maintenance Cleaning your scanner and preventative maintenance on the feed and separator modules is required to ensure the best possible image quality. Tire debris does... mean that the tires are worn or damaged. NOTES: • Some debris from the scanner. • Using unapproved cleaning fluids or solvents may require more paper dust and debris and may damage the rubber tires...

User Guide
Page 50
... silicate which can cause eye irritation. Supplies/Consumables Kodak Feeder Consumables Kit for i1400 Series Scanners Kodak Extra-Large Feeder Consumables Kit for i1400 Series Scanners Kodak Imaging Guide Set for i1400 Series Scanners (1 upper guide, 1 lower guide) Document Printer: Printer Ink Cartridges (10) Document Printer: Kodak Printer Ink Blotters (60) Document Printer: Kodak Printer Ink Cartridge Carrier Enhanced Printer: Black...
... silicate which can cause eye irritation. Supplies/Consumables Kodak Feeder Consumables Kit for i1400 Series Scanners Kodak Extra-Large Feeder Consumables Kit for i1400 Series Scanners Kodak Imaging Guide Set for i1400 Series Scanners (1 upper guide, 1 lower guide) Document Printer: Printer Ink Cartridges (10) Document Printer: Kodak Printer Ink Blotters (60) Document Printer: Kodak Printer Ink Cartridge Carrier Enhanced Printer: Black...

User Guide
Page 51
Cleaning the separator module 1. Remove any documents from the feeder area. 3. Pull up to unlatch the scanner cover. 4. A-61550 July 2008 47 Lift up and out of position. Power down the scanner. 2. With one hand, push the separator module release lever back and with the other hand lift the separator module up the scanner cover release to open the scanner cover. 5.
Cleaning the separator module 1. Remove any documents from the feeder area. 3. Pull up to unlatch the scanner cover. 4. A-61550 July 2008 47 Lift up and out of position. Power down the scanner. 2. With one hand, push the separator module release lever back and with the other hand lift the separator module up the scanner cover release to open the scanner cover. 5.


