User Manual
Page 1
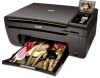
KODAK ESP 5200 Series All-in-One Printer Rotate Back Home MS SD/HC MMC Includes Information for the: ESP 5250 All-in-One Printer ESP 5260 All-in-One Printer Extended User Guide
KODAK ESP 5200 Series All-in-One Printer Rotate Back Home MS SD/HC MMC Includes Information for the: ESP 5250 All-in-One Printer ESP 5260 All-in-One Printer Extended User Guide
User Manual
Page 5
KODAK ESP 5200 Series All-in-One Printer Connectivity ...46 Software support ...46 Physical specifications ...47 Warranty...47 System requirements...47 Safety information ...49 Regulatory compliance...51 FCC statement ...51 Canadian statements ...51 German compliance statement ...52 REACH Article 33 declarations...52 Waste electrical and electronic equipment labeling 52 ENERGY STAR® Qualified ...52 Warranty Information...53 Declaration of Conformity...54 Index www.kodak.com/go/aiosupport v
KODAK ESP 5200 Series All-in-One Printer Connectivity ...46 Software support ...46 Physical specifications ...47 Warranty...47 System requirements...47 Safety information ...49 Regulatory compliance...51 FCC statement ...51 Canadian statements ...51 German compliance statement ...52 REACH Article 33 declarations...52 Waste electrical and electronic equipment labeling 52 ENERGY STAR® Qualified ...52 Warranty Information...53 Declaration of Conformity...54 Index www.kodak.com/go/aiosupport v
User Manual
Page 7
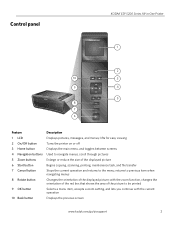
with the current operation Displays the previous screen www.kodak.com/go/aiosupport 2 lifts for easy viewing Turns the printer on or off Displays the main menu, and toggles between screens Used to navigate menus, scroll through pictures Enlarge or... area of the displayed picture; returns to previous item when navigating menus Changes the orientation of the picture to the menu; Control panel KODAK ESP 5200 Series All-in-One Printer ESP 5250 1 All-in-One-Printer 2 Back Home 10 3 9 OK 4 Rotate Back Home MS SD/HC MMC 8 Zoom Rotate 5 Cancel 7 Start 6 Feature 1 LCD 2 On...
with the current operation Displays the previous screen www.kodak.com/go/aiosupport 2 lifts for easy viewing Turns the printer on or off Displays the main menu, and toggles between screens Used to navigate menus, scroll through pictures Enlarge or... area of the displayed picture; returns to previous item when navigating menus Changes the orientation of the picture to the menu; Control panel KODAK ESP 5200 Series All-in-One Printer ESP 5250 1 All-in-One-Printer 2 Back Home 10 3 9 OK 4 Rotate Back Home MS SD/HC MMC 8 Zoom Rotate 5 Cancel 7 Start 6 Feature 1 LCD 2 On...

User Manual
Page 11
...-Fi radio is turned on the printer to connect to temporarily disable your firewall until the printer is needed to connect your wireless network. The printer searches for available wireless networks within range, then displays the list in -One Printer Before you use a wireless access ...Connecting to a listed network See Before you select WiFi Setup Wizard. You can use the one that uses Dynamic Host Configuration Protocol (DHCP). • Your network name (SSID - KODAK ESP 5200 Series All-in order of the items listed above, contact your Internet service provider or your network...
...-Fi radio is turned on the printer to connect to temporarily disable your firewall until the printer is needed to connect your wireless network. The printer searches for available wireless networks within range, then displays the list in -One Printer Before you use a wireless access ...Connecting to a listed network See Before you select WiFi Setup Wizard. You can use the one that uses Dynamic Host Configuration Protocol (DHCP). • Your network name (SSID - KODAK ESP 5200 Series All-in order of the items listed above, contact your Internet service provider or your network...
User Manual
Page 13
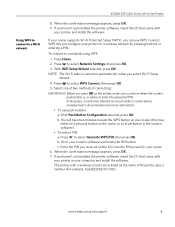
... press OK. Enter the PIN you haven't yet installed the printer software, insert the CD that came with your printer in your computer and install the software. When the confirmation message appears, press OK. 7. www.kodak.com/go/aiosupport 8 If necessary, consult your Internet service provider...+1133). b. If you received on the router or a virtual button in the router's software). • To enter a PIN: a. KODAK ESP 5200 Series All-in-One Printer Using WPS to connect to select Generate WPS PIN, then press OK. Press Home. 2. Press to a Wi-Fi network 8. To connect...
... press OK. Enter the PIN you haven't yet installed the printer software, insert the CD that came with your printer in your computer and install the software. When the confirmation message appears, press OK. 7. www.kodak.com/go/aiosupport 8 If necessary, consult your Internet service provider...+1133). b. If you received on the router or a virtual button in the router's software). • To enter a PIN: a. KODAK ESP 5200 Series All-in-One Printer Using WPS to connect to select Generate WPS PIN, then press OK. Press Home. 2. Press to a Wi-Fi network 8. To connect...
User Manual
Page 15
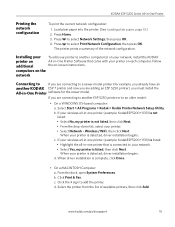
... If you are adding an ESP 5250 printer), you already have an another ESP 5250 printer or to a newer model printer (for example, you must install the All-in -one printer (example: KodakESP5200+1133) is not listed: • Select No, my printer is detected, driver installation begins. www.kodak.com/go/aiosupport 10 KODAK ESP 5200 Series All-in -One Printer Software that is connected...
... If you are adding an ESP 5250 printer), you already have an another ESP 5250 printer or to a newer model printer (for example, you must install the All-in -one printer (example: KodakESP5200+1133) is not listed: • Select No, my printer is detected, driver installation begins. www.kodak.com/go/aiosupport 10 KODAK ESP 5200 Series All-in -One Printer Software that is connected...
User Manual
Page 19
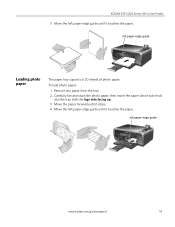
... the paper (short side first) into the tray with the logo side facing up. 3. Move the left paper-edge guide until it touches the paper. KODAK ESP 5200 Series All-in-One Printer 7. Move the left paper-edge guide until it stops. 4. To load photo paper: 1. Move the paper forward until it touches the paper.
... the paper (short side first) into the tray with the logo side facing up. 3. Move the left paper-edge guide until it touches the paper. KODAK ESP 5200 Series All-in-One Printer 7. Move the left paper-edge guide until it stops. 4. To load photo paper: 1. Move the paper forward until it touches the paper.
User Manual
Page 23
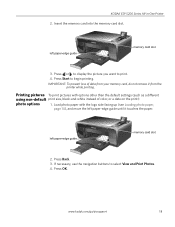
.... Press Back. 3. If necessary, use the navigation buttons to select View and Print Photos. 4. www.kodak.com/go/aiosupport 18 IMPORTANT: To prevent loss of color, or a date on the print): photo options 1. KODAK ESP 5200 Series All-in-One Printer 2. Load photo paper with options other than the default settings (such as a different using non-default...
.... Press Back. 3. If necessary, use the navigation buttons to select View and Print Photos. 4. www.kodak.com/go/aiosupport 18 IMPORTANT: To prevent loss of color, or a date on the print): photo options 1. KODAK ESP 5200 Series All-in-One Printer 2. Load photo paper with options other than the default settings (such as a different using non-default...
User Manual
Page 25
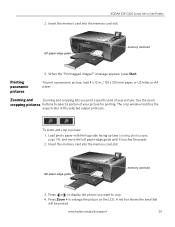
When the "Print tagged images?" Printing panoramic pictures To print a panoramic picture, load 4 x 12 in -One Printer 2. The crop window matches the aspect ratio of your picture for printing. Use the zoom cropping pictures buttons to display the picture you print a ... memory card slot. Press or to select a portion of your picture. left paper-edge guide Rotate Back Home MS SD/HC MMC memory card slot 3. KODAK ESP 5200 Series All-in . / 101 x 305 mm paper, or US letter or A4 paper. To zoom and crop a picture: 1. Insert the memory card into the memory ...
When the "Print tagged images?" Printing panoramic pictures To print a panoramic picture, load 4 x 12 in -One Printer 2. The crop window matches the aspect ratio of your picture for printing. Use the zoom cropping pictures buttons to display the picture you print a ... memory card slot. Press or to select a portion of your picture. left paper-edge guide Rotate Back Home MS SD/HC MMC memory card slot 3. KODAK ESP 5200 Series All-in . / 101 x 305 mm paper, or US letter or A4 paper. To zoom and crop a picture: 1. Insert the memory card into the memory ...
User Manual
Page 29
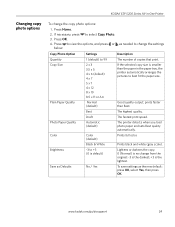
... 3. Press OK. Lightens or darkens the copy. 0 (Normal) is no change the copy photo options: 1. www.kodak.com/go/aiosupport 24 KODAK ESP 5200 Series All-in the paper tray, the printer automatically arranges the pictures to best fit the paper size. to 99 2 x 3 3.5 x 5 4 x 6 ...(default) 4 x 7 5 x 7 4 x 12 8 x 10 8.5 x 11 or A4 Normal (default) Best The number of copies that print. prints faster than the paper in -One Printer...
... 3. Press OK. Lightens or darkens the copy. 0 (Normal) is no change the copy photo options: 1. www.kodak.com/go/aiosupport 24 KODAK ESP 5200 Series All-in the paper tray, the printer automatically arranges the pictures to best fit the paper size. to 99 2 x 3 3.5 x 5 4 x 6 ...(default) 4 x 7 5 x 7 4 x 12 8 x 10 8.5 x 11 or A4 Normal (default) Best The number of copies that print. prints faster than the paper in -One Printer...
User Manual
Page 31
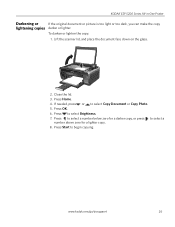
... a number above zero for a darker copy, or press to select Brightness. 7. Press to select a number below zero for a lighter copy. 8. Press Home. 4. Press OK. 6. KODAK ESP 5200 Series All-in-One Printer Darkening or If the original document or picture is too light or too dark, you can make the copy lightening copies darker or lighter...
... a number above zero for a darker copy, or press to select Brightness. 7. Press to select a number below zero for a lighter copy. 8. Press Home. 4. Press OK. 6. KODAK ESP 5200 Series All-in-One Printer Darkening or If the original document or picture is too light or too dark, you can make the copy lightening copies darker or lighter...
User Manual
Page 33
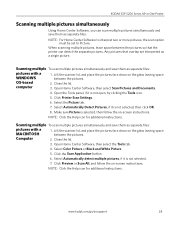
...Select Automatically detect multiple pictures, if it is not selected, then click OK. 8. computer 3. Computer 2. www.kodak.com/go/aiosupport 28 Any pictures that the printer can scan multiple pictures simultaneously and save them as separate files: pictures with a WINDOWS 1. Select Automatically Detect Pictures... -screen instructions. Open the Tools panel, if it is not selected. 7. Close the lid. 3. KODAK ESP 5200 Series All-in-One Printer Scanning multiple pictures simultaneously Using Home Center Software, you can detect the separate pictures.
...Select Automatically detect multiple pictures, if it is not selected, then click OK. 8. computer 3. Computer 2. www.kodak.com/go/aiosupport 28 Any pictures that the printer can scan multiple pictures simultaneously and save them as separate files: pictures with a WINDOWS 1. Select Automatically Detect Pictures... -screen instructions. Open the Tools panel, if it is not selected. 7. Close the lid. 3. KODAK ESP 5200 Series All-in-One Printer Scanning multiple pictures simultaneously Using Home Center Software, you can detect the separate pictures.
User Manual
Page 35
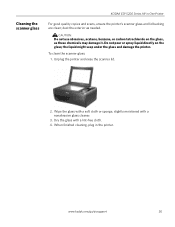
...with a lint-free cloth. 4. www.kodak.com/go/aiosupport 30 To clean the scanner glass: 1. the liquid might seep under the glass and damage the printer. When finished cleaning, plug in -One Printer For good quality copies and scans, ensure the printer's scanner glass and lid backing are ...clean; Do not pour or spray liquid directly on the glass, as needed. dust the exterior as these chemicals may damage it. Cleaning the scanner glass KODAK ESP 5200 Series All-in the printer. ...
...with a lint-free cloth. 4. www.kodak.com/go/aiosupport 30 To clean the scanner glass: 1. the liquid might seep under the glass and damage the printer. When finished cleaning, plug in -One Printer For good quality copies and scans, ensure the printer's scanner glass and lid backing are ...clean; Do not pour or spray liquid directly on the glass, as needed. dust the exterior as these chemicals may damage it. Cleaning the scanner glass KODAK ESP 5200 Series All-in the printer. ...
User Manual
Page 37
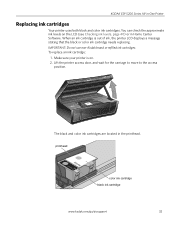
... ink cartridge needs replacing. To replace an ink cartridge: 1. printhead color ink cartridge black ink cartridge www.kodak.com/go/aiosupport 32 KODAK ESP 5200 Series All-in the printhead. The black and color ink cartridges are located in -One Printer Replacing ink cartridges Your printer uses both black and color ink cartridges. IMPORTANT: Do not use non...
... ink cartridge needs replacing. To replace an ink cartridge: 1. printhead color ink cartridge black ink cartridge www.kodak.com/go/aiosupport 32 KODAK ESP 5200 Series All-in the printhead. The black and color ink cartridges are located in -One Printer Replacing ink cartridges Your printer uses both black and color ink cartridges. IMPORTANT: Do not use non...
User Manual
Page 39
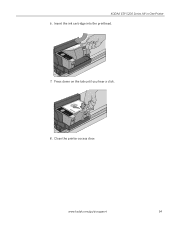
Insert the ink cartridge into the printhead. 7. www.kodak.com/go/aiosupport 34 Press down on the tab until you hear a click. 8. KODAK ESP 5200 Series All-in-One Printer 6. Close the printer access door.
Insert the ink cartridge into the printhead. 7. www.kodak.com/go/aiosupport 34 Press down on the tab until you hear a click. 8. KODAK ESP 5200 Series All-in-One Printer 6. Close the printer access door.
User Manual
Page 41
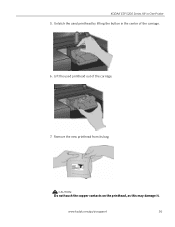
CAUTION: Do not touch the copper contacts on the printhead, as this may damage it. Unlatch the used printhead out of the carriage. 6. Remove the new printhead from its bag. www.kodak.com/go/aiosupport 36 Lift the used printhead by lifting the button in -One Printer 5. KODAK ESP 5200 Series All-in the center of the carriage. 7.
CAUTION: Do not touch the copper contacts on the printhead, as this may damage it. Unlatch the used printhead out of the carriage. 6. Remove the new printhead from its bag. www.kodak.com/go/aiosupport 36 Lift the used printhead by lifting the button in -One Printer 5. KODAK ESP 5200 Series All-in the center of the carriage. 7.
User Manual
Page 43
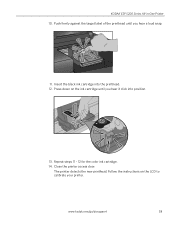
Press down on the LCD to calibrate your printer. Repeat steps 11 - 12 for the color ink cartridge. 14. KODAK ESP 5200 Series All-in-One Printer 10. Insert the black ink cartridge into position. The printer detects the new printhead. Cartouche d'encre noire 10 10 13. Follow the instructions on the ink cartridge until you hear it click into the printhead. 12. www.kodak.com/go/aiosupport 38 Close the printer access door. Push firmly against the target label of the printhead until you hear a loud snap. 11.
Press down on the LCD to calibrate your printer. Repeat steps 11 - 12 for the color ink cartridge. 14. KODAK ESP 5200 Series All-in-One Printer 10. Insert the black ink cartridge into position. The printer detects the new printhead. Cartouche d'encre noire 10 10 13. Follow the instructions on the ink cartridge until you hear it click into the printhead. 12. www.kodak.com/go/aiosupport 38 Close the printer access door. Push firmly against the target label of the printhead until you hear a loud snap. 11.
User Manual
Page 45
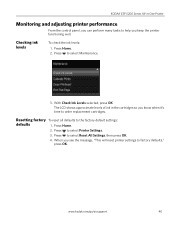
With Check Ink Levels selected, press OK. Press Home. 2. Press to select Maintenance. 3. KODAK ESP 5200 Series All-in the cartridges so you keep the printer functioning well. Press to select Printer Settings. 3. The LCD shows approximate levels of ink in -One Printer Monitoring and adjusting printer performance From the control panel, you can perform many tasks to help you...
With Check Ink Levels selected, press OK. Press Home. 2. Press to select Maintenance. 3. KODAK ESP 5200 Series All-in the cartridges so you keep the printer functioning well. Press to select Printer Settings. 3. The LCD shows approximate levels of ink in -One Printer Monitoring and adjusting printer performance From the control panel, you can perform many tasks to help you...
User Manual
Page 47
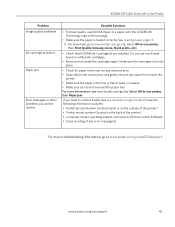
... door and gently remove any error message(s) For more troubleshooting information, go to contact Kodak (see www.kodak.com/go /aiosupport 42 If you need to www.kodak.com/go /itg, select All-in-one printer, then Paper jam. KODAK ESP 5200 Series All-in-One Printer Problem Image quality problems Ink cartridge problems Paper jam Error messages or other problems...
... door and gently remove any error message(s) For more troubleshooting information, go to contact Kodak (see www.kodak.com/go /aiosupport 42 If you need to www.kodak.com/go /itg, select All-in-one printer, then Paper jam. KODAK ESP 5200 Series All-in-One Printer Problem Image quality problems Ink cartridge problems Paper jam Error messages or other problems...
User Manual
Page 49
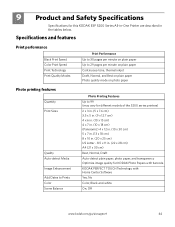
9 Product and Safety Specifications Specifications for this KODAK ESP 5200 Series All-in-One Printer are described in . (22 x 28 cm) A4 (21 x 30 cm) Best, Normal, Draft Auto-detect plain paper, photo paper, and transparency Optimize image quality for different models of the 5200 series printers) 2 x 3 in. (5 x 7.6 cm) 3.5 x 5 in. (9 x 12.7 cm) 4 x 6 in. (10 x 15 cm) ... Add Dates to Prints Color Scene Balance Photo Printing Features Up to 99 (may vary for KODAK Photo Papers with barcode KODAK PERFECT TOUCH Technology with Home Center Software Yes, No Color, Black-and-white On, Off www...
9 Product and Safety Specifications Specifications for this KODAK ESP 5200 Series All-in-One Printer are described in . (22 x 28 cm) A4 (21 x 30 cm) Best, Normal, Draft Auto-detect plain paper, photo paper, and transparency Optimize image quality for different models of the 5200 series printers) 2 x 3 in. (5 x 7.6 cm) 3.5 x 5 in. (9 x 12.7 cm) 4 x 6 in. (10 x 15 cm) ... Add Dates to Prints Color Scene Balance Photo Printing Features Up to 99 (may vary for KODAK Photo Papers with barcode KODAK PERFECT TOUCH Technology with Home Center Software Yes, No Color, Black-and-white On, Off www...


