
User Manual
Page 1
KODAK EASYSHARE DX3700 Digital Camera User's Guide Visit Kodak on the World Wide Web at http://www.kodak.com
KODAK EASYSHARE DX3700 Digital Camera User's Guide Visit Kodak on the World Wide Web at http://www.kodak.com

User Manual
Page 5
Table of Contents 1 Getting Started 1 What Can I Do With My Camera 1 What Can I Do With My Digital Pictures 1 Camera Package Contents 2 Attaching the Wrist Strap and Lens Cap 3 Loading the Battery 3 Turning the Camera On and Off 4 Checking the Battery Level 5 Automatic Powerdown Saves Batteries 6 Checking Camera Status 7 Status Bar Icons 7 Inserting an Optional MMC/SD...
Table of Contents 1 Getting Started 1 What Can I Do With My Camera 1 What Can I Do With My Digital Pictures 1 Camera Package Contents 2 Attaching the Wrist Strap and Lens Cap 3 Loading the Battery 3 Turning the Camera On and Off 4 Checking the Battery Level 5 Automatic Powerdown Saves Batteries 6 Checking Camera Status 7 Status Bar Icons 7 Inserting an Optional MMC/SD...

User Manual
Page 6
... 19 Creating a Print Order 19 Resolution and Print Sizes 19 Running a Slide Show 20 Starting the Slide Show 20 Other Review Settings 20 4 Customizing Your Camera Settings 21 Setup Options 21 Capture Options 22 Setting Image Quality 22 Setting Macro 22 Turning QuickView On or Off 22 Review Options 23 Setting... Video Out 23 Print Order 24 Copying Pictures 25 Viewing Camera Information 25 Formatting Camera Memory or MMC/SD Card 26 Selecting a Language 27 Date/Time Settings 27 iv
... 19 Creating a Print Order 19 Resolution and Print Sizes 19 Running a Slide Show 20 Starting the Slide Show 20 Other Review Settings 20 4 Customizing Your Camera Settings 21 Setup Options 21 Capture Options 22 Setting Image Quality 22 Setting Macro 22 Turning QuickView On or Off 22 Review Options 23 Setting... Video Out 23 Print Order 24 Copying Pictures 25 Viewing Camera Information 25 Formatting Camera Memory or MMC/SD Card 26 Selecting a Language 27 Date/Time Settings 27 iv

User Manual
Page 7
... Transfer Pictures 33 Connecting to Your Computer 33 Connecting With the USB Cable 33 Connecting With the EASYSHARE Camera Dock... 34 Transferring Your Pictures 34 Transferring on a WINDOWS-based Computer ........ 34 Transferring on a MACINTOSH Computer 35 Turning Off KODAK Picture Software Autostart ... 35 Working With Your Pictures 35 Transferring Your Pictures Manually 36 v
... Transfer Pictures 33 Connecting to Your Computer 33 Connecting With the USB Cable 33 Connecting With the EASYSHARE Camera Dock... 34 Transferring Your Pictures 34 Transferring on a WINDOWS-based Computer ........ 34 Transferring on a MACINTOSH Computer 35 Turning Off KODAK Picture Software Autostart ... 35 Working With Your Pictures 35 Transferring Your Pictures Manually 36 v

User Manual
Page 8
... a WINDOWS-based Computer 36 On a MACINTOSH Computer 36 KODAK Camera Connection Software Online Help. 36 Printing Your Pictures 37 From KODAK Picture Software 37 From an MMC/SD Card 37 7 Using the EASYSHARE Camera Dock 39 EASYSHARE Camera Dock Package Contents 39 Installing the Dock Insert 40 Connecting the EASYSHARE Camera Dock 40 Installing the Battery Pack in the...
... a WINDOWS-based Computer 36 On a MACINTOSH Computer 36 KODAK Camera Connection Software Online Help. 36 Printing Your Pictures 37 From KODAK Picture Software 37 From an MMC/SD Card 37 7 Using the EASYSHARE Camera Dock 39 EASYSHARE Camera Dock Package Contents 39 Installing the Dock Insert 40 Connecting the EASYSHARE Camera Dock 40 Installing the Battery Pack in the...
User Manual
Page 9
Camera 62 Using Your Batteries 62 Tips, Safety, Maintenance 63 Camera Accessories 64 Picture Storage Capacities 65 Locating Pictures on an MMC/SD Card 65 Picture File Naming Conventions 66 File Naming Conventions on an MMC/SD card ........66 File Naming Conventions in Internal Memory............66 File Naming Conventions After a Copy 67 Regulatory Information 67 FCC Compliance and Advisory 67 Canadian DOC Statement 68 vii Telephone Numbers 56 10 Appendix 59 DX3700 Camera Specifications 59 EASYSHARE Camera Dock Specifications 61 Original Factory Settings -
Camera 62 Using Your Batteries 62 Tips, Safety, Maintenance 63 Camera Accessories 64 Picture Storage Capacities 65 Locating Pictures on an MMC/SD Card 65 Picture File Naming Conventions 66 File Naming Conventions on an MMC/SD card ........66 File Naming Conventions in Internal Memory............66 File Naming Conventions After a Copy 67 Regulatory Information 67 FCC Compliance and Advisory 67 Canadian DOC Statement 68 vii Telephone Numbers 56 10 Appendix 59 DX3700 Camera Specifications 59 EASYSHARE Camera Dock Specifications 61 Original Factory Settings -

User Manual
Page 11
... unwanted pictures. Have fun! Review Display your purchase of the KODAK EASYSHARE DX3700 Digital Camera. make prints at a KODAK Picture Maker kiosk, or take your MMC/SD card to your computer. Set Up Select camera settings. fix red-eye; crop and rotate; What Can I Do With My Digital Pictures? Print to your photo retailer for printing. and much...
... unwanted pictures. Have fun! Review Display your purchase of the KODAK EASYSHARE DX3700 Digital Camera. make prints at a KODAK Picture Maker kiosk, or take your MMC/SD card to your computer. Set Up Select camera settings. fix red-eye; crop and rotate; What Can I Do With My Digital Pictures? Print to your photo retailer for printing. and much...

User Manual
Page 12
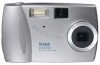
.... *** In some countries, the User's Guide is provided. For details on a CD instead of in printed form. Chapter 1 Camera Package Contents The KODAK EASYSHARE DX3700 Digital Camera includes: 1 2 3 4 1 Camera 2 Lithium battery, KCRV3 or equivalent* 7 3 Wrist strap 4 USB cable 6 5 Lens cap 5 6 Video cable 7 Dock insert (Do not discard.)** 8 User's Guide,*** Quick Start Guide, and Software ...
.... *** In some countries, the User's Guide is provided. For details on a CD instead of in printed form. Chapter 1 Camera Package Contents The KODAK EASYSHARE DX3700 Digital Camera includes: 1 2 3 4 1 Camera 2 Lithium battery, KCRV3 or equivalent* 7 3 Wrist strap 4 USB cable 6 5 Lens cap 5 6 Video cable 7 Dock insert (Do not discard.)** 8 User's Guide,*** Quick Start Guide, and Software ...

User Manual
Page 13
...door. NOTE: If the battery is removed after Date/Time are set (page 27), the camera will retain the settings for the types of batteries you can use alkaline batteries. If your camera operates dependably, do not use in the inset. See page 62 for approximately 10 minutes.... For details on charging and loading the Battery Pack, see page 42. 3 For acceptable battery life and to make sure your camera was packaged with a KODAK EASYSHARE Camera Dock, the KODAK Ni-MH Rechargeable Battery Pack is included.* 1 Open the battery door. 2 Insert the battery as shown. Loading the Battery...
...door. NOTE: If the battery is removed after Date/Time are set (page 27), the camera will retain the settings for the types of batteries you can use alkaline batteries. If your camera operates dependably, do not use in the inset. See page 62 for approximately 10 minutes.... For details on charging and loading the Battery Pack, see page 42. 3 For acceptable battery life and to make sure your camera was packaged with a KODAK EASYSHARE Camera Dock, the KODAK Ni-MH Rechargeable Battery Pack is included.* 1 Open the battery door. 2 Insert the battery as shown. Loading the Battery...

User Manual
Page 14
...an extended time, the Date/Time need to be set to be reset. 4 The camera completes any Save, Delete, or Copy operations that are removed for an explanation of the status bar icons. 2 To turn the camera on, press the power button until the ready light turns off , press the power ... turned on, the Language and Date/Time need to Capture ) the camera is briefly displayed on the LCD. Chapter 1 Turning the Camera On and Off Power button 1 To turn the camera off . The ready light glows orange while the camera performs a self-check. When the ready light glows steady green (and the Mode ...
...an extended time, the Date/Time need to be set to be reset. 4 The camera completes any Save, Delete, or Copy operations that are removed for an explanation of the status bar icons. 2 To turn the camera on, press the power button until the ready light turns off , press the power ... turned on, the Language and Date/Time need to Capture ) the camera is briefly displayed on the LCD. Chapter 1 Turning the Camera On and Off Power button 1 To turn the camera off . The ready light glows orange while the camera performs a self-check. When the ready light glows steady green (and the Mode ...
User Manual
Page 15
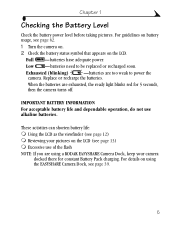
... life and dependable operation, do not use of the flash NOTE: If you are using the EASYSHARE Camera Dock, see page 12) m Reviewing your camera docked there for 5 seconds, then the camera turns off. These activities can shorten battery life: m Using the LCD as the viewfinder (see... page 39. 5 Low -batteries need to power the camera. Full -batteries have adequate power. For details on using a KODAK EASYSHARE Camera Dock, keep your pictures on the LCD. Exhausted (blinking) -batteries are exhausted, the ready light blinks red...
... life and dependable operation, do not use of the flash NOTE: If you are using the EASYSHARE Camera Dock, see page 12) m Reviewing your camera docked there for 5 seconds, then the camera turns off. These activities can shorten battery life: m Using the LCD as the viewfinder (see... page 39. 5 Low -batteries need to power the camera. Full -batteries have adequate power. For details on using a KODAK EASYSHARE Camera Dock, keep your pictures on the LCD. Exhausted (blinking) -batteries are exhausted, the ready light blinks red...
User Manual
Page 16
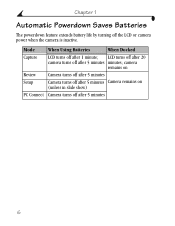
LCD turns off after 20 camera turns off the LCD or camera power when the camera is inactive. Chapter 1 Automatic Powerdown Saves Batteries The powerdown feature extends battery life by turning off after 5 minutes minutes; Mode When Using Batteries When Docked Capture LCD turns off after 1 minute; camera remains on Review Camera turns off after 5 minutes Setup Camera turns off after 5 minutes Camera remains on (unless in slide show) PC Connect Camera turns off after 5 minutes 6
LCD turns off after 20 camera turns off the LCD or camera power when the camera is inactive. Chapter 1 Automatic Powerdown Saves Batteries The powerdown feature extends battery life by turning off after 5 minutes minutes; Mode When Using Batteries When Docked Capture LCD turns off after 1 minute; camera remains on Review Camera turns off after 5 minutes Setup Camera turns off after 5 minutes Camera remains on (unless in slide show) PC Connect Camera turns off after 5 minutes 6

User Manual
Page 17
The current camera status icons are active. 1 Slide the Mode selector to Capture and turn the camera on. 2 Press the button on the LCD. Status Bar Icons Auto Fill Red-eye Off Flash Best Better Good Quality Pictures remaining Date stamp Full battery Low battery Exhausted battery (blinking) 7 If an icon is not displayed, that camera feature is not currently activated. Chapter 1 Checking Camera Status In Capture mode, press the button on the 4-way controller at any time to check which camera settings are briefly displayed on the 4-way controller.
The current camera status icons are active. 1 Slide the Mode selector to Capture and turn the camera on. 2 Press the button on the LCD. Status Bar Icons Auto Fill Red-eye Off Flash Best Better Good Quality Pictures remaining Date stamp Full battery Low battery Exhausted battery (blinking) 7 If an icon is not displayed, that camera feature is not currently activated. Chapter 1 Checking Camera Status In Capture mode, press the button on the 4-way controller at any time to check which camera settings are briefly displayed on the 4-way controller.

User Manual
Page 18
Notched corner of card 3 Orient the card as shown. 4 Push the card into the slot to seat the connector. CAUTION: The card can only be inserted one way. Use only certified cards that carry the MultiMedia (MMC) or Secure Digital (SD) logo. Chapter 1 Inserting an Optional MMC/SD Card To insert a card: 1 Turn the camera off. 2 Open the card door. Close the door. Forcing the card may damage your camera. See page 65 for storage capacities. 8
Notched corner of card 3 Orient the card as shown. 4 Push the card into the slot to seat the connector. CAUTION: The card can only be inserted one way. Use only certified cards that carry the MultiMedia (MMC) or Secure Digital (SD) logo. Chapter 1 Inserting an Optional MMC/SD Card To insert a card: 1 Turn the camera off. 2 Open the card door. Close the door. Forcing the card may damage your camera. See page 65 for storage capacities. 8

User Manual
Page 19
Doing so may damage your pictures, card, or camera. 9 When it . Chapter 1 To remove a card: 1 Turn the camera off. 2 Open the card door. 3 Push the end of the card in, then release it is blinking. CAUTION: Do not insert or remove a card when the ready light is partially ejected, remove the card.
Doing so may damage your pictures, card, or camera. 9 When it . Chapter 1 To remove a card: 1 Turn the camera off. 2 Open the card door. 3 Push the end of the card in, then release it is blinking. CAUTION: Do not insert or remove a card when the ready light is partially ejected, remove the card.

User Manual
Page 20
...). The storage location icon indicates the location of the picture. - Chapter 1 Choosing Internal or Removable Memory If an MMC/SD card is inserted in the camera, new pictures are stored in internal memory, then copy them to Review . NOTE: You can capture pictures in internal memory. You cannot copy pictures from...
...). The storage location icon indicates the location of the picture. - Chapter 1 Choosing Internal or Removable Memory If an MMC/SD card is inserted in the camera, new pictures are stored in internal memory, then copy them to Review . NOTE: You can capture pictures in internal memory. You cannot copy pictures from...

User Manual
Page 21
... or remove an MMC/SD card when the ready light is being saved. Doing so may damage your subject using the viewfinder, or turn the camera on (see page 12) and use the LCD. 3 Press the Shutter button halfway down to set the exposure and focus. 4 Press the Shutter button...2 2 Taking Pictures Taking a Picture Mode Selector Shutter button 1 Slide the Mode selector to Capture and turn Preview on . 2 Frame your pictures, MMC/SD card, or camera. 11 The ready light blinks green while the picture is blinking. If necessary, wait for the flash to take the picture. The ready light blinks...
... or remove an MMC/SD card when the ready light is being saved. Doing so may damage your subject using the viewfinder, or turn the camera on (see page 12) and use the LCD. 3 Press the Shutter button halfway down to set the exposure and focus. 4 Press the Shutter button...2 2 Taking Pictures Taking a Picture Mode Selector Shutter button 1 Slide the Mode selector to Capture and turn Preview on . 2 Frame your pictures, MMC/SD card, or camera. 11 The ready light blinks green while the picture is blinking. If necessary, wait for the flash to take the picture. The ready light blinks...

User Manual
Page 24
... taking pictures at night, indoors, or outdoors in existing light or when flash is prohibited. Flash button Press the button repeatedly to Auto when the camera is turned off. 14 Fill-Use when bright light comes from behind the subject. The flash icon that is displayed on the LCD Status Bar...
... taking pictures at night, indoors, or outdoors in existing light or when flash is prohibited. Flash button Press the button repeatedly to Auto when the camera is turned off. 14 Fill-Use when bright light comes from behind the subject. The flash icon that is displayed on the LCD Status Bar...

User Manual
Page 25
Chapter 2 Using the Digital Zoom This camera provides a 2X and 3X digital zoom.* 1 Set the Mode selector to Capture . 2 Press the button to 1X (no zoom). Select/Digital Zoom button The LCD displays the image and the magnification level. 4 Take the picture. * You may notice a decrease in printed image quality when using digital zoom. See "Resolution and Print Sizes" on . Press again for 2X zoom. Use the LCD to frame your subject. 3 Press the Select/Digital Zoom button for 3X zoom. Press again to return to turn Preview on page 19. 15
Chapter 2 Using the Digital Zoom This camera provides a 2X and 3X digital zoom.* 1 Set the Mode selector to Capture . 2 Press the button to 1X (no zoom). Select/Digital Zoom button The LCD displays the image and the magnification level. 4 Take the picture. * You may notice a decrease in printed image quality when using digital zoom. See "Resolution and Print Sizes" on . Press again for 2X zoom. Use the LCD to frame your subject. 3 Press the Select/Digital Zoom button for 3X zoom. Press again to return to turn Preview on page 19. 15

User Manual
Page 27
... the applied features: Internal memory MMC/SD card Print order Frame number Picture Location Best Better Good/2X Digital Zoom Quality Full battery Low battery Exhausted battery 17 If no card is present, the camera accesses the card. The icons displayed with the pictures stored in the LCD Mode Selector 1 Slide the...
... the applied features: Internal memory MMC/SD card Print order Frame number Picture Location Best Better Good/2X Digital Zoom Quality Full battery Low battery Exhausted battery 17 If no card is present, the camera accesses the card. The icons displayed with the pictures stored in the LCD Mode Selector 1 Slide the...


