User Manual
Page 7
... the Camera Dock 46 Installing the Battery Pack in the Camera 47 Docking the Camera 47 Charging the Battery Pack 48 Transferring Pictures 49 Using a Tripod 49 8 Troubleshooting Problems 51 Troubleshooting-Camera 51 Troubleshooting-Camera Dock 60 9 Getting Help 63 Software Help 63 Kodak Online Services 63 Kodak Fax Support 63 Telephone Customer Support 64 10 Appendix 67 DX3500 Camera Specifications 67 Camera Dock...
... the Camera Dock 46 Installing the Battery Pack in the Camera 47 Docking the Camera 47 Charging the Battery Pack 48 Transferring Pictures 49 Using a Tripod 49 8 Troubleshooting Problems 51 Troubleshooting-Camera 51 Troubleshooting-Camera Dock 60 9 Getting Help 63 Software Help 63 Kodak Online Services 63 Kodak Fax Support 63 Telephone Customer Support 64 10 Appendix 67 DX3500 Camera Specifications 67 Camera Dock...
User Manual
Page 10
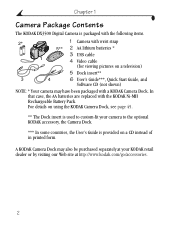
.../go/accessories. 2 For details on using the KODAK Camera Dock, see page 45. ** The Dock insert is used to the optional KODAK accessory, the Camera Dock. *** In some countries, the User's Guide is packaged with the following items. 2* 1 Camera with the KODAK Ni-MH Rechargeable Battery Pack. Chapter 1 Camera Package Contents The KODAK DX3500 Digital Camera is provided on a CD instead of in printed...
.../go/accessories. 2 For details on using the KODAK Camera Dock, see page 45. ** The Dock insert is used to the optional KODAK accessory, the Camera Dock. *** In some countries, the User's Guide is packaged with the following items. 2* 1 Camera with the KODAK Ni-MH Rechargeable Battery Pack. Chapter 1 Camera Package Contents The KODAK DX3500 Digital Camera is provided on a CD instead of in printed...

User Manual
Page 11
... are replaced with the KODAK Ni-MH Rechargeable Battery Pack. IMPORTANT BATTERY INFORMATION See page 70 for the types of the arrow, then lift to make sure your camera. For details on charging and loading the Battery Pack, see page 47. 3 NOTE: * Your camera may have been packaged...with your camera.* To load the batteries: 1 Turn the camera off. 2 On the bottom of the camera, slide the battery door in the direction of batteries you can use in your camera operates dependably, do not use alkaline batteries. In that case, the AA batteries are included with a KODAK Camera Dock. For ...
... are replaced with the KODAK Ni-MH Rechargeable Battery Pack. IMPORTANT BATTERY INFORMATION See page 70 for the types of the arrow, then lift to make sure your camera. For details on charging and loading the Battery Pack, see page 47. 3 NOTE: * Your camera may have been packaged...with your camera.* To load the batteries: 1 Turn the camera off. 2 On the bottom of the camera, slide the battery door in the direction of batteries you can use in your camera operates dependably, do not use alkaline batteries. In that case, the AA batteries are included with a KODAK Camera Dock. For ...
User Manual
Page 15
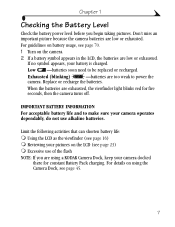
...the flash NOTE: If you begin taking pictures. Chapter 1 Checking the Battery Level Check the battery power level before you are using the Camera Dock, see page 70. 1 Turn on battery usage, see page 45. 7 Exhausted (blinking) -batteries are exhausted, the viewfinder light blinks...the batteries. Don't miss an important picture because the camera batteries are low or exhausted. For guidelines on the camera. 2 If a battery symbol appears in the LCD, the batteries are low or exhausted. For details on using a KODAK Camera Dock, keep your battery is charged. If no symbol ...
...the flash NOTE: If you begin taking pictures. Chapter 1 Checking the Battery Level Check the battery power level before you are using the Camera Dock, see page 70. 1 Turn on battery usage, see page 45. 7 Exhausted (blinking) -batteries are exhausted, the viewfinder light blinks...the batteries. Don't miss an important picture because the camera batteries are low or exhausted. For guidelines on the camera. 2 If a battery symbol appears in the LCD, the batteries are low or exhausted. For details on using a KODAK Camera Dock, keep your battery is charged. If no symbol ...
User Manual
Page 47
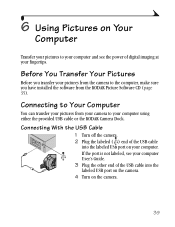
... cable into the labeled USB port on your computer using either the provided USB cable or the KODAK Camera Dock. Before You Transfer Your Pictures Before you transfer your computer User's Guide. 3 Plug the other end of digital imaging at your fingertips. 6 Using Pictures on Your Computer Transfer your pictures to your computer and...
... cable into the labeled USB port on your computer using either the provided USB cable or the KODAK Camera Dock. Before You Transfer Your Pictures Before you transfer your computer User's Guide. 3 Plug the other end of digital imaging at your fingertips. 6 Using Pictures on Your Computer Transfer your pictures to your computer and...

User Manual
Page 48
... Picture Card Reader to Your Computer. See your pictures. Chapter 6 Connecting With the KODAK Camera Dock 1 Open the connection door on your computer: C:\Kodak Pictures. Transferring Your Pictures KODAK Picture Transfer Software automatically opens on a WINDOWS-based Computer m Click Transfer Now to transfer your pictures to change the default options for transferring pictures. 40 m ...
... Picture Card Reader to Your Computer. See your pictures. Chapter 6 Connecting With the KODAK Camera Dock 1 Open the connection door on your computer: C:\Kodak Pictures. Transferring Your Pictures KODAK Picture Transfer Software automatically opens on a WINDOWS-based Computer m Click Transfer Now to transfer your pictures to change the default options for transferring pictures. 40 m ...

User Manual
Page 53
... to transfer your pictures to take pictures, store your camera in the Camera Dock whenever you received an insert with your camera into the Camera Dock. See your camera, you can purchase one pictured. 3 3 KODAK Ni-MH Rechargeable Battery Pack 1 4 Quick Start Guide (not shown) 45 7 Using the KODAK Camera Dock The KODAK Camera Dock makes it . To keep the Battery Pack charged and...
... to transfer your pictures to take pictures, store your camera in the Camera Dock whenever you received an insert with your camera into the Camera Dock. See your camera, you can purchase one pictured. 3 3 KODAK Ni-MH Rechargeable Battery Pack 1 4 Quick Start Guide (not shown) 45 7 Using the KODAK Camera Dock The KODAK Camera Dock makes it . To keep the Battery Pack charged and...
User Manual
Page 54
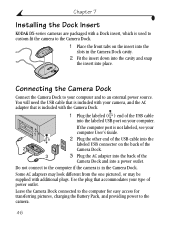
...Installing the Dock Insert KODAK DX-series cameras are packaged with a Dock insert, which is used to custom-fit the camera to the Camera Dock. 1 Place the front tabs on the back of the Camera Dock. 3 3 Plug the AC adapter into the back of power outlet. You will need the USB cable that is in the Camera Dock cavity. ...labeled USB connector on the insert into a power outlet. Some AC adapters may look different from the one pictured, or may be supplied with the Camera Dock. 1 Plug the labeled ( ) end of the USB cable into the labeled USB port on your computer. 1 2 If the computer port ...
...Installing the Dock Insert KODAK DX-series cameras are packaged with a Dock insert, which is used to custom-fit the camera to the Camera Dock. 1 Place the front tabs on the back of the Camera Dock. 3 3 Plug the AC adapter into the back of power outlet. You will need the USB cable that is in the Camera Dock cavity. ...labeled USB connector on the insert into a power outlet. Some AC adapters may look different from the one pictured, or may be supplied with the Camera Dock. 1 Plug the labeled ( ) end of the USB cable into the labeled USB port on your computer. 1 2 If the computer port ...
User Manual
Page 55
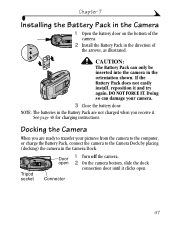
Kodak CAUTION: The Battery Pack can damage your pictures from the camera to the computer, or charge the Battery Pack, connect the camera to transfer your camera. 3 Close the battery door. NOTE: The batteries in the orientation shown. See page 48 for charging instructions. Doing so can only be inserted into the camera... in the Battery Pack are ready to the Camera Dock by placing (docking) the camera in the direction of the camera. 2 Install the Battery Pack in the Camera Dock. Docking the Camera When you are not charged when you ...
Kodak CAUTION: The Battery Pack can damage your pictures from the camera to the computer, or charge the Battery Pack, connect the camera to transfer your camera. 3 Close the battery door. NOTE: The batteries in the orientation shown. See page 48 for charging instructions. Doing so can only be inserted into the camera... in the Battery Pack are ready to the Camera Dock by placing (docking) the camera in the direction of the camera. 2 Install the Battery Pack in the Camera Dock. Docking the Camera When you are not charged when you ...
User Manual
Page 56
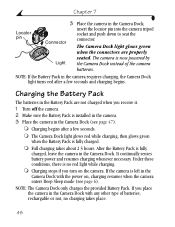
... Battery Pack in the camera requires charging, the Camera Dock light turns red after a few seconds and charging begins. The camera is installed in the camera. 3 Place the camera in the Camera Dock with the power on the camera. m Full charging takes about 2.5 hours. It continually senses battery power and resumes charging whenever necessary. The Camera Dock light glows green when...
... Battery Pack in the camera requires charging, the Camera Dock light turns red after a few seconds and charging begins. The camera is installed in the camera. 3 Place the camera in the Camera Dock with the power on the camera. m Full charging takes about 2.5 hours. It continually senses battery power and resumes charging whenever necessary. The Camera Dock light glows green when...

User Manual
Page 57
... and your pictures are transferred, leave the camera in the Camera Dock. 8 minutes after the transfer is active. Chapter 7 Transferring Pictures To transfer pictures from the Camera Dock and connect the tripod directly to the computer is complete, the Dock & Go begins to your computer: 1 Place the camera in the Camera Dock. m KODAK Picture Transfer Software automatically opens on the...
... and your pictures are transferred, leave the camera in the Camera Dock. 8 minutes after the transfer is active. Chapter 7 Transferring Pictures To transfer pictures from the Camera Dock and connect the tripod directly to the computer is complete, the Dock & Go begins to your computer: 1 Place the camera in the Camera Dock. m KODAK Picture Transfer Software automatically opens on the...

User Manual
Page 59
...a Picture removed. Picture Card was Make sure the camera is available in camera. 8 Troubleshooting Problems There may be corrupt. (page 34). For updates to Troubleshooting information, visit our Web site at http://www.kodak.com. is Insert a Picture Card. Additional technical ...Card Picture Card. No Picture Card is inserted or removed. Troubleshooting-Camera Picture Card Problem Cause Solution The camera does not The Picture Card Purchase a certified recognize your KODAK camera or Camera Dock. This chapter help you have questions about using your may be...
...a Picture removed. Picture Card was Make sure the camera is available in camera. 8 Troubleshooting Problems There may be corrupt. (page 34). For updates to Troubleshooting information, visit our Web site at http://www.kodak.com. is Insert a Picture Card. Additional technical ...Card Picture Card. No Picture Card is inserted or removed. Troubleshooting-Camera Picture Card Problem Cause Solution The camera does not The Picture Card Purchase a certified recognize your KODAK camera or Camera Dock. This chapter help you have questions about using your may be...

User Manual
Page 68
... picture (page 25). cable is not Install the software (page 35). Camera was not pressed 60 installed. Chapter 8 LCD Messages Message Unrecognized File Format Cause Solution The camera cannot Transfer the unreadable read the picture format. during picture transfer. Troubleshooting-Camera Dock Camera Dock Problem Pictures are too Close all software applications many applications and try...
... picture (page 25). cable is not Install the software (page 35). Camera was not pressed 60 installed. Chapter 8 LCD Messages Message Unrecognized File Format Cause Solution The camera cannot Transfer the unreadable read the picture format. during picture transfer. Troubleshooting-Camera Dock Camera Dock Problem Pictures are too Close all software applications many applications and try...

User Manual
Page 69
... (page 47). The Battery Pack Check for damage. The camera and Slowly return the camera and Battery Pack have Battery Pack to room been exposed to temperature. Light glows steady Camera Dock is green docked. The camera and Camera Dock are damaged. very high or low temperatures. 61 Chapter 8 Camera Dock indicator light Light Status Cause Solution Light glows steady...
... (page 47). The Battery Pack Check for damage. The camera and Slowly return the camera and Battery Pack have Battery Pack to room been exposed to temperature. Light glows steady Camera Dock is green docked. The camera and Camera Dock are damaged. very high or low temperatures. 61 Chapter 8 Camera Dock indicator light Light Status Cause Solution Light glows steady...

User Manual
Page 71
... m World Wide Web http://www.kodak.com (click Service and Support) Kodak Fax Support m U.S. 9 Getting Help If you need help with your camera or Camera Dock, it is available from a number of resources: m Troubleshooting Problems, page 51 m Place of purchase m Software application online help m World Wide Web m Product information by fax m ...
... m World Wide Web http://www.kodak.com (click Service and Support) Kodak Fax Support m U.S. 9 Getting Help If you need help with your camera or Camera Dock, it is available from a number of resources: m Troubleshooting Problems, page 51 m Place of purchase m Software application online help m World Wide Web m Product information by fax m ...
User Manual
Page 75
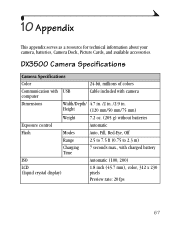
... Automatic Flash Modes Auto, Fill, Red-Eye, Off Range 2.5 to 7.5 ft (0.75 to 2.3 m) Charging 7 seconds max., with camera Dimensions Width/Depth/ 4.7 in. /2 in. /2.9 in. DX3500 Camera Specifications Camera Specifications Color 24-bit, millions of colors Communication with USB computer Cable included with charged battery Time ISO Automatic (100, 200) LCD....7 mm), color, 312 x 230 pixels Preview rate: 20 fps 67 10 Appendix This appendix serves as a resource for technical information about your camera, batteries, Camera Dock, Picture Cards, and available accessories.
... Automatic Flash Modes Auto, Fill, Red-Eye, Off Range 2.5 to 7.5 ft (0.75 to 2.3 m) Charging 7 seconds max., with camera Dimensions Width/Depth/ 4.7 in. /2 in. /2.9 in. DX3500 Camera Specifications Camera Specifications Color 24-bit, millions of colors Communication with USB computer Cable included with charged battery Time ISO Automatic (100, 200) LCD....7 mm), color, 312 x 230 pixels Preview rate: 20 fps 67 10 Appendix This appendix serves as a resource for technical information about your camera, batteries, Camera Dock, Picture Cards, and available accessories.

User Manual
Page 76
... Lens Type Optical quality glass, 5 element Maximum Fixed: f/4.5 Aperture Close-Up: f/8 Focal Length 38 mm (equivalent to 35mm camera) 6.1 mm (actual) Focus Distance 2.5 ft (0.75 m) to infinity, fixed focus with Macro Accessory 27 mm-external threads on lens ...-not included, optional purchase 2.2 MP Best Quality-1800 x 1200 pixels Good Quality-900 x 600 pixels Batteries 2 Lithium, AA (included with camera) 2 Ni-MH, AA rechargeable (optional purchase) Alkaline batteries not recommended Battery Pack, KODAK Ni-MH Rechargeable Battery Camera Dock Pack, recharge in Camera Dock only.
... Lens Type Optical quality glass, 5 element Maximum Fixed: f/4.5 Aperture Close-Up: f/8 Focal Length 38 mm (equivalent to 35mm camera) 6.1 mm (actual) Focus Distance 2.5 ft (0.75 m) to infinity, fixed focus with Macro Accessory 27 mm-external threads on lens ...-not included, optional purchase 2.2 MP Best Quality-1800 x 1200 pixels Good Quality-900 x 600 pixels Batteries 2 Lithium, AA (included with camera) 2 Ni-MH, AA rechargeable (optional purchase) Alkaline batteries not recommended Battery Pack, KODAK Ni-MH Rechargeable Battery Camera Dock Pack, recharge in Camera Dock only.
User Manual
Page 77
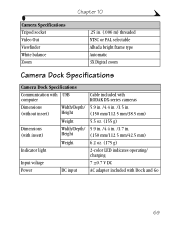
....25 in. (.006 m) threaded NTSC or PAL selectable Albada bright frame type Automatic 3X Digital zoom Camera Dock Specifications Camera Dock Specifications Communication with USB computer Dimensions (without insert) Width/Depth/ Height Weight Dimensions (with... insert) Width/Depth/ Height Weight Indicator light Input voltage Power DC input Cable included with KODAK DX-series cameras 5.9 in. /4.4 in. /1.5 in. (150 mm/112.5 ...
....25 in. (.006 m) threaded NTSC or PAL selectable Albada bright frame type Automatic 3X Digital zoom Camera Dock Specifications Camera Dock Specifications Communication with USB computer Dimensions (without insert) Width/Depth/ Height Weight Dimensions (with... insert) Width/Depth/ Height Weight Indicator light Input voltage Power DC input Cable included with KODAK DX-series cameras 5.9 in. /4.4 in. /1.5 in. (150 mm/112.5 ...
User Manual
Page 78
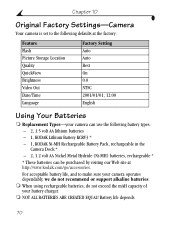
... Best On 0.0 NTSC 2001/01/01; 12:00 English Using Your Batteries m Replacement Types-your camera can use the following battery types: - 2, 1.5 volt AA lithium batteries - 1, KODAK Lithium Battery KCRV3 * - 1, KODAK Ni-MH Rechargeable Battery Pack, rechargeable in the Camera Dock * - 2, 1.2 volt AA Nickel Metal Hydride (Ni-MH) batteries, rechargeable * * These batteries can be purchased...
... Best On 0.0 NTSC 2001/01/01; 12:00 English Using Your Batteries m Replacement Types-your camera can use the following battery types: - 2, 1.5 volt AA lithium batteries - 1, KODAK Lithium Battery KCRV3 * - 1, KODAK Ni-MH Rechargeable Battery Pack, rechargeable in the Camera Dock * - 2, 1.2 volt AA Nickel Metal Hydride (Ni-MH) batteries, rechargeable * * These batteries can be purchased...
User Manual
Page 80
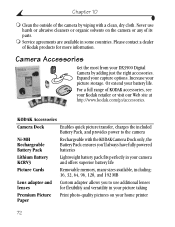
Chapter 10 m Clean the outside of its parts. Camera Accessories Get the most from your DX3500 Digital Camera by wiping with the KODAK Camera Dock only, the Battery Pack ensures you'll always have fully powered batteries Lithium Battery KCRV3 Lightweight battery pack fits perfectly in some countries. Or extend ...
Chapter 10 m Clean the outside of its parts. Camera Accessories Get the most from your DX3500 Digital Camera by wiping with the KODAK Camera Dock only, the Battery Pack ensures you'll always have fully powered batteries Lithium Battery KCRV3 Lightweight battery pack fits perfectly in some countries. Or extend ...


