
User Manual
Page 1
KODAK DX3500 Digital Camera User's Guide Visit Kodak on the World Wide Web at www.kodak.com
KODAK DX3500 Digital Camera User's Guide Visit Kodak on the World Wide Web at www.kodak.com
User Manual
Page 5
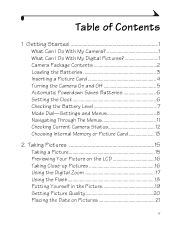
Table of Contents 1 Getting Started 1 What Can I Do With My Camera 1 What Can I Do With My Digital Pictures 1 Camera Package Contents 2 Loading the Batteries 3 Inserting a Picture Card 4 Turning the Camera On and Off 5 Automatic Powerdown Saves Batteries 6 Setting the Clock 6 Checking the Battery Level 7 Mode Dial-Settings... Through The Menus 11 Checking Current Camera Status 12 Choosing Internal Memory or Picture Card 13 2 Taking Pictures 15 Taking a Picture 15 Previewing Your Picture on the LCD 16 Taking Close-up Pictures 16 Using the Digital Zoom 17 Using the Flash 18 ...
Table of Contents 1 Getting Started 1 What Can I Do With My Camera 1 What Can I Do With My Digital Pictures 1 Camera Package Contents 2 Loading the Batteries 3 Inserting a Picture Card 4 Turning the Camera On and Off 5 Automatic Powerdown Saves Batteries 6 Setting the Clock 6 Checking the Battery Level 7 Mode Dial-Settings... Through The Menus 11 Checking Current Camera Status 12 Choosing Internal Memory or Picture Card 13 2 Taking Pictures 15 Taking a Picture 15 Previewing Your Picture on the LCD 16 Taking Close-up Pictures 16 Using the Digital Zoom 17 Using the Flash 18 ...

User Manual
Page 6
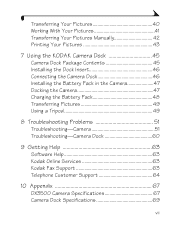
... a Slide Show 27 Copying Pictures 29 Viewing Picture Information 30 4 Customizing Your Camera Settings 31 Adjusting LCD Screen Brightness 31 Setting Video Out 32 Selecting a Language 33 Viewing Camera Information 33 Formatting Memory or Picture Card 34 5 Installing the Software 35 Install ...the Software 35 Software Included With Your Camera 36 Computer System Requirements 37 6 Using Pictures on Your Computer ...
... a Slide Show 27 Copying Pictures 29 Viewing Picture Information 30 4 Customizing Your Camera Settings 31 Adjusting LCD Screen Brightness 31 Setting Video Out 32 Selecting a Language 33 Viewing Camera Information 33 Formatting Memory or Picture Card 34 5 Installing the Software 35 Install ...the Software 35 Software Included With Your Camera 36 Computer System Requirements 37 6 Using Pictures on Your Computer ...
User Manual
Page 7
... Pack in the Camera 47 Docking the Camera 47 Charging the Battery Pack 48 Transferring Pictures 49 Using a Tripod 49 8 Troubleshooting Problems 51 Troubleshooting-Camera 51 Troubleshooting-Camera Dock 60 9 Getting Help 63 Software Help 63 Kodak Online Services 63 Kodak Fax Support 63 Telephone Customer Support 64 10 Appendix 67 DX3500 Camera Specifications 67 Camera Dock Specifications 69...
... Pack in the Camera 47 Docking the Camera 47 Charging the Battery Pack 48 Transferring Pictures 49 Using a Tripod 49 8 Troubleshooting Problems 51 Troubleshooting-Camera 51 Troubleshooting-Camera Dock 60 9 Getting Help 63 Software Help 63 Kodak Online Services 63 Kodak Fax Support 63 Telephone Customer Support 64 10 Appendix 67 DX3500 Camera Specifications 67 Camera Dock Specifications 69...
User Manual
Page 9
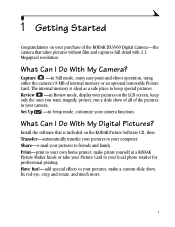
... to friends and family. What Can I Do With My Digital Pictures? Capture -in Setup mode, customize your camera functions. What Can I Do With My Camera? Set Up -in Still mode, enjoy easy point-and-shoot operation, using either the camera's 8 MB of internal memory or an optional removable Picture Card... Maker kiosk or take your Picture Card to your local photo retailer for professional printing. make a custom slide show of all of the KODAK DX3500 Digital Camera-the camera that is ideal as a safe place to keep only the ones you want, magnify, protect, run a slide show , fix red-eye, ...
... to friends and family. What Can I Do With My Digital Pictures? Capture -in Setup mode, customize your camera functions. What Can I Do With My Camera? Set Up -in Still mode, enjoy easy point-and-shoot operation, using either the camera's 8 MB of internal memory or an optional removable Picture Card... Maker kiosk or take your Picture Card to your local photo retailer for professional printing. make a custom slide show of all of the KODAK DX3500 Digital Camera-the camera that is ideal as a safe place to keep only the ones you want, magnify, protect, run a slide show , fix red-eye, ...
User Manual
Page 10
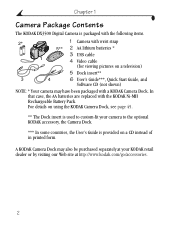
... pictures on a CD instead of in printed form. Chapter 1 Camera Package Contents The KODAK DX3500 Digital Camera is provided on a television) 5 Dock insert** 3 4 6 User's Guide***, Quick Start Guide, and Software CD (not shown) NOTE: * Your camera may also be purchased separately at your camera to the optional KODAK accessory, the Camera Dock. *** In some countries, the User's Guide is...
... pictures on a CD instead of in printed form. Chapter 1 Camera Package Contents The KODAK DX3500 Digital Camera is provided on a television) 5 Dock insert** 3 4 6 User's Guide***, Quick Start Guide, and Software CD (not shown) NOTE: * Your camera may also be purchased separately at your camera to the optional KODAK accessory, the Camera Dock. *** In some countries, the User's Guide is...

User Manual
Page 11
... camera.* To load the batteries: 1 Turn the camera off. 2 On the bottom of batteries you can use alkaline batteries. Chapter 1 Loading the Batteries AA lithium batteries are replaced with the KODAK Ni-MH Rechargeable Battery Pack. NOTE: * Your camera may have been packaged with a KODAK Camera Dock.... IMPORTANT BATTERY INFORMATION See page 70 for the types of the camera, slide the battery door in your...
... camera.* To load the batteries: 1 Turn the camera off. 2 On the bottom of batteries you can use alkaline batteries. Chapter 1 Loading the Batteries AA lithium batteries are replaced with the KODAK Ni-MH Rechargeable Battery Pack. NOTE: * Your camera may have been packaged with a KODAK Camera Dock.... IMPORTANT BATTERY INFORMATION See page 70 for the types of the camera, slide the battery door in your...

User Manual
Page 12
...Use only certified cards that carry the CompactFlash logo . Doing so may damage your pictures, Picture Card, or camera. KODAK Picture Cards can only be purchased separately on the camera. 3 On the bottom of Picture Cards as illustrated and remove the Card. Picture Cards provide easy picture storage... and transfer. Card door Raised lip To insert a Picture Card: 1 Turn off the camera. 2 Open the Picture Card door on our Web site at http://www.kodak.com/go/accessories. 4 See page 73 for Picture Card storage capacities. Chapter 1 Inserting a Picture Card Think...
...Use only certified cards that carry the CompactFlash logo . Doing so may damage your pictures, Picture Card, or camera. KODAK Picture Cards can only be purchased separately on the camera. 3 On the bottom of Picture Cards as illustrated and remove the Card. Picture Cards provide easy picture storage... and transfer. Card door Raised lip To insert a Picture Card: 1 Turn off the camera. 2 Open the Picture Card door on our Web site at http://www.kodak.com/go/accessories. 4 See page 73 for Picture Card storage capacities. Chapter 1 Inserting a Picture Card Think...
User Manual
Page 13
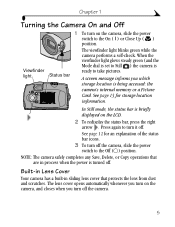
... a self-check. When the viewfinder light glows steady green (and the Mode dial is set to Still ) the camera is being accessed: the camera's internal memory or a Picture Card. NOTE: The camera safely completes any Save, Delete, or Copy operations that are in sliding lens cover that protects the lens from dust ...and scratches. The lens cover opens automatically whenever you turn on the camera, and closes when you which storage location is ready to the Off ( ) position. A screen message informs you turn off the...
... a self-check. When the viewfinder light glows steady green (and the Mode dial is set to Still ) the camera is being accessed: the camera's internal memory or a Picture Card. NOTE: The camera safely completes any Save, Delete, or Copy operations that are in sliding lens cover that protects the lens from dust ...and scratches. The lens cover opens automatically whenever you turn on the camera, and closes when you which storage location is ready to the Off ( ) position. A screen message informs you turn off the...
User Manual
Page 14
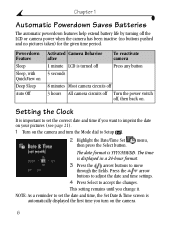
... Sleep, with QuickView on Deep Sleep Auto Off Activated Camera Behavior after 1 minute LCD is turned off 5 seconds To reactivate camera Press any button 8 minutes Most camera circuits off 3 hours All camera circuits off Turn the power switch off the LCD or camera power when the camera has been inactive (no buttons pushed and no pictures...
... Sleep, with QuickView on Deep Sleep Auto Off Activated Camera Behavior after 1 minute LCD is turned off 5 seconds To reactivate camera Press any button 8 minutes Most camera circuits off 3 hours All camera circuits off Turn the power switch off the LCD or camera power when the camera has been inactive (no buttons pushed and no pictures...
User Manual
Page 15
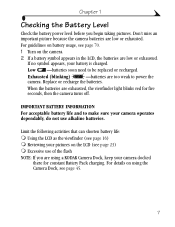
... low or exhausted. If no symbol appears, your camera docked there for five seconds, then the camera turns off. For details on using a KODAK Camera Dock, keep your battery is charged. Don't miss an important picture because the camera batteries are exhausted, the viewfinder light blinks red for... Using the LCD as the viewfinder (see page 16) m Reviewing your pictures on the camera. 2 If a battery symbol appears in the LCD, the batteries are too weak to power the camera. IMPORTANT BATTERY INFORMATION For acceptable battery life and to be replaced or recharged. Chapter 1 Checking...
... low or exhausted. If no symbol appears, your camera docked there for five seconds, then the camera turns off. For details on using a KODAK Camera Dock, keep your battery is charged. Don't miss an important picture because the camera batteries are exhausted, the viewfinder light blinks red for... Using the LCD as the viewfinder (see page 16) m Reviewing your pictures on the camera. 2 If a battery symbol appears in the LCD, the batteries are too weak to power the camera. IMPORTANT BATTERY INFORMATION For acceptable battery life and to be replaced or recharged. Chapter 1 Checking...
User Manual
Page 16
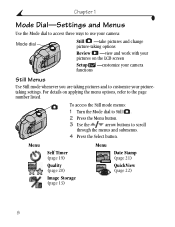
Chapter 1 Mode Dial-Settings and Menus Use the Mode dial to access three ways to use your camera: Mode dial Still -take pictures and change picture-taking pictures and to scroll through the menus and submenus. 4 Press the Select button. To access the ...Still mode menus: 1 Turn the Mode dial to Still . 2 Press the Menu button. 3 Use the arrow buttons to customize your camera functions Still Menus Use Still mode whenever you are taking options Review -view and work with your pictures on applying the menu options, refer to...
Chapter 1 Mode Dial-Settings and Menus Use the Mode dial to access three ways to use your camera: Mode dial Still -take pictures and change picture-taking pictures and to scroll through the menus and submenus. 4 Press the Select button. To access the ...Still mode menus: 1 Turn the Mode dial to Still . 2 Press the Menu button. 3 Use the arrow buttons to customize your camera functions Still Menus Use Still mode whenever you are taking options Review -view and work with your pictures on applying the menu options, refer to...
User Manual
Page 17
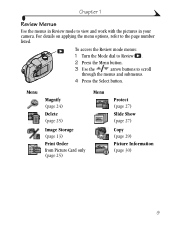
Menu Magnify (page 24) Delete (page 25) Image Storage (page 13) Print Order from Picture Card only (page 25) Menu Protect (page 27) Slide Show (page 27) Copy (page 29) Picture Information (page 30) 9 To access the Review mode menus: 1 Turn the Mode dial to Review . 2 Press the Menu button. 3 Use the arrow buttons to view and work with the pictures in your camera. Chapter 1 Review Menus Use the menus in Review mode to scroll through the menus and submenus. 4 Press the Select button. For details on applying the menu options, refer to the page number listed.
Menu Magnify (page 24) Delete (page 25) Image Storage (page 13) Print Order from Picture Card only (page 25) Menu Protect (page 27) Slide Show (page 27) Copy (page 29) Picture Information (page 30) 9 To access the Review mode menus: 1 Turn the Mode dial to Review . 2 Press the Menu button. 3 Use the arrow buttons to view and work with the pictures in your camera. Chapter 1 Review Menus Use the menus in Review mode to scroll through the menus and submenus. 4 Press the Select button. For details on applying the menu options, refer to the page number listed.

User Manual
Page 18
For details on the LCD. 2 Use the arrow buttons to the page number listed. The Setup menu screen is displayed on applying the menu options, refer to scroll through the menus and submenus. 3 Press the Select button. Menu Display Brightness (page 31) Date/Time set (page 6) Menu Image Storage (page 13) About (page 33) Video Out (page 32) Language (page 33) Format (page 34) 10 Chapter 1 Setup Menus Use the menus in Setup mode to Setup . To access the Setup mode menus: 1 Turn the Mode dial to customize your camera settings.
For details on the LCD. 2 Use the arrow buttons to the page number listed. The Setup menu screen is displayed on applying the menu options, refer to scroll through the menus and submenus. 3 Press the Select button. Menu Display Brightness (page 31) Date/Time set (page 6) Menu Image Storage (page 13) About (page 33) Video Out (page 32) Language (page 33) Format (page 34) 10 Chapter 1 Setup Menus Use the menus in Setup mode to Setup . To access the Setup mode menus: 1 Turn the Mode dial to customize your camera settings.

User Manual
Page 19
... 3 In Still and Review modes, press the Menu button to scroll through the menus and selecting options is briefly displayed in all three of the camera modes.
... 3 In Still and Review modes, press the Menu button to scroll through the menus and selecting options is briefly displayed in all three of the camera modes.
User Manual
Page 20
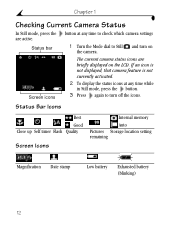
... In Still mode, press the button at any time to check which camera settings are briefly displayed on the camera. If an icon is not displayed, that camera feature is not currently activated. Status Bar Icons Best Good Close up Self timer Flash Quality Screen Icons Internal ...memory Auto Pictures Storage location setting remaining Magnification Date stamp Low battery Exhausted battery (blinking) 12 The current camera status icons are active. Screen icons 2 To display the status icons at any time while in Still mode, press the button. 3...
... In Still mode, press the button at any time to check which camera settings are briefly displayed on the camera. If an icon is not displayed, that camera feature is not currently activated. Status Bar Icons Best Good Close up Self timer Flash Quality Screen Icons Internal ...memory Auto Pictures Storage location setting remaining Magnification Date stamp Low battery Exhausted battery (blinking) 12 The current camera status icons are active. Screen icons 2 To display the status icons at any time while in Still mode, press the button. 3...
User Manual
Page 21
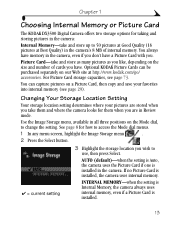
.... Use the Image Storage menu, available in the camera. AUTO (default)-when the setting is Auto, the camera uses the Picture Card if one is installed. 13 Chapter 1 Choosing Internal Memory or Picture Card The KODAK DX3500 Digital Camera offers two storage options for them when you are stored... when you take them and where the camera looks for taking and storing pictures in the camera: Internal Memory-take and store as many pictures as ...
.... Use the Image Storage menu, available in the camera. AUTO (default)-when the setting is Auto, the camera uses the Picture Card if one is installed. 13 Chapter 1 Choosing Internal Memory or Picture Card The KODAK DX3500 Digital Camera offers two storage options for them when you are stored... when you take them and where the camera looks for taking and storing pictures in the camera: Internal Memory-take and store as many pictures as ...
User Manual
Page 22
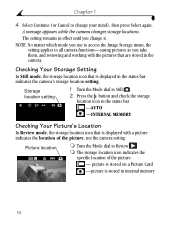
... the setting applies to Review . Picture location m Turn the Mode dial to all camera functions-saving pictures as you change your mind), then press Select again. A message appears while the camera changes storage locations. Checking Your Storage Setting In Still mode, the storage location icon ...that is displayed in internal memory 14 m The storage location icon indicates the specific location of the picture, not the camera setting. Chapter 1 4 Select Continue (or Cancel to Still . 2 Press the button and check the storage location icon in the status bar...
... the setting applies to Review . Picture location m Turn the Mode dial to all camera functions-saving pictures as you change your mind), then press Select again. A message appears while the camera changes storage locations. Checking Your Storage Setting In Still mode, the storage location icon ...that is displayed in internal memory 14 m The storage location icon indicates the specific location of the picture, not the camera setting. Chapter 1 4 Select Continue (or Cancel to Still . 2 Press the button and check the storage location icon in the status bar...
User Manual
Page 23
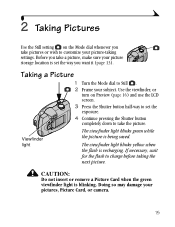
.... If necessary, wait for the flash to charge before taking settings. Taking a Picture 1 Turn the Mode dial to Still . 2 Frame your pictures, Picture Card, or camera. 15 CAUTION: Do not insert or remove a Picture Card when the green viewfinder light is being saved. Viewfinder light The viewfinder light blinks green while...
.... If necessary, wait for the flash to charge before taking settings. Taking a Picture 1 Turn the Mode dial to Still . 2 Frame your pictures, Picture Card, or camera. 15 CAUTION: Do not insert or remove a Picture Card when the green viewfinder light is being saved. Viewfinder light The viewfinder light blinks green while...
User Manual
Page 24
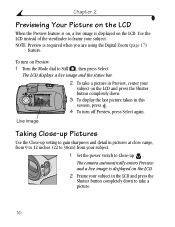
... sharpness and detail in the LCD and press the Shutter button completely down . The LCD displays a live image is required when you are using the Digital Zoom (page 17) feature. NOTE: Preview is displayed on the LCD. To turn off Preview, press Select again. Live image Taking Close-up Pictures Use...
... sharpness and detail in the LCD and press the Shutter button completely down . The LCD displays a live image is required when you are using the Digital Zoom (page 17) feature. NOTE: Preview is displayed on the LCD. To turn off Preview, press Select again. Live image Taking Close-up Pictures Use...


