
User Guide
Page 5
...printer dock 1 Installing the custom camera insert 2 Connecting the power 3 Handling and storing the color cartridge 3 Installing and removing the color cartridge 4 Handling and storing the paper 5 Loading paper 6 Installing and removing the paper tray 7 2 Setting up your digital camera 8 Docking and charging your digital camera...without a computer 12 Printing from your digital camera 12 Printing from the internal card reader 13 Printing from a Kodak card reader 14 Printing tagged pictures 15 Printing from a PictBridge compatible camera or device 15 Changing the printed picture ...
...printer dock 1 Installing the custom camera insert 2 Connecting the power 3 Handling and storing the color cartridge 3 Installing and removing the color cartridge 4 Handling and storing the paper 5 Loading paper 6 Installing and removing the paper tray 7 2 Setting up your digital camera 8 Docking and charging your digital camera...without a computer 12 Printing from your digital camera 12 Printing from the internal card reader 13 Printing from a Kodak card reader 14 Printing tagged pictures 15 Printing from a PictBridge compatible camera or device 15 Changing the printed picture ...
User Guide
Page 6
... Connecting to a computer 24 Transferring pictures from your digital camera 26 Transferring pictures from the internal card reader 28 Transferring pictures from a Kodak card reader 29 Printing from a computer 30 Canceling printing 33 Uninstalling the software 34 5 Using the wireless features of your printer dock 35 Printing from a Bluetooth® wireless technology enabled device...
... Connecting to a computer 24 Transferring pictures from your digital camera 26 Transferring pictures from the internal card reader 28 Transferring pictures from a Kodak card reader 29 Printing from a computer 30 Canceling printing 33 Uninstalling the software 34 5 Using the wireless features of your printer dock 35 Printing from a Bluetooth® wireless technology enabled device...
User Guide
Page 9
... digital camera to dock the camera, otherwise the camera may also need to use the optional Kodak dock adapter kit D-26.* a Remove any packing material covering the connector. Visit www.kodak.com/go /support 2 www.kodak.com/go /dfiswwcontacts. For Kodak EasyShare camera and dock compatibility, visit www.kodak.com/go/adapterkitchart. IMPORTANT: Depending on your camera connector, you may not fit on the printer dock...
... digital camera to dock the camera, otherwise the camera may also need to use the optional Kodak dock adapter kit D-26.* a Remove any packing material covering the connector. Visit www.kodak.com/go /support 2 www.kodak.com/go /dfiswwcontacts. For Kodak EasyShare camera and dock compatibility, visit www.kodak.com/go/adapterkitchart. IMPORTANT: Depending on your camera connector, you may not fit on the printer dock...

User Guide
Page 10
...: Use only the AC power adapter included with your camera, printer dock, or computer. 1 If a digital camera is docked, remove it. 2 Connect the AC power cord to the AC power adapter, then to the back of high-temperature environments (such as a vehicle parked in the sun). 3 www.kodak.com/go/support NOTE: Depending on the ribbon...;F (30 °C). ■ To avoid getting fingerprints on your country, the AC power cord plug may be different from direct sunlight and out of the printer dock.
...: Use only the AC power adapter included with your camera, printer dock, or computer. 1 If a digital camera is docked, remove it. 2 Connect the AC power cord to the AC power adapter, then to the back of high-temperature environments (such as a vehicle parked in the sun). 3 www.kodak.com/go/support NOTE: Depending on the ribbon...;F (30 °C). ■ To avoid getting fingerprints on your country, the AC power cord plug may be different from direct sunlight and out of the printer dock.
User Guide
Page 15
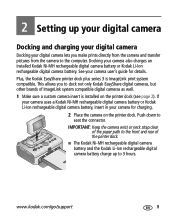
... up your digital camera Docking and charging your digital camera Docking your camera also charges an installed Kodak Ni-MH rechargeable digital camera battery or Kodak Li-Ion rechargeable digital camera battery. www.kodak.com/go/support 8 2 Setting up to the computer. Docking your digital camera lets you to seat the connector. Plus, the Kodak EasyShare printer dock plus series 3 is installed on the printer dock. IMPORTANT: Keep the...
... up your digital camera Docking and charging your digital camera Docking your camera also charges an installed Kodak Ni-MH rechargeable digital camera battery or Kodak Li-Ion rechargeable digital camera battery. www.kodak.com/go/support 8 2 Setting up to the computer. Docking your digital camera lets you to seat the connector. Plus, the Kodak EasyShare printer dock plus series 3 is installed on the printer dock. IMPORTANT: Keep the...

User Guide
Page 16
...cycle takes up your digital camera ■ The Battery charging lights turn on the printer dock to maintain the charge. If these tips don't help, the battery may leave the camera on as charging progresses. Refreshing the Kodak Ni-MH rechargeable digital camera battery IMPORTANT: The battery ...in the camera. 2 Place your EasyShare camera on how much charge is complete when all three lights are getting fewer than 20 pictures per charge with the Kodak Ni-MH rechargeable digital camera battery only. Setting up to 8 hours, depending on the printer dock (see the camera user's ...
...cycle takes up your digital camera ■ The Battery charging lights turn on the printer dock to maintain the charge. If these tips don't help, the battery may leave the camera on as charging progresses. Refreshing the Kodak Ni-MH rechargeable digital camera battery IMPORTANT: The battery ...in the camera. 2 Place your EasyShare camera on how much charge is complete when all three lights are getting fewer than 20 pictures per charge with the Kodak Ni-MH rechargeable digital camera battery only. Setting up to 8 hours, depending on the printer dock (see the camera user's ...

User Guide
Page 17
...) on as discharging green lights progresses). www.kodak.com/go /accessories. Ascending Charging battery (lights steady turn off as charging green lights progresses). Charging is complete when all three lights are proportional to the printer dock paper, preventing unwanted cropping of your digital camera to 3:2 . See your digital camera 3 Press and hold the Battery charging...
...) on as discharging green lights progresses). www.kodak.com/go /accessories. Ascending Charging battery (lights steady turn off as charging green lights progresses). Charging is complete when all three lights are proportional to the printer dock paper, preventing unwanted cropping of your digital camera to 3:2 . See your digital camera 3 Press and hold the Battery charging...

User Guide
Page 18
For information on tagging pictures on your Kodak EasyShare digital camera, see page 30. 11 www.kodak.com/go/support Keep the print quantity as described above. See your camera user's guide for printing NOTE: The following procedure pertains to exit. * To tag all pictures in the storage ...desired print quantity is applied to the pictures. 5 Press the OK button, then press the Share button to Kodak EasyShare digital cameras. Setting up your digital camera Tagging pictures for details. To print tagged pictures from your computer, see page 15. To remove print tagging from...
For information on tagging pictures on your Kodak EasyShare digital camera, see page 30. 11 www.kodak.com/go/support Keep the print quantity as described above. See your camera user's guide for printing NOTE: The following procedure pertains to exit. * To tag all pictures in the storage ...desired print quantity is applied to the pictures. 5 Press the OK button, then press the Share button to Kodak EasyShare digital cameras. Setting up your digital camera Tagging pictures for details. To print tagged pictures from your computer, see page 15. To remove print tagging from...

User Guide
Page 19
..., the paper tray, the color cartridge, or the camera. ■ To exit without a computer Printing from your digital camera 1 Take a picture with your camera user's guide). 2 Place the camera on the printer dock, . www.kodak.com/go/support 12 The current or most recent picture... appears on the camera screen. ■ To print the current picture, press...
..., the paper tray, the color cartridge, or the camera. ■ To exit without a computer Printing from your digital camera 1 Take a picture with your camera user's guide). 2 Place the camera on the printer dock, . www.kodak.com/go/support 12 The current or most recent picture... appears on the camera screen. ■ To print the current picture, press...

User Guide
Page 20
...complete before removing paper, the paper tray, the color cartridge, or the camera. ■ To exit without a computer Printing from your SDIO, SD, or MMC memory card. 1 Open the accessory door on the printer dock. Notched corner ■ To print the current picture, press the Print ...Do not insert or remove a card when the printer dock is transferring pictures (see page 15). NOTE: If the memory card contains pictures tagged for printing, instead of Kodak products, or visit www.kodak.com/go/accessories. 13 www.kodak.com/go/support Printing without printing, press the Cancel...
...complete before removing paper, the paper tray, the color cartridge, or the camera. ■ To exit without a computer Printing from your SDIO, SD, or MMC memory card. 1 Open the accessory door on the printer dock. Notched corner ■ To print the current picture, press the Print ...Do not insert or remove a card when the printer dock is transferring pictures (see page 15). NOTE: If the memory card contains pictures tagged for printing, instead of Kodak products, or visit www.kodak.com/go/accessories. 13 www.kodak.com/go/support Printing without printing, press the Cancel...

User Guide
Page 21
... the current picture, all tagged pictures are not supported. 1 Open the accessory door on the printer dock. 2 Plug the USB connector from a Kodak card reader Your printer dock is complete before removing paper, the paper tray, the color cartridge, or the camera. ■ To exit without a computer Printing from the card reader into the USB device...
... the current picture, all tagged pictures are not supported. 1 Open the accessory door on the printer dock. 2 Plug the USB connector from a Kodak card reader Your printer dock is complete before removing paper, the paper tray, the color cartridge, or the camera. ■ To exit without a computer Printing from the card reader into the USB device...

User Guide
Page 22
...computer Printing tagged pictures If your camera or memory card contains pictures tagged for printing (see page 11 or your device user's guide for details. Print tags are removed from a PictBridge compatible camera or device The Kodak EasyShare printer dock plus offers PictBridge compatibility, which... lets you the option to review pictures, choose printing options, and print. If your camera or card as they are printed. Printing from ...
...computer Printing tagged pictures If your camera or memory card contains pictures tagged for printing (see page 11 or your device user's guide for details. Print tags are removed from a PictBridge compatible camera or device The Kodak EasyShare printer dock plus offers PictBridge compatibility, which... lets you the option to review pictures, choose printing options, and print. If your camera or card as they are printed. Printing from ...

User Guide
Page 24
...device does not match any of the picture size options on the printer dock, the closest available picture size option on the paper. For best results, choose a picture size or number of copies (on your camera or device) that are each tagged for printing one sheet of... printing from a PictBridge compatible camera or device (see page 15), the number of white space on the printer dock is determined by the device's multi-up option on the printer dock is selected, three 2 x 3 in. (5.1 x 7.6 cm) pictures are printed is automatically selected. 17 www.kodak.com/go/support For example,...
...device does not match any of the picture size options on the printer dock, the closest available picture size option on the paper. For best results, choose a picture size or number of copies (on your camera or device) that are each tagged for printing one sheet of... printing from a PictBridge compatible camera or device (see page 15), the number of white space on the printer dock is determined by the device's multi-up option on the printer dock is selected, three 2 x 3 in. (5.1 x 7.6 cm) pictures are printed is automatically selected. 17 www.kodak.com/go/support For example,...

User Guide
Page 25
www.kodak.com/go/support 18 NOTE: If you wish to begin printing. Printing without a computer Printing different pictures on the same sheet 1 Tag the pictures you want to print on your camera, duplicate pictures are printed on the picture size you select more than one copy of a... picture when tagging them on your digital camera (see page 11). 2 Place the camera on the printer dock, or insert the memory card into the internal card reader or a connected Kodak 8-in-1 card reader (sold separately). 3 Press the Picture Size button repeatedly to ...
www.kodak.com/go/support 18 NOTE: If you wish to begin printing. Printing without a computer Printing different pictures on the same sheet 1 Tag the pictures you want to print on your camera, duplicate pictures are printed on the picture size you select more than one copy of a... picture when tagging them on your digital camera (see page 11). 2 Place the camera on the printer dock, or insert the memory card into the internal card reader or a connected Kodak 8-in-1 card reader (sold separately). 3 Press the Picture Size button repeatedly to ...

User Guide
Page 26
... to print. , to select the number of copies you would like to print. 2 Place the camera on the printer dock, or insert the memory card into the internal card reader or a connected Kodak 8-in-1 card reader (sold separately). 3 Press the Picture Size button repeatedly to select either 2 up , 4 up , or 9 up on your digital...
... to print. , to select the number of copies you would like to print. 2 Place the camera on the printer dock, or insert the memory card into the internal card reader or a connected Kodak 8-in-1 card reader (sold separately). 3 Press the Picture Size button repeatedly to select either 2 up , 4 up , or 9 up on your digital...
User Guide
Page 27
...using the flash on your computer. To turn the default to always off. www.kodak.com/go/support 20 If printing from a computer (see page 30), use the Kodak EasyShare software on your digital camera. If you correct your prints with push of a button. Repeat to turn ..., press the Red Eye Reduction button, , before pressing the Print button. The print job is disabled when printing from the printer dock. Printing without a computer Reducing red eye in your prints The Kodak EasyShare printer dock plus series 3 incorporates technology that were captured using red eye reduction.
...using the flash on your computer. To turn the default to always off. www.kodak.com/go/support 20 If printing from a computer (see page 30), use the Kodak EasyShare software on your digital camera. If you correct your prints with push of a button. Repeat to turn ..., press the Red Eye Reduction button, , before pressing the Print button. The print job is disabled when printing from the printer dock. Printing without a computer Reducing red eye in your prints The Kodak EasyShare printer dock plus series 3 incorporates technology that were captured using red eye reduction.

User Guide
Page 31
.../support 24 See your computer documentation for details. 3 Plug the other end of the printer dock. Using your printer dock with a computer Connecting to a computer IMPORTANT: Make sure your camera is NOT docked when you connect the printer dock to the computer. 1 Make sure Kodak EasyShare software is installed on the computer (see page 22). 2 Plug the labeled end of...
.../support 24 See your computer documentation for details. 3 Plug the other end of the printer dock. Using your printer dock with a computer Connecting to a computer IMPORTANT: Make sure your camera is NOT docked when you connect the printer dock to the computer. 1 Make sure Kodak EasyShare software is installed on the computer (see page 22). 2 Plug the labeled end of...

User Guide
Page 33
..., . In addition, the images on your computer are being transferred. IMPORTANT: Do not remove the camera when the printer dock is disabled. NOTE: You can change Sync and Transfer Manager settings in the Kodak EasyShare software for details. The printer dock Transfer light blinks while the pictures are updated according to the synchronization options you have an...
..., . In addition, the images on your computer are being transferred. IMPORTANT: Do not remove the camera when the printer dock is disabled. NOTE: You can change Sync and Transfer Manager settings in the Kodak EasyShare software for details. The printer dock Transfer light blinks while the pictures are updated according to the synchronization options you have an...

User Guide
Page 34
... and transfer process. Using your printer dock with a computer Synchronizing with Kodak EasyShare software (Kodak EasyShare cameras only) Synchronizing with Kodak EasyShare software is an easy way to organize the images on your Kodak EasyShare camera without making these same changes to your images in the Kodak EasyShare software for details. Follow the prompts on your EasyShare digital camera. See your camera user's guide, or click the...
... and transfer process. Using your printer dock with a computer Synchronizing with Kodak EasyShare software (Kodak EasyShare cameras only) Synchronizing with Kodak EasyShare software is an easy way to organize the images on your Kodak EasyShare camera without making these same changes to your images in the Kodak EasyShare software for details. Follow the prompts on your EasyShare digital camera. See your camera user's guide, or click the...

User Guide
Page 35
...the card slot. 4 Orient the SD/MMC card as shown. Using your printer dock with a computer Transferring pictures from the internal card reader 1 Make sure Kodak EasyShare software is installed (see page 22) and the printer dock is connected to your computer (if it . IMPORTANT: Insert the card only... button, , on your computer (see page 24). 2 Open the accessory door on the printer dock. 3 If a digital camera is docked, remove it out. IMPORTANT: Do not insert or remove a card when the printer dock is transferring pictures or if the card slot light is blinking. ■ To stop transfer,...
...the card slot. 4 Orient the SD/MMC card as shown. Using your printer dock with a computer Transferring pictures from the internal card reader 1 Make sure Kodak EasyShare software is installed (see page 22) and the printer dock is connected to your computer (if it . IMPORTANT: Insert the card only... button, , on your computer (see page 24). 2 Open the accessory door on the printer dock. 3 If a digital camera is docked, remove it out. IMPORTANT: Do not insert or remove a card when the printer dock is transferring pictures or if the card slot light is blinking. ■ To stop transfer,...
