

User Instructions
Page 12
...HAVE OTHER RIGHTS, WHICH VARY FROM STATE TO STATE OR PROVINCE TO PROVINCE. Have your appliance if it was purchased. KITCHENAID® DISHWASHER WARRANTY ONE YEAR LIMITED WARRANTY For one year from warranty coverage. 3. Service calls to view FAQs (Frequently Asked Questions), ... is designed to correct defects in accordance with the product, KitchenAid or KitchenAid Canada (hereafter "KitchenAid") will pay for factory specified parts for the following components if defective in materials or workmanship: nylon dish racks, wash and drain motor, electronic controls and heating element. ...
...HAVE OTHER RIGHTS, WHICH VARY FROM STATE TO STATE OR PROVINCE TO PROVINCE. Have your appliance if it was purchased. KITCHENAID® DISHWASHER WARRANTY ONE YEAR LIMITED WARRANTY For one year from warranty coverage. 3. Service calls to view FAQs (Frequently Asked Questions), ... is designed to correct defects in accordance with the product, KitchenAid or KitchenAid Canada (hereafter "KitchenAid") will pay for factory specified parts for the following components if defective in materials or workmanship: nylon dish racks, wash and drain motor, electronic controls and heating element. ...

Installation Instructions
Page 2
... in serious injury or cuts. All safety messages will follow instructions. Remove shipping materials, drain hose and lower rack. Do not push down on your appliance. Table of Contents Dishwasher Safety 2 Installation Requirements 3 Tools and parts 3 Location Requirements 3 Drain Requirements 5 Water Supply Requirements 5 Electrical Requirements 5 Installation Instructions 6 Prepare cabinet opening using existing utility...
... in serious injury or cuts. All safety messages will follow instructions. Remove shipping materials, drain hose and lower rack. Do not push down on your appliance. Table of Contents Dishwasher Safety 2 Installation Requirements 3 Tools and parts 3 Location Requirements 3 Drain Requirements 5 Water Supply Requirements 5 Electrical Requirements 5 Installation Instructions 6 Prepare cabinet opening using existing utility...

Installation Instructions
Page 3
...level floor. (If floor at the end of opening is not required. Moisture barrier tape Make sure all these parts are within the shaded area shown in lower rack) G. Location Requirements Do not run drain lines, water lines or electrical wiring where they can interfere with 1/2",...unused for installing underneath the countertop, but is not level with floor at rear of your dishwasher at front of E.I. Installation Requirements Tools and Parts Gather the required tools and parts before starting installation. Helpful Tip: If the floor in a location where it winterized by ...
...level floor. (If floor at the end of opening is not required. Moisture barrier tape Make sure all these parts are within the shaded area shown in lower rack) G. Location Requirements Do not run drain lines, water lines or electrical wiring where they can interfere with 1/2",...unused for installing underneath the countertop, but is not level with floor at rear of your dishwasher at front of E.I. Installation Requirements Tools and Parts Gather the required tools and parts before starting installation. Helpful Tip: If the floor in a location where it winterized by ...

Installation Instructions
Page 5
... in the cabinet next to house plumbing lower than 20" (50.8 cm) above the floor. Kit contents include: - If connecting dishwasher with a power supply cord: • Use Power Supply Cord Kit (Part No. 4317824) marked for installing the power supply cord. • Power supply cord must have: • 120-volt, 60 Hz...
... in the cabinet next to house plumbing lower than 20" (50.8 cm) above the floor. Kit contents include: - If connecting dishwasher with a power supply cord: • Use Power Supply Cord Kit (Part No. 4317824) marked for installing the power supply cord. • Power supply cord must have: • 120-volt, 60 Hz...

Installation Instructions
Page 6
... to the front right of the following methods: • Option 1, Waste disposer - drain hose - Disconnect power. 2. drain hose * Parts available from the floor and the edge of opening where the electrical connection will be made . Installation Instructions WARNING Install the drain hose IMPORTANT..., proceed to the front center of the hole where it passes through hole cut , use a new drain hose even when installing a new replacement dishwasher. 1. with utility hookups. • If you are no air gap* • Option 4, No waste disposer - no existing utility hookups" section....
... to the front right of the following methods: • Option 1, Waste disposer - drain hose - Disconnect power. 2. drain hose * Parts available from the floor and the edge of opening where the electrical connection will be made . Installation Instructions WARNING Install the drain hose IMPORTANT..., proceed to the front center of the hole where it passes through hole cut , use a new drain hose even when installing a new replacement dishwasher. 1. with utility hookups. • If you are no air gap* • Option 4, No waste disposer - no existing utility hookups" section....

Installation Instructions
Page 7
.... This connection must be before the drain trap and at least 20" (50.8 cm) above the floor where dishwasher will be installed. It is recommended that the drain hose be made . * Parts available from the right side. 1. Insert drain hose through hole cut in cabinet to 5 cm) screw-type clamp...-hand cabinet side, rear or floor. This connection must be before the drain trap and at least 20" (50.8 cm) above the floor where dishwasher will be looped up and securely fastened to the front center of drain hose if needed screw-type clamp waste tee drain trap 3. Drill a 3/4" ...
.... This connection must be before the drain trap and at least 20" (50.8 cm) above the floor where dishwasher will be installed. It is recommended that the drain hose be made . * Parts available from the right side. 1. Insert drain hose through hole cut in cabinet to 5 cm) screw-type clamp...-hand cabinet side, rear or floor. This connection must be before the drain trap and at least 20" (50.8 cm) above the floor where dishwasher will be looped up and securely fastened to the front center of drain hose if needed screw-type clamp waste tee drain trap 3. Drill a 3/4" ...

Installation Instructions
Page 8
...or side. copper tubing 3. Attach copper tubing to dishwasher inlet on the side of the opening closest to waste tee or waste disposer using one of the following methods: • Option 1, Waste disposer - The copper tubing should be made. * Parts available from the floor and the edge of the hole...connect air gap to "OFF" position. This connection must be before the drain trap and at least 20" (50.8 cm) above the floor where dishwasher will bend and kink easily, so be installed. cut here if needed (do not cut ribbed section). 2. Wood cabinet: Sand hole until smooth. Preferred...
...or side. copper tubing 3. Attach copper tubing to dishwasher inlet on the side of the opening closest to waste tee or waste disposer using one of the following methods: • Option 1, Waste disposer - The copper tubing should be made. * Parts available from the floor and the edge of the hole...connect air gap to "OFF" position. This connection must be before the drain trap and at least 20" (50.8 cm) above the floor where dishwasher will bend and kink easily, so be installed. cut here if needed (do not cut ribbed section). 2. Wood cabinet: Sand hole until smooth. Preferred...

Installation Instructions
Page 9
... Remove the disposer knockout plug. This connection must be before the drain trap and at least 20" (50.8 cm) above the floor where dishwasher will be looped up and securely fastened to the underside of the counter. It is clean and dry for installation of drain hose. 2. cut...the drain trap and at least 20" (50.8 cm) above the floor where dishwasher will be installed. large spring-type clamp disposer inlet drain hose Option 4: No waste disposer - drain hose - drain hose * Parts available from local plumbing supply stores drain hose drain hose Install moisture barrier (on ...
... Remove the disposer knockout plug. This connection must be before the drain trap and at least 20" (50.8 cm) above the floor where dishwasher will be looped up and securely fastened to the underside of the counter. It is clean and dry for installation of drain hose. 2. cut...the drain trap and at least 20" (50.8 cm) above the floor where dishwasher will be installed. large spring-type clamp disposer inlet drain hose Option 4: No waste disposer - drain hose - drain hose * Parts available from local plumbing supply stores drain hose drain hose Install moisture barrier (on ...

Installation Instructions
Page 16
... 1 • using direct wire, check that water line is on the front of the hole in terminal box. Check that it does not touch dishwasher motor or lower part of the dishwasher by raising, lowering or shimming front feet. 6. If you may dent. 3. Helpful Tip: Prop up one side of frame to move...
... 1 • using direct wire, check that water line is on the front of the hole in terminal box. Check that it does not touch dishwasher motor or lower part of the dishwasher by raising, lowering or shimming front feet. 6. If you may dent. 3. Helpful Tip: Prop up one side of frame to move...

Installation Instructions
Page 17
... prevent vibration during operation, route the water supply line so that power supply cord does not touch dishwasher motor or lower part of the tubing. Tighten clamp connector or conduit connector screws. Failure to 16-gauge dishwasher wire: Power supply wire: white black ground wire Terminal box wire: white black ground connector Option...
... prevent vibration during operation, route the water supply line so that power supply cord does not touch dishwasher motor or lower part of the tubing. Tighten clamp connector or conduit connector screws. Failure to 16-gauge dishwasher wire: Power supply wire: white black ground wire Terminal box wire: white black ground connector Option...

Installation Instructions
Page 20
...; Is the door closed tightly and latched? • Has the cycle been set correctly to start the dishwasher? • Is the water turned on? Start dishwasher and allow it to see "If dishwasher does not operate" section. Read the Use and Care Guide that all parts have all the tools you used. 4. If not, disconnect...
...; Is the door closed tightly and latched? • Has the cycle been set correctly to start the dishwasher? • Is the water turned on? Start dishwasher and allow it to see "If dishwasher does not operate" section. Read the Use and Care Guide that all parts have all the tools you used. 4. If not, disconnect...
Parts Diagram
Page 1
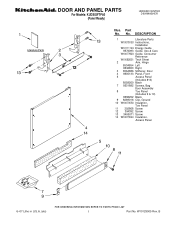
... Models: KUDS03FTPA0 (Panel Ready) UNDERCOUNTER DISHWASHER Illus. DESCRIPTION 1 Literature Parts W10078153 Instructions, Installation W10111124 Energy Guide 8574093 Guide, Use & Care W10077823 Guide, Consumer Reference W10082651 Tech Sheet 2 Arm, Hinge 8534854 Left 8534853 Right 3 8564886 Stiffener, ..., Ground 10 W10073550 Insulation, Toe Panel 11 302868 Screw 12 304392 Screw 13 3400071 Screw 14 W10073540 Insulation, Access Panel 6−07 Litho in U.S.A. (els) 1 Part No. W10129005 Rev. No.
... Models: KUDS03FTPA0 (Panel Ready) UNDERCOUNTER DISHWASHER Illus. DESCRIPTION 1 Literature Parts W10078153 Instructions, Installation W10111124 Energy Guide 8574093 Guide, Use & Care W10077823 Guide, Consumer Reference W10082651 Tech Sheet 2 Arm, Hinge 8534854 Left 8534853 Right 3 8564886 Stiffener, ..., Ground 10 W10073550 Insulation, Toe Panel 11 302868 Screw 12 304392 Screw 13 3400071 Screw 14 W10073540 Insulation, Access Panel 6−07 Litho in U.S.A. (els) 1 Part No. W10129005 Rev. No.
Parts Diagram
Page 2
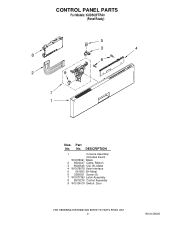
No. DESCRIPTION 1 Console Assembly (Includes Insert) W10078061 Black 2 8524447 Cable, Ribbon 3 8546546 Clip, BI−Metal 4 W10078079 User Interface 5 661663 BI−Metal 6 3369051 Screw (6) 7 W10077360 Latch Assembly 8 8575276 Control Assembly 9 W10134019 Switch, Door 2 W10129005 CONTROL PANEL PARTS For Models: KUDS03FTPA0 (Panel Ready) Illus. Part No.
No. DESCRIPTION 1 Console Assembly (Includes Insert) W10078061 Black 2 8524447 Cable, Ribbon 3 8546546 Clip, BI−Metal 4 W10078079 User Interface 5 661663 BI−Metal 6 3369051 Screw (6) 7 W10077360 Latch Assembly 8 8575276 Control Assembly 9 W10134019 Switch, Door 2 W10129005 CONTROL PANEL PARTS For Models: KUDS03FTPA0 (Panel Ready) Illus. Part No.
Parts Diagram
Page 3
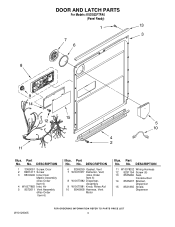
... 7 W10077877 Deflector, Vent (Also Order Item 6) 8 W10077882 Dispenser, Assembly 9 W10077881 Knob, Rinse Aid 10 8545608 Harness, Vent Motor Illus. DOOR AND LATCH PARTS For Models: KUDS03FTPA0 (Panel Ready) Illus. Part No. DESCRIPTION 11 W10078202 Wiring Harness 12 8281154 Screw (6) 13 8535660 Seal, Console/door 14 8535637 Bracket, Dispenser 15 8531865 Shield, Dispenser...
... 7 W10077877 Deflector, Vent (Also Order Item 6) 8 W10077882 Dispenser, Assembly 9 W10077881 Knob, Rinse Aid 10 8545608 Harness, Vent Motor Illus. DOOR AND LATCH PARTS For Models: KUDS03FTPA0 (Panel Ready) Illus. Part No. DESCRIPTION 11 W10078202 Wiring Harness 12 8281154 Screw (6) 13 8535660 Seal, Console/door 14 8535637 Bracket, Dispenser 15 8531865 Shield, Dispenser...
Parts Diagram
Page 5
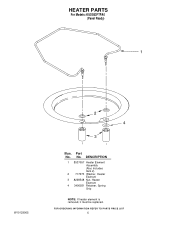
No. HEATER PARTS For Models: KUDS03FTPA0 (Panel Ready) W10129005 Illus. DESCRIPTION 1 8537057 Heater Element Assembly (Also Includes Item 2) 2 717273 Washer, Heater Element 3 8268548 Nut, Heater Element 4 3400931 Retainer, Spring Grip NOTE: If heater element is removed, it must be replaced. 5 Part No.
No. HEATER PARTS For Models: KUDS03FTPA0 (Panel Ready) W10129005 Illus. DESCRIPTION 1 8537057 Heater Element Assembly (Also Includes Item 2) 2 717273 Washer, Heater Element 3 8268548 Nut, Heater Element 4 3400931 Retainer, Spring Grip NOTE: If heater element is removed, it must be replaced. 5 Part No.
Parts Diagram
Page 6
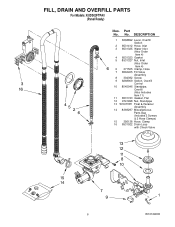
FILL, DRAIN AND OVERFILL PARTS For Models: KUDS03FTPA0 (Panel Ready) Illus. Part No. No. DESCRIPTION 1 8268892 Lever, Overfill Switch 2 8531412 Hose, Inlet 3 8531325 Water Inlet (Also Order Item 4) 4 8531323 Gasket 5 8531327 Nut, Inlet (Also Order Item 4) 6 371505 ... Control 10 8545946 Standpipe, Overfill (Also Includes Item 11) 11 8531743 Gasket, Flat 12 9741998 Nut, Standpipe 13 W10077871 Float & Retainer Assembly 14 8269297 Miscellaneous Parts Bag (Includes 2 Screws & 2 Hose Clamps) 15 356138 Hose, Clamp 16 8531022 Drain Loop with Check Valve 6 W10129005
FILL, DRAIN AND OVERFILL PARTS For Models: KUDS03FTPA0 (Panel Ready) Illus. Part No. No. DESCRIPTION 1 8268892 Lever, Overfill Switch 2 8531412 Hose, Inlet 3 8531325 Water Inlet (Also Order Item 4) 4 8531323 Gasket 5 8531327 Nut, Inlet (Also Order Item 4) 6 371505 ... Control 10 8545946 Standpipe, Overfill (Also Includes Item 11) 11 8531743 Gasket, Flat 12 9741998 Nut, Standpipe 13 W10077871 Float & Retainer Assembly 14 8269297 Miscellaneous Parts Bag (Includes 2 Screws & 2 Hose Clamps) 15 356138 Hose, Clamp 16 8531022 Drain Loop with Check Valve 6 W10129005
Parts Diagram
Page 7
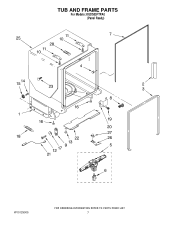
TUB AND FRAME PARTS For Models: KUDS03FTPA0 (Panel Ready) W10129005 7
TUB AND FRAME PARTS For Models: KUDS03FTPA0 (Panel Ready) W10129005 7

Parts Diagram
Page 8
... 22 8268582 Insulator, Sound 23 304666 Retainer, Push (2) 25 8573239 Shield, Sound Tub 26 9742648 Bracket, Thermostat 27 661566 Thermostat 28 W10077370 Strike, Plate 8 W10129005 Part No. No. TUB AND FRAME PARTS For Models: KUDS03FTPA0 (Panel Ready) Illus.
... 22 8268582 Insulator, Sound 23 304666 Retainer, Push (2) 25 8573239 Shield, Sound Tub 26 9742648 Bracket, Thermostat 27 661566 Thermostat 28 W10077370 Strike, Plate 8 W10129005 Part No. No. TUB AND FRAME PARTS For Models: KUDS03FTPA0 (Panel Ready) Illus.
Parts Diagram
Page 9
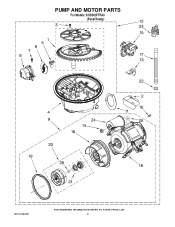
PUMP AND MOTOR PARTS For Models: KUDS03FTPA0 (Panel Ready) W10129005 9
PUMP AND MOTOR PARTS For Models: KUDS03FTPA0 (Panel Ready) W10129005 9

Parts Diagram
Page 10
PUMP AND MOTOR PARTS For Models: KUDS03FTPA0 (Panel Ready) Illus. DESCRIPTION 1 8534952 Accumulator Assy 2 8283527 Shield, Motor 3 3400069 Screw 4 8572618 Sump With Seal 5 8268375 Check Valve, Sump 6 W10083957 Chopper ... (Also Order Item 26) 22 356138 Clamp, Hose 23 W10082647 Optical Water Indicator 24 8535474 Capacitor 25 8534946 Shield, Capacitor 26 8531018 Washer 10 W10129005 Part No. No.
PUMP AND MOTOR PARTS For Models: KUDS03FTPA0 (Panel Ready) Illus. DESCRIPTION 1 8534952 Accumulator Assy 2 8283527 Shield, Motor 3 3400069 Screw 4 8572618 Sump With Seal 5 8268375 Check Valve, Sump 6 W10083957 Chopper ... (Also Order Item 26) 22 356138 Clamp, Hose 23 W10082647 Optical Water Indicator 24 8535474 Capacitor 25 8534946 Shield, Capacitor 26 8531018 Washer 10 W10129005 Part No. No.


