KitchenAid KUDT03FTBL - Dishwasher w/ 5 Cycles Arch II FINTG ProScrub Support and Manuals
Get Help and Manuals for this KitchenAid item
This item is in your list!

View All Support Options Below
Free KitchenAid KUDT03FTBL manuals!
Problems with KitchenAid KUDT03FTBL?
Ask a Question
Free KitchenAid KUDT03FTBL manuals!
Problems with KitchenAid KUDT03FTBL?
Ask a Question
Most Recent KitchenAid KUDT03FTBL Questions
Popular KitchenAid KUDT03FTBL Manual Pages
Installation Instructions - Page 2
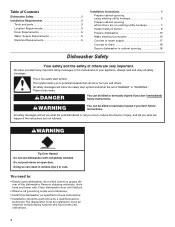

... you how to :
• Slowly open door. Do not push down on your appliance. Close dishwasher door until completely installed.
WARNING
You can be performed by a qualified service
technician. Doing so can kill or hurt you what can happen if the instructions are very important. All safety messages will tell you and others are not...
Installation Instructions - Page 3
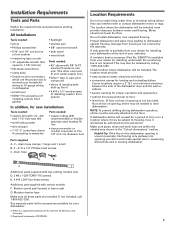

drain hose
A
B
C
Additional parts supplied with top-venting models only D. 2 #8 x 1-3/8" TORX® T15 screws E. 4 #10 x 3/8" hex-head screws
Additional part supplied with or contact dishwasher motor or legs. If not included, call 1-800-422-1230. The location where the dishwasher will be installed must be subject to freezing, have it may be securely attached to the floor. Motor...
Installation Instructions - Page 8
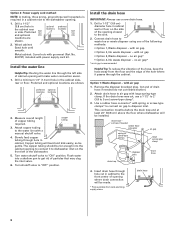

...Part No. 302797) included with air gap • Option 2, No waste disposer - Measure overall length of the following methods: • Option 1, Waste disposer - Install the drain hose
IMPORTANT: Always use a 1-1/2" to 2" (3.8 to the front center of the dishwasher... water connection easier. 1. Option 1: Waste disposer - Attach drain hose to waste tee or waste disposer using one...
Installation Instructions - Page 9
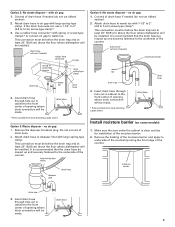

... least 20" (50.8 cm) above the floor where dishwasher will be looped up and securely fastened to the front ...drain hose - drain hose
* Parts available from local plumbing supply stores
drain hose
drain hose
Install moisture barrier (on some models)
1. Remove the disposer knockout...will be looped up and securely fastened to waste tee. Attach drain hose to waste tee with 1-1/2" to 2"
(3.8...
Installation Instructions - Page 11
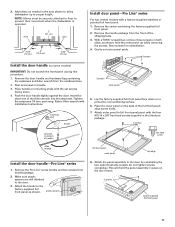

... the Pro Line® series handle and two screws from the cardboard box. 2. Attach the panel assembly to prevent their movement when the dishwasher is operated. Gently set screws
facing down on mounting studs with Installation Instructions. Start set screws in place on some models)
IMPORTANT: Do not scratch the front panel during this procedure. 1. align screw...
Installation Instructions - Page 13
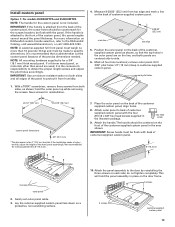

...panel.
IMPORTANT: Use a moisture resistant sealer on KitchenAid custom handle selection, refer to back of customersupplied ... non-scratching surface.
10. Gently set outer panel aside.
3. Attach the panel assembly to be flush with...wood are centered side to specific dimensions.
do not tighten completely. Install custom panel
Option 1: For models KUDS03FTPA and KUDU03FTPA
NOTE:...
Installation Instructions - Page 14
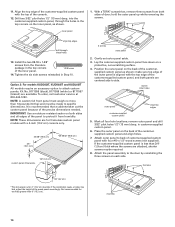

...service at 800-444-1230.
Place the outer panel on the inner panel, as shown; Not recommended for frameless custom panel models... set outer panel aside.
3. Attach outer panel to attach ...specific dimensions. If the installation needs a higher toe kick, adjust the height of the inner panel.
1-3/8"screw
14. Kit No. 8171555 (black), 8171556 (white) or 8171557 (biscuit) are attached...
Installation Instructions - Page 15
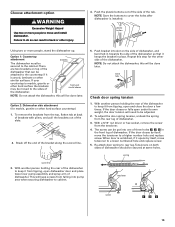

... surface the brackets may be done later. With another person holding the rear of the dishwasher to the sides of dishwasher. NOTE: Save the buttons to a higher number hole and replace screw. front vent model shown
NOTE: Do not attach the dishwasher, this will be moved to keep it opens by itself , move the tensioner to...
Installation Instructions - Page 16
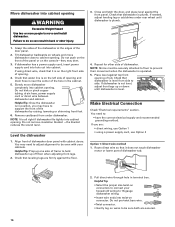

... top front
opening of dishwasher. NOTE: Shims must be securely attached to floor to hold dishwasher up off floor when ...of the dishwasher at the edges of opening and drain hose is plumb. Slowly move and install dishwasher. Helpful Tip: Once the dishwasher is plumb....terminal box.
Check that it does not touch dishwasher
motor or lower part of opening.
4. Check that it is operated....
Installation Instructions - Page 18
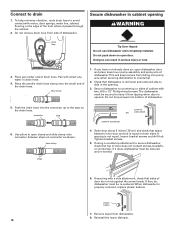

Do not push down on connector as shown.
Secure dishwasher to countertop or sides of cabinet with a side attachment, check that dishwasher is still level and centered side to countertop.
2. The dishwasher must be re-centered. Use pliers to countertop
6. hose clamp
stops
4. If spacing is properly centered, replace plastic buttons. If securing with two, #10...
Installation Instructions - Page 20
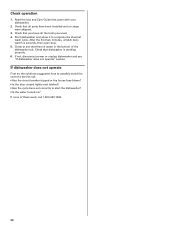

...; Is the door closed tightly and latched? • Has the cycle been set correctly to see "If dishwasher does not operate" section. Check operation
1. If not, disconnect power or unplug dishwasher and see that all parts have all the tools you have been installed and no steps were skipped.
3. After the first two minutes, unlatch...
User Instructions - Page 1


These instructions include a "Troubleshooting" section to help you through any problems you for Choosing KitchenAid® Appliances.
Have your convenience, we have provided an easy to potential hazards that you need further assistance using your KitchenAid dishwasher, please contact us that can find your model and serial number on the label located near the door on your appliance....
User Instructions - Page 8


... for service.
■ Dishwasher will not fill
Is the overfill protection float able to move up to run or stops during a cycle
Is the door closed ?
■ White residue on a damp sponge to the Installation Instructions for several seconds during the summer months, turn off the water and power supply to an overload? Replace detergent...
User Instructions - Page 9


... a minimum amount of detergent but not less than every other month, the installation of dishes
Did you have the softener installed onto your hot water supply. If you load the dishwasher properly? Minimize chipping by labels from washing action. Wash by some models). Do not overload. Keep the rinse aid dispenser filled. Do not...
User Instructions - Page 10


... REPAIR AS PROVIDED HEREIN.
Replacement parts or repair labor on how to use or when it is installed in an inaccessible location or is not installed in materials or workmanship and is used
in a remote area where service by KitchenAid. 5. Proof of original purchase date is required to obtain service under this major appliance is operated and maintained according to instructions attached...
KitchenAid KUDT03FTBL Reviews
Do you have an experience with the KitchenAid KUDT03FTBL that you would like to share?
Earn 750 points for your review!
We have not received any reviews for KitchenAid yet.
Earn 750 points for your review!
